Errors in the electronic control unit are the most common malfunction that can occur in the Lada Kalina. Sometimes, it is not possible to carry out diagnostics by connecting directly to the ECU. The question arises: how to carry out diagnostics then? There is an exit. Not everyone knows, but car diagnostics can be done using the dashboard.
Video about ECU self-diagnostics using the instrument panel on a Lada Kalina:
The video materials will clearly show how to diagnose the Lada Kalina using the dashboard, and also contain some explanations and recommendations
Description of the instrument panel Lada Priora and Kalina
The Lada Priora/Kalina instrument cluster is designed to display driving characteristics, the current state of vehicle systems that ensure traffic safety, as well as the correct operation of the entire vehicle as a whole. If you are a novice driver, then this description of the dashboard will help you understand the readings of instruments and indicators.
- Tachometer. Shows engine speed in real time. The red scale zone indicates a dangerous operating mode for the engine;
- Malfunction lamp of the electronic brake force distributor. To check, the lamp lights up red for a few seconds when the ignition is turned on. The burning of the lamp in other cases indicates a malfunction; when driving with a burning lamp, increased safety measures must be observed;
- Battery charge lamp. To check, the lamp lights up red when the ignition is turned on and goes out after the engine starts. If the lamp is lit in other cases, it indicates a lack of battery charge;
- Left turn signal lamp. Flashes when the turn signal or hazard lights are on;
- Speedometer. Shows at what speed the car is currently moving;
- Engine oil pressure warning lamp. To check, the lamp lights up when the ignition is turned on and goes out after the engine starts. In other cases, the lamp is lit indicating low pressure in the engine lubrication system. It is not recommended to operate the engine in such conditions;
- Right turn signal lamp. Flashes when the turn signal or hazard lights are on;
- Handbrake lamp. Lights up red when the parking brake is applied;
- Coolant temperature gauge. Engine operating temperature is 90 degrees and above to the red zone. It is prohibited to operate the vehicle if it overheats. When the arrow reaches the red zone, a buzzer will sound. To extend engine life, it is recommended not to operate the engine at high speeds until the coolant temperature reaches operating temperature;
- Gasoline level indicator in the tank. The arrow shows the fuel level. Lack of gasoline can damage the fuel pump;
- Fuel reserve lamp. Lights up with an accompanying buzzer signal when there is less than 10 liters of fuel left in the tank;
- Button for switching display modes and resetting daily mileage readings. A short press switches between daily and total mileage. When you hold the button, the daily mileage is reset, accompanied by a sound;
- Hazard warning light. Flashes red when the emergency lights are turned on simultaneously with the turn signals.
- Electric power steering (EPS) malfunction lamp. To check, the lamp lights up yellow when the ignition is turned on for a few seconds. Lighting of the lamp in other cases indicates a malfunction of the EUR;
- Headlight high beam lamp. Lights up when the high beam headlights are turned on;
- Lamp for turning on external lighting. Lights up when the headlights are turned on or the headlights are low beam;
- Airbag system malfunction lamp. To check, the lamp lights up yellow when the ignition is turned on for a few seconds. In other cases, if the lamp is illuminated, it indicates a malfunction in the airbag system. In this case, in the event of an accident, the airbags will not deploy;
- Immobilizer lamp. If the system is working properly and the engine is allowed to start, when the ignition is turned on, the lamp flashes once and goes out. If the lamp flashes constantly (accompanied by short beeps), then the system is faulty. If, after turning on the ignition, the lamp lights up for 15 seconds and goes out, then the anti-theft system is not activated;
- Liquid crystal display of the on-board computer (BC). Displays daily and total mileage, as well as information from the BC;
- Seat belt warning light (optional). The lamp lights up when the driver's seat belt is not fastened, accompanied by buzzer signals for 1.5 minutes;
- Brake system emergency lamp. To check, the lamp lights up red when the ignition is turned on for 4 seconds. In other cases, the lamp is lit indicating an insufficient level of brake fluid, or another malfunction of the brake system;
- Front passenger airbag lamp (optional). Passenger airbag deactivation lamp;
- Anti-lock braking system fault lamp (optional). To check, the lamp lights up when the ignition is turned on and goes out after a few seconds or after the engine starts. When the lamp is lit, there is a malfunction in the ABS system, but the brakes remain fully operational;
- Engine management system malfunction lamp (Check Engine). To check, it lights up when the ignition is turned on and goes out after the engine starts. In other cases, the lamp is lit indicating a malfunction in the system. See the error code.
Decoding combinations
Errors read on the standard panel of the on-board computer can be deciphered using the table. It is useful to print out such information and carry it with you in the glove box, since breakdown of car sensors can happen on the road. Many problems can be corrected only during repair work in a car service center. Knowledge of the decoding will allow the owner to control the process of repairing his car.
Self-diagnosis codes
When diagnosing, you can read the fault codes listed in the table from the instrument panel. Please note that several errors may be displayed simultaneously during the verification process.
Below is a complete list of self-diagnosis errors.
| Code on screen | Decoding |
| 2 | Excess voltage in the on-board electrical network |
| 3 | No signal in the circuit from the fuel level sensor |
| 4 | No signal from the internal combustion engine temperature sensor |
| 5 | The signal from the sensor measuring the air temperature outside the car is not detected |
| 6 | Raising the engine temperature above the permissible level |
| 7 | Critically low oil pressure in the engine lubrication system |
| 8 | Brake fluid leak or failure of the system's electronic components |
| 9 | Excessive reduction in battery voltage |
| E | EEPROM data error |
Controller errors
For more complete diagnostics, the car needs to be checked with a KKL VAG-COM for 409.1 scanner. To do this, you need the scanner itself and a laptop with the pre-installed Diagnostic Tool v. 1.3.1., which allows you to view all the vehicle’s operating parameters and find out possible problems. Error codes received by such devices will consist of four numbers and a letter located in front of the numbers.
It should be remembered that each letter is responsible for a certain part of the machine components:
- B - indicates errors in the electronic components of the car body (window lifters, microclimate);
- C - errors in chassis components (power steering);
- P - malfunctions in the engine or automatic transmission control systems.
Read also: Kia VIN code converter
The video, shot by the author of CompsMaster, clearly demonstrates the connection of a test laptop to the diagnostic connector and shows the functionality of the program.
Another way to control the ECM is the additional on-board computer State, which is connected directly to the diagnostic connector and installed on the center console. This device is capable of reading almost all operating parameters of various vehicle systems. There are several types of State computers, which are selected according to the model of the ECM unit.
Basic mistakes
The table below summarizes the main error codes for Kalina category “P” without taking into account the letter prefix.
| Number | Decoding |
| 0030, 0031, 0032 | The heating of the lambda probe installed upstream of the converter is faulty (burnout of the spiral or short circuit) |
| 0036, 0037, 0038 | The heating of the lambda probe installed after the converter is faulty (burnout of the spiral or short circuit) |
| 0101 | Operating parameters of the engine air supply sensor are outside the tolerance range |
| 0102 | The signal level from the engine air supply sensor drops below the permissible level |
| 0103 | Increase in signal level from the air supply sensor to the engine above the permissible level |
| 0112 | The signal level from the air temperature sensor at the engine inlet drops below the permissible level |
| 0113 | Increase in signal level from the air temperature sensor at the engine inlet above the permissible level |
| 0115 or 0116 | Incorrect data from the engine temperature sensor |
| 0117 | The signal level from the engine temperature sensor drops below the permissible level |
| 0118 | Increase in signal level from the engine temperature sensor above the permissible level |
| 0122 | The signal level from the throttle angle sensor drops below the permissible level |
| 0123 | Increase in signal level from the throttle angle sensor above the permissible level |
| 0130, 0131 and 0133, 0134 | Missing or low signal from the first lambda probe |
| 0132 | Crankshaft Position Sensor Error |
| 0135 | Incorrect operation of the heating system of the first lambda probe |
| 0136 | Short circuit of the second lambda probe |
| 0137, 0138 | Missing or low signal from the second lambda probe |
| 0140, 0141 | Incorrect operation of the second lambda probe heating system |
| 0171, 0172 | Excessively lean or rich mixture |
| 0201-0204 | Gap in the injector control wiring (from 1 to 4 cylinders) |
| 0217 | Engine temperature goes beyond the upper limit |
| 0230 | Broken fuel pump drive relay |
| 0261, 0262 | Breakdown to "minus" or "plus" of the wiring for controlling the injector of the first cylinder |
| 0264, 0265 | Likewise for the second cylinder |
| 0267, 0268 | Same for the third cylinder |
| 0270, 0271 | Same for the fourth cylinder |
| 0300 | Numerous misfires on all cylinders |
| 0301-0304 | Problems with ignition in a specific cylinder (from 1 to 4 cylinders) |
| 0326-0328 | Failure of the knock sensor |
| 0335-0338 | Damage to the signal circuit from the crankshaft sensor |
| 0340 | Camshaft position sensor does not work (only for 16 valves) |
| 0342, 0343 and 0346 | Phase sensor (only for 16 valves) |
| 0351-0354 | Coil failure (16 valves only) |
| 0363 | Restriction of fuel supply due to ignition misfires |
| 0422 | Low efficiency of the neutralizer |
| 0441, 0444 and 0445 | Absorber malfunctions |
| 0480, 0481 | Radiator fans do not work |
| 0500 | Speed sensor faulty |
| 0506, 0507 | Failure of the idle control system |
| 0511 | No signal from IAC |
| 0560, 0562 and 0563 | Problems with voltage in the on-board network |
| 0601 | ECM memory error |
| 0615-0617 | Problems with the starter relay |
| 0627-0629 | You need to check the fuel pump relay |
| 0645-0647 | Problems with power supply through the relay to the compressor clutch |
| 0650 | Malfunction warning lamp does not work |
| 0654 | Failure of the tachometer circuit |
| 0685-0687 | Closing the main relay circuits |
| 0691, 0692 | Fan relay shorted |
| 1102, 1115 | Drop in resistance of the lambda probe heating coil |
| 1123, 1124 | Violation of mixture parameters at idle |
| 1127, 1128 | The same, but at medium load |
| 1135 | Short circuit of the first lambda probe heater circuit |
| 1136, 1137 | Violation of mixture parameters at low load |
| 1171, 1172 | Incorrect operating parameters of the CO sensor |
| 1335, 1336 | Throttle Position Error |
| 1386 | Errors in the data transmission circuit from the knock sensor |
| 1410, 1425 and 1426 | Absorber purge failure |
| 1500, 1501 and 1502 | Open or short circuit in the fuel pump relay circuit |
| 1509, 1513 and 1514 | Damage to the idle speed control circuit |
| 1606, 1616 | Rough Road Sensor Errors |
| 1620-1622 | Errors in ECU memory blocks |
| 2070, 2071 | Malfunction of the valve for changing the length of the intake channels |
| 2100, 2101 | Open circuit of the electric throttle valve |
| 2102, 2103 | Electric throttle actuator short circuit |
| 2122, 2123, 2127 and 2128 | Damage to the gas pedal position sensor |
| 2187, 2188 | Violation of the mixture composition at idle |
| 2135, 2138 | Asynchronous operation of throttle position sensors |
| 2176, 2178 | It is necessary to set the throttle valve to zero position |
| 2187, 2188 | Violation of the mixture composition at idle |
| 2301, 2304, 2307 and 2310 | Closing the control circuits of the ignition coils |
| 2500, 2501 | Exit of the operating parameters of the generator excitation circuit beyond the tolerance range |
| 0720 | Automatic transmission output shaft sensor faulty |
| 0717 | Failure of the automatic transmission turbine speed sensor |
| 0706, 0705 | Contacts in the automatic transmission selector are faulty |
| 0962, 0963 | Failure of the pressure regulation solenoid in the automatic transmission |
| 0973, 0974 | Failure of the gear shift solenoid in the automatic transmission |
| 0731-0734 | Transmission errors in automatic transmission |
| 0744, 1744 | Automatic transmission clutch malfunctions |
| 0711-0713 | Failure of the automatic transmission oil temperature sensor |
| 0863 | Automatic transmission unit communication error via CAN bus |
| 1735-1738 | Gear selection lock |
| 062F | Resetting the memory of the automatic transmission control unit |
| 230 | No signal from fuel pump relay |
| 263, 266, 269 and 272 | Failure of the control unit (driver) of the injector nozzles |
| 650 | Burnout of the check indicator or its wiring |
Read also: How to break a plug in a heating system
The video, shot by the channel “In Sandro’s Garage,” demonstrates all the functionality of the additional State computer.
CAN bus errors
On the Lada Kalina 2, several specific errors in the CAN bus operation are often encountered.
The main ones include:
- U0001 - general CAN bus malfunction;
- U0009 - short circuit of CAN bus components;
- U0073 - CAN shutdown;
- U0100 - no communication between the ECM and CAN;
- U0155 and U0305 - errors in interaction between cruise control and CAN bus.
EMUR errors
Kalina cars are equipped with an electromechanical power steering (EMPS), during which errors with index C are common.
| Code | Decoding |
| 1011, 1012 | Rotation sensor does not work |
| 1013, 1014 | Supply voltage out of tolerance |
| 1021-1024 | Torque sensor faulty |
| 1031-1033 | No signal from steering shaft position sensor |
| 1041-1045 | The position of the auxiliary motor rotor is not determined |
| 1050-1061 | Opens and short circuits of the motor winding |
| 1070-1079 | Various errors in the EMUR control unit |
ABS errors
In the chassis of modern Kalina and Kalina 2, equipped with an ABS system, the following category C errors are often encountered.
| Code | Decoding |
| 0035, 0040 | Failures of speed sensors on the front wheels |
| 0045, 0050 | Similar, but on the rear |
| 0060, 0065, 0070, 0075, 0080, 0085, 0090 and 0095 | Damage to valves in the anti-lock braking system module |
| 0161 | Stop light doesn't work |
| 0550, 0640 | ABS control unit memory errors |
| 0800 | Low voltage in the ABS block circuit |
Airbag errors
Many Kalinas of recent years of production are equipped with airbags that have their own control units. They are characterized by errors with index B.
| Code | Decoding |
| 9000 | Control unit error |
| 9001, 9002 | Malfunctions in the driver and front passenger seat belts |
| 9003, 9004 | Front airbag failure |
| 9042 | Incorrect power settings |
Errors of light, mirrors and others
In addition to those listed above, we can highlight a number of errors in the light control unit, which is installed on some Kalina cars:
- In 9501 - there is no signal from the raindrop sensor on the glass;
- In 9502 - the sensor sensitivity regulator does not work;
- In 9503, 9505 and 9506 - errors in the functioning of the windshield wiper;
- In 9504 there is a problem with the operation of the headlight relay.
If you have heated and electrically adjustable rear view mirrors, additional errors are possible:
- In 9244, 9246, 9247, 9250 and 9251 - malfunctions of the mirror tilt system;
- B 9230 - error in the mirror control unit;
- In 9252 - sticking of the regulator contacts.
As a separate block, you can consider controller problems related to the operation of electrical equipment on the body and in the cabin. Such errors are indexed B.
| Code | Decoding |
| 0001-0004 | Turn signal lamps do not work |
| 0005-0018 | Various problems in the operation of window motors |
| 0019-0026 | Problems with power supply to mirrors |
| 0027-0028 | Malfunctions of fog lights |
| 0035-0038 | Open circuit or overload |
| 0039-0043 | Breaks in the glass heating circuits, side lights and low beams |
| 0044-0046 | Immobilizer errors |
| 0052 | Error that appears after a power failure |
| 1375-1378 | Air conditioner evaporator sensors do not work |
| 1382-1385 | Open circuit in the interior temperature sensor circuit |
| 1860, 1861 | Power parameters are out of tolerance |
In addition, one of the most common errors on the Lada Kalina is P 0441, indicating an insufficient volume of air supplied to purify the absorber. This problem causes the check lamp to come on after prolonged driving and does not affect the driving performance of the car. Malfunction P 1602 is no less common; it signals a loss of voltage to the ECM and is recorded in memory after the battery is disconnected.
Errors in lambda probes and their heating systems are common. For example, 0036, which indicates a failure of the electrical heating of the sensor. The solution to this problem is to replace the sensor or install a decoy. As changes are made to the design of cars and new options become available, the list of error codes for the Lada Kalina is constantly expanding.
Description and location of indicators and instruments on the panel
Thanks to the tidy, the driver receives information about the condition of the car and the speed of movement.
Tidy Lada Kalina 2
A novice car enthusiast should know about the purpose of warning lights from the very first days.
Below is a description of the device:
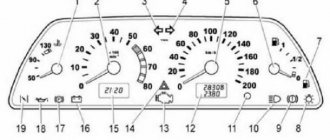
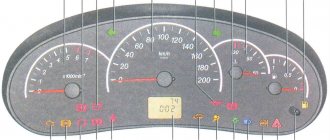
1 - tachometer - a device showing at what frequency the crankshaft rotates; 2, 4 — direction indicators, left and right, respectively; 3 — speedometer, displays the actual speed of the vehicle; 5 — coolant temperature indicator; 6 - indicator showing the fuel level in the tank; 7 — fuel reserve warning light; 8 - button with which the daily mileage readings are reset; 9 - a lamp indicating that the emergency lights are on, during which the side lights and turn signals flash, indicating a car malfunction; 10 — electric power steering lamp. Goes off when the ignition is turned on. If it continues to light, then the EUR is faulty; 11 — high beam indicator. The light is on if the high beam is on; 12 — indicator of the applied hand brake; 13 — external lighting indicator; 14 — airbag malfunction indicator; 15 — emergency oil pressure indicator in the car system; 16 — immobilizer warning light; 17 - liquid crystal screen displaying information from the on-board computer; 18 — seat belt malfunction indicator; 19 — battery charging lamp; 20 — emergency brake fluid level indicator; 21 - electronic brake force distribution light, red light indicates a malfunction; 22 — brake pad warning light; 23 — anti-lock braking system (ABS) indicator; 24 - a constantly burning orange light indicates problems with the engine.
After the engine starts, the indicators light up orange. If everything in the system works normally, then they go out after 1-2 seconds.
Tidy Lada Kalina
The process of diagnosing a car using a tester or a connected computer
Much more accurate and reliable data when checking a car for malfunctions can be obtained if you use separately connected equipment. But the introduction of such tools and devices gives encrypted readings, therefore, in order to correctly understand and find all the faults in the car, you need to decrypt the data received from diagnostic devices. Of course, manufacturers could have done it easier for Russian-speaking motorists. It would be possible to write “replace the canister valve” on the device screen after diagnostics, but instead, only a code in the form of p0441 can be found on the display, and code p0130 will appear only due to problems with the oxygen sensor.
But the problem is that Lada Priora is produced not only for the domestic market, it is also produced for sale in other countries. Therefore, such a classification of automobile problems and their code on the testing device was created.
It is easier to enter only a certain number of universal codes into the program than to enter your own language data for each national market. As a result, you can look at a specific code on the display and easily determine the essence of the problem in the car using a list that lists all encrypted codes. A special code is used to indicate error codes on the Lada Priora car. This cipher includes:
- letter fault code;
- digital code for the location of a malfunction in the vehicle design.
On the Lada Priora, all gap codes in the vehicle's operation will have five digits. Here is a complete list of Priora designations. The first character of the code will be a Latin letter. The letter “P” indicates problems with the engine, or more precisely with its electronic system. The letter “B” indicates problems with the interior electronics.
The letter “C” is present on the screen only if there are failures in the electronic system of the vehicle chassis. If combined errors occur in several operating systems of the vehicle, the letter “U” will appear on the display. The letter designation is followed by a number.
The zero indicator is indicated by the OBD-2 code. Numbers 1 and 2 show the company code, and the third digit is responsible for the backup code. The subsequent set of numbers conditionally shows the place where errors were detected during diagnostics. A zero code indicates the exhaust system. Number 1 indicates the fuel system, number 2 indicates the air supply system.
If there is a malfunction in the ignition, then the number 3 will appear. If there are problems with additional control, the number 4 will appear. If there are malfunctions in the idle speed, then the number 5 is responsible for this, and if there are problems in the ECU, the number 6 will appear. Numbers 7 and 8 are associated with the transmission In the general code, the very last two digits indicate the error number in the operation.
Possible faults
The following malfunctions are possible with the dashboard:
- Fuel level or temperature gauges do not work. The reason may be faulty sensors or damaged wiring.
- When the tank is full, the fuel level needle drops to the zero position.
- The arrow on the fuel level indicator moves abruptly and often drops to the zero position.
- The fuel reserve indicator does not go out.
- If any indicators on the device do not light up, the reason may be burnt out light bulbs, insufficient contact between the light bulb socket and the printed circuit board, oxidation of contacts, broken wires, or a malfunction of the indicator sensor.
- If the speedometer is not working, the reason may be in the flexible drive shaft of the device: the nuts are poorly tightened, a break, mechanical damage, etc. (video author - RasH19).
Types of input and output signals
The ECU processes only a few types of input signals:
- digital signal (has only two levels - “high” and “low”). This signal is also called logical, since it has only two values - true or false (true/false), logical 0 or logical 1;
- a pulse signal is a short-term change in a physical quantity. For example, based on the number of pulses from the ABS sensor, the control unit calculates the rotation speed of each wheel;
- analog signal – described by a function of time and a continuous set of possible values. In a car, these signals include voltage measurements.
Master cascades used to control actuators can generate a switching signal and a pulse-width modulated signal
A PWM signal is characterized by the duty cycle of the pulses - the ratio of the period of the pulses to their duration. The duty cycle is expressed as a percentage, which shows the ratio of the period of voltage supply to the period of de-energized state
For example, if the duty cycle of the idle air regulator (IAC) control signal is 50%, then the regulator rod will be extended halfway.
While pulse width modulation allows flexible control of the actuator, the switching signal has only two states - on or off. This signal will be the inclusion of a fan, air conditioner clutch, etc.
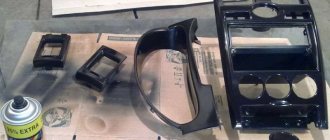
Instructions for dismantling and repair
Dismantling the tidy may be required to perform tuning, replacing backlight bulbs or repair work. You can find out how to remove the instrument panel on a Lada Kalina from the car's operating instructions.
LED instrument lighting
Tools and materials
Before disassembling the Kalina 2 instrument panel, you need to prepare the following materials and tools:
- a set of keys;
- Phillips and flat screwdriver;
- replacement parts and bulbs.
Before carrying out work, turn off the power to the vehicle by removing the negative terminal from the battery.
Removing the Kalina torpedo
Algorithm of actions
The disassembly procedure consists of the following steps:
- Using a Phillips screwdriver, you need to unscrew two self-tapping screws.
- Next, you need to remove the trim from the instrument panel.
- At the next stage, the spring clips are removed from the clutch.
- After unscrewing two screws, you need to slide the panel towards you.
- The latch holding the block must be pryed up using a flat-head screwdriver and turned.
- Next, you need to disconnect the connectors with the wires and you can safely remove the tidy.
- To remove the glass from the instrument panel, unclip the plastic clips.
How are errors diagnosed?
If problems and unusual malfunctions begin to appear in the usual operation of your car, think about carrying out diagnostics of the systems. Remember that not every machine has special pads for working with a specific professional connector, so it makes sense to use a standard connector. Why is code combination analysis so important? It is displayed on the on-board computer monitor, clearly demonstrating the problem and its location, which helps the owner to quickly carry out repair work. For a more detailed scanning of the breakdown, you can connect a special device - a scanner connected to the connector.
Self-diagnosis of the car
The system makes adjustments independently, automatically. Its structure includes other electronic devices. Thanks to special ECU sensors, the device’s memory receives information, including faults (shown in the form of numerical combinations). Most often, manufacturing companies are reluctant to provide complete information about the designation of codes and ciphers, as they consider professional inspection and care to be of better quality than independent care.
Experts recommend contacting the Lada service center to avoid fraud. Most cars are equipped with a bot controller - a unit that processes the information received by the sensors and displays it on the monitor. The Lada model does not have such a device, so it is appropriate to use scanning equipment. Let's take a closer look at the process itself:
- turn on the ignition, press “Reset” (needed in order to reset the mileage for the last day), hold it for a while;
- A self-diagnosis mode, segment icons, and indicators will appear on the instrument panel. The arrows will start moving;
- you need to switch between selected modes using a button located under the steering wheel on the right side;
- press the “errors” mode, reset them - hold down the above button for a little more than 3 seconds;
- Return from the set mode will occur automatically if the device is in idle mode.
How to diagnose via the dashboard
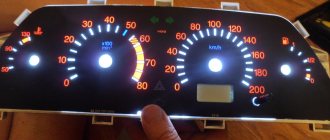
Diagnostics can be performed via the instrument panel. In order to start the verification process, it is recommended to click the button for recording the car mileage per day. Hold it a little and slowly turn on the ignition. If the manipulation is performed correctly, the instrument panel arrows (tachometer, speedometer, other indicators) will move in a circle, shifting from beginning to end. When the process is complete, switch the screen to another position using the button on the wiper adjustment surface (located at the bottom of the steering wheel). When you press it, an icon with the operating parameters of the ECU devices will appear on the instrument panel. One more thing: software with the inscription “self-diagnosis” always appears.
Diagnostics using a computer
For self-diagnosis, you can also use a laptop or PC. It is convenient to use a tablet. All you need is a USB cable to connect to the device and a previously installed testing program. There are a variety of firmwares, for example, a service for VAZ, developed specifically for certain car models (including Kalina). Connect the cable to the special connector located under the gearbox using the lever. Exact location: place above the cigarette lighter. The algorithm is like this:
- install the service on the device;
- in front of the lever, open the plastic cover, open the K-Line outlet;
- connect the wire to the block. Connect the first edge to the connector, the second to the gadget;
- You can start diagnostics and check the connection. Go to the “Tasks” menu, click the “Hardware” tab, view the connection. If it is, continue testing;
- start the firmware process. Monitor the reading of codes by the service; if this does not happen, click the “File” button, click the “diagnostics” field. A table with fault codes will pop up on the screen;
- There is a “parameters” button in the menu, which indicates the general condition of the car. If you need to view faults, click the “Codes” button.
When all the information is displayed on the monitor, it needs to be decrypted. The next steps are clear: a reference book or technical table is used, and the problem is resolved using the information provided.
Review of the instrument panel on the Lada Kalina: description of lamps and indicators
Using the instrument panel, the driver can monitor the vehicle’s condition, driving characteristics and other functions and processes that affect the safety of movement. Also, with the help of indicators, the car owner will be able to operate it correctly. Next, a description of the indicators on the instrument panel will be given to make it easier for a novice driver to understand.
Reset errors
If necessary or after correcting problems, the driver can delete the error from the control unit’s memory. To do this, you need to activate the service mode, enter the error codes menu and press the Reset button, which should be held for at least 3 seconds. After this time, the codes will be discarded. Deletion is indicated by a message like “——” on the instrument cluster screen.
Controller errors can be reset using software. Typically, this procedure is carried out during regular vehicle maintenance.
Appearance of the instrument panel on Lada Kalina
Dashboard for Lada Kalina
- Tachometer. Using it, the driver can find out what the crankshaft rotation speed is. The dial is divided into sectors. If the arrow is on red, this means that the engine is operating in a dangerous mode.
- Indicator of a malfunction of the system that controls the motor. This light turns orange when the ignition is turned on and goes out when the engine starts running. If it lights up while the engine is running, this means that the engine must be stopped and the cause of the malfunction eliminated. Operating the engine with the indicator on is prohibited.
- A diode that signals the activation of the left turn signal.
- Indicates low oil pressure in the system. After the motor starts running, the indicator goes out. If the light stays on for more than 5 seconds after starting the engine, this will indicate that the oil pressure in the unit is insufficient.
- ABS. Lights up when the ignition is turned on and goes out two seconds after starting the engine. If it continues to burn, this will indicate that the brake system is faulty. It is not recommended to use the car in this case. We need to find the problem and fix it.
- Immobilizer. Lights up orange. The driver can use it to determine the operation of the car’s security system.
- Coolant. The indicator displays the temperature of the coolant in the system. After starting the engine it goes out. Also, during operation of the car, the indicator may light up when the fluid temperature is above 115 degrees. When the temperature drops to 110 degrees, the light bulb will go out. It is not recommended to operate the vehicle if this indicator is constantly on. This may lead to motor failure.
- Parking brake. After starting the engine it goes out. If the indicator lights up while driving and a beep is heard, this will indicate that there is not enough fluid in the brake system. If the indicator lights up, it is prohibited to operate the vehicle.
- The light indicates that the right turn signal is on.
- Battery. Lights up red. Goes off after starting the engine. If the light comes on at full intensity while driving, this means that the battery charge is low. In this case, the alternator (or alternator belt) or voltage regulator may be faulty. It is prohibited to operate the machine with the indicator on.
- Speedometer. Shows the speed at which the car is moving.
- ESC. Lights up yellow. Goes off after starting the engine. If “ESC OFF” lights up while driving, this indicates that the system is not working. If the lamp flashes while driving, this will allow the driver to understand that the system is working. In all other cases, the lamp will indicate that the exchange rate stability system is not working.
- Shift to higher gear. Not applicable on this car.
- High beam. It indicates that the high beams are on in the car.
- Fog lights. It says the rear fog lights are on.
- Low beam. The car has low beams on. If the headlight does not light, check the fuse, then replace the low beam lamp.
- Front fog lights. Indicates that the front fog lights are on.
- Reset daily mileage. When you press the button, the counter is reset to zero.
- On-board computer display.
- Unclosed doors. Indicates that one of the doors in the car is not closed.
- Fuel. Indicates the amount of fuel in the tank. It is not recommended to allow the gasoline in the tank to run out completely. This may cause the fuel pump to fail.
- Tire pressure. Indicates insufficient tire pressure.
- Power steering indicator. Lights up orange. After starting the engine it goes out. If the lamp lights up while the engine is running, this indicates a malfunction of the amplifier. The problem needs to be fixed.
- Unfastened seat belts.
- Motor malfunction. Not used on cars.
- Airbag condition. Goes off after starting the engine. If the lamp continues to light, this indicates a malfunction. The problem needs to be fixed, because if necessary, the pillow will not open.
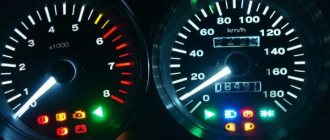
View of the instrument panel when the ignition is turned on
Ignition is on, check indicators come on
On-board computer display
On-board computer display (explained below)
Liquid crystal display. It is a device that can display all the necessary information about the car and trip.
Standard on-board computer Lada Granta/Kalina 2
The liquid crystal display is an electronic device that displays trip information collected and processed by the trip computer. Depending on the configuration, three types of trip computers are installed on the car, differing in the amount of information displayed.
The display shows the following information:
- line 1 displays the current time or (in a variant) the gear shift prompt indication mode, as well as the automatic transmission operation indication mode;
- Line 2 displays your choice of total or daily mileage;
- line 3 displays the outside temperature or (in an optional version) the functions of the on-board computer;
- line 4 displays the fuel level.
Source
Kalina - instrument panel: studying and testing in action
It often happens that a light comes on on the dashboard, and the driver does not know what this or that signal means. Let's dot all the i's. The instrument cluster of the Lada Kalina car displays:
- features of movement;
- in what state are the machine systems that are responsible for safe movement;
- Is the whole car being operated correctly in general?
The following description of the Kalina instrument panel is intended to help every novice driver understand their readings.
conclusions
As practice shows, diagnosing the Lada Kalina using the dashboard is quite easy and simple. This does not require any special tools or skills. It is worth noting that, according to the experience of many car owners, it is not always possible to fully diagnose all errors in the electronic control unit, since wear and breakage of some contact connections can be interpreted by the ECU in its own way.
What is a liquid crystal display or indicator? liquid crystal display, or LCD for short, is a flat-shaped display based on liquid crystals. So, it was not in vain that I started with LCD indicators, since we will talk about the LCDs installed in the Lada Kalina.
An indicator installed on the dashboard displays information processed by the on-board computer. The amount of information displayed depends on the vehicle configuration.
This screen displays the following information:
1. Current time or number of the suggested manual transmission gear (or automatic transmission mode);
2. It also shows the total mileage of the vehicle or mileage during one day(s);
3. Displays data on the external temperature or one of the indicators (the latter depends on the vehicle configuration);
4. Fuel level.
In order to start the self-testing mechanism in a Lada Kalina car, you must:
1. The battery must be connected;
2. It is necessary to hold down the car daily mileage reset button and turn on the ignition
3. Then, after turning on the LCD indicator, you need to press the “mileage” button again once. The indicator display will then show the program version;
4. Error codes, if any, will be displayed in the top two lines;
5. In order to return the system to working condition, there are two ways:
•press any of the buttons on the control panel;
•wait 15-30 seconds. and the system itself will return to working condition, however, when choosing this option, you do not need to press the buttons.
Below is a breakdown of the codes that may appear on the panel:
1. Code 2 – on-board network overvoltage;
2. Code 3 – fuel level indicator (open circuit);
3. Code 4 – coolant temperature indicator, also an open circuit;
4. Code 5 – the external air temperature sensor has failed;
5. Code 6 – engine overheating;
6. Code 7 – oil pressure level is too low;
7. Code 8 – the vehicle’s brake system has broken down;
Checking using a connected computer or tester
Driver Information Panel
Checking system malfunctions using connected devices gives more accurate results, but at the same time requires deciphering special codes. For example, the monitor displays code p0441 or p0130 or error p0422. Oh, these car manufacturers, in human language they could write “replace the oxygen sensor” instead of P0130 or “check the canister valve” instead of P0441.
But nothing can be done, the Lada Priora is also intended for export, so it is easier to write p0441 in the program than to give explanations in Russian, Kazakh, Arabic, Armenian and 10 other languages. And then attach special tables that indicate the meaning of certain codes. Just look at them and everything will become clear. But these tables are not included with the operating instructions.
Either way, you can check them out below.
All fault codes for Lada Priora car systems consist of 5 characters. Here is a breakdown of Prior's errors.
The Latin letter comes first:
- P - error in the electronic systems of the motor;
- C - error in the electronic systems of the chassis;
- B - error in interior electronics;
- U is an error in the joint operation of different systems.
Next comes the number:
- 0 - OBD-2 code;
- 1 - enterprise code;
- 2 - enterprise code;
- 3 - reserve code.
The system indicates an error
The next digit indicates the system in which the malfunction was found:
- 0 — exhaust;
- 1, 2 — fuel and air supply system;
- 3 - ignition;
- 4 - additional control;
- 5 — idle system;
- 6 - ESC;
- 7, 8 - transmission.
https://youtube.com/watch?v=zEPxE6CZZIo
The last 2 digits indicate the serial number of the fault.
Return
How to charge a VAZ-2114 battery yourself
You need to know how to charge a VAZ-2114 battery not only if self-diagnosis shows error 8. Correct and timely charging of the battery will extend its life. To do this, follow the recommendations of experts:
- Remove the battery and carefully go over it with a cloth, your task is to thoroughly clean it from dirt. Focus on the top of the piece.
- Now check the electrolyte load indicators. According to service station workers, the electrolyte level should be between the minimum and maximum icons located on the battery case. If the electrolyte is not enough, it must be added to the norm.
- Charge the battery when the plugs are turned out with a current of 5.5 A. Also monitor the density of the electrolyte.
- While charging, the battery can reach a temperature of 40 degrees, this is the maximum allowable value. However, experts believe that even this figure is too high - it is necessary to lower it to 27 degrees by interrupting battery charging.
- When should charging be completed? If a large volume of gas comes from the battery, the electrolyte voltage and its density are kept constant. 3 measurements are taken as a basis.
- If the density is different, then it needs to be adjusted. The increased density can be reduced by adding distilled liquid to part of the material. If it is low, use the method of adding electrolyte with increased density.
- When the adjustment has been made, do not remove the battery from charging for up to half an hour, then turn it off and check the electrolyte readings after half an hour. If the material level is too high, use a rubber blower to remove excess material.
About diagnostics using special equipment
During such checks, error codes will consist of four numbers and one letter in front of them. Let's see what they can mean:
- B
– indicates faults related to the body. These could be airbags, central locking, windshield wipers, power windows; - C
– relates to problems in the chassis; - P
- warns of problems in the power unit or transmission.
What does the first digit in the code indicate:
- 0
– is common to ATS; - 1
– refers to the machine manufacturer; - 2
– also from the car manufacturer; - 3
– is a reserve digit of the code.
What do the second digits of the code say:
- 1
– malfunctions with the supply of the air-fuel mixture; - 2
– also refers to problems with the supply of the working mixture; - 3
– problems with the car’s ignition system; - 4
– signal about the possibility of auxiliary control; - 5
– the idle speed control system does not work; - 6
– malfunctions with ECU circuits; - 7 and 8
– refer to errors in the performance of the vehicle’s transmission.
It signals the possible occurrence of all kinds of errors in the machine’s systems.
If you count the number of flashes, you can diagnose the problem node. If the driver managed to detect a malfunction and then eliminate it, it is necessary to reset the error code. Otherwise, during repeated diagnostics, even if there is no malfunction, it may appear again. This is not difficult to do; press the switch that resets the daily mileage of the car and hold it pressed for about five seconds. We hope that everyone who read this article to the end will understand the decoding of error codes for Kalina 1.6 8 and 16 valves. Most of the identified faults can be corrected yourself. However, if this is related to the car’s electronic systems, it is better to entrust the troubleshooting to specialists.
How to clear/reset the Check Engine error on Lada Kalina cars - this question often worries owners of VAZ cars. The fact is that most Lada owners have encountered such a problem when, for no apparent reason, the “chek” error lights up.
Here many people immediately panic. Don't worry, there's nothing wrong with it. Firstly, this error appears when any sensor fails.
Secondly, this error appears when the wrong mixture enters the combustion chamber. This can happen in two cases: some sensor is not working correctly, or low-quality gasoline. Try using higher quality fuel the next time you fill up.
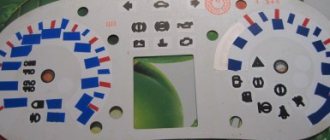
What do the icons on Kalina's dashboard mean?
- 1 – standard tachometer. The dial indicator is divided up to 7000 rpm with a threshold of 500 rpm;
- 2 – Check the engine. A standard lamp found on all modern cars. Indicates a serious engine breakdown and the need for urgent repairs;
- 3/9 – indicators indicate the turn signals are turned on;
- 4 – the oil pressure in the engine has greatly decreased;
- 5 – ABC is faulty and usually goes out when you turn the key;
- 6 – immobilizer operation indicator;
- 7 – the indicator has a simple meaning, it indicates that the motor is overheating;
- 8 – parking brake status indicator;
- 10 – the battery symbol shows the battery charge status;
- 11 – odometer;
- 12 – indicator of the state of the exchange rate stability system;
- 13 – the need to shift to a higher gear is not established in most versions;
- 14 – high beam indicator lamp;
- 15/17 – indicator of normal operation of stern/front fog lights;
- 16 – low beam indicator;
- 18 – daily mileage reset key;
- 19 – standard display;
- 20 – icon indicating that the doors are closed correctly;
- 21 – critical drop in fuel level in the gas tank;
- 22 – an exclamation mark inscribed in the tire profile indicates a punctured wheel;
- 23 – if the lamp goes out after starting the engine, the power steering is working normally;
- 24 – requirement to fasten seat belts;
- 25 – exclamation mark is used only in some vehicle configurations;
- 26 – airbag operation indicator.
The badges are only relevant for hatchback and sedan versions of certain versions. Depending on the year of manufacture and configuration, the symbol designation may differ from the nominal value.
Advice from car enthusiasts and recommendations from experts
There may be a break in the backlight brightness adjustment circuit. The adjustment rheostat has a soldered spring - it tends to fall off. You can simply put a jumper, that is, bypass the rheostat, then the brightness will not be adjusted, or solder it back - you will need to remove the rheostat.
Ustov
https://autolada.ru/viewtopic.php?t=100217
Lamp contacts often become loose, and they burn very quickly. I have already changed more than one.
compositor77
https://kalina-club.com.ua/forum/index.php?showtopic=6768
It is better to immediately install LED lighting bulbs for the instruments, they are not much more expensive, but on a cloudy day or when the sun sets, the instruments are readable with a bang. Moreover, no modifications are needed, the base is suitable...
maxx
https://kalina-club.com.ua/forum/index.php?showtopic=6768
You can do everything yourself, everyone basically does it, nothing complicated, the main thing is to unscrew everything and not break it, disconnect the connector. And check the bulbs to see if they are all intact, check the contacts. Maybe some of the light bulbs have burned out and it seems that the light is getting worse.
privatelex
https://kalina-club.com.ua/forum/index.php?showtopic=6768
I also had this problem. The backlight inexplicably disappeared and then turned on again. It's all about the cigarette lighter illumination. The contact shorts and the brains turn off the backlight. I unscrewed the cover under the gearshift lever and wrapped the wires near the cigarette lighter with electrical tape. All OK.
Roman Didenko
https://otvet.mail.ru/question/93393860
There's a spinner there. Adjusting the brightness of the shield. You need to twist it, it won’t help, either replace it or remove it completely and do it directly.
Taxi Osa
https://otvet.mail.ru/question/93393860
If the instrument lighting on the Lada Kalina stops lighting, then you cannot delay fixing the problem. This must be done as soon as possible. In most cases, it will take a maximum of 30–50 minutes to fix the problem.