The steering wheel braid is an accessory that has not only an aesthetic function in the car interior (although this is also important, because style emphasizes individuality). Don't know how to determine sizes? The surest way is to measure the diameter of the steering wheel or find this parameter in the operating instructions for the car of the desired model. Each brand has a corresponding size – S, M, L, XL.
For cars such as Tavria, Oka, cars with a sports steering wheel, size S is suitable - the smallest. Diameter – 35-37 cm.
The most common size is M. Nowadays, most cars have a standard steering wheel with a diameter of 37-39 cm.
These are almost any foreign passenger cars, as well as Lada Kalina, Lada Priora, Lada Granta, etc.
If the braid is chosen for a VAZ 2101-2107, 21011, 21013, Niva, Volga or Moskvich, then the car has a steering wheel diameter of 39-40 cm, which corresponds to L.
XL – GAZELLE, UAZ, etc. (42-43 cm).
PS: I bought it in China, since I sewed it myself, it took me about 3 hours, but I’m very pleased with the result!
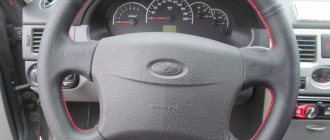
| The leather steering wheel on Kalina is not only practical and convenient, but also beautiful. This steering wheel adds style to the interior of the car and does not allow your hands to slip. This kind of tuning can be done with your own hands, but do you know how to install leather braiding on the Kalina 2 steering wheel? |
Anyone who decides to cover the steering wheel of Kalina 2 with leather for the first time is recommended to use a ready-made kit (price about 1,500 rubles), which is called “Leather braiding for the steering wheel of Lada Kalina 2.” It contains everything you need to re-tighten the steering wheel yourself as simply as possible (leather braid, thread, needle and instructions).
This way, you don't need to remove the template and make patterns. The braid already has holes for the threads, so all you need to do is put the braid on the handlebars and lace it with thread. All details are described in this manual:
Lacing the braid onto the handlebars is a painstaking job that will require time, patience and care. The entire process of covering the steering wheel with leather will take you about 4 hours. At first, the leather on the steering wheel may turn, but after it dries and shrinks, it will no longer be possible to turn it on the steering wheel. This completes the tuning of the steering wheel of the new Kalina!
Process video:
What does the Kalina steering system consist of?
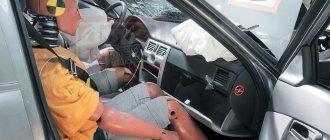
The control wheel is one of the main parts of the entire mechanism. It is placed on the splines of the control shaft and secured there with a locking nut. Thanks to this, the greatest reliability of the wheel fit is achieved and the likelihood of damage is reduced.
With all this, the control shaft itself is not an integral element, but consists of several parts - the upper and intermediate parts. Its rotation is carried out thanks to two bearings installed inside the control column tube, on which the ignition switch with an anti-theft system is located. The control column is assembled with a motor gearbox and an electronic amplifier control unit.
Protection from dust and dirt is provided by the decorative casing of the control column, installed on the front of the panel. Its dismantling is done using a Phillips screwdriver. The normal operation of the amplifier depends on the speed of the vehicle.
One of the parts of the column is the steering shaft driveshaft. Finding it is quite easy; to do this you will need to remove the casing. The steering shaft cardan softens vibration and makes steering safe.
Brackets are attached to the steering column tube using hinges, and their lower part is attached to the body with studs and special nuts. The top bracket has a mechanism that allows you to fix the column in different positions. When the lever is moved to the lower position, the angle of inclination of the column changes, and when it is moved up, it is fixed.
The rack and pinion steering mechanism consists of a housing, a rack and a drive gear. It is secured to the engine compartment crossbar using two steel brackets on rubber supports. The steering rod is attached to the racks, part of which are the steering ends, as well as adjusting bushings.
LADA Kalina steering tips are designed to ensure the mobility of the mechanism and allow you to easily change the lower angle of rotation of the wheels. The adjusting bushings are installed on the inside of the rod, and on their outer part there are ball pins that connect the rod to the rotating arms of the front suspension struts. When the slats are shifted, the position of the racks changes.
READ How to remove the heater radiator VAZ 2112 16
Which to choose
Those who like to tune their Priors and those who want to install a multimedia steering wheel are tormented by the same question: “Which method to choose?” There are several options for the multifunction steering wheel:
- panel with buttons (installed on the steering wheel between the spokes);
- factory universal multifunction steering wheel;
- steering wheel from Lada Vesta.
The first and last options are the simplest, as they do not require major alterations. In the first option everything is simple. You purchase a panel with buttons for the steering wheel in tuning or auto parts stores and install it in any place convenient for you on the steering wheel, having first passed the wiring from the radio to the steering wheel through the steering column tunnel.
The second option is to purchase a universal steering wheel, modify the mounts to suit your Priora and install it on the car. In this case, you will have to wiggle your brains out, since universal steering wheels are not made for a specific car. This means that there may be a difference in the splines and seat. And the steering wheel must be securely fastened, this is primarily your safety.
The third option is to install a steering wheel from a Lada Vesta. Lada Vesta is the first domestic car on which a multifunction steering wheel is installed directly on the assembly line. And the manufacturer is the same - AvtoVAZ, so there are no problems with the splines. When installing for the first time, you will need a needle file. The metal on the steering wheel is soft, making it easy to “align” the splines.
The steering wheel is installed in two stages. The first is to place the steering wheel on the splines with a little force. Then remove and use a file to smooth out the places where there are traces of the slots. After this, install the steering wheel in its place and tighten it with the nut. The steering wheel is in place and won't go anywhere. Don't forget to connect the buttons. After all, it all began for them. Sometimes Priora is equipped with a multifunction steering wheel from Korean cars. But this option, unfortunately, does not fit the slots at all.
Also, for an expensive and elegant look, it is a good idea to cover the steering wheel with eco-leather. The leather can be matched to the interior color.
For more detailed information, watch the video instructions.
If you doubt that you will be able to install the multifunction steering wheel yourself, it is better to contact a specialized workshop. In addition, you now know the installation process, and unscrupulous craftsmen will not be able to “rip off three skins” from you for installing a multifunction steering wheel.
Question for experts: is it really possible to install a multifunction steering wheel from a Vesta and connect the buttons to a standard MMS with a screen?
Comments 24
Good day to all. With my level of knowledge of car electricians, I think anything is possible. Because if you think about it, the Priora has an airbag and the Vesta has one. Both here and there on two wires... At most the chips will be different. The onboard system is 12v here and there. I think it will work out in terms of safety... But you will have to suffer with the control of the multi-function steering wheel... To the question why, I will answer the audio system is controlled through just one wire and as I understand it, for example, on a guitar there is a chip or circuit that promptly sends a kind of code to MMS for one or another function. And I don’t think that the chip code on the Vesta steering wheel will match. With Priorovskaya... On my own behalf, I would add that if I were you, I would give up the idea with the steering wheel. In any case, the factory is better. And at least I’m confident that I’m safe and there won’t be any problems with the cops.
Causes of knocking and creaking steering wheel
The first reason may be a worn ball joint. It should be replaced. A rupture of the support will result in the impossibility of the upcoming movement due to the wheel being twisted inward or outward. A tow truck will be needed.
The lemon valve may also be faulty. The load is applied to the right grenade when the steering wheel is turned to the left, and vice versa.
The control rack is faulty. There is kickback and the steering wheel bites. It is necessary to carry out diagnostics at 100, tighten the rack fastenings or replace it.
If the Kalina are very worn, you should use silicone for lubrication, then the noise will disappear.
If the crankcase guard mounting bolts are loose, they must be tightened. If the thread breaks, the bolt should be replaced.
The knocking noise may appear after changing a wheel. If the bolts are loose, they need to be tightened with a certain amount of force. If this is not done, vibration will be added to the knocking.
If the spring has burst or cracked, it will need to be replaced.
The springs are leaking or worn out, they cannot support the load when turning the steering wheel to the right or to the left, they sag with a crash under the weight of the car - carry out diagnostics or replace spare parts.
Dismantling algorithm
Note. Depending on what year Kalina was released, the steering wheel mounts may differ. An may or may not be present . If there is one, then you need to use a Phillips screwdriver to unscrew the bolts that secure it.
- It is worth noting that the bolts are fastened quite firmly, so you need to remove them with the utmost care so as not to damage the buttons and contacts.
- Afterwards the cover can be completely detached.
- The next step is to use a socket with a wrench to unscrew the nut that secures the steering wheel to the shaft. The steering wheel must be locked.
- In a situation where the nut is difficult to rotate, you can use a ratchet, with which this can be done faster and easier. There is no need to unscrew the nut completely; it is better to leave it in place, otherwise you might get hit in the forehead when removing the steering wheel.
- The position of the handlebar should be marked with a marker or pencil so that when mounting it back, it should be set straight. Marks can be made either on the steering wheel itself or on the casing.
- Now you need to take the steering wheel with both hands and pull it towards you, removing it from the shaft splines. If he doesn’t give in the first time, you can hit him with his hands from below, alternately left and right.
- After the steering wheel has been removed, you need to unscrew the nut completely and remove the wheel.
Sources:
https://olden-avto.ru/remont/kak-snyat-rul-na-kaline.html https://mobile-DVR.ru/ekspluatatsiya/kak-snyat-rul-s-podushkoi-bezopasnosti-na-kaline .html
Removing the steering rack from the car
The rear wheels are fixed by rolling back, the front wheels are lifted with a jack. Inside the car, on the driver's seat side, unscrew the bolt of the splined connection of the column. The difficulty in disconnecting is that it is located where the pedals are grouped.
After removing the front wheels, the cam nuts are removed and the space under the hood is prepared. The terminals from the battery and the battery itself, together with the mounting plane and the thermal reflector, are removed. The body mount of the rack is removed with a nut, it is released and placed on a flat surface for future work with it.
Diagnostics for the presence of free play is carried out as follows: the rack casing is clamped in a vice and swung with force from side to side. There is a feeling of free movement - you need to try to tighten the spring nut by less than 10 degrees. Check the free play again, and so on until the problem is eliminated. Tightening is prohibited, because the steering wheel will become very difficult to rotate, even if an electronic amplifier is installed.
Some drivers have learned to make adjustments without removing the rack. This method helps save time and effort. To perform this type of work, the car is placed in a pit and the location of the part is determined in the front part. The spare part is pulled clockwise if you can only get to it from below. If you can feel it from above, then the tightening goes counterclockwise. Actions are carried out in the sequence described a little higher.
It is necessary to keep in mind that replacement does not always solve the problem; the rack continues to make noise and squeak when turning the steering wheel. In order to double the service life of the control rack of a machine with hydraulic booster, constant oil monitoring, checking the technical condition of the control rod boots and their timely replacement are important.
READ How to remove the front bumper of Volkswagen B3
The control rack does not like movement without braking in the deepest holes. The steering wheel does not need to be turned all the way so as not to create excessive pressure in the hydraulic booster, otherwise the seals will quickly wear out.
Grenade change
Limonka, or CV joint, is one of the main parts of the car's chassis. It ensures safe traffic on the roads. The lemon is located in the drive of the drive wheels, which allow the steering wheel to move. Occasionally you can see this hinge on a rear-wheel drive car. The CV joint can be internal or external.
The lemon valve is out of order and requires replacement if the car starts to click and squeak when moving back and forth, and you can hear a creaking sound when you turn the steering wheel.
The car is raised with a jack, the wheel is removed, and you must try to knock out the control rod with a hammer. Unscrew the lower ball nuts and use a crowbar to push the steering knuckle away. The bolts are unscrewed and the control rod is removed. The old retaining ring is thrown away, since it is included in the kit of the new CV joint. Lubricate the spare part with a special granite-based lubricant and put on the boot. Assembly is carried out in reverse order.