The dashboard of Granta or Kalina can be called modern. This can be confirmed not only by its appearance, but also by the use of LEDs, rather than lamps, to highlight readings and indicators. Let's look at how you can change the standard green color of the instrument panel backlight.
We dismantle the device ourselves
To remove the dashboard in Kalina-2, first dismantle the plastic cladding. The part is held in place by three self-tapping screws, two of which are immediately visible. Look at the tidy below and you will find them. The third screw, in turn, is located in the fuse compartment.
The fuse compartment will be covered with a cover.
In the figure, the required element is indicated by the number “3”.
In the absence of cladding, it is easy to find 4 screws holding the tidy in place. By unscrewing them, the block can be completely dismantled. But don’t rush: when dismantling, you will need to disconnect the connector. This means that even before performing all operations, the battery terminals are disconnected.
Usually only the negative terminal is disconnected. The part is held in place by one nut, and to unscrew it you need a 10mm wrench.
Installation of the dashboard Kalina 1
Installation is done in reverse order. For prevention, all surfaces are cleaned of dust and dirt, checked for defects and damage. The rag is dry; moisture may get on the surface of the electrical connector. Before installing a new instrument panel, check the correct location of the fastening units.
Installation steps:
- Install the plug connecting to the car's electrical network.
- Turn on the battery and check the operation of the dashboard.
- Disconnect the battery.
- Insert the lower rollers into the mounting recesses.
- Fix the shield, tighten 2 screws.
- Install the cover plate into the lower latches and screw in the mounting screws.
Several types of instrument panels have been developed for the Lada Kalina. They differ in appearance and functionality, but their installation diagram is the same.
When connecting the plug, you need to carefully move the latch to the “closed” position. This part is made of thin plastic and may break if pressed hard. First, insert the plug tightly, then turn the latch.
Replacing LEDs
Having disassembled the instrument panel unit, you will notice that the illumination of two scales and the display is provided by flat LEDs. They, in turn, can be replaced with parts of the same standard size. But remember one rule: the switching polarity cannot be violated. On a planar diode, polarity is indicated by the presence of a “bevel” on one side.
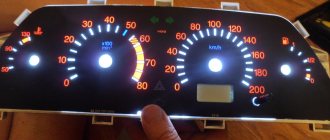
There is an example when standard elements were replaced with blue light diodes:
Blue backlight of the display and two scales
Blue backlight of the standard display
The next video will show how you can further improve the tidy by simply replacing the LEDs.
The operating voltage of one diode is 3-3.5 Volts. Do not install elements designed for other voltages. It is not recommended to use LEDs that are too powerful and consume significant current.
Installing a sports steering wheel and sports seats
The appearance of the Lada Kalina car can be changed by tuning the Lada Kalina interior.
It's definitely worth installing a sports steering wheel. It will increase the ease of driving and improve the appearance of the interior. Next, when tuning the interior of the Lada Kalina, you should install new seats or upholster the old ones.
The sports seats look impressive. They have a fixed fit, which will be beneficial for the spine. But a comfortable seat for the driver helps better concentration, as well as health.
Adding a digital scale
For those who have experience working with plastic, the following tuning option is recommended.
In the instrument panel, under any of the two scales, you can cut out a window in which a standard indicator is fixed. We are talking about a digital indicator consisting of two or three separate segments.
The plane of the tidy is cut through, an indicator is attached to the window
When the modification is completed, the dashboard looks like this:
3-segment indicator installed and secured
If there are glares, use a simple solution: cover the inside of the glass with a matte tint film. Good luck.
How to change the color of the instrument cluster illumination
1. Use SMD of the desired color. For example, use white LEDs to illuminate one part of the panel, and blue LEDs for the other.
2. Use a light filter (electrical tape or film of different colors) together with white LEDs. We stick it on the desired area, as a result of which we get the illumination of the desired color. To change the color, you do not need to use a soldering iron, just disassemble the instrument panel and stick a film of a different color.
It is worth noting that the hands have an orange coating. To change the illumination of the hands, wipe off the varnish with nail polish remover and, if necessary, apply a new varnish of a suitable color. Another option is to use LEDs for the arrows of the desired color.
You can change the backlight of the screen (display) not only by replacing its LEDs, but also by turning the film over. First, we tear off the film from the display, clean the remaining adhesive with a solvent and glue the film on the back side. This results in an inversion of the panel display:
3. Use RGB-SMD LEDs. If you want to change the backlight color at once. In this case, you will have to additionally output switching control.
Rework by replacement
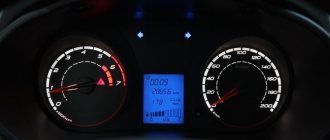
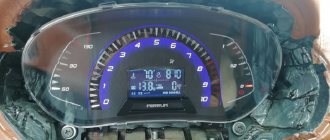
This option seems obvious: the speedometer and tachometer can be left in place, and the computer display can be replaced. In reality, such a replacement is difficult to perform. The on-board computer in Kalina-2 is integrated into the tidy circuit, so you cannot get rid of it. The instrument cluster unit is usually replaced as an assembly, and third-party companies have been able to provide several suitable solutions.
Tidying with a computer from a third-party company (option 1)
Tidying with a computer from a third-party company (option 2)
Tidying up the updated Priora, ITELMA
You can install a more “complicated” dashboard than in Kalina, produced by ITELMA. This company is a supplier of electronics for all VAZ cars. We will leave the choice to the owner. Happy tuning!
Head optics: how to improve them?
In many ways, the exterior style is determined by the installed head optics and rear lights. The design options available at the factory cannot be called attractive, since they are still manufactured using old technologies and are of low quality.
The features of such tuning include the following points:
- You can upgrade the existing structure or purchase a new one. Some tuning salons provide the opportunity to buy new optics and lights that are ideal for the car.
- There are quite a large number of ways to modernize an already installed structure. An example is recommendations related to replacing a standard light source with a diode one.
Why are diode light sources so popular today? There are quite a few reasons:
- Low cost. Diode light sources are among the cheapest, which allows you to save on tuning and further maintenance.
- Attractive view. Diode strips have long been used in tuning many cars.
- Low power consumption. Due to this, the load on the installed generator is reduced and the amount of fuel consumed is reduced, and when the engine is off, the battery is less discharged.
- High reliability. The service life of high-quality diodes is quite long, since they are not negatively affected by high humidity and other influences.
- Compact sizes. Due to this, a larger number of light sources are placed in a small area.
- Long service life.
If you pay attention to new cars from almost all manufacturers, head optics and rear lights are made using diode technology. In addition, the following types of tuning of optics and flashlights are carried out:
- Protective glass is tinted.
- The surface of the protective glass is polished.
- Install various eyelashes and extensions.
When performing tuning, you should remember that headlights and taillights perform an important function and are not a decorative part of the body. That is why all changes must be thoughtful.
Lighting
The Kalina's interior lighting leaves much to be desired. Only the front part of the machine is equipped with a lamp. The back row does not have any lighting devices. An LED strip will help fill the back row with light. It can be powered from the front lamp, and the wiring can be laid under the ceiling card. For convenience, you can install a separate switch in the rear row area so that passengers can turn it on themselves.
Tuning the Lada Kalina with your own hands will take a little time, but by doing so you will reduce the cost of its implementation. By making changes to problematic parts of the car, you thereby improve the impression of the entire car as a whole.
Armchairs
The seats in a car are the first thing everyone who gets into it pays attention to. And tuning the interior of the Lada Kalina will be incomplete if the seats are not modernized or replaced. A short bottom cushion and lack of lateral support are the main disadvantages of the seats installed in Kalina. To correct these shortcomings, you can contact a specialized studio and reshape the existing seats or select a suitable option from another car. The latter option is more acceptable due to the amount of funds spent on its implementation. Specialized studios charge a lot of money for their services, and if you are lucky enough to find chairs that suit you, you can redo the fastenings yourself.
Description and location of indicators and instruments on the panel
Thanks to the tidy, the driver receives information about the condition of the car and the speed of movement.
Tidy Lada Kalina 2
A novice car enthusiast should know about the purpose of warning lights from the very first days.
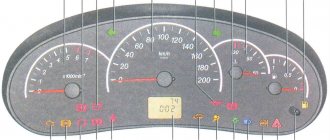
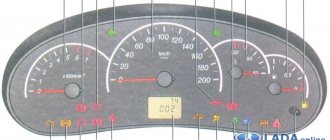
Below is a description of the device:
1 - tachometer - a device showing at what frequency the crankshaft rotates; 2, 4 — direction indicators, left and right, respectively; 3 — speedometer, displays the actual speed of the vehicle; 5 — coolant temperature indicator; 6 - indicator showing the fuel level in the tank; 7 — fuel reserve warning light; 8 - button with which the daily mileage readings are reset; 9 - a lamp indicating that the emergency lights are on, during which the side lights and turn signals flash, indicating a car malfunction; 10 — electric power steering lamp. Goes off when the ignition is turned on. If it continues to light, then the EUR is faulty; 11 — high beam indicator. The light is on if the high beam is on; 12 — indicator of the applied hand brake; 13 — external lighting indicator; 14 — airbag malfunction indicator; 15 — emergency oil pressure indicator in the car system; 16 — immobilizer warning light; 17 - liquid crystal screen displaying information from the on-board computer; 18 — seat belt malfunction indicator; 19 — battery charging lamp; 20 — emergency brake fluid level indicator; 21 - electronic brake force distribution light, red light indicates a malfunction; 22 — brake pad warning light; 23 — anti-lock braking system (ABS) indicator; 24 - a constantly burning orange light indicates problems with the engine.
Economical tuning option - interior trim
A more economical option for tuning the interior of the Lada Kalina will be interior trim. For this, various materials are used, such as tweed, velor, leather. Leather is the most durable and durable material, however, it is also the most expensive. It is important to choose the right color; usually it matches the color of the car body.
Proper, contrasting lighting will improve both the appearance and provide better visibility. Old lamps are replaced with LED or neon ones. You can also equip new lighting, for example, in the glove compartment.