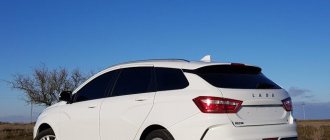
Tuning options for the Lada Vesta instrument panel
- Soldering LED contacts to illuminate the instrument panel when the DRLs are activated. Relevant for the “Classic” package.
- Replacement of color indication of diodes.
- Purchase of a finished dashboard. Relevant when the factory warranty for a technical product expires.
Note to the driver! Remember that you carry out all work at your own responsibility. Tuning the device involves breaking the factory seal, which may void the warranty.
In the case of purchasing a customized dashboard (hereinafter referred to as PP), everything is extremely simple: dismantling the old one, installing a new one. We will not consider this option. We focus on synchronizing the lighting of the PP with the daytime running lights DRL.
One of the lighting options
Sequence of actions during dismantling
- In the engine compartment, remove the terminal from the battery to avoid a short circuit in the wiring.
- At the top of the shield, unscrew two screws (a cross-shaped bit).
- We pull the PP towards us and remove the body from the plastic latches.
- Disconnect the block with wires from the reverse side.
Next, we proceed to disassembling the shield. Structurally, it consists of three wells (sections). The backlight is provided by SMD diodes.
- We dismantle the plastic mask (wells) and move the latches to the side.
- We remove the tachometer and speedometer arrows from the base of the dashboard. Unscrew it in a counterclockwise direction and pull it toward you. It is important not to damage the gear stop. Otherwise, buy a new module.
- Remove the cover from the back side and unclip the plastic clips.
- We remove the instrument board from the housing.
- Remove the PP cover.
- We disconnect the contact connector and remove the on-board computer.
Ready. The Lada Vesta instrument panel has been disassembled.
Dismantling (rear view)
So, we need the backlight on the instrument panel to be activated when the DRL is turned on. We do it quickly, and most importantly, for free. The workshop requires at least 3,500 rubles for such a service.
- Using a soldering iron and solder, we solder three contacts together. They are located immediately below the central plug. For strength, we use stranded copper wire 4–5 cm long.
- We assemble the structure in reverse order.
Now, after starting the DRL, the dashboard is automatically illuminated. Very convenient, practical, and most importantly, informative for the driver.
Required
- Buy KIT kit (7 different types), prices from 4000 rub.
- Remove the instrument panel.
- Disassemble the instrument panel.
- Soldering iron, long curved pliers, utility knife, screwdriver, installation wire (MGTF 0.08-0.12).
Before ordering a KIT kit, you need to know the number of your instrument panel
(remove the shield and look at the number on the back cover). You will need this number when ordering a KIT kit. The plate number will also help you determine which installation instructions are right for you.
A little about SMD LEDs
| Brightness level | Data | Light flow |
| very bright | SMD 5050 | 15 Lumens |
| bright | SMD 3825 | 7- 9 Lumens |
| medium brightness | SMD 3528 | 5 Lumen |
| —/— | SMD 3028 | —/— |
| not bright | SMD 3020 | 4 Lumen |
| —/— | SMD 3014 | 3 Lumen |
The symbols next to the SMD indicate the dimensions. For example, SMD 3427: 3.4 x 2.7 mm.
Review of SMD diode manufacturer prices
| Name | Price , rub.) |
| Instrument cluster Gamma GF 616 | From 11500 |
| GF 625 | From 8100 |
| Range GF 851 | From 2100 |
| GF 819 Black | From 12000 |
| GF619 | From 9000 |
| Gamma 821 | From 12000 |
| Instrument cluster Sport Ferrum | From 3800 |
| GF822 | From 3000 |
*prices are current as of November 14, 2018.
Recommendations for selection
If your budget allows, then buy an assembled shield module. This way you will reduce the likelihood of damage to the board to zero and eliminate incompatibility of components. This often happens when an inexperienced owner tries to carry out repairs or tuning on his own.
Replace the LEDs on your own only if you have instructions at hand, a visual aid for repairing the machine.
Purchase components for the dashboard only at certified points of sale; ask the seller to provide a quality certificate for the product he sells.
For most drivers, the above-mentioned “tricks” are not at all important. The standard backlight, brightness, and color range are quite sufficient for high-quality lighting of the instrument panel on a Lada Vesta car. The final choice is up to the car owner.
Addresses of companies that install the dashboard on Lada Vesta
| № | Name | Address |
| 1. | "StoVesta" | 73 building 2, Shkolnaya st., St. Petersburg, Russia, 197082 |
| 2. | "AvtoSTOlitsa" | 1st Murinsky Ave., 9, St. Petersburg, Russia, 197198 |
| 3. | "Car service in Lithuanian" | Litovskaya st., 9, St. Petersburg, Russia, 194100 |
| 4. | "6+, service station" | st. Chapaeva, 17, St. Petersburg, Russia, 197101 |
| 5. | "STO Autopride-SPB" | Novorossiyskaya st., 53b, St. Petersburg, Russia, 194021 |
| 6. | "Station No. 1" | st. Mineralnaya, 13, St. Petersburg, Russia, 195197 |
Do-it-yourself firmware
You need to be aware that all actions are performed at your own peril and risk. No one can guarantee that after installing the firmware yourself, the device will work correctly. To prevent this outcome, it is recommended to update the panel either at an authorized dealer or at specialized service stations.
There is no need to confuse the panel firmware with the multimedia firmware - these are different devices.
The cost of such a service varies from 1,500 to 2,500 thousand rubles. This is much cheaper than buying a new shield to replace a damaged one yourself. For dismantling and reflashing, the warranty may be revoked if the procedure is not carried out by an authorized dealer. If you decide to update the software yourself, you will need to make a backup copy of the standard firmware, then prepare the necessary tools:
- A device for flashing Usbdm OSBDM V4.95 - can be ordered on AliExpress, the cost is approximately 600-700 rubles.
- Install drivers and software for Windows from the disk included with the programmer.
- Dismantle the instrument panel, peel off the factory seal, and remove the cover from the back.
- Open the programmer and move the checkbox to the 3.3V position - at this voltage you will not need an external power source.
- Connect to the dashboard and PC.
- On a computer or laptop, open the HCS12 Programmer program, select and click on the “Detected” item.
- Go to the “Target” item and select the folder with the location of the firmware, check the box next to the “Auto Reload” item, then click on “Detect Chip”. The programmer will determine the chip type automatically.
- Go to the “Security” tab and check the “Unsecure” box.
- In the “Advanced” tab, check the “Enable” box.
- In the “Device Operations” section on the “Target” tab, select the “Erase Selective” item - only the firmware will be replaced, the immobilizer data and mileage will be saved.
Now you can click on the “Program Flash” button - the firmware process will start. This will last a few seconds. After completion, when prompted by the program to connect the dashboard, click “No”. The flashing device can be turned off and the instrument panel replaced.
List of online stores selling parts for the dashboard of the Lada Vesta
| № | Name | Address |
| 1. | "LADA-VESTA-SHOP" | https://lada-vesta-shop.ru/ |
| 2. | "BAZA.DROM" | https://baza.drom.ru/ |
| 3. | "STOVESTA" | https://stovesta.ru/ |
| 4. | "AVITO" | https://www.avito.ru/ |
| 5. | "LARGUS-SHOP" | https://largus-shop.spb.ru/ |
| 6. | "ELECTRO-STAVR" | https://electro-stavr.ru/ |
Reviews
| № | Positive |
| 1. | Gennady: after buying the car I decided to upgrade it a little, starting with the instrument panel. The standard backlight is not enough, and some colors are too bright at night. The replacements were carried out by StoVesta, the guys were smart, they did it quickly and efficiently. |
| 2. | Vasily: my positive review of the AvtoSTOLITSA car service center. Installed new diodes on the shield. I am satisfied with the quality and efficiency, no comments. |
| 3. | Dmitry: I recommend Auto Service on Lithuanian, I recently installed new wiring. They got it done quickly, the price was affordable, and the craftsmen knew their stuff. |
| 4. | Vladlen: my comrades advised me to get service at 6+, service station. Initially I doubted it, but now I’m happy with the advice. Masters are what you need. Feel free to take your car in for repairs, you won’t regret it. |
| 5. | Kirill: a month ago I underwent another maintenance, and at the same time I tuned the dashboard. I am satisfied with the quality of the work of the “STO Autopride-SPB” craftsmen, I recommend it to others. Modern equipment, special premises, qualified personnel. |
| 6. | Victor: my positive review of the service station “Station No. 1”. They always work by appointment, there are no queues and delays like other service stations. My recommendations, keep it up. |
| 7. | Gennady: I visited the StoVesta service station for the first time on the advice of my friends. The guys are great, they know their job. We replaced the dashboard diodes in half an hour, and at the same time carried out a comprehensive diagnostic of the entire car. |
| Negative | |
| 1. | Vladlen: I visited Auto Service on Lithuanian twice, I didn’t like it. The staff is small, the mechanics are periodically distracted, we can talk about the quality of work. |
| 2. | Kirill: I was serviced at “6+, service station” for six months, now I’m moving on to others. There are no spare parts available, they are inclined to pre-order, the cost of services has increased. |
| 3. | Konstantin: after buying Vesta, I was serviced at AvtoSTOlitsa, but now I decided to change the workshop, since the quality of the work has deteriorated, while the prices remained the same. |
Advantages and disadvantages
Despite the short duration of sales of the new Lada Granta, according to the reviews of the owners, one can judge the main pros and cons of the restyled model.
Advantages:
- High and comfortable fit.
- Availability of lateral support.
- Spacious trunk (especially in a station wagon).
- Pistons with grooves are installed, which eliminates damage to the valves.
- Small price.
- Cheap CASCO.
- Availability of air conditioning.
Flaws:
- Sometimes the engine speed fluctuates.
- Minor vibrations are felt.
- At speeds above 100 km/h, you need to hold the steering wheel harder.
- There is a slight hum in the gearbox.
- Rear visibility is not very good.
- Music only works when the ignition is on.
- Sound insulation is far from ideal.
- Hard and inexpensive plastic.
- The light from the dashboard is too bright.
- Crickets appear almost immediately after purchase.
- There is no steering wheel height adjustment in budget trim levels.
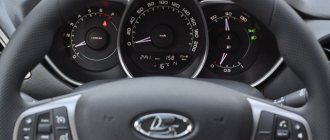
Instrument panel features
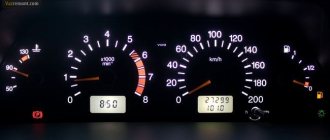
The dashboard of the Lada Vesta contains measuring and control components:
- Fuel level sensor.
- Tachometer.
- Motor heating indicator.
- Speedometer.
The area directly above the steering wheel was selected for their placement.
The main device is the speedometer (from 0 to 200 km/h). Lada Vesta SV Cross vehicles do not accelerate to the maximum value. The engine type does not affect the speed limit. The following indicators and sensors are concentrated directly on the speedometer, which signal certain processes:
- The luggage compartment is not closed.
- Open hood.
- Open door designs.
- Climate control system.
- Turn sensors.
- Speed limiters.
- Emergency alarm.
- Turn indicator.
The on-board computer monitor on the Lada Vesta dashboard is concentrated under the speed scale. The following data is displayed on the screen:
- Total mileage and mileage per trip.
- Viewing time and the time the driver is on the road.
- Medium speed.
- Fuel costs.
- Checkpoint performance.
- Temperature conditions in the cabin.
- Voltage.
- Features of the climate control system.
On the left side there is a tachometer, the scale of which has 7 units. If the “red section” lights up, this indicates that the engine is producing more than 5,000 rpm.
There are also indicators that signal certain aspects:
- Problems with the motor.
- Power supply performance.
- Brake system failure.
- The functionality of adjusting pedals, seat belts and airbags.
- Climate control adjustment.
- Condition of transmission, electric power steering.
On the right side there is a fuel scale and an engine temperature scale. For additional control, the following indicators are located on the instrument panel:
- Fuel level.
- The functioning of lighting devices, their brightness.
- Immibilizer performance.
This Vesta dashboard has a modern design. The presence of backlight makes the operation process easier.
What malfunctions occur?
For some motorists, the Lada vesta sw cross control panel stops functioning over time and works intermittently. Such problems arise if the following malfunctions appear:
- The contact between the on-board network and the instrument panel is deteriorating. Such problems arise if the contacts or connectors have certain damage.
- Indicators and sensors fail. Inaccurate information is displayed on the dashboard if the fuel level indicator, speed sensor, etc. have failed. This causes the master data to fail.
- The integrity of the shield is compromised due to strong vibration or mechanical stress. The front shield is being replaced. This procedure is performed by masters.
- The included electronic board is faulty. Its functionality is restored by specialists. No backlight indicates that certain bulbs have burned out.
Let's sum it up
Now you know whether the body is galvanized. Only careful care of the LADA Granta car will keep the body presentable for a long time and ensure its trouble-free operation. And the question about the level of efficiency of galvanizing the Granta body will move to the background here.
https://youtube.com/watch?v=cDuXl4n69tg
Anti-corrosion treatment of the Lada Granta is mandatory, like any domestically produced car, despite the excellent performance characteristics of the vehicle: reliability, practicality, and efficiency.
About 30% of the car's parts are made of special alloys, but there are weak points in the Lada. These are the bottom, doors, hollow elements, welding joints. To avoid damage, you need to apply a special coating to such places.
New instrument panel
Recently, AvtoVAZ installed a new instrument panel on the Lada Vesta. What distinctive features does it have?
- The size of the numbers has been increased.
- When designing the scale, orange elements were used.
- The dashboard lighting also works during the day. Therefore, you can enter settings and study the description in the daytime, when the sun is shining brightly. The brightness can also be changed manually.
- The volume level of both warning and information signals has been increased. If the driver decides to leave the vehicle with the key left, he will receive a corresponding signal.
- Some commands received voice guidance. A female voice informs about the activity of the system or the functionality of the new shield.
- Introduction of light indicators that indicate passengers who have not fastened their seat belts. A signaling device has also been introduced, with the help of which the tire pressure level is set.
- Time synchronization is performed automatically. For this purpose, signals from the corresponding satellites are used. To use this function, you must first set the time zone.
- The temperature mode is displayed in steps. This greatly simplifies the process of studying and familiarizing yourself with the data.
The manufacturing company plans to release a trial series in order to test the new dashboard. Initially, vehicles with such shields will be sold abroad. After some time they will begin deliveries to our country.
If drivers purchased a Lada Vesta car earlier, then the problem can be solved in two ways:
- The shield, which is prepared according to the new model, is purchased separately. Estimated cost is about 7,500–8,000 rubles.
- Make adjustments yourself.
The second option is acceptable if the driver has certain experience and the required knowledge.
A test drive is required to evaluate all the benefits of the new shield. Our car enthusiasts will have the opportunity to implement it this year. After all, the new control panel will be delivered soon.
Share “Review of the Lada Vesta instrument panel”
Production Lada cars have analogue instrument panels, but third-party manufacturers are trying to fill this gap.
LADA > Vesta
- As you know, the development of the restyled Vesta is in full swing, and perhaps it will have a standard electronic “tidy”, but for now the Car Modifications Group company has decided to release one, as its specialist spoke about in the video announcement.
The price is expected to be 25 thousand rubles. True, it cannot be said that this is the first manufacturer who has conceived of this; Ferrum is already producing something similar and asking a little more than 30 thousand for it. But this is not a fully electronic instrument panel; it has an analog tachometer and speedometer, and only the on-board computer is digital.
In the case of the product from CMG, social network users rightly note that the plastic cover with three wells does not look very nice, and suggest replacing it with a common “rim.”
In any case, it is good if there is some variety of offers on the market, until AVTOVAZ itself becomes concerned about this problem. However, this cannot but affect the cost of the car.
Firmware for VESTA instrument panel, VestaLargusX-RAY engine
Firmware for VESTA instrument panel, VestaLargusX-RAY engine, post pinned
Firmware for ICE 1.6 Vesta, X-RAY, Largus with M86 block Firmware available from Motor-Master (Dynamic and Super Dynamic) and Chelyaba. Different versions - Euro2/5, with fan turned on at 95-97°, with quick start, normal heating. With preservation of the firmware number and checksum of the drain. Show in full…
Firmware for LADA VESTA dashboards, WITHOUT REMOVING the panel, saving the VIN. For panels with white scales PO - 26, 28, 35, 36
— Software firmware — Activation of cruise control and speed limiter — Disabling the seat belt warning light For panels with orange scales Software — 11, 19, 22, 27, 126, 226, 301, 501 — Software firmware — Display of REAL engine temperature — Activation of cruise control and speed limiter - Disabling the seat belt warning light
Register the VIN number in the tidy For those who independently flashed the tidy with ready-made firmware and did not register the VIN
Mileage adjustment. Reduce the mileage on the dashboard, register the real mileage after an unsuccessful winding and mileage “999999”
Enabling additional functions on LADA VESTA 1. Enabling the cornering lights using PTF for the Luxury package 2. Disabling the automatic activation of the rear wiper for SW and SW Cross 3. Enabling the sound signal when the standard alarm is turned on/off 4. Disable the hill start assist system ( HSA) 5. Follow Me Home (“take me home”) for the Luxury package 6. Turning off the DRL when the turn signal is ON, from the turn signal ON side, for the Luxury package
On the first Lada Vesta cars, the instrument panel was not backlit in the daytime, which made reading the readings in bright light difficult. In addition, after installing cruise control yourself, there will be no corresponding indication on the panel. All these shortcomings can be corrected by updating the dashboard firmware.