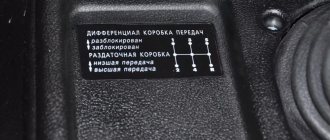
The transfer case is the main source of vibration and noise in the Niva 21214 and the modernized Urbana.
The peculiarity is due not only to the specific design solutions of the unit, but also to the method of attaching the part to the car. Therefore, instead of installing it on the power components of the body, as is customary in the global automotive industry, engineers implemented a method of communication through silent blocks directly on the floor of the car. As a result, the surface quickly crumbles at contact points and “splits” at speeds above 80 km/h.
One way to relieve stress is to install a transfer case subframe on the Niva. At the same time, the owner will notice a decrease in vibration load, an increase in the natural resource and protection of the transmission. Of the minuses: the relative complexity of implementing the idea and reduced ground clearance by 2-3 cm (corrected with a suspension lift).
Manufacturing according to the scheme
Although there is no shortage of offers on the market, you can save money by making your own subframe 2121 according to the drawings.
The manufacturing process will require a cold-rolled steel sheet with a thickness of 4 mm 0.525x0.350 m, angles 35x35, 70x50, 70x70 with a length of 0.7 m, 0.4 and 0.4 m, respectively, as well as a channel 16 0.73 meters, M10, M12x1.25 and M12x1 .5 In the creation process, you will need a cold-rolled steel sheet 4 mm 0.525x0.350 m, corners 35x35, 70x50, 70x70 with a length of 0.7 m, 0.4 and 0.4 m, respectively, as well as a channel 0.73 meters 16. B Bolts M8, M10, M12x1.25 and M12x1.5 are used as fasteners.
Suspension lifting Niva VAZ 2121 21213 21214 2131
We will tell you how to properly perform tuning modifications in this material. Do-it-yourself elevator - drawings, diagrams, sizes, types of kits. Lifting varies in the degree of intervention in the standard structure. For some, it is enough to raise the SUV by a few centimeters, and for others by as much as 20.
Extreme tuning – maximizing cross-country ability for traveling on severe off-road conditions.
It is advisable to perform such work with a partner. First of all, it's safer. Secondly, some lifting work is performed with four hands. Let's take the front suspension as an example.
Raise the front end. You can safely cling to the standard bumper, only the jack is installed under the pipe securing it. By removing the wheel, we get full access to the lever and spring. The front suspension 21214 is made using a double wishbone design, which simplifies the task.
The lever travel is limited by the shock absorber. Unscrew its fastening and move it to the side. Next you need to free the suspension from the anti-roll bar. The mounting bolts may become stuck due to corrosion, so we will use a penetrating liquid (such as WD-40). The stabilizer silent block clamp can be pryed off with a pry bar.
Standard tool:
• Vernier calipers and ruler with vernier;
An alternative optimization option is allowed using not corners, but a square profile with a section of 60x30 or 40x25.
There are ideas to place the gearbox and gearbox on the same “frame”.
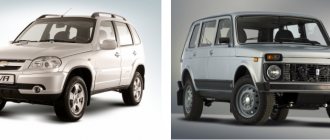
SsangYong Korando II
This is a Korean-made all-wheel drive car. It was produced with two petrol engine options - 2.3 liters and 3.2 liters. There were models with diesel power units of 2.3 liters and 2.9 liters, created under license from Mercedes-Benz.
And the maximum configuration of the SUV includes a six-cylinder petrol engine with a volume of 3.2 liters and a power of 212 hp. s., which works in tandem with an automatic transmission. All other models could have either manual or automatic transmission. Regardless of the configuration, the Korean SUV is more powerful than the Niva.
The second generation SsangYong Korando has several body styles - convertible and station wagon. The car is designed for 5 seats, but if there are fewer passengers, the rear seats are separated by armrests. This car is slightly larger in size than the domestic Niva - 60 cm in length and 9 cm in height. And the wheelbase is 30 cm longer.
The cost of the Niva on the secondary market is much lower than that of a foreign car. SsangYong Korando ll costs from 300 thousand rubles, and a domestic SUV produced in 2009 costs from 200 thousand rubles.
Preparation.
1. After the initial preparation of the elements, finishing operations and connection into a single structure are carried out: 1. Rectangular windows are cut out in the channel according to the diagram, ending no more than 0.8 cm from the edge of the edge. chamfers (chamfers) are removed);
2. Holes measuring 70x50 or 70x70 are drilled in the corners for bolted connections, after which they are fixed by welding.
3. On the lower edge of the channel, corners of 35x35 cm are fixed, to which plates are welded to protect against impacts and dirt. Service holes are drilled in the latter for access to the drain plug and for regular cleaning. 3. On the lower edge of the channel there are corners measuring 35x35 cm, to which plates are welded to protect against impacts and dirt. Service holes are drilled in the latter for access to the drain plug and for regular cleaning.
Body reinforcement 2121
To protect himself from problems, a caring driver uses preventative measures. These, in addition to anti-gravity treatment and other procedures, include strengthening.
All operations related to strengthening and restoration of the car body are very complex, take a lot of effort and time, but give an excellent result.
When it comes to upgrading the body, strengthening the side members comes first. It is often carried out using a steel sheet up to 3-4 mm thick. At the same time, the suspension fasteners are strengthened.
Design modification.
To strengthen the rack stand and reduce the profile height (up to 2 times), you can additionally equip the side shelves of the channel with 4 corners at the level of the hole for the dispenser, after which the side walls can be cut to the corner of the shelf.
Tuning is ensured by connecting the spar and subframe through hinges / silent blocks.
Assembly options
The first step is to measure the distance for the parts. Using the subframe drawings, we assemble the structural parts according to the measurements obtained.
Here are three build options:
- A simple version of the Niva-Comfort type frame, where you only need 5 main parts and a couple of fasteners for them. It is assembled from five square-shaped channel pieces with an additional reinforcement strip. The ends of the four parts are bent into the frame and holes are drilled into them for bolted connections. The frame parts can be welded or bolted together. A more complex design consists of almost a dozen parts and is assembled according to three drawings.
- In this homemade version, one wide channel is used as a basis, in which there will be a hole exactly for the transfer case. On the sides of the channel there are large corners, and at the ends there are shelves made from smaller corners. All parts are connected exclusively by bolted connections. This design protects the bottom of the machine well, but is more labor-intensive for manual production. The great advantage of this particular option is the installation of engine crankcase protection, which can be connected to the subframe; in addition, the protection of all parts around is improved.
Read more: Braun or bosch blender
https://www.youtube.com/watch?v=-vFwRL5BBCA
Installation
To facilitate installation, the machine is secured to a lift or pit. Surfaces (attachment points, subframe) are pre-treated with protective agents such as Movil.
The finished product is tested on site individually for each vehicle. 4 symmetrical holes are drilled around the perimeter of the structure relative to the center line. Having previously loosened the transfer case fasteners.
Placing the plates on the interior side, as in the photo, the subframe is attached to the side members with M12x1.25 bolts.
The RK brackets are sequentially removed, turned over and freely fixed on the subframe. The position of the shaft flanges is adapted to the formation of minimal backlash due to the movement of the entire structure. Centering is performed at 3000 rpm with the machine standing.
The bolts are fully tightened.
Full technical specifications of the Chevrolet Niva - summary table
| Parameter | Chevrolet Niva 1.7 80 hp |
| Engine | |
| Engine code | 2123 |
| engine's type | petrol |
| Injection type | distributed |
| Supercharging | No |
| Number of cylinders | 4 |
| Cylinder arrangement | in-line |
| Number of valves per cylinder | 2 |
| Volume, cubic cm. | 1690 |
| Power, hp (at rpm) | 80 (5000) |
| Torque, N*m (at rpm) | 127.5 (4000) |
| Transmission | |
| Drive unit | full |
| Transmission | 5 manual transmission |
| Suspension | |
| Front suspension type | independent multi-link |
| Rear suspension type | dependent |
| Brake system | |
| Front brakes | disk |
| Rear brakes | drums |
| Steering | |
| Amplifier type | hydraulic |
| Tires | |
| Tire size | 205/75 R15 / 205/70 R15 / 215/65 R16 |
| Disk size | 6.0Jx15 / 6.0Jx15 / 6.5Jx16 |
| Fuel | |
| Fuel type | AI-95 |
| Environmental class | Euro-5 (Euro-4*) |
| Tank volume, l | 58 |
| Fuel consumption | |
| Urban cycle, l/100 km | 13.2 (14.1) |
| Extra-urban cycle, l/100 km | 8.4 (8.8) |
| Combined cycle, l/100 km | 10.2 (10.8) |
| dimensions | |
| Number of seats | 5 |
| Number of doors | 4 |
| Length, mm | 4048 |
| Width, mm | 1770 |
| Height, mm | 1652 |
| Wheelbase, mm | 2450 |
| Front wheel track, mm | 1466 |
| Rear wheel track, mm | 1456 |
| Front overhang, mm | 721 |
| Rear overhang, mm | 748 |
| Trunk volume (min/max), l | 320/650 |
| Ground clearance (clearance), mm | 200 |
| Geometric parameters | |
| Entry angle, degrees | 37 |
| Departure angle, degrees | 35 |
| Weight | |
| Curb (min/max), kg | 1410 |
| Full, kg | 1860 |
| Maximum trailer weight (equipped with brakes), kg | 1200 |
| Maximum trailer weight (not equipped with brakes), kg | 600 |
| Dynamic characteristics | |
| Maximum speed, km/h | 140 |
| Acceleration time to 100 km/h, s | 19.0 |
Also interesting: How does the transfer case work on a Chevrolet Niva || Chevrolet Niva transfer case switch * – engine data before modernization in 2022 is indicated in brackets.
| Parameter | Chevrolet Niva 1.7 80 hp | Chevrolet Niva 1.8 122 hp |
| Engine | ||
| Engine code | 2123 | Z18XE |
| engine's type | petrol | |
| Injection type | distributed | |
| Supercharging | No | |
| Number of cylinders | 4 | |
| Cylinder arrangement | in-line | |
| Number of valves per cylinder | 2 | 4 |
| Volume, cubic cm. | 1690 | 1797 |
| Power, hp (at rpm) | 80 (5000) | 122 (5600) |
| Torque, N*m (at rpm) | 128 (4000) | 167 (3800) |
| Transmission | ||
| Drive unit | full | |
| Transmission | 5 manual transmission | |
| Suspension | ||
| Front suspension type | independent multi-link | |
| Rear suspension type | dependent | |
| Brake system | ||
| Front brakes | disk | |
| Rear brakes | drums | |
| Steering | ||
| Amplifier type | hydraulic | |
| Tires | ||
| Tire size | 205/70 R15 | |
| Disk size | 6.0Jx15 | |
| Fuel | ||
| Fuel type | AI-92 | |
| Environmental class | n/a | |
| Tank volume, l | 58 | |
| Fuel consumption | ||
| Urban cycle, l/100 km | 14.2 | 12.8 |
| Extra-urban cycle, l/100 km | 8.9 | 8.5 |
| Combined cycle, l/100 km | 10.9 | 10.1 |
| dimensions | ||
| Number of seats | 5 | |
| Number of doors | 4 | |
| Length, mm | 4048 | |
| Width, mm | 1770 | |
| Height, mm | 1652 | |
| Wheelbase, mm | 2450 | |
| Front wheel track, mm | 1450 | |
| Rear wheel track, mm | 1440 | |
| Trunk volume (min/max), l | 320/650 | |
| Ground clearance (clearance), mm | 200 | |
| Weight | ||
| Curb (min/max), kg | 1400 | 1520 |
| Full, kg | 1850 | 1870 |
| Maximum trailer weight (equipped with brakes), kg | n/a | n/a |
| Maximum trailer weight (not equipped with brakes), kg | n/a | n/a |
| Dynamic characteristics | ||
| Maximum speed, km/h | 140 | 165 |
| Acceleration time to 100 km/h, s | 19.0 | 12.0 |
Installation of subframe step by step video
Video 2 off-road rides
Despite all its popularity, the most popular Russian SUV, the Niva, has a number of disadvantages. The main problem of the car is the increase in the level of vibration in the car interior and it increases significantly with the increase in the life of the car. Experts believe that the reason for this effect is an ill-conceived design solution to the transfer case problem. The fact is that the unit is attached directly to the bottom of the car using silent blocks, and the increased vibration that occurs during its operation is transmitted directly to the cabin. Most owners of the Niva car, struggling with this problem, install a special metal device under the “wiring”, which takes on all the negative impacts. This device is called a stretcher.
Do-it-yourself frame for a cornfield (drawings)
Dimensions of openings and clearances of mating parts of the car body of the VAZ-2121 model
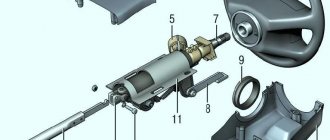
Engine and suspension mounting points on the body of a VAZ-2121 model car
Mounting points for the engine and suspensions on the body 21214 and 2131
1 – fastening of the front suspension cross member; 2 – mounting of the anti-roll bar; 3 – fastening the rear suspension of the power unit; 4 – transfer case fastening; 5 – fastening of the lower longitudinal rods; 6 – fastening of the upper longitudinal rods; 7 – attachment point for the rear suspension transverse rod. ( )* – size given for body 2131
Engine and suspension mounting points on the body 21214M, 2131M
7 – fastening of rear shock absorbers; 8 – attachment point for the rear suspension transverse rod. ( )* – size given for body 2131M
Design and purpose
This device is a metal structure consisting of a channel, an angle and a steel sheet with a bolted connection of all components. The subframe is attached to the side members on the underbody of the car using mounting plates using elastic supports. The device compensates for the force transmitted from the transfer case to the body, reducing noise, resonance and vibrations inside the vehicle. The design minimizes angular vibrations in the longitudinal-vertical plane by shifting the trajectory of the output pulses, which significantly reduces the load on the floor surface.
Counter frame consisting of a channel and an angle, without a protective plate
The subframe for “distributing” the Niva car, in addition to increasing the load-carrying capacity of the body, has a number of other advantages:
- increase the strength (solidity) of the frame;
- creating additional support points for the node;
- reduction of noise and vibration levels to minimum values;
- protection of the transfer case from mechanical damage;
- additional reinforcement of side members;
- uniform distribution of load on the floor;
- the ability to adjust the displacement of the axis between the transfer case and the gearbox.
This design, along with all its advantages, also has disadvantages, namely a slight reduction in the ground clearance (free space) of the car and a rather labor-intensive manufacturing process.
field improvements | Topic author: Stina
https://www.kknoka.ru/index.php? /topic/2954-postroika-.. Petr (Gonda) gentlemen, you’ll probably tell me now that I’m wrong and all that….
but, I had a Niva and I tried to make it... so no matter how much you make a Niva, it’s shit)) well, it’s not designed for off-road tuning. It’s not reliable, the engine is dead, there’s no frame, etc., in short, my opinion is that if you want a cool jeep, take the UAZ! this is a PPC tank... I now have a 469 rear self-block (it’s a self-block, and not like a limited slip differential is sold on a field) 35 wheels and a winch... I’ve driven it somewhere, I wouldn’t have driven it in a field... like that)
Sergey (Munanire) Peter, but in our fields we won’t have to go far for the tractor!!
Sergey (Munanire) that’s the joke, so as not to easily get through the swamp or mud, but to try to get through
Petr (Gonda) Sergey, well, yes))) plus)))
Alexander (Cloone) Guys, let's not compare UAZ and NIVU, the cars are completely different. Each has its own pros and cons. The same thing as comparing the BTR 80 and T-90. It's more a matter of taste and preference.
Sergey (Munanire) that's for sure. and anyway, the topic was created about the development of the Niva and not about comparing it with other cars
Petr (Gonda) VV didn’t quite understand me, gentlemen) my point is that if you want to make a serious SUV, you shouldn’t make it from a field, that’s all
Siegfried (Toma) Peter, depending on how you look at it... look at what remains of the UAZ in the cutlet based on the UAZ... the body? a serious SUV is always a prototype, and a cutlet is a cutlet, a collection of spare parts from all SUVs on a frame covered with body parts. It doesn’t matter what the body is made of.
Petr (Gonda) Siegfried, well, the cutlet is already expensive)
Siegfried (Toma) Peter, it’s not expensive... you just have to want to go to Arkatovo... come to us on the 1st in Arkatovo at 11:00... there will be a batch
Siegfried (Toma) fucking keyboard
Petr (Gonda) Siegfried, come tomorrow there’s a rally of jeepers near the village of Kulitskaya, it seems interesting
Petr (Gonda) I’m having troubles with the docks (everyone feeds me breakfast
Siegfried (Toma) Peter, on Saturday or Sunday? I have a day off on Sunday and work on Saturday.
Variety of design solutions
There are several design options for this group of vehicles, from fully welded subframes to multi-bolt attachments. There are designs of one-piece monolithic supports for “distributing” and changing; you can buy ready-made devices like “Niva Comfort”. One of the simplest and most reliable auxiliary frames is considered to be a device consisting of a durable channel, an angle and a protective steel plate. Let us consider the technology for self-manufacturing and installation of this device in more detail.
Types of subframes for the transfer case of the Niva car
Shaking problem
Many drivers who have a VAZ 2121 Niva at their disposal have encountered the fact that the cabin vibrates strongly while driving, especially off-road or at high speed. Vibrations that spread almost throughout the entire cabin cause a lot of inconvenience and constant discomfort. Technically, this was not corrected, so the people’s minds had to independently find a way out of the current situation. And the solution turned out to be quite simple - the transfer case needs a structure that will absorb vibrations. Installing a subframe solves this problem.
The ready-made protective metal frame Niva Comfort is suitable for models 2121, 21213, 21214. The main purpose of the protective part is to eliminate all vibration from the transfer case. But the benefits of installing a subframe on a field turn out to be much greater:
After installing the transfer case subframe, the ground clearance will slightly decrease, but the car will be much more comfortable to drive.
Manufacturing and installation technology
To make your own subframe for the transfer case of a Niva car, you will need a certain set of tools and materials. The ideal option would be to perform the work on a milling machine, but in its absence we will have to show all our natural ingenuity and show a lot of patience.
Tools and materials
In addition to the mandatory hand and face protection (strong gloves, goggles or mask), you will need a set of tools:
- large and small angle grinder (grinder);
- powerful electric drill;
- corner ruler;
- sensors;
- central punch;
- hammer.
For the technology of self-production of “distribution” stretchers, the following materials are required:
- sheet steel 4 mm - 525x350 mm;
- corner 35x35 mm - 700 mm;
- corner 70x50 mm - 400 mm;
- corner 70x70 mm - 400 mm;
- channel No. 16 - 730 mm;
- M8 bolt - 10 pcs.
- M10 bolt - 4 pcs.
- bolt M12x1.5 - 4 pcs.
- bolt M12x1.25 - 4 pcs.
Having prepared all the necessary equipment for work, it is necessary to carefully study the drawings of the main elements of the subframe in order to avoid possible design errors, as well as to eliminate unnecessary waste of material.
Drawings for making a subframe for the transfer case of the Niva car
How to make it yourself
Based on the subframe drawings, we make blanks for structural elements that will undergo further processing: we cut out the channel, angle and protective plate of the required dimensions.
- We work on the main edge of the channel, from which all sizes “push off” from each other. Using a grinder, we cut through the windows, making cuts with a large angle grinder in the longitudinal direction and a small one in the transverse direction. The cuts should end 8 mm from the edge of the upper flange of the part, since this distance is equal to the thickness of the side wall at the junction of the elements. Having cut out the windows, we begin to design the contour of the side walls, making sure to remove the chamfers. We make holes for the bolts according to the drawing of the part.
Fully processed channel
Example of a corner assembly for attaching a subframe to a side member
Example of fastening the cover
Ways to strengthen the structure
Operating a Niva car in extreme conditions requires strengthening the structural strength of the subframe on the transfer case. There are several ways to solve this problem:
- Change the profile of the side parts of the channel, making it lower.
- Installation of additional corners welded to the side shelves. The resulting frame inside the channel will allow you to cut out the part, reducing the height of the subframe and increasing its resistance.
- Reinforcement of the protective plate with angles that are installed on the front of the subframe and transmission support bracket.
Ways to strengthen the subframe structure
Installation of a finished subframe
All activities related to the installation of a stretcher on a Niva car must be carried out by installing the car on an inspection pit or on an elevator. After self-assembly of structural elements, the finished part must be treated with a primer or anti-corrosion paint. After waiting for the coating to dry completely, you can begin installing the device.
- We check the structure on site, mark the attachment points on the side members and drill through holes (two on each side).
- Loosen the standard “pantry” fastening, secure the subframe with four M12x1.25 bolts, insert the reinforcing plates from the interior and tighten the nuts until they stop.
- Disassemble the transfer case suspension on one side, turn it over, install it on the subframe and secure it with a bolt, slightly tightening the nut. We do the same with the second frame.
- We center the transfer case by moving it to find a position in which the shaft flanges will be at the same level, parallel to the bottom of the housing and with minimal play. During the adjustment process, we use the previously removed gaskets for the unit mounting brackets.
- Fully tighten the nuts on the tilt box suspension mounting bolts.
To fully understand the technology of manufacturing and installing a subframe on the transfer case of a Niva car, we suggest watching a video review of the stages of work.
Video about the basic principles of manufacturing and installation of the structure
curious678 › Blog › Niva tuning #4. Niva on a frame, Luaz, Volga, humpbacked Cossacks, etc.
Good day.
I continue to talk about interesting converted cars.
Niva convertible on a GAZ 69 frame.
In previous entries I looked exclusively at the Niva modifications, but besides them there are other interesting car projects.
Mini-Gelandewagen from LuAZ-969M “Volyn”. Initially, the idea was to make a small, comfortable all-terrain vehicle for trips into nature. The master himself says that in the process of creating this machine he came up with a whole vinaigrette of spare parts from other machines.
List of spare parts that were used in the Mini-Gelandewagen.
The front of a Mercedes-Benz G-Class.
Engine from VAZ 2108.
Transfer case from gas 69.
Steering rack from Toyota.
There is a removable roof from Peugeot.
The car can reach speeds of up to 130 km, and has all-wheel drive.
Another idea of the master, LuAZ-969M four-seater pickup truck.
The master’s special pride is the two-faced Volynets on three axles (6x6), aka LuAZ-967M, aka TPK - transporter. This floating car has a Loise front and rear. One copy of this Valynka left the USA and another was ordered by a lover of rare cars from Belgium.
There are also Volgas in the fleet, one of them is a Volga pickup truck on a frame. According to the inventor, such a machine easily replaces a bulldozer.
There is also a limousine based on 31 Volga, the car is six meters long. The interior is lined with white leather, inside there are two sofas facing each other, the car is designed for 8 seats.
Convertible based on 21 Volga.
All-wheel drive Volga station wagon.
From the previous parts one could understand the master’s passion for unusual trailers. Here is another unique trailer made from two rear parts of humpbacked Cossacks, it turned out very cool.
Convertible based on the humpbacked Cossack.
There is also a convertible based on the Moskvich 401, the author gave this car to his daughter.
Experiment with Gas 69.
Very interesting car conversions, simply unique examples of cars, I personally am delighted with such projects. Unfortunately, there is very little information and photographs; you literally have to collect it bit by bit from different sources, which is why not all cars can be given a normal description. Now we are already in the process of writing part 5, believe me, there is also something to see there.
If you liked the post, please repost, the cars are interesting, I think many will not refuse to look at them.
Links to previous posts with the works of this master.
Links to other entries from the Niva tuning and modification series.
Niva tuning #8. Frame Niva 2129 with dual wheels. www.drive2.ru/b/2964249/
Niva tuning #9. Niva Bylina and Volga Prestige. www.drive2.ru/b/2974620/
Niva modifications #2. Niva 21214 Elbrus Edition and the Savages expedition. www.drive2.ru/b/2939609/
Niva modifications #3. Niva Bronto Lynx 1, Niva Bronto Lynx 2 and Niva Bronto Lynx 3. Characteristics, prices and cost of conversion. www.drive2.ru/b/3116592/
Thank you for your time, good luck on the road.
Source
Features of driving a car with a subframe on the transfer case
Many years of experience in accident-free operation of a vehicle suggests that even such a reliable and durable device does not guarantee absolute protection of components and assemblies when driving off-road. When driving a Niva in extreme conditions, remember that installing a subframe reduces the height from the ground or car by at least 20-30 mm.
Stop crossing the line and speeding tickets won't bother you anymore!
You should not relax and completely rely on the protective properties of the structure: be careful when overcoming obstacles, try to avoid accidental “encounters” with large stones, stumps sticking out of the ground or cuts in pipes. Take care of your car, your health, your nerves and your wallet!
The unpretentious and reliable Niva car is specially designed for use in Russia, a country of endless open spaces and widespread off-road conditions. Experts have long come to the conclusion that a subframe on the “wiring” makes the car more comfortable and safer. Now we can install this structure by making it ourselves.
DIY buggy from NIVA
I really wanted to make a buggy with my own hands from the fields with all-wheel drive and, as planned, it should be lighter than the standard one and have a completely independent suspension. There are several strollers that use both Niva front suspensions as suspensions. I consider it half, since the entire front suspension assembly weighs up to 130 kg. Weighing the fist - 2.4 kg, field - 6! The only thing that needs to be done is to preserve the location of the units from the donor - the most standard spare parts.
Everything else is my imagination at someone else’s expense, the main purpose of the car is fishing and a trip to the forest. UAZ tires, Cordiant Off Road on overcooked Niva wheels. 1.7 engine, 4-speed gearbox, driveshafts, speed - everything is standard.
After agreeing on the general concept of the machine with the customer, I had to make several sketches on paper and transfer everything to the computer. I work in AutoCAD and use a very modern paper pen:
Since there was no welding table, I had to make a base from what I had at hand - a rotary table and two channels, which were brought into the plane and allowed me to make a flat frame. The difference in the suspension mounting points (when measuring diagonals) is 2-3 mm, although in reality there was no need to worry.
So, the base is ready. Now you need to prepare the main arches and pipes for the suspension:
I prepared this car in the workshop of a family restorer, so I had to re-stretch the frame several times and re-align everything. With constant measurements of all dimensions, the roof moved to the right by 5 mm, but this is nonsense:
I decided to lengthen the suspension arms as much as possible to increase wheel travel. To do this, it was necessary to reduce the distance between the pipes on which the levers are attached and increase the track to 1550 mm. CV joints had to be made to order. To prevent the suspension mounting points from moving away, I made the lever mounting brackets so that they simultaneously act as conductors for fastening the frame pipes:
The tunnel was made with the units installed, but we had to think about how to position the pipes correctly so that they would not interfere with unscrewing the nuts. All blocks are easily removed. The total weight of the frame was 156 kg, cooked from a tube, which was a lot. What does not belong to the power frame could be welded from a pipe of a smaller cross-section, so after welding I sat down and realized how much weight the frame could lose - it gained 51 kg:
The gas tank is classic. This will allow you to create a dashboard entirely from VAZ devices:
The body kit is made of sheet metal, extremely simple:
Correct the revs on the D-pad - just like our glitchy drivers do on 4WD buggies. Since nivovods have an incorrect understanding of physics and are locked into a standard body, they quite often break the body. If you make a metal case, as described here, the gearbox can easily withstand 400 forces!
When using parts cut on a CNC plasma cutting machine, a milling machine is not required. Such a hole punch can be made quite inexpensively and of any configuration. This is a rear hammer drill, the base is a piece of DN100 water pipe and plates from under the plasma torch:
Using two shock absorbers at different distances from the pivot point of the arm itself results in different piston forces, different movements, and slightly different shock absorber characteristics. It turns out that the characteristics of one shock absorber are slightly shifted compared to the other:
Front swivel welding helmet:
Rear suspension group:
Toe-in can be done on your knees. All you need is some rope and a rubber band from the cart - pull the rope:
As always, R. Kolesnikov (former Gazprom team pilot) says: “If an all-wheel drive stroller rolls easily by hand, it means the wheel alignment angles are correct. We managed to get it within the right limits, and even taking into account the fact that the camber is done on the knees, the frame rolls quite easily. All that remains is to make the body kit, connect the electrical system and get to work.
Master: Andrey “Nitro” Anikin
Especially for jeepbuilding! www.izikastom.info www.ska-buggy.ru + 7-926-181-56-08 Skype - Nitro_LAB ICQ - 422-527-340
ATTENTION! I'm on this site, you can ask your questions directly in the comments to this article.
see also
Comments 22
Hello! How heavy is the frame and what kind of metal?
I haven’t weighed it, I don’t know, I’ll have to weigh the whole field and how much it turned out would be interesting for myself. Profile 60x80x3mm
Very nice, a lot of work has been done. For myself, I will make it on an I-beam profile, for torsion and bending - higher, weight less. Thanks for the work you've done!
How will you weld, and before assembling it on the I-beam?
Do you have drawings and dimensions? The machine is simply rotten, I want to restore it, but just on the frame.
And yesterday I saw it live, already in more or less assembled form. It turns out to be a normal device.
Of course, you're great, the work has been done tremendously, but the profile seemed a bit thin to me, I made one frame from the corners, made it 50*50*5, and made the other from 75*75*6, look at vk.com/ >
HZ, maybe so, while everything is frozen, testing is far away. And if you think about it logically, what motivates the frame from the profile. We made the original spars from 2mm steel from 3mm plus a floor and all the iron is 1.2mm, everything is like in a stock car, only with an additional reserve, since there is enough stock reserve (after all, the engineers were sitting there calculating) the front spars break only due to metal fatigue or service life (they rot) plus we’ll also make a safety frame from pipes, this will also add additional rigidity, I think the rest of the increase (thickening the body elements will only make the structure heavier, it won’t do anything else, plus don’t forget about safety on public roads if you have an accident spar from a 6mm corner, then you will be able to survive, the effect of a hammer hitting an anvil. Good luck.
If I’m not mistaken, the lounges on the field are made of two sheets of 1.5 mm steel for a stock car, and if there are 33 wheels + a winch, then you need something powerful, and as for the accident, if it hits the wall, it’s no good, but if it hits the front, then the chances are greater when the frame is not It’s in vain to make a safety cage or a life capsule in F1. And as for the weight, I don’t really care; Land’s total is 4.5 tons and it drives.
You are mistaken. In the front ones there is a reinforcement for attaching the beam + additional thickness. And as for an accident, the side members are made in such a way that in the event of an accident they fold up to dampen the load. Read the design of the car and you will understand everything
the frame around the passenger safety zone is not crushable, outside the passenger seats there are crushable elements that absorb shock like springs
Of course, you're great, the work has been done tremendously, but the profile seemed a bit thin to me, I made one frame from the corners, made it 50*50*5, and made the other from 75*75*6, look at vk.com/ >
tell her the story maybe
Of course, you're great, the work has been done tremendously, but the profile seemed a bit thin to me, I made one frame from the corners, made it 50*50*5, and made the other from 75*75*6, look at vk.com/ >
Cool, but is there an end result?)
Guys, please give me the dimensions of your frame, if it’s not difficult, I’m very interested, I want to remake mine and if possible, about the frame field from 469
There are no dimensions, we need to measure the climb, the floor was already partially welded. We did this: we measured the old spars and made the frame exactly according to them. The profile is 80x60x3, two pieces of 3 m each. they made cuts and bent and welded, then at the ends they further strengthened the place of welding; the main thing is that there should be no transverse seams on the frame. In the photos the frame is without reinforcement, this was done later. Later I will post how the steering was made.
Listen, have you assembled the car? Maybe the dimensions can be removed somehow? did you cut off the old spars?
Reg.: 12/08/2004 Messages: 2238 From: Nizhny Novgorod Age: 51 Car: UAZ Patriot 2013 diesel 51432
Reg.: 12/09/2004 Threads / Messages: 3 / 2810 From: Kamensk-Uralsky Age: 43 Car: 212180 1.7 carb
In real life, they don’t make a frame for a Niva, but simply put a Niva body on a frame, and you won’t understand why the chassis is at all, and, most importantly, it’s no longer a Niva. Usually the bottom is reinforced, a structure of square pipes is welded into the sills and into the sills.
Reg.: 12/08/2004 Messages: 2238 From: Nizhny Novgorod Age: 51 Car: UAZ Patriot 2013 diesel 51432
Reg.: 12/09/2004 Threads / Messages: 3 / 2810 From: Kamensk-Uralsky Age: 43 Car: 212180 1.7 carb
Does the handicap fly by? The garage can be remodeled. It cannot be an obstacle to achieving your dreams. Coo-coo-ru-zer, coo-coo-ru-zer, 70! On offroad it RULES!
Rules for using a homemade trunk
Even if you rarely transport cargo in a homemade trunk, you need to periodically check its condition and the integrity of the fastening. It is imperative to do this immediately before traveling, especially over long distances. And also follow the following recommendations:
- secure the protective edging so that it does not come into contact with any of the doors;
- do not transport cargo in the trunk during the first 24 hours after installation;
- make sure that the metal brackets are not deformed;
- distribute the load evenly so that it is close to the edges;
- secure the load fairly securely;
- adhere to the maximum permissible load capacity;
- do not exceed the speed of 130 km/m;
- Do not make sudden accelerations, lane changes or braking with a loaded trunk, because in this case the center of gravity shifts and the car may behave unpredictably.
Making and installing a roof rack on a Chevrolet Niva or Lada 2121 4×4 Niva is not difficult. As a last resort, you can purchase one of the many design models in specialized stores. In any case, such a detail will greatly simplify the transportation of goods when traveling out of town, hunting or fishing.
When traveling by car, many people probably face the problem of the small capacity of the trunk and interior of their car. We can solve the problem by installing a luggage compartment on the roof of the car, or by attaching a trailer. At this stage of development of automobile technology, various modifications of both trailers and roof racks are possible, which are sold in automobile markets and stores. In this article I want to tell you how you can make a roof rack with your own hands, which will provide a higher load capacity and evenly distribute the load on the roof of my car.
A luggage compartment made by yourself on the roof of a car will always be very useful for transporting things over long distances and at the same time there will be more free space in the cabin for other luggage
It is worth taking into account that a ready-made box will cost more than one made by yourself
Nowadays, luggage compartments are made of aluminum and its alloys. The advantage of manufacturing from aluminum is that this metal has low weight and great strength, which are fundamental factors in the manufacture of boxes.
For example, let’s consider the option of making your own trunk for the Niva, popular in the post-Soviet space, or the no less popular UAZ. To do this, you can use a thin-walled aluminum profile pipe. However, you can choose the material from which the luggage box will be made, which is an advantage over the finished product.
Replacing side members
The cost of the spar is about 3,000 rubles, so replacement will not hit your pocket hard, but it is quite labor-intensive. It is advisable to buy a complete set - front spar and mudguard. Additionally, you can buy fasteners for the ball joint, since often unscrewing the old one is a waste of time - the fasteners may be in poor condition.
The replacement procedure requires the following tools:
- Bulgarian
- Welding machine
- Chisel
- Regular and impact screwdriver
Steps to replace the spar
The replacement begins with dismantling the door using an impact screwdriver. Remove the mats and heat and sound insulation in the place where you are going to cook, especially attention should be paid to the place where the engine mudguard is attached to the engine shield. Removing the fender. The front part of the car and the front axle beam are fixed with stands with adjustment. The front wheel hub is fixed. small stand. The spring is dismantled and the three bolts of the ball joint (upper) are unscrewed. Dismantling the upper arm. Removing the bolts connecting the bridge beam and the spar. Dismantling the brace securing the beam. Dismantling the spar and mudguard. First, cut off the mudguard, moving away from the welds.
The spar is then divided into two parts. It is sawed immediately with a beam and separated from the body. The attachment point is cleaned. A replacement part is installed - a new spar. The two bolts from the new side member are screwed in and welding begins at the bottom where the part is attached to the front floor side member. The mudguard is welded to the engine shield