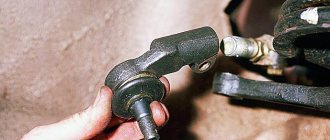
The cylinder head is a cover designed to enclose the cylinder block. It is also indispensable for some other functions that are no less important in the operation of the car’s power plant.
While the engine is running, a gas-air mixture is supplied to the head itself, and thanks to the exhaust manifold, exhaust gases are removed.
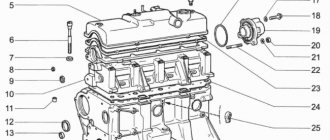
VAZ-2114 engine structure diagram
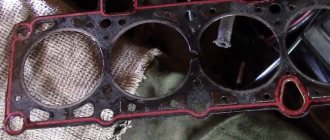
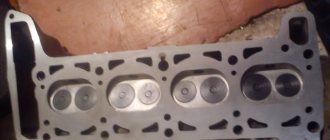
Cylinder head gasket close up (engine removed)
In order to understand the process and principle of replacing engine gaskets, you need to know the structure and sequence of parts in the main power unit.
So, let's look at the design of the VAZ-2114 engine:
Engine diagram and structure
| № | Detail number | Part name |
| 1 | 2108-1003298 | screw |
| 2 | 2108-1003278-01 | Washer |
| 3 | 2108-1003277-01 | Sleeve |
| 3 | 2108-1003277-02 | Sleeve |
| 4 | 2108-1003274 | Cover pin |
| 5 | 2111-1003260 | Cylinder head cover |
| 6 | 2108-1003271 | Bolt M12x1.25x135 |
| 7 | 2108-1003265 | Washer |
| 8 | 14328201 | Plug 10 cup |
| 9 | 14329101 | Plug 30 cup |
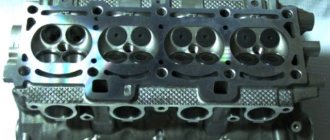
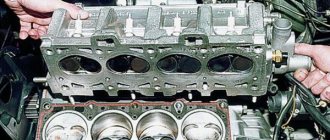
| 10 | 1118-1003011 | Cylinder head |
| 11 | 2101-1002042 | Sleeve |
| 12 | 14329201 | Plug 36 cup |
| 13 | 10158601 | Plug 16 spherical |
| 14 | 11183-1002011-10 | Cylinder block |
| 15 | 14234330 | Bolt M10x1.25x65 |
| 16 | 2108-1003284-10 | Ring sealing |
| 17 | 2111-1003284 | Ring sealing |
| 18 | 2111-1003286 | Bolt |
| 19 | 2111-1003288-10 | Stub |
| 20 | 10725911 | Nut M6 low |
| 21 | 11197773 | Conical spring washer 6 |
| 22 | 13541221 | Hairpin M6x22 |
| 23 | 2108-1003270-10 | Cover gasket |
| 23 | 2108-1003270-11 | Cylinder head cover gasket |
| 24 | 21083-1003020-10 | Head gasket |
| 24 | 21083-1003020-11 | Head gasket |
| 25 | 2112-3855020 | Knock sensor |
| 25 | 2112-3855020-01 | Knock sensor |
| 25 | 2112-3855020-02 | Knock sensor |
| 25 | 2112-3855020-03 | Knock sensor |
| 26 | 2101-1002040 | Sleeve |
Replacement process
So, when the basic structure of the engine is clear, you can proceed directly to the process of replacing the gasket. But first you need to decide on the tools. So, what do you need to complete the procedure: a torque wrench, a set of open-end and socket wrenches, a set of sockets and a ratchet, bits from a Torx set, screwdrivers, coolant for topping up, a new gasket, rags, containers for draining liquids.
Now that you have everything, you can proceed directly to the replacement procedure:
- We remove the “minus terminal”.
Work order
To pull the cylinder head, we need to get to it, and this is not so easy: We disconnect the pads going to the oil level and coolant temperature control sensor. Then you need to drain the antifreeze from the car. This is done through a plug on the radiator or by removing the lower pipe.
- We remove the camshaft bearing protective housing and also disconnect the timing belt.
- Remove all cables and tubes going to the cylinder head.
After this, the further procedure can be carried out. If you decide to carry out repairs due to a broken gasket, you will need to remove the cylinder head, clean the contact areas from the remnants of the old sealant and install a new gasket.
conclusions
Replacing the head gasket on a VAZ-2114 is quite difficult, since you need to know the design features of this engine, as well as have experience in performing such operations on similar engines.
The choice of gasket should be approached seriously and carefully, since the normal operation of many components depends on its condition. If the process described in the article seems quite complicated and the motorist is not able to carry out the operation on his own, then it is recommended to contact a car service center, where they will help and do everything quickly and efficiently.
Photo and video instructions for those who plan to independently remove and install the cylinder head on a VAZ 2114, 13, 15.
The cylinder head is removed to repair it, to replace the head gasket, and also during major engine overhauls.
Symptoms of a problem
Based on the characteristic signs of loss of gasket characteristics, you can take appropriate measures in time to prevent the situation with your car from worsening. As a result, repair costs will only include the purchase of a new gasket. You can change it yourself without any problems.
Symptoms of a problem
Coolant bubbles in the reservoir or radiator
Bubbles indicate a leak. Since the gasket is responsible for the tightness, it most likely no longer performs this function.
Exhaust gases escape through the gasket
This is a rather drastic situation, but it should not be ruled out. Most often appears on cars where the fastening nut has been overtightened.
Smoke pours out of the exhaust pipe
This indicates that there is coolant in the cylinders. Do not exclude the possibility of its penetration through the gasket, but check it better
A foam-like emulsion is visible on the oil level dipstick
The reason is a leak in the cooling system. It occurs both due to the failure of the rubber, that is, the gasket, and as a result of the formation of cracks in the cylinder block. The second option is less possible
Engine power drops, fuel consumption increases
This symptom appears with various types of malfunctions, but as an option, the gasket should definitely be checked for the formation of a hole
Traces of oil in the coolant
Doesn’t necessarily indicate problems with the gasket, but it’s worth checking and making sure otherwise
Useful rules
Before proceeding directly to the gasket replacement procedure itself, we recommend that you familiarize yourself with several important rules. They will help you replace the gasket as correctly as possible and avoid repeated repairs in the next few seasons. Everything depends on many factors.
- Thoroughly degrease the area of the block where the new gasket will be placed and remove all remnants of the old rubber.
- Clean all threaded holes from oil and traces of dirt.
- Use a whetstone to remove existing unevenness on the contacting surfaces. If the defects are more serious, then the surfaces of the cylinder head will need to be ground.
- Carefully center the new rubber according to the guides. Otherwise, the gasket will not be able to effectively perform its tasks and will soon require repeated intervention.
- When replacing the gasket, it is recommended to replace the used connecting bolts with new ones.
- A washer must be installed under each bolt.
Withdrawal procedure
- We prepare the car for work and disconnect the wire terminal from the negative terminal of the battery
- Drain the coolant from the engine
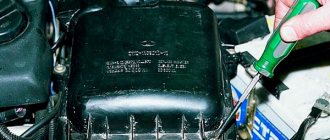
- Removing the air filter
- Remove the intake manifold and exhaust manifold from the engine. If necessary, the cylinder head can be removed complete with parts of the power system and exhaust manifold.
- Removing the cylinder head cover
- On engines with phased fuel injection, disconnect the wire block from the camshaft position sensor
- We disconnect the wire tips from the coolant temperature sensor. For ease of operation, we disconnect the wiring harness block from the knock sensor and move the sensor wire harness to the side.
- Disconnect the wire tip from the coolant temperature gauge sensor
Using a 13 mm socket wrench, unscrew the nut securing the “mass” wire to the engine and remove the wire tip from the stud.- Using a 13 mm socket wrench, unscrew the two nuts securing the pipe.
- We remove the pipe from the cylinder head studs and, without disconnecting the hoses, move it to the side.
- Remove the sealing gasket from the studs.
- Removing the camshaft pulley
- Unscrew the nut and bolt of the upper fastening of the rear timing belt cover
- Remove the oil level indicator.
- Using a Torx E14 socket wrench with a narrow head, unscrew the ten bolts securing the cylinder head. Some of the cylinder head bolts can only be unscrewed with a socket wrench with a narrow head. If you do not have such a key, remove the camshaft and then unscrew the cylinder head bolts.
- Pulling the rear timing belt cover slightly to the side, remove the cylinder head.
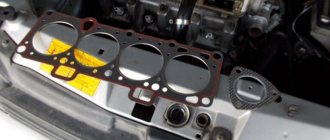
- Removing the cylinder head gasket
- We take out the two guide bushings.
Replacing the cylinder head gasket on a VAZ 2109
At the end of the operational period or if the integrity of the cylinder head gasket is damaged, the element must be replaced.
The main sign of a malfunction or gasket wear is the formation of coolant and oil leaks at the junction of the engine block and the cylinder head.
To change the gasket, you will need to dismantle the assembly, get rid of the worn cylinder head gasket and reassemble the structure in the reverse order, following the recommendations regarding the tightening torques of the cylinder head bolts. We will tell you about all this in more detail.
- Disconnect the wiring from the coolant temperature sensor and emergency oil pressure sensor.
- Remove the thermostat, just remember to drain the coolant first.
- Remove the air filter housing. There is no need to remove the carburetor, because it will not interfere with replacing the gasket.
- Disconnect the exhaust pipe from the exhaust manifold.
- Remove the camshaft drive gear after first setting the piston of the first cylinder to the TDC position. Now you can remove the protective casing of the camshaft drive belt, loosen the gear fixing bolts, securing the gear from turning.
- Remove the camshaft drive belt. Then you can completely unscrew the mounting bolts and remove the gear.
- Press the latch to disconnect the wiring block from the ignition distributor.
- Similarly, turn off the central high voltage.
- Loosen the clamps to remove the fuel supply hose from the fuel pump.
- Disconnect the throttle and air damper drive rods from the carburetor.
- Disconnect the power supply from the solenoid valve.
- Remove the vacuum booster hose from the intake pipe fitting.
- Disconnect the tube from the vacuum ignition corrector.
- Loosen the tension on the clamps to remove the interior heating hoses from the pipes.
- Remove the cylinder head. Using a socket with an extension, the mounting bolts are unscrewed.
- Rock the head a little jerkily, then remove the element.
- Remove the old gasket, clean it of any remaining rubber seal and other contaminants. Wipe dry thoroughly, after which you can reassemble.
- Before assembly, check whether the length of the cylinder head bolts is within the normal range. Ideally, their length is 135.5 millimeters. If the bolts have lengthened during use, then all bolts will have to be replaced.
Installing the cylinder head:
- We wash the cylinder head from dirt and deposits with kerosene or diesel fuel.
- We remove any remaining oil and coolant from the threaded holes of the cylinder block (under the cylinder head bolts).
- We clean the landing surfaces of the head and cylinder block from the remnants of the old gasket, and degrease the surfaces with a solvent. Always use a new gasket when installing the cylinder head. Oil should not come into contact with the surface of the gasket.
- We install the head guide bushings into the mounting hole of the cylinder block. Sequence of tightening the cylinder head bolts
- We place the gasket on the cylinder block, and the guide bushings should fit into the corresponding holes in the gasket.
- We install the head on the cylinder block. By slightly moving the head from side to side, we ensure that the guide bushings fit into the corresponding holes in the head. Reuse of cylinder head bolts is permitted only if their length does not exceed 135.5 mm.
- Using a caliper or a mechanic's ruler, measure the length of the bolts. Bolts longer than 135.5 mm are replaced.
- Before screwing, dip the threaded part of the bolts into engine oil, then let the oil drain, waiting for about half an hour.
- Install bolts and washers into the holes in the head.
- Using a torque wrench, tighten the head mounting bolts (in the sequence shown in the photo) in four steps: – tighten the bolts to a torque of 20 Nm (2 kgf m); – tighten the bolts to a torque of 69.4–85.7 Nm (7.1 –8.7 kgf m);– turn the bolts by 90°;– turn the bolts again by 90°.11. We perform further assembly in reverse order.
breather VAZ 2112 16 valves - hello. thank you very much. I have a VAZ 2112 - 22 answers
In the Service, Maintenance, Tuning section, hello to the question. thank you very much. I have a VAZ 2112 asked by the author Ask for the best answer It may have overheated and the rings are stuck.
Reply from 22 replies Hello! Here is a selection of topics with answers to your question: Hello. thank you very much. I have a VAZ 2112 Reply from Alexander Sudorgin overfilled the oil Reply from Eurovision On the upper plane of the head, the valve drive parts are fixed, which are covered with a lid with a cap. A breather is mounted on the cap. It communicates the crankcase cavity with the atmosphere. The breather is necessary to prevent oil from being squeezed out through the crankcase seals by gases penetrating from the cylinders. Air and gases that have escaped from the cylinders into the crankcase come out through the breather. If, after stopping the engine, the pressure of the cooled air in it becomes below atmospheric pressure, the air enters the crankcase from the outside through the breather. Wire packing soaked in oil cleans the air of dust. In some engines, the breather is located on the side wall of the block (from the side of the rod chamber) or in the neck cover for pouring oil into the crankcase. Most car engines have forced crankcase ventilation. A pan is attached to the bottom plane of the crankcase, which serves as a reservoir. In general, check the oil level)) Answer from Ashera? Is this when they started installing the Priora engine on the VAZ 2112? 16 valves does not mean at all that it is a Priora one. And how did you notice this oil? The breather drives gases into the spider and not into the air vents. There are 2 breathers. Which one does it drive from? Most likely, the partition between the rings on one cylinder has burst. Answer from Theosophy: Check the crankcase ventilation system, there should be a primitive oil separator, so check it first of all with engine diagrams on the Internet, so start by studying the hardware.
The engine crankcase ventilation system 2111 of VAZ 2108, 2109, 21099 cars with fuel injection is designed to effectively remove gases from its crankcase and burn them in the combustion chambers. As a result, the emission of harmful substances into the atmosphere is reduced.
Design of the crankcase ventilation system for engine 2111 (diagram)
1. Engine crankcase.
3. Hose from the breather to the valve cover pipe.
4. Oil separator under the valve cover.
5. A thin hose from the valve cover to the fitting with the throttle body nozzle.
6. Fitting with a jet on the throttle valve block.
7. Thick hose from the valve cover to the inlet pipe.
Operating procedure for the 2111 engine ventilation system
— At idle, with the throttle valve closed, crankcase gases under high vacuum are sucked through the breather and its hose under the valve cover to the oil separator. Further, under the influence of the same vacuum, through a thin hose from the valve cover to the fitting with the nozzle into the throttle assembly, under the throttle valve and further into the combustion chambers (small branch). The jet limits the amount of crankcase gases entering at idle, as normal operation in this mode may be disrupted.
— In operating and power modes, when the throttle valve is slightly open and more efficient crankcase ventilation is required, crankcase gases also flow through the breather, its hose, to the oil separator under the engine valve cover. And then they are sucked through a thick hose from the valve cover into the intake pipe to the throttle body (large branch). Crankcase gases practically do not flow through a thin hose, since when the throttle valve is open, the vacuum behind it drops significantly.
Engine crankcase ventilation system malfunctions 2111
— The main and most common malfunction of the ventilation system is clogging. A clogged crankcase ventilation system can lead to negative consequences in the operation of the car engine. The hoses or oil separator or jet in the throttle assembly may become clogged.
The consequences may be the following:
— violation of the normal operation of the engine at idle (increasing the idle speed control steps more than normal - the speed increases);
— engine oil leaking from under the engine seals (as excess pressure is created in the crankcase);
— oil contamination of the engine air filter and, accordingly, a drop in power plus an increase in fuel appetite;
— contamination of the engine itself with tar deposits.
If, while operating a LADA car, you notice that during load (when the air conditioner is running, the heating is on, etc.) in a traffic jam, the engine begins to operate unstably (troits, pulls poorly, etc.), perhaps the reason lies in the ventilation system crankcase The article proposes to solve the problem by installing a PCV valve from a foreign car.
Video on the topic:
Hello people, tell me which head to unscrew the cylinder head bolts with, I don’t have a hex head, but some kind of sprockets. There are no such people at home or at work to take and not make a mistake. Does the marking seem to be E12, E14 or E16? VAZ 2109, injector. What is the key for the cylinder head.
Similar articles
17 comments on “What is the key for the cylinder head. Which head should I use to unscrew the cylinder head bolts?
With a regular 13mm head you can unscrew it
Andrey, I tried the head on 13, it just scrolls, on 12 it does the same, and on 11 it fits exactly. Only the bolt head is made in the form of an asterisk, and I am not sure that a regular 11 head is the key that is needed to unscrew these bolts.
Valve stem seals
While adjusting the valves, it is quite possible that you had no idea that you were next to another very important element of the gas distribution mechanism - the valve stem seals.
Oil scraper seals are located on the valve stems of the gas distribution mechanism
Purpose of valve stem seals
While the engine is running, the camshaft, rocker arms, valve springs and valve tops operate in an oil mist. Oil is deposited on all parts and mechanisms located under the valve cover. Naturally, it also ends up on the top of the valves, called stems.
Under the influence of gravity, the oil will tend to flow into the combustion chamber. As you know, it shouldn't be there. Oil seals are designed to prevent oil from flowing down the valve stem into the engine combustion chamber.
Engine malfunctions associated with worn caps
The sole purpose of the oil seal is to prevent oil from draining into the engine combustion chamber. Over time, the rubber of this element loses its functions and is destroyed under the influence of an aggressive environment. This leads to the penetration of oil into the air-fuel mixture, where it burns successfully.
A working engine should have oil consumption of about 0.2 - 0.3 liters per 10 thousand kilometers. With worn valve stem seals, it can reach one liter per thousand kilometers.
Oil burning in the cylinders:
- clogs and destroys catalytic converters and particulate filters (devices that reduce the content of harmful substances in exhaust gases), which themselves are very expensive;
- causes overheating and premature failure of engine exhaust valves;
- greatly increases exhaust smoke;
- increases the risk of engine oil starvation due to lack of oil.
The service life of valve stem seals on domestic cars fluctuates around 80 thousand kilometers. This parameter very much depends on the quality of the caps themselves and the oil used.
What components are best to use?
Today, the greatest trust among car enthusiasts and mechanics is in the products of such well-known brands as Corteco and Elring - these brands have proven themselves to be the best in the production of gaskets, oil seals, seals, and valve stem seals.
There are products from domestic manufacturers on the market. Their quality varies greatly, but nevertheless does not reach the quality of the products of leading companies.
How to change valve stem seals
The topic of replacing valve stem seals is extensive and worthy of a separate article. Briefly it is done like this.
- Remove the valve cover.
- Remove the camshaft sprocket.
To remove the camshaft sprocket, you need to unscrew the bolt holding it with a lock washer.
- Remove the camshaft from its beds.
To remove the camshaft, you need to unscrew the bolts securing its bearing housing
- Support the valves with a tin rod through the spark plug well.
To prevent the valves from falling down, they need to be supported with a tin rod.
- Dry the valve.
Squeeze the valve spring and remove the crackers from the groove.
- Replace the oil seal.
The old oil seal can be removed using two screwdrivers.
Typical breakdowns
The very first 1.5 liter engine 2114 has disadvantages:
- periodic valve adjustment;
- unreliable injection system;
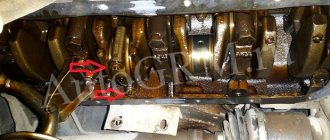
- loosening the exhaust manifold nuts;
- Leaking gaskets of the fuel pump, distribution sensor of the ignition system.
The next 1.6 liter engine does not cause any particular problems for the owner, with the exception of high vibration and noise loads. The weak point traditionally remains the valves, which have to be constantly adjusted.
The internal combustion engine from Lada Kalina 11183 was installed on the fourteenth model solely to meet Euro-3 standards. It has typical disadvantages for a linear series and is no different.
The first sixteen-valve engine 21124 does not bend the valves, the gaps in which are adjusted by hydraulic pushers. However, the belt needs to be tightened after 15,000 km due to the large number of attachments. The second and last in the line of fourteenth ICE models, ICE 21126, has increased power. In addition to typical malfunctions, if the timing belt breaks, the piston will bend the valve due to insufficient recess depth.
Assembly Features
Before assembly, you should check the bolts securing the head to the hood; their length should not be more than 13.5 cm; if they are longer, they can no longer be used.
You should also check the flatness of the head. If it was overheated, it is possible that it was warped and will require repair in the form of trimming the plane.
During assembly, the head bolts are tightened in a certain sequence and with a strictly defined tightening torque. Next, everything is assembled in the reverse order of disassembly.
Disassembly is also carried out in the same sequence if the power plant is being modified.
Conversion kit for an 8-valve injection engine to a 16-valve engine. You can check prices here www.tltzap.ru/price.html#1
The kit includes: price: 1. Cylinder head 21126 assembled.___________________17,000 2. Timing casing.___________________________1000 3. Timing rollers___________________________500 4. Timing belt 2112______________________________250 5. Water pump 2112________________550-1000 6. Bare fuel rail with tube 7. Injector wiring 8. Pistons 21124 82.0____________________1000 9. Piston pins 2110______________50-75 10. Retaining rings_____________1-25 for 1 piece 11. Modified cylinder head bolts 2108___________40 for 1 piece 12. Intake receiver____________________4500 13. Exhaust manifold gasket_______2-36 for 1 piece 14. Exhaust manifold (spider 4 -2-1)_______1800 15. Modified cylinder head gasket__________ 16. Oil dipstick________________________75 17. Aluminum breather____________780 18. Lower breather hose (thick) 2112_____30 19. Damper 2112_______________________550 20. Crankshaft pulley 2112____________870 2 1. Valve cover 21126______________1400 22. Timing pulleys__________________________950 23. Coils ignition 24. Ignition coil wiring 25. Spark plugs 2112 26. Crankshaft bolt 27. Camshaft bolts 28 Camshaft bolt washers 29. Valve cover bolts 30. Timing roller nuts 31. Timing roller washers 32. 4mm alignment washers for the rollers. 33. Timing cover mounting bolts. PS: Pistons can be replaced with sizes 82.4 and 82.8.__770-2950 per set
Cons and pros
Depending on which 2114 engine is used, the owner’s risks differ:
- 2111, 21183, 21114 and 21124 – do not bend the valve if the timing belt breaks;
- 21126 – valve bending due to insufficient groove.
The main disadvantage of the latest 16 valve versions is the lighter crank mechanism:
- the engine is adjusted to Euro-4 standards;
- to reduce weight, the length of the piston skirt is reduced;
- Accordingly, the width of the oil scraper and compression rings decreases;
- The resource of the internal combustion engine is sharply reduced.
For example, in Japan, manufacturers abandoned Euro-4 standards, considering that the reliability and high service life of the motor are more important for the consumer.
The drive power increased from 77 horsepower to 81 hp, then 82 hp, 89 hp, and 98 hp. In models with hydraulic compensators, periodic adjustment of this unit is not required, however, the quality of the oil in the system must be high for normal operation of the pushers.
Maintenance schedule
To avoid having to carry out expensive overhauls of the Lada Samara 2114 yourself, you should follow the manufacturer’s recommendations for servicing the internal combustion engine:
| Maintenance object | Time or mileage (whichever comes first) |
| Timing belt | replacement after 100,000 km |
| Battery | 1 year/20000 |
| Valve clearance | 2 years/20000 |
| Crankcase ventilation | 2 years/20000 |
| Belts that drive attachments | 2 years/20000 |
| Fuel line and tank cap | 2 years/40000 |
| Motor oil | 1 year/10000 |
| Oil filter | 1 year/10000 |
| Air filter | 1 – 2 years/40000 |
| Fuel filter | 4 years/40000 |
| Heating/Cooling Fittings and Hoses | 2 years/40000 |
| Coolant | 2 years/40000 |
| Oxygen sensor | 100000 |
| Spark plug | 1 – 2 years/20000 |
| Exhaust manifold | 1 year |
If consumables are replaced within the recommended time frame, the operational life of the internal combustion engine will increase.