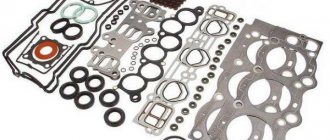
The cylinder head gasket is a perforated sheet made of iron and asbestos or aluminum paronite with edging on the sides and holes for cylinder chambers and connecting bolts. The main task of the cylinder head gasket is to seal the connection between the planes of the cylinder block. In addition, the gasket maintains the required internal oil pressure in the engine system and also prevents mixing of coolant and engine oil.
This photo report shows how the cylinder head gasket of a VAZ 2110 (injector) is replaced. On a car with a carburetor engine, the principle is the same, only instead of the injector, you need to remove the carburetor.
Replacement intervals for the cylinder head gasket on the VAZ-2110
It is very difficult to predict the exact service life of a gasket.
The most important thing that interests owners is the replacement interval for this part.
It is very difficult to say how long a particular gasket will last.
It depends on the:
- Manufacturer of the part.
- The quality of the material from which the gasket is made.
- The conditions under which these parts were stored.
Since the gasket is made of rubber, storage conditions directly affect its service life. For example, a part purchased at the market, which was stored for a long time in a damp and unheated container, will be worse than the same spare part purchased in a store.
The main function is to ensure maximum sealing of the cylinder block with the cylinder head. If you do not monitor the condition, the engine life will be significantly reduced.
Self-check of injectors
Let's start with the fact that automobile injectors are divided into several types, of which two types have found widespread use at different times: mechanical injectors and electromagnetic (electromechanical) injectors.
Electromagnetic injectors are based on a special valve that opens and closes the injector to supply fuel under the influence of a control pulse from the engine ECU. Mechanical injectors open as a result of increased fuel pressure in the injector. Let us add that modern cars often have electromagnetic devices installed.
To check the injectors with your own hands without removing them from the car, you can use several methods. The simplest and most affordable way to quickly check injection nozzles without removing them from the car is to analyze the noise emitted by the engine during operation.
Signs of a broken gasket
Foam around the expansion tank cap is one of the signs of a cylinder head gasket failure.
You can find out that the seal of the connection is broken for the following reasons:
- White vapor appears in the exhaust gases.
- You may notice oil stains in the antifreeze.
- Leak in cylinder head connections.
- There is a large amount of oil in the pan.
- You may notice foam around the filler cap.
Although it seems that it is very difficult to notice the vapors in antifreeze, this can be done by placing a bag over the neck of the open expansion tank. If there are gases in the antifreeze, the bag will inflate.
When should you change?
The need to replace the cylinder head gasket on a carburetor or injection car arises when, during use and due to natural wear, the seal loses its elasticity. This leads to a decrease in the quality and efficiency of fulfilling the main purpose - reliable sealing of the cylinder head connection with the cylinder block itself.
It is necessary to replace the cylinder head gasket on a VAZ 2110 in the following cases:
- If oil drips appear at the junction of the head and the block. There may also be a refrigerant leak in this area.
- The presence of light-colored foreign impurities or foam in the motor fluid. This can be detected by removing the dipstick from the inspection hole. The formation of a foam emulsion and the appearance of impurities occurs as a result of mixing engine and coolant fluids.
- Change in color of exhaust gases. A more saturated white-blue gas comes out of the car's muffler. This indicates that water has entered the combustion chamber of the cylinder block.
- The appearance of oil stains in the expansion tank with antifreeze.
- Increase in power unit temperature. As a result of exhaust gases entering the cooling system, the antifreeze heats up much faster. This leads to an increase in engine temperature.
User Sergei Tsapyuk showed in his video the consequences of a burnt-out head gasket in a VAZ car.
Articles
The gasket costs pennies compared to the labor of replacing it.
Before you start replacing the gasket, you should purchase this gasket. Although any car store will select a suitable spare part for you, it is better to know its part number. The most suitable gaskets for the VAZ-2110 are:
- The original VATI gasket, which has the article number 21083100302020.
- Part VICTOR REINZ. This item is of higher quality than the original. Its article number is 613666000.
- TRIALLI gaskets, which have the article number GZ.
It’s better to immediately buy a better quality spare part than to bother with disassembly again later.
Tools
It is better to change the gasket in the garage.
Although this part can be replaced right near the house, it is better to carry out all replacement operations in the inspection hole. To replace you will need the following tools:
- Set of sockets for ratchet. Heads must be from 10 to 19;
- Torx key;
- Several screwdrivers;
- Candle key;
- Torque wrench.
A special liquid, WD-40, will also come in handy, which will help when unscrewing soured bolts. As the practice of such repairs shows, during disassembly it is often necessary to use other tools, so having them will never hurt.
Replacement procedure
The replacement process occurs as follows:
- First you need to disconnect the battery; to do this, remove the negative terminal.
- You need to disconnect the exhaust pipe from the muffler.
Unscrew the 4 nuts securing the muffler to the exhaust manifold.
- We dismantle the carburetor.
- Next, you need to disconnect all the sensor terminals, and all the wires are disconnected from the spark plugs.
- The next step is to disconnect the vacuum booster from the intake manifold.
- The distributor sensor is disconnected.
- Disconnect the high-voltage wires.
- Unscrew the nuts and remove the sensor.
- The fuel pump and the housing of auxiliary devices are dismantled.
Having disconnected the hoses, unscrew the nuts securing the fuel pump and remove it.
The roller and timing belt are removed.
Before this, we install the first cylinder at TDC and lock the crankshaft flywheel with a toothed lock.
- The pulley is dismantled, after which you need to remove the timing cover.
- Disconnect the hoses and unscrew the cover nuts.
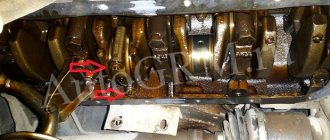
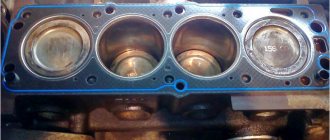
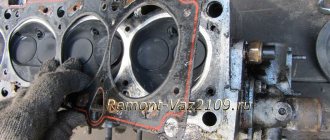
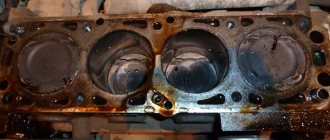
After this, all that remains is to unscrew the bolts and remove the block head. After removing the old gasket, you need to carefully inspect the contact surfaces of the head and cylinder block. There should be no dirt or residue from the old gasket on them. All obvious signs of contamination must be eliminated.
Cylinder block with old gasket.
Cylinder block with old gasket.
How to change it yourself?
Replacing the cylinder head gasket on a VAZ 2110 with an injector or carburetor engine requires certain knowledge and skills.
To change the head mechanism on an 8 or 16 valve engine, you must carefully prepare for this task.
Tools and materials
If you change the cylinder head gasket yourself, you will need:
- star key;
- a set of ratchet wrenches with socket heads;
- Phillips and flat head screwdrivers;
- torque wrench for tightening cylinder head bolts;
- spark plug key.
Channel Sdelaj Sam! Pljus interesting! published a video that will help you understand how to correctly determine the burnout of the cylinder head gasket between the cylinders of the power unit.
Step-by-step instruction
A detailed guide on how to remove and change the cylinder head gasket on a VAZ 2110 is given below:
- Drive the car into a garage with a pit or onto an overpass; if possible, it is better to use a lift, since some of the work will be done under the bottom of the car.
- Open the hood and loosen the bolt securing the battery terminal, disconnect it. This is necessary in order to prevent voltage surges during repairs.
- Then disconnect the intake line from the exhaust pipe.
- If the car is equipped with a carburetor engine, then the carburetor itself must be removed.
- Disconnect the lead cables from the spark plugs. A wire with a connector is connected to the power unit temperature controller; it also needs to be removed. After this, disconnect the plug from the pressure and engine fluid level controller.
- Loosen the fastening and disconnect the vacuum booster tube that is fixed to the intake manifold.
- Disconnect the connectors and disconnect the ignition distributor controller.
- Remove the gasoline pump with all its components. Loosen the clamps and disconnect the pipes connected to the pumping device. Some fuel may come out of it, so use a rag when dismantling it.
- Using a wrench, loosen the screw securing the timing belt tension roller. This will allow you to remove the wheel along with the belt.
- Next, secure the camshaft toothed disk to prevent it from turning during further repair work.
- Unscrew the fixing screw and remove the pulley from its seat. To perform this task, you need to use two screwdrivers at the same time.
- Next, locate the nuts securing the rear timing cover. You need to unscrew them and remove the cover. Using a Phillips head screwdriver, loosen the clamps to disconnect the pipes connected to the cylinder head exhaust pipe.
- Using a hex wrench, remove the cylinder head mounting screws, there are ten in total. The bolts are removed along with the washers. Assess the condition of the latter. If washers or bolts are damaged, they must be replaced with new ones. The screws themselves are reusable parts, but they often wear out, leading to the need for replacement. You can tell how worn the bolts are by their length. If it is about 13.55 cm, then purchase new clamps in advance.
- Then the cylinder head with the failed seal is dismantled.
- During further installation of the GB, new screws must be lubricated with engine fluid. This will ensure simple and reliable fixation of the parts. In addition, lubrication will prevent accelerated wear of the bolts.
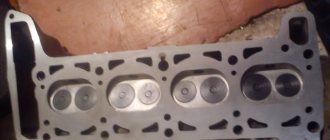
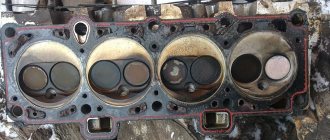
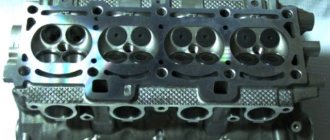
- The contact surfaces of the head and the block must be thoroughly cleaned of wear and contaminants. These elements usually show signs of an outdated gasket. Thoroughly clean and dry the surfaces before further installation of the service seal.
- Perform a visual inspection of the mounting screw holes. Often when repairs are carried out, they contain residues of the sealing element, engine fluid or antifreeze. Any dirt in the holes must be removed.
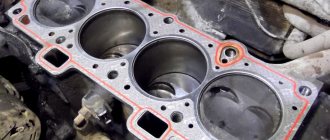
- A new seal is being installed, which must first be cleaned and dried. During installation, make sure that the hole used for the passage of engine fluid is located between the fourth and third cylinders. Also, when installing the gasket, make sure that the valve elements of cylinder 1 are closed.
- When the installation procedure is completed, you need to correctly tighten the cylinder head bolts, taking into account the sequence and torque. First, the two middle bolts are tightened - the bottom and the top, and then all the rest. On the first tightening circle, the torque should be 20 Nm, this indicator is controlled using a torque wrench. On the second lap the torque should be about 69.4-85.7 Nm. On the third circle, all the bolts are rotated 90 degrees in the prescribed order, and they are turned by the same amount on the fourth circle.
- Further assembly is done in reverse order. When performing the task, it is not allowed to rotate the crankshaft and camshaft until you install the timing belt. The camshaft pulley is mounted in such a way that the protruding part of the hub is directed towards the car engine. When the repair procedure is completed, check the correct assembly and make sure there are no gaps on the valves. Also adjust the timing belt tension.
Installing a new part
The new part to be installed must be undamaged, dry and clean.
When installing, you need to make sure that the hole intended for the passage of oil is located between the third and fourth cylinders.
Before installing the cylinder head, be sure to ensure that the valves of the first cylinder are closed. The bolts must be tightened according to a certain pattern, in four stages.
Tightening sequence for cylinder head bolts.
Recommended tightening torque
VAZ-2107 injector: fuel consumption. Which is better - an injector or a carburetor?
Before you begin tightening, several conditions must be met:
- Clean the working surface of the hole and the threaded connection of the screw as much as possible. Before this, you will need to remove contaminants from the intake manifold, block and the cylinder itself. Be careful not to damage the surface of the parts, especially if you use a wire brush. In most cases, it is better to use a simple rag for cleaning.
- Lubricating the screw holes is mandatory. Before screwing the bolts into the blind sockets, you need to take a small amount of lubricant, otherwise you will not be able to screw them in all the way.
- If you are installing new bolts, lubricate the threads with a small amount of clean engine oil. For old fasteners, simply clean it.
You need to tighten the cylinder head fasteners of a VAZ-2106 car according to the following diagram:
- central (1 and 2);
- two at the top and bottom, located on each side of the center (3, 4, 5, 6);
- extreme right (7, 8);
- extreme left (9, 10);
- 11 screw (only on the third circle).
You need to work in accordance with the diagram using a torque wrench
That is why it is so important to observe the tightening torque, as in the table:
| Circle number | Required tightening torque, kgf/m |
| 1 | 3,5-4,1 |
| 2 | 10,5-11,5 |
| 3 | only 11 screws are tightened with a torque of 3.5-4 |