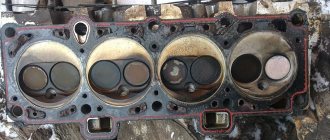
According to many years of experience of various car enthusiasts, replacing the cylinder head of a VAZ 2109 is most often associated with problems arising with the gasket. But there may be others that can cause the engine to overheat or even seize.
Every driver can repair and modify the cylinder head on a VAZ 2109, but special tools and a little knowledge of the operating principle of this unit are required. Recently, tuning of this unit has become increasingly popular, due to which the power of the car increases. Carrying out tuning yourself is possible if you have experience in such work. Working with valves and actuators requires specialized knowledge and skills.
When is it time to change?
- When replacing or repairing a cylinder head, you may begin to notice that fuel consumption has increased or the unit's power has decreased.
- Also, improper assembly and installation of valves and cylinders can lead to malfunctions in the cylinder head system.
- If you constantly fill your car with low-quality gasoline, do not be surprised that over time this system will begin to malfunction and will require repairs.
- The resulting crack in the block cannot be repaired except by completely replacing the element.
- A sign of a problem in the cylinder head may be white smoke coming from the exhaust pipe, caused by coolant entering the engine cylinders.
- If there are oil stains on the surface of the coolant in the tank, the unit requires repair. This is due to the fact that the oil somehow began to get where it shouldn’t.
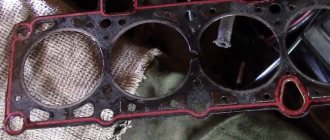
- It is rare, but it happens that exhaust gases begin to penetrate through the gasket. In this case, there is no other option but to remove the head and replace the gasket.
- For VAZ 2109 tuning, restoration, problems with spark plugs, forging bolts or boring cylinders, disassembling the cylinder head may be required.
White smoke from the exhaust pipe
Procedure for replacing the cylinder head gasket on a VAZ 2109-2108
The gasket may remain either on the surface of the head or stick to the block itself. You can try to remove it by hand without using any tools, and if that doesn’t work, you can carefully pry it off with a flat-head screwdriver without damaging the surface of the part.
Carefully inspect the surface of the cylinder head and if pronounced traces of corrosion are found on it, especially in close proximity to the coolant channels, then it is necessary to repair it: milling, grinding, etc. If everything is normal, then we remove traces of the old gasket using special means:
We wait a few minutes until the whole thing has cooled down and remove the residues that have not succumbed to the chemicals, if any remain, with a razor blade. Then we wipe everything dry and you can even degrease it so that no foreign traces remain on the surface:
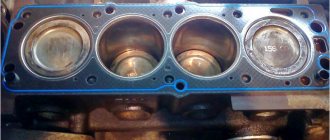
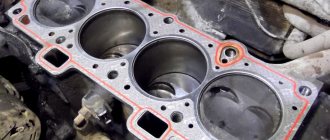
The engine block also needs to be cleaned and then a new gasket installed on it. It is important that the holes in the gasket coincide with the guides, which are located at the corners of the block:
Process
Before you begin disassembling and repairing the VAZ 2109 cylinder head, it is necessary to perform certain preparatory work in sequence.
Removal
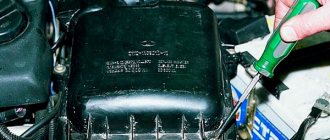
- First of all, remove the air purifier housing.
- Disconnect the hoses and lines from the carburetor or injector.
- After this, you need to disconnect the pants from the manifold.
- Remove the grinding wheel.
- Unscrew the valve cover.
- Remove the carburetor and manifolds.
- To unscrew the head bolts on a VAZ 2109, most likely you will need a gate and a hexagon, since the screws are screwed in with decent force. Tube as a lever
- Remove the cylinder head bolts and washers.
- We remove the VAZ 2109 cylinder head from the power unit.
- Remove the gasket. A gasket that has reached the end of its life and needs to be replaced.
- In addition, if necessary, engine block components are repaired or modified.
The pipe is like a lever.
Remove the screws.
A gasket that has reached the end of its service life must be replaced.
Tuning
Proper adjustment, modification and tuning of the VAZ 2109 head will help to fully reveal the capabilities of your power unit. You've probably heard about it, read a lot, or even watched videos on the Internet. Typically tuning is done by boring and aligning the bores, which reduces turbulence and reduces power. The valves were replaced with larger ones and ground into their seats. Tuning may also include replacing the standard valve guides with bronze ones.
Valve lapping
The following is a check of the running-in process:
- the assembled head is on its side;
- the collector holes are filled with liquid (ordinary water can be used).
If fluid does not leak through the valves, the job is done well and the valves are lapped properly. After eliminating all defects, you can proceed to assembling the head.
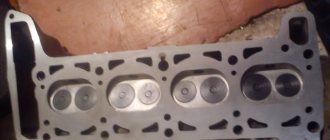
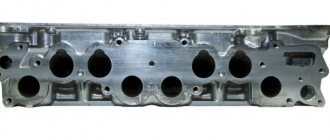
Design of the VAZ 2109 cylinder head
The design of the VAZ 2109 cylinder head consists of the following parts:
- a crankcase with a combustion chamber in which the air-fuel mixture is ignited and all cylinder head components are located;
- gas distribution mechanism (GRM), including valves installed at an angle of 7°30′ to the cylinder axis, and a timing drive with a camshaft;
- threaded outlets for spark plugs and injectors;
- landing planes for intake and exhaust manifolds;
- gasket that separates the cylinder head from the cylinder block itself.
The timing camshaft of the VAZ-2109 is cast from cast iron and has five supports, with eight cams on it for opening the valves. It is driven from the crankshaft pulley by a toothed belt. Valve seats and guides are pressed into the cylinder head. On the inside of the bushings there are grooves for supplying lubricant; the bushings are closed on top with oil deflector caps.
The valves are steel, and the intake valve head is made of heat-resistant steel. The inlet valve is larger in diameter than the outlet valve. The gaps between the valves and camshaft cams are adjusted using special washers that have increased wear resistance. Valve pushers are metal cups that move in the cylinder head holes. To improve wear resistance, their surface is cemented.
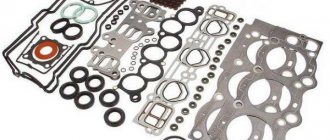
The cylinder head (cylinder head) of the VAZ 2109 is connected to the cylinder block through a special gasket. The gasket must ensure tightness of the cooling system channels, oil pipeline and combustion chamber. In order for it to withstand high temperatures and high pressures, it is often made of reinforced metal.
https://www.youtube.com/watch?v=pW9OyNFXEcU
The gasket is disposable and cannot be repaired; if it fails, it must be replaced. Replacing the cylinder head gasket on a VAZ 2109 can easily be done with your own hands.
Replacement
To change the gasket, you will need to dismantle the assembly, get rid of the worn cylinder head gasket and reassemble the structure in the reverse order, following the recommendations regarding the tightening torques of the cylinder head bolts. We will tell you about all this in more detail.
- Disconnect the wiring from the coolant temperature sensor and emergency oil pressure sensor.
- Remove the thermostat, just remember to drain the coolant first.
- Remove the air filter housing. There is no need to remove the carburetor, because it will not interfere with replacing the gasket.
- Disconnect the exhaust pipe from the exhaust manifold.
- Remove the camshaft drive gear after first setting the piston of the first cylinder to the TDC position. Now you can remove the protective casing of the camshaft drive belt, loosen the gear fixing bolts, securing the gear from turning.
- Remove the camshaft drive belt. Then you can completely unscrew the mounting bolts and remove the gear.
- Press the latch to disconnect the wiring block from the ignition distributor.
- Similarly, turn off the central high voltage.
- Loosen the clamps to remove the fuel supply hose from the fuel pump.
- Disconnect the throttle and air damper drive rods from the carburetor.
- Disconnect the power supply from the solenoid valve.
- Remove the vacuum booster hose from the intake pipe fitting.
- Disconnect the tube from the vacuum ignition corrector.
- Loosen the tension on the clamps to remove the interior heating hoses from the pipes.
- Remove the cylinder head. Using a socket with an extension, the mounting bolts are unscrewed.
- Rock the head a little jerkily, then remove the element.
- Remove the old gasket, clean it of any remaining rubber seal and other contaminants. Wipe dry thoroughly, after which you can reassemble.
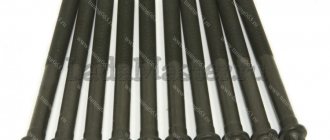
- Before assembly, check whether the length of the cylinder head bolts is within the normal range. Ideally, their length is 135.5 millimeters. If the bolts have lengthened during use, then all bolts will have to be replaced.
HOW TO REMOVE THE cylinder head on a VAZ 2109 - STEP-BY-STEP INSTRUCTIONS:
Disconnect the negative terminal from the battery.
Drain the coolant into a plastic container.
Disconnect the exhaust pipe from the exhaust manifold.
Now remove the receiver together with the throttle assembly (VAZ-2111), or the carburetor in the case of (VAZ-21083), as well as the intake and exhaust manifolds (remove the cylinder head without removing the manifolds).
On a VAZ-2111, you need to disconnect the “mass” wires (they are attached to the left end of the head), remove the fuel rail with fuel pipes and injectors.
Disconnect the high-voltage wires from the spark plugs, as well as the connectors of the coolant temperature and oil pressure level sensors.
On the VAZ -21083 you will additionally have to remove the housing of the auxiliary units, the ignition distributor and the fuel pump.
Now remove the timing belt, then the tension pulley, spacer washer and camshaft timing pulley.
Unscrew the rear fastening nut that secures the timing cover to the cylinder head.
Remove the cylinder head cover.
Using a Phillips screwdriver, loosen the clamps and disconnect all the hoses from the cylinder head exhaust pipe one by one.
Unscrew the 10 cylinder head mounting bolts using a "10" hexagon.
Remove the screws and washers.
Now you can remove the cylinder head along with the gasket.
When disassembling the valve mechanism, place a wooden block under the valve plate that you are going to dry out.
Dehydrate the valve
Remove it from the cylinder head guide bushing.
Take the key to “13” and unscrew the two fastening nuts on the exhaust pipe.
Remove the gasket and pipe.
Assembling and installing the cylinder head is carried out in the reverse order.
The valve stems and bushing guides are lubricated with engine oil.
Before starting installation, it is necessary to thoroughly clean the surface of the cylinder block from dirt and oil, as well as remnants of the old gasket.
The cylinder head gasket is replaced using two special centering bushings.
Now you can install the mounting screws and tighten them in four steps according to the diagram below.
The first tightening of the screws is carried out with a torque of 20 N.m (2 kgf.m);
The second - with a moment of 69.4–85.7 N.m (7.1–8.7 kgf.m);
Third - extension by 90°;
The fourth is to turn the screws 90°.
Burnout of the gasket under the cylinder head on VAZ 2109-2108 cars is the most common reason why the head has to be removed from the engine, and accordingly with further repairs, or rather, replacement of the gasket. If this problem is not noticed in time, it can lead to quite sad consequences, since the engine can overheat and even jam.
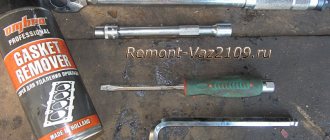
The procedure itself for removing the cylinder head and replacing its gasket is not complicated, but at the same time it requires certain technical skills and a small number of tools, the list of which is given below:
- Hex or similar bit with adapter for use with wrench
- Torque wrench - in this case I used the Ombra model with a range from 10 to 110 Nm, which is quite enough
- Flat screwdriver
- Extension
- Gasket Remover
Puff
Reassembling the unit if you strictly follow the instructions for dismantling work will not pose any particular problems.
An incredibly important aspect of replacing the cylinder head gasket and all other activities associated with removing the head is the correct adjustment and tightening of the bolts.
Tightening the bolts is done strictly with a torque wrench, which will allow you to control the tension torque.
- Place the holder in the zero position. This will indicate that now the key data is equal to the moment of the original position;
- Look at the torque tool readings as you begin to tighten the bolts;
- Rotate the holder, monitor the indicators;
- If the torque does not change, the fastener may be stretchable, which is normal. This is exactly what should happen;
- If the torque increases rapidly, bolt movement should be achieved. That is, the stretch of the holder is small, it needs to be stabilized.
Golden rules of tightening
To properly reassemble the cylinder head, you need to adhere to the golden rules:
- Strictly follow the tightening torque data corresponding to the VAZ 2109;
- Make adjustments only using a torque wrench. Other tools do not allow you to get the desired result;
- To install the cylinder head, use only serviceable bolts that meet the requirements of your engine installed on the VAZ 2109;
- Before work, make sure that the holders are in good condition.
Tightening diagram
In addition to observing the required tightening torques for the cylinder head mounting bolts, one more rule must be observed here.
Returning the bolts to their places is carried out strictly according to the diagram below.
Tightening is performed in four circles, following the sequence of work with the mounting bolts indicated in the diagram.
| Tightening circle | Your actions |
| First round | All bolts are tightened using a torque wrench according to the diagram with an applied torque of up to 2.0 kg/cm m |
| Second round | Tightening in the second circle is carried out even according to the diagram, but the torque is applied up to 8 kg/cm m |
| Third circle | Each bolt on the third installation circle must be tightened 90 degrees. |
| Fourth circle | The fourth and final round of tightening the cylinder head bolts requires re-tightening the fasteners an additional 90 degrees. |
Make sure your bolts meet the specifications before following the instructions and diagram. Otherwise, even the most correct, strictly observed tightening will not give any result.
The cylinder head gasket on the VAZ 2109 is a fairly reliable element, but it tends to lose its performance qualities. To replace it, you have to perform far from the simplest operations, but in no case can you ignore the violation of the integrity of the gasket. Otherwise, the consequences will result in expensive repairs, and sometimes even a complete replacement of the engine.
The cylinder head (cylinder head) is usually removed to replace the gasket or block, or to repair the valve mechanism of the piston group or the head itself. The need to remove the cylinder head may also arise in the case of engine tuning or complete disassembly of the engine.
This work is carried out on an inspection pit or overpass.
Reinstalling the head
Now you can carefully install the cylinder head in its place, making sure that at this moment the gasket does not slip out or move to the side. Of course, the guides fix it, but you should still be extremely careful.
Next, we will need a torque wrench, since the bolts will have to be tightened with a certain torque. It is also worth keeping in mind that the tightening order must be observed. The diagram below shows the sequence in which to twist:
Now regarding the force with which it is necessary to tighten the bolts. This should be done in 4 steps:
- First, a torque of 20 Nm
- Second reception with a torque of 75-85 Nm
- Tighten each bolt another 90 degrees.
- Finally turn it 90 degrees.
After this, all that remains is to install all the equipment removed from the car, fill in the coolant, connect all the sensors, wires and hoses and check the work done. Usually everything becomes visible immediately after pouring antifreeze. If wet marks appear at the junction of the head and block, you can take everything back and do the whole job again! But I hope that this will not happen in your practice! Happy renovation!
The VAZ 2109 cylinder head (cylinder head) protects the cylinder block from negative influences. The cylinder head on a VAZ 2109 is a complex-shaped part made of a special aluminum alloy using precision casting. After the casting is produced, it is subjected to mechanical processing. The head is attached to the cylinder block with ten bolts.
How do you install the cylinder head and tighten the bolts?
What unexpected problems may occur during execution:
- Without a doubt, it is necessary to adhere to the cylinder head tightening torques.
- In this case, you cannot use other tools. Due to the fact that it is possible to determine the degree of tension only with a torque wrench.
- To perform tensioning, it is allowed to use serviceable screws. According to the requirements that are installed on the VAZ 2109 vehicle on the power unit.
- Subsequently, you need to know for sure that the holders are in working order.
- If a repair or complete replacement of the cylinder head has already been carried out before, in this case it is not advisable to use the bolts twice to perform tension. At the same time, go to the nearest spare parts store and buy a new spare part.
- On 16 cl internal combustion engines, secondary use of cylinder head screws is permitted, only in one case, if the length is no more than 9.5 centimeters. The screws are measured with a washer; if it turns out that the bolt is more than 9.5 centimeters, then it certainly needs to be changed.
- If the car is equipped with an aluminum head, then the cylinder head is mounted on TTU bolts. They will not have to be tightened as they are screwed into the thread.
- When purchasing cylinder head gaskets, first of all pay attention to the specifications of the manufacturer. Today they indicate a certain tightening ratio for each specific gasket. It is worth remembering that the specified moment of force should not differ from those used during repair work.
Stages of work
As we have already said, the replacement process is not complicated, but if you decide to take on it for the first time, then it is better to invite someone with experience in this matter to help. You may also need help if you decide to improve the performance of the VAZ 2109 engine by tuning it using channel boring. Replacing the plugs also requires additional assistance. In this case, removing old plugs and correctly installing new ones requires certain skills.
Tools
- hexagon;
- torque wrench;
Torque wrench - knob;
- screwdriver.
Process
Before proceeding with the removal and repair of the VAZ 2109 cylinder head, it is necessary to carry out some preparatory work in accordance with the order.
Removal
- First of all, remove the air purifier housing.
- Disconnect the hoses and wires from the carburetor or injector.
- Next, you need to disconnect the pants from the manifold.
- We remove the distributor.
- Unscrew the valve cover.
- Remove the carburetor and manifolds.
- To unscrew the head bolts on a VAZ 2109, you will most likely need a wrench and a hexagon, because the bolts are tightened with decent force.
Pipe as a lever - Remove the head mounting bolts and washers.
We take out the bolts - We remove the VAZ 2109 cylinder head from the power plant unit.
- We remove the gasket.
Gasket that has expired and needs to be replaced - Also, if necessary, we carry out repairs or modifications to engine block components.
Tuning
Qualified adjustment, modification and tuning of the VAZ 2109 head will help to fully reveal the capabilities of your power unit. You've probably heard a lot about this, read or even watched videos on the Internet. Typically, when tuning, the channels are bored and smoothed, thereby reducing the turbulence that reduces power. The valves are changed to larger ones and ground into the seats. Tuning may also involve replacing standard valve guides with bronze ones.
Valve lapping
Lapping control is carried out as follows:
- the assembled head lies on its side;
- liquid is poured into the collector holes (ordinary water can be used).
If the liquid does not flow through the valves, this means that the work was done efficiently and the valves were ground in correctly. After all faults have been eliminated, you can begin installing the head.
Installation
- Begin assembly by installing a new gasket. Attention! The holes in the gasket must coincide with the guides, which are located at the corners of the block.
New gasket - You need to install the head carefully, do not move the gasket from its place at this moment.
- We insert the bolts into their places and begin tightening with a torque wrench.
Tightening with a torque wrench - Next, we install the dismantled equipment, injector or carburetor, in reverse order. Fresh coolant is added. Wires and hoses are connected.
Attention! This operation requires some knowledge and skills. Therefore, before performing it, you should know that the bolts need to be tightened according to a certain pattern and with a certain force. It would be useful to read additional material on this topic and watch video instructions.
As you can see, there are certain difficulties in modifying the VAZ 2109, tuning, replacing plugs and assembling. But if you learn how to do these jobs yourself, calculate how much money you can save.
Loading …
Tightening the cylinder head and running-in config
The time has come to assemble the engine and the question arose about completing the attachment. Since the engine is new, I had to run it gently for 2000 km at a speed of no more than 3000. I could install all the tuning parts at once (Stingger trapezoid receiver, 56mm throttle, Volga injectors, DBP/DTV and possibly the camshaft) but then I would have to immediately make adjustments to firmware, but there was no desire to do it (as well as the opportunity). And the engine would have lost in the low end, but there would be no way to break it in without them.
Therefore, I decided to assemble it from stock for testing, although of course it is clear that the factory receiver and the sawn head are a so-so combination