Generator serial number: 9402.3701-14 (also 2170-3701010-10, 21700370101010)
Applicability: vehicles VAZ-1117, -1118, -1119 (Kalina), VAZ-2170, -2171, -2172 (Priora Lux), VAZ-2190 (Granta)
Features: Alternating current generator 9402.3701-14 with a built-in rectifier unit and voltage regulator, designed to work as a source of electrical energy in parallel with the battery in the electrical system of the VAZ-1117, -1118, -1119 (Kalina"), VAZ-2170, -2171, -2172 (“Priora” Lux), VAZ-2190 (“Granta”); operating at ambient temperatures from minus 40 C° to plus 45 C° and humidity 90%. The generator is intended for supply to the domestic market and for export to countries of all climatic zones.
1. Multifunctional voltage regulator 897.3702 (Description). From the factory the relay number is TRT5-01. Integral relay 849.3702 is not suitable for this generator.
2. Restrictive rectifier block BVO8-120-02 (Description). The diode bridge BVO 8-105-02 is not suitable for this generator.
3. Collector ring (alternator rotor track - description)
or a new sample along with a plastic cross (description)
4. Winding (Stator 94.3701100-14) of the VAZ-2170 generator (115A) - (Description). Stator G9402.3701-06 is not suitable for this generator.
5. Generator block (integrated charging relay 849.3702, 897.3702) Tver
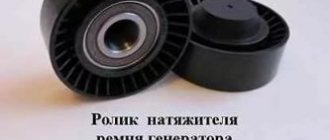
Generator 2170-3701010 with output current up to 115A and generator 1119-3701010 with output current up to 85A (engine 11194) are not interchangeable, the mounting points are located in different places. At the same time, in adjusting the belt tension on the engine. 11194 an additional roller assembled with a bracket is used.
In the event of a malfunction, as well as complete failure of the diode bridge on Lada Priora cars, the charging of the battery will either completely disappear, or will be significantly less than necessary. If it turns out that it was the diode bridge that caused poor charging, then it must be replaced with a new one. To do this, you will need to remove the generator from the car, and only then can you begin repairs.
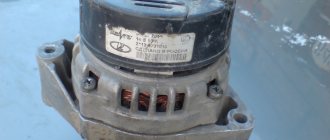
Diode bridge of Priora 115a generator
Generator serial number: 9402.3701-14 (also 2170-3701010-10, 21700370101010)
Applicability: vehicles VAZ-1117, -1118, -1119 (Kalina), VAZ-2170, -2171, -2172 (Priora Lux ), VAZ-2190 (“Grant”)
Features: Alternating current generator 9402.3701-14 with a built-in rectifier unit and voltage regulator, designed to work as a source of electrical energy in parallel with the battery in the electrical system of the VAZ-1117, -1118, -1119 (Kalina"), VAZ-2170, -2171, -2172 (“Priora” Lux), VAZ-2190 (“Granta”); operating at ambient temperatures from minus 40 C° to plus 45 C° and humidity 90%. The generator is intended for supply to the domestic market and for export to countries of all climatic zones.
1. Multifunctional voltage regulator 897.3702 (Description). From the factory the relay number is TRT5-01. Integral relay 849.3702 is not suitable for this generator.
2. Restrictive rectifier block BVO8-120-02 (Description). The diode bridge BVO 8-105-02 is not suitable for this generator.
3. Collector ring (alternator rotor track - description)
or a new sample along with a plastic cross (description)
4. Winding (Stator 94.3701100-14) of the VAZ-2170 generator (115A) – (Description). Stator G9402.3701-06 is not suitable for this generator.
5. Generator block (integrated charging relay 849.3702, 897.3702) Tver
Generator 2170-3701010 with output current up to 115A and generator 1119-3701010 with output current up to 85A (engine 11194) are not interchangeable, the mounting points are located in different places. At the same time, in adjusting the belt tension on the engine. 11194 an additional roller assembled with a bracket is used.
In the event of a malfunction, as well as complete failure of the diode bridge on Lada Priora cars, the charging of the battery will either completely disappear, or will be significantly less than necessary. If it turns out that it was the diode bridge that caused poor charging, then it must be replaced with a new one. To do this, you will need to remove the generator from the car, and only then can you begin repairs.
How to replace the diode bridge of a car generator with your own hands? Step-by-step instructions and correct tips
Even if the generator
alternating current built into the
electrical
of a modern car is unusable, then this immediately affects
the start of
the vehicle’s power unit.
Often, this situation arises due to problems that appear in the diode bridge
of the generator.
One of the main indicators
diode bridge
failure is
battery
discharge warning light dashboard
, which may start flashing if the generator
has stopped
recharging the battery.
According to auto experts, in most cases this symptom is directly related to a problem with the voltage regulator
or
diode bridge test
.
According to auto mechanics, replacing a diode bridge
is not a complicated procedure and is accessible to almost every car owner; the main thing in this matter is to follow
the step-by-step instructions
and listen to
the right advice
from experts.
{banner_adsensetext} Before moving on to the step-by-step instructions for checking and replacing the diode bridge, you should first find out what this generator component is. A diode bridge
is a special electronic circuit that is assembled on the basis of rectifier diodes designed to convert the alternating current supplied to it into direct current.
Thus, the diode bridge
, also known as
the rectifier unit
, performs
the function
of converting the alternating current generated in
the stator winding
of the generator into electric current with a constant voltage.
Where is the diode bridge located? In most standard generators, a diode bridge
(rectifier unit) is installed on the rear of the generator.
Typically found in standard
37
series generators .
3701
, which are installed on many modern domestic passenger cars, for example,
VAZ
(
Lada
), the diode bridge
is attached
to
the rear wall
of this key component of electrical equipment.
{banner_reczagyand} STEP-BY-STEP INSTRUCTIONS AND CORRECT TIPS FOR REPLACING THE GENERATOR DIODE BRIDGE 1
.
Dismantling the generator
.
So, before you can be sure whether there are problems in the rectifier unit, the first step is to carry out an accurate check of the component. To do this, the generator is dismantled, and then it is taken out of the engine compartment, after which it is placed on a bench, if available. 2
.
Tester check
. After dismantling, using a special voltage tester or the simplest version of an ohmmeter, the quality of current flow through the generator circuits is tested. If, as a result of checking these readings, the fact of failure of the semiconductors is confirmed, then the diode bridge will have to be completely replaced.
3
.
Replacing the diode bridge
. If the car owner still has to change the diode bridge with his own hands or he is going to replace its individual components, then you need to be prepared for the fact that this procedure is by no means an easy one, since the operation requires from the performer not only extreme concentration, but also the presence of certain practical skills .
4
.
Preparation for dismantling the diode bridge
. To gain access to the diode mounting area, you will have to remove the brush block from the generator and unscrew the nuts that tighten the front and rear covers together. After this, you can disconnect the unit element with the pulley and rotor from the stator.
5
.
Dismantling the diode bridge
. Next, after part of the generator has been disassembled, it is necessary to unscrew the bolts securing the leads of the stator windings to the rectifier block using a socket wrench. And only when the negative wire from ground has been disconnected can you remove the middle element of the unit by disconnecting it from the back cover, from which the bolts with insulators and the diode bridge itself are then carefully removed.
6
.
Installation of a new diode bridge
. After installing a new rectifier unit instead of the old one, in the free space, the screws with insulators are screwed into the cover again. Next, the leads of the stator windings are screwed onto them again. Subsequently, the screws are finally tightened.
7
.
Assembling generator components
. The rotor along with the front cover is inserted through the stator onto the rear wall of the generator. Next, the generator housing is installed and tightened with screws.
8
.
Final assembly and installation of the generator
. And finally, at the very end of the procedure, the generator brushes are installed and the body of the entire device is checked for reliability. Next, pick up an electrical equipment tester and ring the generator. If, after ringing, no problems are found, then the generator is installed back under the hood of the car, after which the change of the diode bridge is finally completed.
For reference, we note that
generator diode bridge
May be
assembled
not only from
individual
components, but also manufactured in the form
monolithic
designs like
diode assembly
where are you
diodes
usually selected according to
parameters
. Such
diode bridge
much
easier
install and
serves
he is much
longer
ordinary. According to experts, the main thing
disadvantage
diode bridge is a necessity
replacements
all
assemblies
, and even if it’s out of order
came out
Total
one
diode.
Video
:
“How to replace the diode bridge of a car generator without errors? “
In conclusion, we would like to add that there are only two main failures of the diode bridge of the generator - a “break” and/or a “short circuit” of the diodes.
In the case of a “break,” the diode stops passing electric current through itself, and in the case of a “short circuit,” the current, on the contrary, flows in both directions, therefore, the diode is “broken.” In any of the cases, the car generator loses its ability to produce the required amount of electric current and a control indicator lamp lights up on the dashboard, indicating that the battery is low. THANK YOU FOR YOUR ATTENTION
.
SUBSCRIBE TO OUR NEWS
.
SHARE WITH YOUR FRIENDS
.
Replacing the generator diode bridge on a Priora
So, in order to remove and change the diode bridge on the 2170 car and its configurations, you must first remove the plastic cover, under which the rectifier unit is located.
After this, all fastenings for this part become available to us. It is worth noting that in this case the repair will be considered specifically using the example of a new type generator - meaning with a conventional integrated circuit and brush assembly, as on Kalina, Grant and other recent VAZ front-wheel drive cars.
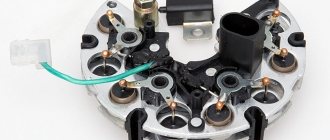
From the above photo you can clearly see that the first step is to unscrew the nut securing the brush assembly contact; of course, all this is done using a regular 13 mm wrench. Then unscrew the remaining mounting bolts. It is most convenient to use a ratchet handle or a socket with an 8 mm knob:
Now the most interesting thing remains - to disconnect the winding wires from each of the diodes. To make your work easier, immediately prepare two flat-blade screwdrivers.
After all the diodes have been dealt with, you can easily remove the bridge assembly, as shown in the photo below.
Installing a new one occurs in the reverse order of removal. Of course, the assembly is carried out carefully so that there are no problems after installation - a short circuit or vice versa, an open circuit, etc.
Where to buy and how much does a generator diode bridge cost for a Priora
In fact, such a part as a rectifier unit should be present in every auto parts store, since its failure is a fairly common breakdown. Depending on the type, as well as the current strength of the generator, diode bridges can have different prices:
Typically, on a Priora with air conditioning, more powerful 115 Ampere generators were installed from the factory, and accordingly, axles must be selected taking this fact into account.
Of course, a similar product can be bought at a car dismantling center, and if you wish, you can find a really fresh diode bridge at least half the price of the store price.
- In stock
- Wholesale and Retail
- Code: 220031
- Terms of payment and delivery
- Schedule
- Address and contacts
The limiting rectifier unit BVO8-105-02 is designed to rectify three-phase alternating current and limit overvoltage pulses in the electrical equipment system of automobiles as part of a generator set.
Technical specifications – TU3417-015-07629712-2004
Applicability
VAZ 1117, 1118, 1119 “Kalina” cars with generators 9402.3701-06.
Features of application
The limiting rectifier unit is installed directly on the generators. Any working position in space. Forced air cooling.
The mass of the block is no more than 0.16 kg.
BVO is produced in climatic version “O”, placement category 2 according to GOST 15150.
Overall, installation and connection dimensions
Main settings
Rated voltage, UDC, V
Maximum rectified current, Ivpb.max, A
Forward voltage (amplitude value) on each diode of the power rectifier at t=(25±10) єC and Ipr=110A, no more, V
Pulse limiting voltage on each diode of the power rectifier (at Ilim.=45A, t=(25±10) єC), no more than, V
Method of connecting stator windings
Guarantee period
The warranty period for the units is 24 months from the date of commissioning or expiration of the storage period with a warranty operating time of no more than 50,000 km of vehicle mileage.
Scheme of the rectifier block block BVO8-105
Source
Removing the generator Priora with air conditioning: pulling it down without removing the headlight
If the process of removing the headlight seems complicated and time-consuming, which in reality it is, then you can use another method. Its implementation occurs in the following order:
- We de-energize the car.
- We remove the belt from the generator pulley by first unscrewing the bolt securing the tensioner pulley. It is recommended to remove it to check for serviceability.
- The upper mount of the generator is unscrewed using two “13” keys.
- The engine protection is removed.
- The electrical part of the generator is disconnected.
- Unscrew the lower mount of the generator. The nut is unscrewed with a wrench at “13”, and the bolt is fixed with a head at “17”.
- To pull the generator out through the space between the engine and the radiator, you must also loosen the fastening of the air conditioning compressor and move it to the side by 3-5 cm. The design of the compressors differs depending on the type: Halla and Panasonic. Let's immediately look at the location of the mounts for the Panasonic air conditioner. Using a “12” wrench, unscrew (not completely) the 4 bolts securing the Panasonic air conditioning compressor. The bolts on the right are shown below.
- Another bolt on the lower left side is at “12”.
- And one more left upper bolt for securing the Panasonic air conditioning compressor, which is best reached using a universal joint or a flexible ratchet extension.
- Below is shown where the top mounting bolt is located and how best to access it with a tool.
- Below is a picture of the Panasonic air conditioning compressor with the mounting holes placed for easier reference.
- Next, we move the Panasonic compressor to the side (closer to the radiator at the distance of the unscrewed bolts), and pull out the generator, moving the rubber tubes of the cooling system and air conditioning to the side.
Installation of the generator in place is carried out in the same way. The method involves removing a minimum number of parts. You can watch it in the video clip below.
It is important to consider that this method is only suitable for situations where the car has separate cooling fans. This is actually typical for Priors with Panasonic brand air conditioners, where the main fan is located between the radiator and the engine, and the additional one is moved forward between the radiator and the bumper (shown in the photo below).
If there are two of them paired (as on Priors with Halla air conditioning), then a different method for dismantling the generator is described below.
Replacing the generator diode bridge on a Priora
So, in order to remove and change the diode bridge on the 2170 car and its configurations, you must first remove the plastic cover, under which the rectifier unit is located.
After this, all fastenings for this part become available to us. It is worth noting that in this case the repair will be considered specifically using the example of a new type generator - meaning with a conventional integrated circuit and brush assembly, as on Kalina, Grant and other recent VAZ front-wheel drive cars.
From the above photo you can clearly see that the first step is to unscrew the nut securing the brush assembly contact; of course, all this is done using a regular 13 mm wrench. Then unscrew the remaining mounting bolts. It is most convenient to use a ratchet handle or a socket with an 8 mm knob:
Now the most interesting thing remains - to disconnect the winding wires from each of the diodes. To make your work easier, immediately prepare two flat-blade screwdrivers.
After all the diodes have been dealt with, you can easily remove the bridge assembly, as shown in the photo below.
Installing a new one occurs in the reverse order of removal. Of course, the assembly is carried out carefully so that there are no problems after installation - a short circuit or vice versa, an open circuit, etc.
How to remove the generator on a Priora with air conditioning through the headlight
On Prioras, where an air conditioner is installed, the process of dismantling the generator is also complicated by the fact that the climate system pipes interfere with its removal. However, dismantling is quite possible, and there are different ways to do this. The most time-consuming option is to remove the generator through the headlight. How to do this correctly, we will consider in detail below.
- We de-energize the car by disconnecting the negative terminal from the battery.
- Next, you need to remove the right headlight, and also dismantle the adsorber. How to do this correctly is described in detail in this manual (for 8 and 16 valve models).
- After the headlight and adsorber have been removed, we continue to further describe the process of removing the generator on a Priora with air conditioning. Using a “10” wrench, unscrew the bolt securing the air conditioner pipes (shown in the photo).
- Lift the tubes out.
- Unscrew the bolt securing the air conditioner pipes next to the right engine mount.
- Remove the belt from the generator pulley by unscrewing the tensioner pulley bolt with a 17 key.
- Disconnect the wires from the generator. It is most convenient to do this from below, so we remove the protection (if it has not already been dismantled). Having gained access to the rear cover of the generator, disconnect the first connector “L” by removing the plug. To turn it off, you need to press the corresponding tab (latch or flag).
- Next, we move aside the protective cover from the other contact “B+” of the generator, and unscrew the nut with a wrench set to “13”.
- Using two “13” keys, you need to unscrew the upper mount of the generator and remove the bolt. The instructions from Avto-VAZ indicate that you need to unscrew the lower fastening first, but in reality there is no difference.
- After this, unscrew the lower mount of the generator using keys “13” (nut) and “17” (bolt head). We take out the bolt.
- We remove the generator through the vacated headlight hole.
- It is installed back in a similar way.
As noted above, removing the generator on a Priora through the headlight is one of the most labor-intensive processes, since many parts need to be removed. However, there are other options for dismantling the unit. Let's consider other methods.
Where to buy and how much does a generator diode bridge cost for a Priora
In fact, such a part as a rectifier unit should be present in every auto parts store, since its failure is a fairly common breakdown. Depending on the type, as well as the current strength of the generator, diode bridges can have different prices:
Typically, on a Priora with air conditioning, more powerful 115 Ampere generators were installed from the factory, and accordingly, axles must be selected taking this fact into account.
Of course, a similar product can be bought at a car dismantling center, and if you wish, you can find a really fresh diode bridge at least half the price of the store price.
Leave a reply Cancel reply
You must be logged in to post a comment.
Source
Generator for Priora with fasteners, brackets and belt: articles and types
The mounting scheme for the generator on a Priora without a generator and air conditioning differs from more expensive modifications. The difference lies in the unit mounting bracket. Below is a diagram of the device with the designation of all elements.
Priora without power steering and air conditioning
The names of the parts, as well as their original numbers, are shown in the photo below.
As can be seen from the diagram, on such motors the belt tension is adjusted by changing the position of the unit itself. The upper fastening element is designed accordingly for this purpose. In addition, it is important to pay attention to the fact that Priors are equipped with generators of various modifications. Their original codes are presented in the list above.
Priora engine without power steering and air conditioning
On Priors with air conditioners (and without them) and power steering, slightly different modifications of the generator brackets are used. The photo below shows their diagram with the designation of the elements.
Priora with air conditioning or power steering
Interesting! Priora was also produced in a limited number of models with power steering and air conditioning.
It can be seen that the bracket is significantly different from the previous type. It does not have an adjustment plate, and the tensioner roller is responsible for adjusting the belt tension on Prioras with this fastening design. Below are the names of the parts, as well as their article numbers, which may be needed if it is necessary to purchase new original products due to failure of standard elements.
Having understood the differences, you can now consider the process of removing or dismantling the generator on a Priora in different ways.
How to remove the generator on Lada Priora? 3 possible ways
Applicability: vehicles VAZ-1117, -1118, -1119 (Kalina), VAZ-2170, -2171, -2172 (Priora Lux), VAZ-2190 (Granta)
Features: Alternating current generator 9402.3701-14 with a built-in rectifier unit and voltage regulator, designed to work as a source of electrical energy in parallel with the battery in the electrical system of the VAZ-1117, -1118, -1119 (Kalina"), VAZ-2170, -2171, -2172 (“Priora” Lux), VAZ-2190 (“Granta”); operating at ambient temperatures from minus 40 C° to plus 45 C° and humidity 90%. The generator is intended for supply to the domestic market and for export to countries of all climatic zones.
1. Multifunctional voltage regulator 897.3702 (Description). From the factory the relay number is TRT5-01. Integral relay 849.3702 is not suitable for this generator.
Replacing the generator diode bridge on a Priora
So, in order to remove and change the diode bridge on the 2170 car and its configurations, you must first remove the plastic cover, under which the rectifier unit is located.
After this, all fastenings for this part become available to us. It is worth noting that in this case the repair will be considered specifically using the example of a new type generator - meaning with a conventional integrated circuit and brush assembly, as on Kalina, Grant and other recent VAZ front-wheel drive cars.
From the above photo you can clearly see that the first step is to unscrew the nut securing the brush assembly contact; of course, all this is done using a regular 13 mm wrench. Then unscrew the remaining mounting bolts. It is most convenient to use a ratchet handle or a socket with an 8 mm knob:
Now the most interesting thing remains - to disconnect the winding wires from each of the diodes. To make your work easier, immediately prepare two flat-blade screwdrivers.
After all the diodes have been dealt with, you can easily remove the bridge assembly, as shown in the photo below.
Installing a new one occurs in the reverse order of removal. Of course, the assembly is carried out carefully so that there are no problems after installation - a short circuit or vice versa, an open circuit, etc.
How to remove a generator without air conditioning from a Priora with power steering: detailed instructions with photos and videos
Without much further discussion, let's get straight to the point. For ease of work, it is recommended to install the vehicle on an inspection hole, if available. However, this is not a prerequisite, since you can reach the generator mount from below and without a hole. Be sure to begin dismantling work by first removing or disconnecting the negative terminal from the battery. This will protect the car from shorting the wiring.
On a Priora without air conditioning with power steering, the process of dismantling the generator is performed in the following sequence:
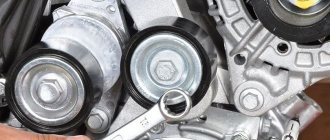
- First of all, using a key set to “17”, you need to loosen the bolt securing the tensioner pulley. There is no need to remove the bolt together with the roller if you do not plan to replace them. Remove the alternator belt from the pulley and move it to the side.
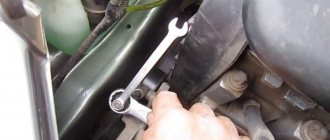
- Using a wrench set to “13”, unscrew the nut of the upper mounting of the generator. If necessary, hold the bolt with a key set to “13” on the other side. After unscrewing the nut, remove the bolt from the upper mounting of the generator. The photo shows it already removed.
- Now we move on to unscrewing the lower mount of the generator. To do this, we first remove the engine protection (if it is, and if not, then it is better to install it after completion of the work). We move down and unscrew the nut with a wrench at “13” of the lower generator mount. After this, we pull out the bolt, which is impossible to do on Priors with power steering. It will definitely rest against the engine mount bracket.
- And this is where the fun begins. Further actions throw everyone involved in the dismantling into a stupor. To remove the bolt, you need to remove the spacer sleeve from the side where the nut is located, as indicated in the instructions class=”aligncenter” width=”600″ height=”494″[/img]
- However, in practice this does not work, and after removing the bushing, the bolt still cannot be pulled out. That is why there are already proven methods on what to do correctly in this case in order to remove this bolt. The first method can be called anti-vandal. To implement it, you need to install a jack under the engine and jack it up.
- Next, in the engine compartment, we find the rear engine mount (aka guitar) and use a “15” key to loosen fastening No. 1 in the photo below. Having unscrewed the nut of bolt No. 2 (also with a key set to “15”), we pull it out (we do not pay attention to the air conditioner pipe, these instructions are specifically for Priora without air conditioning).
- We perform the same procedure with the front engine mount. Unscrew the nut with a 15mm wrench and remove the bolt. At this point, the engine must be secured with a jack so that it does not fall down.
- Unscrew the right support nut using a 17mm wrench. There is no need to remove the right airbag unless you plan to replace it. If you need to replace it, it is secured with two bolts with a Torx-E10 socket head.
- Next, slowly and carefully jack up the engine until the power steering pump pulley rests on the right cushion bracket.
- You can now remove the lower alternator mounting bolt. After this, the unit is removed. We’ll look at how best to do this a little later. For now, the second option is how to remove the lower bolt of the generator on a Priora. This method, unlike the first, is called vandal. To implement it, you will need a metal file (not a hacksaw, but only a blade).
- The blade is used to saw the bolt leg. There is no need to cut completely, but until it bends to be removed from the seat. If you cut the bolt completely, a new problem will arise. The rest of it will be difficult to get.
- We remove the bolt from the seat after bending it, and now all that remains is to disconnect the wires from the generator and begin dismantling it.
- In this case, it is important to purchase a new bolt to replace the deformed product. The original part has the number 21100-3701376-00 and standard dimensions M8×110. The bolt is installed back on the other side so that next time you don’t have to worry about removing it.
- Disconnect the “D+” wire connector from the device. After this, we move the rubber protective cover aside and use a “10” key to unscrew the contact nut “B+”. The negative terminal on the battery must be disconnected (check again).
- Now we remove the generator. If the engine has not been jacked up, then it is better to remove the device from below in the gap between the engine and the radiator.
- If the engine has been jacked up, the generator can be removed from the engine compartment.
Further actions with the removed generator depend on the type of its malfunction. After repair or in case of replacement, installation is carried out in the reverse order.
Below are video materials that show how to remove a generator on a Priora with power steering without air conditioning by lifting the engine.
And also a video instruction, which shows in detail how to saw off the lower mounting bolt of the generator on a Priora with power steering (without air conditioning), and remove the device from below.
Another method of removing a generator on a Priora is described in the video below.
Priora generator brushes: how to replace them correctly and do it yourself
If the owner of the Priora notices that the charge from the battery is disappearing, first of all, he needs to check the condition of the generator brushes. Of course, at first the charge decreases insignificantly, but if the problem is not corrected in time, the charge will very soon disappear altogether. Replacing the brushes of the Priora generator, which are clearly worn out, will help correct this problem.
Important! The brush mechanism of the generator on the Priora cannot be repaired. If any breakdown occurs, only replacement along with brushes will be required.
Since this process is not so complicated, you can do everything yourself. You just need to take into account the recommendations of professionals.
What tools are needed for work?
Before changing the brushes on the generator, prepare the tools you will need for the job:
- flat screwdriver;
- wrench – it’s better if it’s an open-end wrench (size 13);
- car head with wrench (size 10).
Changing the generator brushes, process sequence
It is quite possible to replace the alternator brushes on a Priora that have worn out without removing it. But, according to experts in their field, the process is simplified if replacing the generator is preceded by removing it from its usual location.
Important! When carrying out any work on the generator (replacement, repair, etc.), be sure to disconnect the battery. https://www.youtube.com/embed/gh7P7zWPOOc
After removing the generator on the Priora, replacement is carried out as follows:
- Use a screwdriver to remove the plastic cover, which is designed to protect the device. Having done this, you gain access to the brushes;
- disconnect the connecting plug from them;
- slowly unscrew both fasteners (they are located along the edges of the elements that are inspected);
- Take the above key and unscrew the locking bolt. Do this in the center of the element;
- Having unscrewed all the fasteners, remove the brushes, inspect them, assess their condition and replace them with new ones, connect the wires.
What are the signs that indicate that the generator brushes have become unusable?
The following external “signs” will help with this:
- if, upon examining this element, you find that its length is less than 5 mm, it certainly requires replacement;
- if the brushes are worn unevenly, this will also negatively affect the functioning of the generator, so they need to be replaced.
There is no need to skimp on buying new brushes. If you find a cheap option, it is highly doubtful that they will last long. It is more likely that such savings will lead to the need to re-replace the above-mentioned components.
Reassembly
After purchasing high-quality brushes (it is advisable that your choice falls on a well-established manufacturer), you can begin the general assembly of the element, and then install the generator itself in its place.
However, as mentioned above, the last procedure can be performed without removing the generator. Which, however, is something every car owner decides independently. All operations performed should be performed in reverse order.
After completing the work, the operating efficiency of the entire generator must be checked.
If the replacement of failed brushes was carried out correctly, and the battery was discharged precisely because the main elements of the car’s electrical system were worn out, the car owner will solve this problem without the help of service station workers.
And in this case, you will save a lot on such a service. The replacement process is really quite simple. However, if you encounter any difficulties during the repair work, you can watch the help video. It is provided by specialists.
On the Internet resource you can, among other things, find out:
about design features - generator 2170; how to check the generator for operability, what you should pay special attention to; how to change wipers on a Priora and so on; what other possible problems with the energy generator
Lada Priora Hatchback 217230 › Logbook › Replacing the diode bridge on a Priora with air conditioning
So I decided to “dig deeper” into Gennady... Day 1.
What can I say... the day before yesterday the battery light on the dashboard came on, and I had to drive 100 km... It was getting dark in the evening... In the end, it got to the point where a squeaking sound began to appear, the power steering failed, and a whole bunch of other troubles, with grief I drove across the floors and made it to the garage. The battery is drained - 11.7 V, a clear sign of undercharging...
I took it off, put it on charge, and charged it with a Soviet charger-boiler. BANG - the fuse on it blew out... I think it’s strange... I put a backup one... the flight was normal, but the wires began to get very hot, in order to avoid misunderstandings... I left this matter the next day and went home.
see also
Comments 38
I would like a diode bridge right now and a snout for 350 rubles... Fucking dreams
The diode bridge that was purchased is from the so-called Chevrolet Niva with a voltage regulator from the 10, it does not work, but if you buy an additional regulator from Shnivy, the generator would work a little better, the power will not increase, but the voltage will be more stable
I've been having the same problem lately. The generator produces 13 V and, accordingly, the battery is constantly undercharged and the light flickers at idle. And a couple of days ago the revolutions jumped to 2000 rpm. We need to start doing something.
Advice! Install a (THREE LEVEL VOLTAGE REGULATOR) on your generator and you WILL FORGET ABOUT UNDERCHARGING the generator FOREVER! There is information on the Internet about this gadget. I suffered with undercharging for four years. And now I’ve been using this gadget for six years now, which has never failed!
Tell me, is there a bosh 14v regulator, can it give more than 14v, otherwise I checked it at work and it cuts off at 13.8, everyone claims that it should cut off at 14.3, how can it be if the limit is 14v? very interesting, please tell me
On Friday the gene died and stopped charging, all of a sudden. Over the weekend I read all kinds of passions on the forum and was already prepared to replace the genes. Today I went to the station because... It's cold outside and I didn't want to mess around with it myself. The master did not remove the gene from the car, he threw off the wires, plastic casing, relay regulator and diode bridge. Of course, he was perverted, but it turned out to be quite possible to replace the relay-regulator without removing the gene. I rang everything, everything works, I put everything back again, the battery icon on the panel is on and there is no charging, I replaced the relay regulator and the problem went away. I paid 1000 rubles for the relay and work. the relay in the store costs 300 rubles. the rest is work. But I don’t want to pervert and cut my hands and I don’t recommend it to anyone. If the problem happens again, I’ll do it myself next time, I already have experience.
Diagnostic methods
There are two main methods that will allow you to determine the malfunction of the generator diode bridge. You need to choose based on what you have at hand. The first option requires the presence of a multimeter, and the most entry-level option, which is inexpensive, is suitable. The second is a regular 12V light bulb with three long wires so you can connect them to the right pins.
Diagnostics using a multimeter
Let's look at the option without removing the diode bridge, since it requires less time. The test is easy to carry out on an installed unit if you know the main features. The process is simple; you first need to provide access to the generator contacts. After this, carry out the following checks:
- When checking for a short circuit, press the positive contact of the multimeter to pin 30, and the negative contact to the body. If everything is in order with the diode bridge, the resistance readings will tend to infinity. Any other reading indicates a problem.
- To find out whether the positive diodes are broken, you should attach the positive terminal to pin 30 on the generator, and the negative terminal to the diode bridge mounting bolt. If everything is in order, the resistance will tend to infinity.
- To test the performance of negative diodes, you need to press the positive probe against the bolt that secures the diode bridge, and attach the negative probe to the housing. The readings should tend to infinity.
- To check additional diodes, the positive contact of the multimeter should be pressed to pin 61 on the generator, and the negative contact to the mounting bolt of the diode bridge. As in all cases above, the resistance should tend to infinity.
Important! Do not forget to first switch the device to ohmmeter mode.
Using simple recommendations, you can literally check in a few minutes and find out whether the diode bridge has burned out or the reason lies in another unit. You can use not only a multimeter, but also any other device if it has an ohmmeter mode.
Checking the bridge with a light bulb
This option is especially good on the road, because it only requires a 12-volt light bulb and three long wires with bare ends. Or you can use a ready-made warning lamp, they are sold in car dealerships. In this case, proceed like this:
- To detect a short circuit, the plus must be pressed to pin 30 on the generator, and the minus must be shorted to the housing. If the light is on, you need to change the diode bridge, but if not, then everything is in order.
- To test positive diodes, you need to apply positive from the battery through the light bulb to pin 30 of the generator. Connect the negative from the battery to the bridge mounting bolt; if the lamp is on, one or more positive diodes are broken.
- From the battery through the light bulb, the plus is given to the diode bridge mounting bolt, and the minus goes to the housing (also from the battery). If the lamp is on, the negative diodes are faulty.
- If you connect the 61 terminals of the generator to the positive terminal of the battery through a light bulb, and apply the negative terminal to the diode bridge mounting bolt, you can check additional diodes. If they are faulty, the lamp will light up.
This option, due to its simplicity, allows for quick diagnosis. However, it will not require much time and will allow you to identify the problem within a few minutes. But it is better to work with an assistant to hold the wires.
Circuit and device
The generator diagram shows how the unit is connected to other components of the car. Lada Priora with air conditioning and power steering received model 5102.3771, which has a number of advantages over generators of previous generations. Increased current output at low engine speeds is one of the advantages of the device: the timing rotor speed is reduced by 300 min, while the output is increased by 4-6 A. This innovation made it possible to use an automatic transmission, and also increased performance for the winter period.
The diagram shows that the operation of the device is monitored by a warning lamp that is installed in the dashboard. When you turn the key in the ignition, the lamp should light up, and after starting it should go out. This is how a working generator works. If the lamp continues to light while the engine is running, then there is a malfunction in the operation of the unit; the diagram will help you understand it.
Once the circuit has been studied, you can move on to the details of the generator.
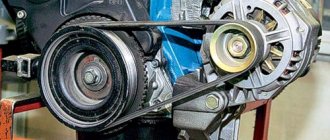
How to tension a belt and check its tension
For Priora, in addition to the original ones, similar belts from foreign brands such as Contitech, Dayco, Gates, and Flennor are recommended.
Symptoms of a problem
On automobile forums you can often see complaints from Lada owners with air conditioning about increased current. It is worth saying right away that the current cannot be increased - this applies to voltage. If the instruments show you that the current in the generator is too high, then you need to look for a problem in the relay. Electrical defects include burnout or wear of brushes, broken wiring and windings, damage to the regulator relay (increased current), and defects in the operation of the diode bridge. As for mechanical failures, these include worn springs and bearings, belt damage or damage to the housing.
You can understand that the Lada generator needs repair or replacement by the following signs:
- Extraneous sounds when driving that come from the right side of the hood.
- During diagnostics, the devices report that there is an increased current in the node. The scheme does not provide for this.
- The battery discharge indicator flashes or lights up even when the power plant is running.
- The headlights became dim.
- The brightness of the optics is constantly changing.
You can determine whether the generator with air conditioning is working or not by measuring its voltage. First you need to get the readings at the battery terminals, you need to start the engine and take the data while the Priora unit is running. Before starting, the voltage indicator should be 12 V, and after - from 13.8 to 14.7 V. If the deviation is in the smaller direction, then this indicates that there is no current flowing, and in the larger direction, there is an overload. The current cannot increase above the limit, so it is worth looking for the reason in the regulator relay.
Features of detecting generator breakdowns on Priora
The generator on a car is the most important element, therefore, if its electrical part malfunctions, the battery icon on the panel will immediately light up, which indicates that the battery is not receiving current from the source of its generation. In this case, the unit must be checked, the cause must be identified and eliminated. The reason could be anything:
- oxidation of the battery terminal;
- alternator belt break or loosening;
- brush wear;
- malfunction of the regulator (integrator);
- failure of the diode bridge;
- collector wear.
All these breakdowns will appear in the form of a highlighted battery icon on the instrument panel. If the cause of the generator breakdown is a faulty bearing, then it will also not be difficult for the driver to identify it. After all, in this case, extraneous noise will be emitted from the engine, and if you open the hood, it will clearly be visible next to the generator. To really make sure that the cause of this extraneous noise is the generator, and not the pump or other timing elements, you should remove the belt from the generator and start the engine. The absence of a characteristic sound is the main sign that the breakdown lies in the generator and it needs to be dismantled.
Interesting! You can check the serviceability of the generator for electrical function using a multimeter. With the engine running, you need to measure the voltage at the battery terminals. Without any electrical appliances on the car, the multimeter should show a voltage of at least 13.8V, and ideally 14.2-14.5V. Now let's make sure that the generator produces sufficient voltage under load. We turn on the car's heater, headlights, heated rear window, fog lights, and record the readings again. A voltage drop to 13.7V indicates that the electrical part of the generator is working properly and the unit can continue to be operated. If the value is 13.5V and below, then the device should be diagnosed, otherwise the battery will soon be completely discharged at one point.
Alternator malfunctions should be repaired after removing it from the vehicle. Exceptions include situations where the belt breaks or loosens, as well as contact oxidation. Some car owners are so afraid of the procedure for removing the generator on a Priora that they resort to replacing the voltage regulator on the installed device. However, this is quite possible to do, as evidenced by the experience of car owners.
It is only important to make sure that the cause of the corresponding malfunction is the voltage regulator, and not a worn-out collector or a broken diode bridge.
Selecting and repairing a generator: help for prior drivers
The generator on any vehicle, including the Lada Priora, is designed to power electrical equipment while driving. Much depends on the performance of this unit, and its breakdown will lead to the fact that the equipment will not be able to work correctly. Learn more about the design, malfunctions, and installation of the mechanism from this article.
Regardless of which generator is installed on the Priora, the owners of these cars often replace the unit due to the fact that not all devices allow connecting various equipment to the on-board network. Which manufacturer is good and which device is better to install on the Lada Priora?
You can supply generators of the following brands:
- BATE 90 ampere;
- KZATE 115a;
- BOSCH 120 amp;
- devices manufactured by VAZ for 120 or 115a.
Generator unit for Priora
In principle, other models of generator devices for domestic cars can be found on sale. When purchasing, the main thing is to check the integrity of the unit so that there are no signs of damage on the body.
It is better to install high power so that there is a power reserve, thereby the device will last longer.
In addition, it should be taken into account that it is not recommended to install less powerful generators, especially if many devices are connected to the vehicle’s on-board network.
Possible malfunctions and ways to eliminate them
The operation of Lada Priora generating devices may occasionally fail.
For what reasons may a generator from Priora not work correctly:
- Elements F12 have burned out on the fuse diagram. In this case, the devices on the dashboard will stop working, and the lamp will not light up when the ignition is turned on. Replacing the part will solve the problem.
- There has been a break in the power supply circuit of the instrument devices; the symptoms will be similar to those described above. To fix the problem, you need to check the connections, as well as the contacts from the orange wiring.
- The ignition switch refuses to function. Regardless of what kind of lock it may be, it needs to be changed.
- Souring or wear of the mechanism brushes, oxidation of slip rings. Symptoms of malfunction will be the same. To solve the problem, you need to change the voltage regulator on the Lada Priora, and also clean the contacts. Many priority drivers today use a three-level voltage regulator - three levels allow you to always control the voltage level in the network.
- The excitation winding leads have broken. The problem can only be solved by replacing the rotor of the unit.
- If the drive belt slips, the battery discharge lamp will indicate this - adjusting the tension will solve the problem.
- Another reason why the Priora Lux generator may be faulty is damage to the valves of the rectifier device. The block itself will have to be replaced.
- The battery discharge lamp may appear when the diode batteries of the excitation winding are damaged. In this case, the rectifier unit will also have to be changed.
- A short circuit or break may occur in the stator winding - it will be necessary to repair the latter or install a new one instead. Also, the stator needs to be changed in case of an interturn short circuit or a short circuit to ground.
- The bearing elements have worn out - the car owner will be informed about this by third-party sounds when the generator unit is operating. In the video below you can familiarize yourself with the procedure for repairing a mechanism at home (the author of the video is Repair and Tuning).
How to check the generator on a Priora
To check the operation of the unit you will need a multimeter. A very useful device if you often do your own electronics repairs.
Checking the generator on a Priora
First of all, you need to check the voltage on the battery. To do this, start the car, turn on the maximum number of consumers, check the voltage level at the battery terminals with a multimeter. Acceptable values are no less than 13.5 V and no more than 14.
Removal and replacement
The generator body should be marked so that it can be assembled later. Tags will be needed for motorists who want to disassemble its body. The marks will help in the final stage to correctly place the cover and secure all the fasteners.
If you want to carry out a full check or change the timing belt, then you won’t be able to do it without dismantling it. Below are instructions for Lada Priora with air conditioning and power steering. The difference from a car without air conditioning is that we will have to approach the generator from below. The car should be driven onto a viewing hole or a lift, after which the replacement begins. For repairs you will need a standard set of tools.
The replacement begins with dismantling the engine protection; Now we move on to the timing belt tension roller, we need to loosen its tension a little, check that the tension remains; Find the upper timing belt mounting bolt and unscrew it;
The bolt highlighted in red is difficult to reach without a ratchet - you need to unscrew it; first move under the car. There will be more problems here, since the fasteners are located in a hard-to-reach place. An extension cord with a ratchet and a 13mm head wrench will make the situation easier;
Unscrew all fasteners shown in photos
Let's start replacing
Replacing a Priora generator with air conditioning
To remove the generator on a Priora with 16 valves with air conditioning, you will need a pit (overpass) or a lift. You can simply jack up the car, but it will be inconvenient and unsafe.
Replacing a Priora generator with air conditioning
After that:
- Remove the negative terminal from the battery.
- Remove the engine protection.
- Remove the rubber protective cover from the power wire contact on the generator and unscrew the nut.
- Unhook the control wire's Euro plug.
- Unscrew the tensioner pulley and remove the belt.
- We unscrew the air conditioning compressor (there is no need to remove the pipes from it, otherwise you will have to fill the air conditioning system with freon).
- We unscrew the assembly itself directly, prying it with a screwdriver, pull it out to the right (towards the middle of the car), simultaneously moving the compressor away (everything is intuitive).
We reassemble in reverse order.
How to remove the generator
To replace the generator in cars with a simple configuration, you will need a pit or overpass. Due to the absence of an air conditioning compressor and power steering, access to the generator is free and unrestricted, so it can be removed without much effort:
- Remove the negative terminal from the battery.
- Remove the engine protection.
- Loosen the upper belt tension bolt.
- We remove the belt.
- Unscrew the two bolts securing the unit requiring replacement.
- We take out the generator.
We perform assembly in reverse order.
How to remove a generator on a Priora with power steering
To remove the generator from the Priora 115A, you will need a pit (overpass) or a lift.
- Remove the negative terminal from the battery.
- Remove the crankcase protection.
- Remove the rubber cover and unscrew the power cable nut.
- We unhook the Eurochip.
- Unscrew the tensioner pulley and remove the belt.
- We unscrew the power steering compressor (leave the pipes, otherwise oil will spill).
- We unscrew the generator itself and pull it out to the right (towards the middle of the car), while simultaneously moving the compressor away.
We carry out the assembly similarly to the previous operations, in reverse order.
How to connect the replaced node
In order for the newly installed generator to start working correctly, the following is necessary:
- Insert the control wire plug into the generator socket.
- Screw on the power cable with a nut and put on the rubber cap.
- Place the belt over the pulley.
- Use the bolt on the top bracket to tighten the belt.
- Check belt tension. The belt should not rotate more than 90°.
On vehicles with power steering and air conditioning, the belt is tensioned using a tensioner pulley. To do this, use a special wrench to turn the roller to the required tension level and tighten the fixing bolt.
Alternator belt: how to tension, what tension should be and how to check
How to tension the alternator belt
Many car owners are interested in the question: how to tighten the alternator belt? After all, the battery charge level and the voltage in the car’s electrical network depend on this. Also, the condition of the belt itself, as well as the condition of the crankshaft bearings and the generator shaft, depend on how the generator belt is tensioned. Next, we will analyze in detail how to properly tension the alternator belt with a specific example.
The importance of tension level and checking it
Let's consider what unpleasant consequences an incorrect level of tension will lead to. If it is weakened, then there is a high probability of slippage. That is, the generator drive will not operate at rated speed, which in turn will lead to the level of voltage generated by it being below normal.
The result is an insufficient level of battery charging, insufficient electricity to power the vehicle systems, and operation of the electrical system under increased load.
If the belt is too tight, this can also cause excessive wear on the belt itself. And in the worst case, even to its breakage. Also, excessive tension has a detrimental effect on the bearings of the crankshaft and generator shaft, because they have to work under conditions of increased mechanical load. This leads to excessive wear and speeds up their failure.
Common causes of generator failure
Avto-VAZ very often presents car owners with various surprises that arise during operation. One of these is the generator on the Priora, which can hardly maintain 60 thousand kilometers without problems. Once the numbers on the odometer exceed the specified value, malfunctions of this most important component on the car may occur at any time. A faulty generator makes it simply impossible to operate the car, since it does not produce the current necessary to charge the battery. Everyone is familiar with the purpose of a generator on a car, and if there are gaps in memory, then below is material that will help refresh your knowledge.
The service life of generators depends on various factors. This includes the manufacturing quality of the device, operating features, and even work on diagnosing and eliminating minor defects. Typically, their service life on budget cars is at least 5 years or 100-120 thousand kilometers. This is exactly the service life that, in theory, devices on Priors should have, but as mentioned above, these values differ greatly (it is important to note that this is not always the case). This is all due to the quality of the generators that the Priors are equipped with from the factory. These are devices of the famous or “LADA”, problems with which are known not only on the VAZ-2170, but also on other cars from the Russian concern.
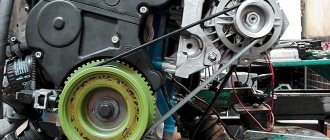
Touching upon generator malfunctions on Priora, it should be noted that a common problem is not in the electrical part, but in the mechanical part. The reason lies in the rotor bearing, which, when it fails, produces a characteristic hum and grinding noise, indicating that the car owner is faced with at least the need to dismantle the generator. Such repairs are not at all complicated, but quite labor-intensive for known reasons. The biggest difficulty is removing the generator on the Priora, which is located between the engine and the radiator. Owners of the VAZ-2170, who have had to look under the hood of their car more than once, are well aware that the generator is located in a very limited space, and access to it is closed from all sides.
Interesting! An overtightened alternator belt leads to accelerated wear of the bearings.
The most common reasons why Prior owners need to dismantle the generator are:
- Bearing failure. These elements fail more often than the brushes on the voltage regulator wear out.
- Voltage regulator malfunction. The brushes on the device wear out, and the generated voltage to the battery also drops.
- Worn slip rings or commutator.
- Malfunctions of the diode bridge, which often occurs when moisture gets into the device, and as a result, oxidation appears.
In all of the above situations, you can repair the generator by replacing or eliminating defective elements. If the stator or rotor winding fails, then in such situations the unit must be completely replaced.
Interesting! If it is necessary to replace generator bearings on a Priora, you should choose products of the following types: B17-102DG38 - front support (has the following dimensions: outer diameter - 47 mm, inner diameter - 17 mm, width - 14 mm), 6202DW8 - rear support (outer diameter - 35 mm, internal diameter 15 mm, width - 11 mm).