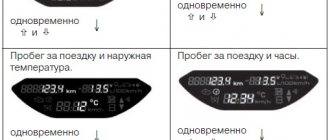
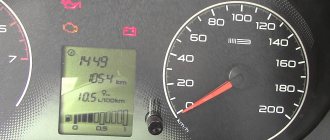
The on-board route controller in the practical Lada Largus station wagon is an electronic device that allows for continuous collection, processing and subsequent display of information regarding various operating modes of important vehicle systems.
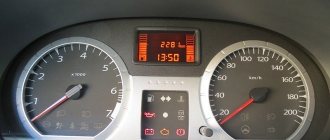
The manufacturer installs a standard on-board computer in a standard socket located on the dashboard between the speedometer and tachometer scales. The design of the controller and its operation are made in such a way that the risk of interfering with the procedure for diagnosing electronic systems in Lada Largus during maintenance in a specialized service is completely eliminated.
The on-board computer allows you not only to display route information, but also to independently determine the presence of errors with the possibility of their subsequent removal. Here the owner provides himself with some cost savings in terms of not having to visit a diagnostic service every time the “CHECK” symbol on the dashboard spontaneously lights up.
Depending on the equipment level of the Lada Largus station wagon, the trip on-board computer may differ in its capabilities.
Lada Largus › Logbook › Start-stop button. Immobilizer bypass. Thriller, second episode
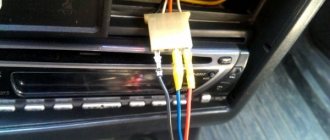
A logical continuation of installing a start-stop button. Something needs to be done with the standard immobilizer. The first option was this: I bought a Starline lineman at a nearby store. I took the antenna from him and put it on top of the antenna casing of the standard immobilizer. There was a dead Shurik charger lying in the garage, I took it apart, sawed it off, wound a coil, brought it into divine shape, soldered the wires from the antenna, and screwed it onto the center console near the right leg. The idea was this: I got into the car, put the key in this unit, the coil read the chip, pressed the button, and drove off. There is no key in the box - the car will not start. The sting of the key sticking out from the bottom of the box was annoying, I corrected the situation by purchasing a folding key housing. I didn’t sharpen the tip, I shuffled the original one a couple of times with a file and inserted it into the new body. Everything is working. More precisely, it worked. Until the first sub-zero temperature. The only negative is that this system does not see the key. Plus, it starts without problems. What the hell, -HZ. Well, don’t think about it, you have to go. I did option number two.
I took off my box and installed the factory one from Starline. Naturally, I had to put a chip in there. It starts with half a kick, but the chip is always in the car, you can’t take it with you like a key. Putting a switch in the gap is a crazy idea, and the ritual of starting the engine becomes more complicated, but on the contrary, I want to simplify it. This is how the idea of a time relay with remote control came up. I ordered it, guess where, it arrived. I set it for 15 seconds (in reality it turned out to be 19) and connected the lineman’s power wire to the break. And along the way, purely for visual control, I soldered an LED in parallel and stuck it into the panel not far from the button. Now this disgrace looks like this: I got into the car, pressed the button on the key fob (the LED lit up, i.e. the relay supplied power to the lineman), pressed the start-stop button, and drove off. After 5/10/15 seconds (configurable), the relay turns off the power to the lineman. If the engine is running, the chip is not needed; it is polled by the computer only at startup. Well, if you have to leave the car in suspicious places, then it makes sense to remove the service mode from the button. Then, upon startup, you will also have to bring the tag directly to the reader of the button itself. You could say there are two immobilizers.
And one more thing: do not place the crawler unit close to the stove, it heats up and stops seeing the chip. Until it cools down. I first put it in the panel under the radio, when I realized the reason, I moved it and the problem went away.
We take out the fuel pump.
The fuel pump on Largus is located under the rear seats. In order for us to get to it, we recline (raise) the rear seats - “forward”.
The hatch with the fuel pump is located under a black cover. To move the cover we need to unscrew the plastic fasteners and remove the top plastic casing.
We pull the floor covering a little to the side and the protective cover of the fuel pump is visible in front of us. Remove the protective cover and clean off all the dirt and dust near the plastic nut of the fuel pump
. Now we can disconnect the supply fitting and unhook the connector.
To remove this connector, you need to have a small and thin screwdriver, otherwise you will not be able to bend it. Made a little awkwardly.
This will be the first and smallest difficulty we encountered.