VAZ-2170
- Specifications
- Controls
- Dashboard
- On-board computer
- Lighting engineering
- Interior heater
- Air conditioner
- Circuit breakers
- Replacing lamps
- Passport details
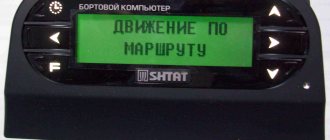
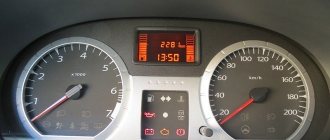
The LCD of the on-board computer is located on the dashboard and contains three lines:
- the top line displays the total/daily mileage counter;
- The middle line displays the functions of the on-board computer, the display of which is carried out sequentially, at the choice of the driver:
- The bottom line displays the icon for the selected mode.
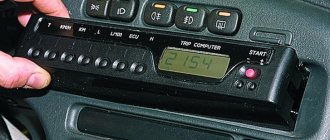
To switch between the bottom line display modes, use the keys on the steering column wiper switch: the keys (position 2) located at the end of the switch switch functions “in a ring” forward and backward; the “Reset” key (position 1), located at the bottom of the switch, resets the values to “zero”.
The top line readings (total/daily mileage) are switched by a button located on the right side of the dashboard (under the fuel gauge). If the daily mileage counter is displayed, then to reset it, you must press and hold the button for 3 seconds.
The procedure for setting the clock on the Lada Priora:
- To switch from the current time indication mode to the installation mode, you must press and hold the “Reset” key for more than 3 seconds, while the hours and minutes will begin to flicker;
- The minutes are set by pressing the “ring forward shift” key located at the end of the steering column wiper switch;
- The clock is set by pressing the “ring back shift” key located at the end of the steering column wiper switch;
- When you press the key once, the minutes/hours value increases by “1”; to change the values faster, you need to press and hold the key;
- When setting the minutes, the seconds counter is reset to zero (setting the hour counter does not affect the seconds counter);
- To return from the installation mode to the indication mode, you must briefly press the “Reset” key or, in the clock setting mode, do not press any key for 1 minute.
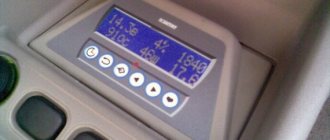
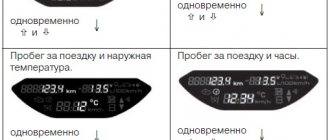
Detailed information about the displayed functions (their ranges) of the Lada-Priora on-board computer:
- current time
(hour, min) - 0:00-23:59 (resolution 1 minute); - outside air temperature
(°C) — -40°C…+70°C; (resolution 1°C); - driving time
(hour, min), defined as the time during which the engine has been running since the last reset - 0:00-99:59 (resolution 1 minute; to reset, you must hold the “Reset” key for 3 seconds) - average fuel consumption
(l/100km) - 0.0-19.9 (resolution 0.1l/100km; after zeroing, the first 500 meters of the distance traveled are not indicated); - instantaneous fuel consumption
(l/100km) - 0.0-19.9 (not displayed if the speed is less than 1 km/h); - approximate remaining power reserve
(km) - 999-30 (resolution 5 km); - average car speed
(km/h) - 0-250 (resolution 1 km/h; after zeroing, the first 500 meters are not displayed); - amount of fuel consumed
(l) - 0-9999 (resolution 1 l; to reset, you must hold the “Reset” key for 3 seconds).
To the top of the page
The on-board computer of a Priora car is: 1) a way to obtain current information about the operation of the car and devices. For example: speed, engine speed 2) this is an indication of errors and a reminder to do maintenance. There are two types of devices on Lada Priora. They show approximately the same thing, but are designed differently: on the pre-restyling version of the VAZ 2170 (Priora), the on-board computer is built into the instrument panel, in the restyled version it is located with a display to the right of the tidy. It may seem like an unnecessary device that is only suitable for an airplane or a racing car, but in fact it turns out to be very useful - especially when you need to analyze the signs of a malfunction in one of the car’s units.
Deciphering faults in the fuel and air systems
- P0030 - the oxygen sensor heater wire to the exhaust gas converter has broken;
- P0031 - the same electrical wire has shorted to ground;
- P0032 - the same wire has shorted to the on-board network (BS);
- P0036 - the wiring of the oxygen sensor heater is broken, after the converter;
- P0037 - the same wiring has shorted to ground;
- P0038 - it has shorted to BS;
- P0102 - weak signal in the mass air flow sensor network;
- P0103 - very strong signal in the network of this device;
- P0112 - weak signal in the air temperature sensor network;
- P0113 - very strong signal in the network of the same device;
- P0116 - antifreeze temperature sensor signal is out of operating range;
- P0117 - poor signal from the antifreeze temperature sensor network;
- P0118 - very strong signal from the antifreeze temperature sensor;
P0122 - poor signal in the throttle position sensor circuit;
P0123 - very strong signal in the same circuit; P0130 - the oxygen sensor before the converter does not work; P0131 - weak outgoing signal on the network of this device; P0132 - signal too strong on the same network; P0133 - slow response to changes in mixture quality in the network of the same device; P0134 - oxygen sensor circuit inactive; P0136 - the oxygen sensor after the converter is broken; P0137 - poor signal in the circuit of this device; P0138 - signal too strong in the same circuit; P0140 - the same sensor circuit is inactive; P0141 - the oxygen sensor heater after the converter is broken; P0171 - there is a lot of air in the fuel mixture; P0172 - there is a lot of gasoline in the fuel mixture; P0201 - injector wire No. 1 is broken; P0202 - injector wire No. 2 is broken; P0203 - injector wire No. 3 is broken; P0204 - injector wire No. 4 is broken; P0217 - engine overheated; P0230 - failure in the electric fuel pump relay network;
Here we are looking for an electrical problem that has arisen.
P0261 - the injector circuit of cylinder No. 1 has shorted to ground;
P0263 - injector driver No. 1 does not work; P0264 - the injector circuit of cylinder No. 2 has shorted to ground; P0266 - injector driver No. 2 does not work; P0267 - injector circuit No. 3 has shorted to ground; P0269 - injector driver No. 3 does not work; P0270 - injector circuit No. 4 has shorted to ground; P0262 - the injector circuit of cylinder No. 1 is shorted to the BS; P0265 - injector circuit No. 2 is shorted to BS; P0268 - injector circuit No. 3 is shorted to BS; P0271 - injector circuit No. 4 is shorted to BS; P0272 - injector driver No. 4 does not work.
Problems with additional systems and ignition
How to bypass the immobilizer on Priora and Kalina
If a spark does not occur in all cylinders or only in one of them, then a code from P0300 to P0304 may appear. If the detonation devices are broken, then the code is P0326. If the signal is weak in the same place, the code is P0327, and if the signal is too strong, the code ends with the number 28.
If there are problems with the crankshaft, code P0335, in this case: 0336 - the indicators are outside the limits; 0337 - short circuit; 0338 - network interruption. Errors P0342 - a weak signal is received from the phase sensor, and with P0343 - too strong. But if the number at the end is 46, then the data has gone far beyond the permissible limits. If there are problems with the coils and cylinders, then these are codes P0351-P0363.
Error p0422 indicates a breakdown in the neutralizer. If a situation occurs where “error 0422” appears on the display, this may indicate a decrease in the efficiency of the converter below the permissible threshold, and with code 0441, the error indicates a problem with the air valves. With codes 0480 and 0481 there is a problem with the fan.
Features of BC State Priora XD
The State Priora XD on-board computer has non-volatile memory. This means that when the terminal is removed from the battery, the BC retains all values. The trip computer has two independent mileage and consumption counters with the ability to view previous parameter values (before reset) for one type of report.
Fuel quality control
The fuel quality control function allows you to find out the quality of the filled fuel. A very useful feature when traveling long distances, when you have to refuel at unverified gas stations.
Plasmer function
PLAZMER is a plasma heating of candles. The effect is achieved by applying high-voltage pulses with a frequency of 150 Hz and an energy of 0.04 J to the electrodes of the spark plugs. During the exposure time, energy of about 60 J is released on each spark plug. In this case, the air in the cylinders is ionized, the electrodes of the spark plugs and their insulators are heated. After such preparation, the probability of failure to start the engine in severe frost or high humidity conditions, as well as in the event of unacceptable filling of spark plug electrodes with gasoline, is reduced several times.
Fast and Furious function
FORCING is resetting (cleaning) the controller memory to factory settings. This function erases not only information about errors, as was the case in previous versions of the On-Board Computer, but also removes the cause of the error, thereby resuscitating (correcting) the electronic control unit of the car. New automobile controllers, such as BOSCH MP7.0, BOSCH M7.9.7, JANUARY 7.2, have an operating algorithm based on comparing a mathematical model of the engine with real parameters. All deviations from the mathematical model are recorded in the controller’s special memory and taken into account in further work - this is the so-called self-learning of the controller. If the car is operated for a long time in an “unusual” mode, this can lead to undesirable consequences in the future. The engine may operate unstably, gain speed poorly, and experience detonation overloads more often. This happens, for example, when operating on low-quality gasoline; in monotonous mode (mainly at low or high engine speeds); in high load mode, etc. Most often this happens when changing the type of fuel from gasoline to gas or vice versa.
Eg:
If the engine has been running on gasoline for some time, then when switching to gas, the controller does not notice this and continues to control the ignition according to the “gasoline” algorithm, the parameters of which are stored in the learning memory. Resetting this memory will force the controller to immediately respond to all changes and write new gas parameters into memory.
Second example:
Your car has a bad connection to the battery terminal. Any vibration of the car while driving can cause emergency operation of the engine of your car, causing unstable operation of any of the electronic components. When “resetting errors” you will extinguish the “Check eng” indication, but will not get rid of the emergency condition of the car without resetting it to zero - EQU RESET. The Fast and Furious function will allow you to carry out repairs without leaving the salon.
Tropic function
TROPIC is the activation of the cooling system fan based on the engine temperature you set. This function is especially useful in the summer in hot weather, when the car is stuck in a traffic jam in the city, because... will help avoid engine overheating.
Working with HBO
This on-board computer is capable of taking into account fuel consumption corrections when running on natural gas. This allows the owner of a Lada Priora car to install gas equipment or, briefly, LPG equipment on their car.
Alarm function
The on-board computer State Priora XD has emergency light and sound alarms.
This means that if the engine overheats or the voltage is unacceptable, the computer will warn you with a light alarm along with voice guidance. With the appropriate connection, if the alarm is triggered, the BC can reduce the volume of the radio.
Dynamic Mode
The Priora XD staff has a “DYNAMICS” mode, which allows you to measure and display the dynamic characteristics of the car.
Taxi Mode
The on-board computer has a “TAXI” mode, which allows you to display the cost characteristics of the trip and the cost of fuel consumed.
PC connection
The on-board computer State Priora XD has flash memory for recording data received from the ECM about engine operation. This data can be transferred to a personal computer for analysis.
Software Update
The State Priora XD trip computer has the ability to update software via the Internet from the manufacturer’s website.
Failures in the idle speed system (IAC) and ESC
- P0500 - speed sensor is broken.
- P0506 - very low engine speed at idle.
- P0507 - too high speed at idle.
- P0511 - the XX regulator network is faulty.
- P0560 - BS voltage is below the minimum threshold.
- P0562 - very low voltage in the BS.
- P0563 - very high voltage in the BS.
- P0601 - ROM checksum error.
- P0615 - the wires of the additional starter relay are broken.
- P0616 - the same wires are shorted to ground.
- P0617 - they shorted at the BS.
- P0627 - the fuel pump relay wires are broken.
- P0628 - the same wires are shorted to ground.
- P0629 - they shorted it to the BS.
- P0645 - break in the wiring of the air conditioning compressor clutch relay.
- P0646 - the same wiring has shorted to ground.
- P0647 - she shorted to BS.
- P0650 - Malfunction indicator light circuit does not operate.
- P0654 - Tachometer control circuit is faulty.
- P0685 - the main relay electrical wire is broken.
- P0686 - the same electrical wire has shorted to ground.
- P0687 - he shorted it to the BS.
- P0691 - the electrical wiring of the fan control relay is shorted to ground.
- P0692 - the same wiring has shorted to the BS.
Hi all! I discovered a huge number of topics dedicated to instrument panel errors and many questions related to them, therefore, I decided to write everything in one topic. Materials were used from the Internet, and in particular: www.drive2.ru, www.priorovod.ru/
Purpose of the computer Staff Priora XD
The State Priora XD on-board computer is designed for installation on first generation cars of the Lada Priora family, such as: VAZ 2170, VAZ 2171, VAZ 2172.
Installs in a standard 1-DIN location.
The State Priora XD computer, unlike its predecessor the State Priora X-6 computer, has a diagnostic tester that allows you not only to read errors and operating parameters of the ECM, but also to read errors in additional electronic units of the car, such as airbags and ABS.
Computer display
The graphic display of the State Priora XD is text (16 characters on 2 lines) with RGB backlighting. The display is covered with a special anti-reflective coating and has automatic thermal compensation of display contrast in a wide temperature range: -25…+70.
Other manufacturers
For your VAZ-2170, you can consider analogs to the standard BC that will meet your requirements:
- BC STATE x1 – 1400 – 1500 rubles. Looks like a small button. Placed instead of a plug. The display occupies more than 70% of the front area, and under it there are two small mode switching buttons. Will show all the necessary information on errors, consumption, speed.
- State Matrix - about 3,500 rubles. Beautiful display, full functionality, but no GPS navigation.
- Unicomp About 4,200 rubles. A full-fledged computer that will show and do everything you need.
Errors: malfunctions and breakdowns
The on-board computer of a Priora car rarely breaks down - rather, it itself talks about other problems with the car. Even a small display can display a minimal set of errors; all symbols have an assigned number:
- 2 — “Increased voltage level of the electrical network”;
- 3 — “The fuel sensor does not respond”;
- 4 — “DTOZH does not respond”;
- 5 — “DTV does not respond”;
- 6 - Antifreeze overheating";
- 7 — “Low oil level”;
- 8 — “The service brake system is faulty”;
- 9 - “The battery is discharged”;
- E - “System error”.
If the car has, for example, an on-board vehicle device, it will show an exact list of faults with a number, designation, and explanation. Computer x 1 and many other analogues will do the same.
To view malfunctions and errors of the on-board computer, you will have to connect to the OBD connector using a receiver. For convenience, it should be connected to a smartphone via Bluetooth. All errors with a standard dashboard are read in the same way - the on-board car unit does not display absolutely all codes through the display.
Standard bot computer for Priora - article number and price
It is important to say that in the basic versions the on-board computer was built into the dashboard. Essentially, this is a display on which information is displayed that is collected by the electronic control unit from several sensors. The pre-restyling Lada Priora was equipped with instrument clusters with catalog number 21700-3801010-00, costing about 5,000 rubles.
For the restyled VAZ-2170, the instrument cluster with catalog number 2172-3801010-00 is suitable. Price – from 15,000 rubles.
For cars belonging to the Luxury class, the equipment is a little more complicated. With restyling, the multimedia system with GPS began to perform the functions of an on-board radio and radio. The display on the dashboard was changed - it showed a map with a route, and separately - more extensive settings and options than those given in the basic configuration.
The instrument cluster of the Priora 2 along with a standard multimedia system, which is quite expensive - from 20 to 25 thousand rubles. Catalog number 2192-7900300-10. In order to install something restyled on a pre-restyling VAZ-2170, the car will have to be modernized so that the transmission of information to the on-board vehicle device is accurate. For this you need a controller.
January
First on the list is January 7.2 21126-1411020-11. The price is about 6,500 rubles. Owners of cars who dared to install January talk a lot about it. The reviews are positive.
Itelma
Itelma sells a whole set of instrument panels for the VAZ 2170. The cost is slightly lower than the original - 19,000 rubles. The kit contains everything needed for connection and configuration.
Bosch
A Bosch controller with article number 21126-1411020-00 costs on average 6,600 – 7,000 rubles, suitable for engines 21126.
Avtel
The controller with article number M73 21126-1411020-11 is sold at a price of 7,500 rubles, intended for Priora with engine 21126.
On-board computer Lada-Priora (VAZ-2170)
The LCD of the on-board computer is located on the dashboard and contains three lines:
- the top line displays the total/daily mileage counter;
- The middle line displays the functions of the on-board computer, the display of which is carried out sequentially, at the choice of the driver:
- The bottom line displays the icon for the selected mode.
To switch between the bottom line display modes, use the keys on the steering column wiper switch: the keys (position 2) located at the end of the switch switch functions “in a ring” forward and backward; the “Reset” key (position 1), located at the bottom of the switch, resets the values to “zero”.
The top line readings (total/daily mileage) are switched by a button located on the right side of the dashboard (under the fuel gauge). If the daily mileage counter is displayed, then to reset it, you must press and hold the button for 3 seconds.
The procedure for setting the clock on the Lada Priora:
- To switch from the current time indication mode to the installation mode, you must press and hold the “Reset” key for more than 3 seconds, while the hours and minutes will begin to flicker;
- The minutes are set by pressing the “ring forward shift” key located at the end of the steering column wiper switch;
- The clock is set by pressing the “ring back shift” key located at the end of the steering column wiper switch;
- When you press the key once, the minutes/hours value increases by “1”; to change the values faster, you need to press and hold the key;
- When setting the minutes, the seconds counter is reset to zero (setting the hour counter does not affect the seconds counter);
- To return from the installation mode to the indication mode, you must briefly press the “Reset” key or, in the clock setting mode, do not press any key for 1 minute.
Detailed information about the displayed functions (their ranges) of the Lada-Priora on-board computer:
- current time
(hour, min) - 0:00-23:59 (resolution 1 minute); - outside air temperature
(°C) — -40°C..+70°C; (resolution 1°C); - driving time
(hour, min), defined as the time during which the engine has been running since the last reset - 0:00-99:59 (resolution 1 minute; to reset, you must hold the “Reset” key for 3 seconds) - average fuel consumption
(l/100km) - 0.0-19.9 (resolution 0.1l/100km; after zeroing, the first 500 meters of the distance traveled are not indicated); - instantaneous fuel consumption
(l/100km) - 0.0-19.9 (not displayed if the speed is less than 1 km/h); - approximate remaining power reserve
(km) - 999-30 (resolution 5 km); - average car speed
(km/h) - 0-250 (resolution 1 km/h; after zeroing, the first 500 meters are not displayed); - amount of fuel consumed
(l) - 0-9999 (resolution 1 l; to reset, you must hold the “Reset” key for 3 seconds).
Source of the article: https://vaz-2101-07.ru/lada-priora/comp.html
Description
If we talk about on-board computers on the VAZ-2170 car, then it is worth mentioning that their instrument cluster contains a liquid crystal indicator under the speedometer. It has three lines that display a total of eight functions. In that case, who needs a more functional BC for the Lada Priora, it is recommended that instead of the instrument panel blank, install the on-board computer STATE X1. It is specially designed for this car model. A wide selection of standard BC modes (trip computer, diagnostic tester, plasma, tropic, alarm, afterburner) allows you to obtain complete information about the car. On-board computers of the Gamma brand also work quite normally on the Lada Priora.
- On-board computer on Lada Priora
- More Videos
A C-class passenger car, modern lighting technology, high-level safety, reasonable price, low consumption - don’t read further if you don’t need the best car. Because we will talk about a modern, one-of-a-kind creation of the Russian automobile industry.
Having launched the production of Lada Priora in 2007, AvtoVAZ OJSC immediately captivated car enthusiasts with an affordable, “people's” car with an ergonomic design and a multifunctional interior. The only domestic car with electric power steering, heated seats, reliable silent door locks has a double-sided galvanized body, which allows you to forget about corrosion for the next 6 years.
A completely new part of the interior was the lining of the floor tunnel, which has a central armrest that houses a small but very convenient box for small items. Individual lighting, a shelf for glasses - everything is done for convenience. A place for a telephone with a socket for connecting it will also be important. The front seats have a wide range of position adjustments, which allows both the driver and passenger up to 189 cm in height to sit comfortably. Moving to the luggage compartment, we find a free volume of up to 430 liters, and the maximum height of the cargo that can be accommodated reaches 500 mm.
Optimized for operation in harsh winter conditions, the Priora's sixteen-valve engine, along with high efficiency, is very responsive to the accelerator pedal and playful in various operating modes. Driving a car with such an engine, you can easily reach its speed limit of 183 km/h, and acceleration to hundreds will take only 11.5 seconds. Not bad for a new generation electronic ignition system with a volume of 1.6 liters and a Euro-4 toxicity level!
AvtoVAZ produced several modifications of the Priora:
VAZ-2170 - The sedan was launched into mass production in March 2007;
• VAZ-2170 CNG - Sedan, is a bi-fuel modification running on compressed natural gas (CNG) and gasoline.
• VAZ-2172 - Hatchback, serial production began - February 2008;
• VAZ-2171 - Station wagon, serial production began - May 2009;
• VAZ-21708 Priora Premier - a model produced in a small series. It is a version of the sedan extended by 175 mm. Production has been carried out by AvtoVAZ's partner since November 2008. This model is equipped with a 1.8-liter VAZ-21128 engine with a power of 100 hp. ;
• VAZ-2172 Coupe is a three-door model based on a hatchback. Production began in January 2010 at the AvtoVAZ production plant.
For audiophile drivers, a standard radio with six speakers (4 front and 2 rear), providing pleasant sound even at high speeds, will be a pleasant surprise. All this is achieved using completely new materials in sound insulation and unique developments in the arrangement of seals in the openings of body elements. After all, not every car can boast a noise level in the cabin of only 69 dB!
Now nothing can stop you from enjoying listening to your favorite tunes and having a comfortable ride. And leave safety, ease of control and stylish design to the Priora.
Power windows for Lada Priora doors
The car is equipped with electric windows for the front doors, and in a variant version it can be equipped with electric windows for the rear doors. The electric windows for all doors can be controlled using switches located in the switch block under the driver's door armrest. The power windows of each passenger door can also be controlled using a switch installed in the armrest of this door. Control of the power windows of the doors using the switch keys is only possible when the ignition is turned on (the ignition key is in position “I”), as well as within 30 s after turning off ignition if none of the car doors have been opened. To lower the window, press the edge of the corresponding switch key and hold it until the glass takes the desired position (the windows of the front and rear doors do not lower completely). In order to raise the window completely or to a certain height, we pry up the switch key and hold it until the glass takes the desired position.
When using power windows, do not allow items of clothing or body parts to get into the gap between the glass and the door frame. Do not allow small children to operate the power window switches or remote control. Location of the power window switch key in the passenger door armrest. In order to disable the control of the rear door power windows from the switch keys located on the rear door armrests (for example, when there are children in the back seat), press the rear door power window lock button located in the switch block driver's door. In this case, the symbol in the lock switch key will be highlighted in orange. When you press the lock button again, the backlight in it goes out and the ability to control the power windows of the rear doors from the switches located in the armrests of these doors is restored. When the ignition is turned off, the power windows of all doors can be controlled by buttons on the remote control system.
Installation instructions
1. Dismantle the car radio.
2. Remove the cover marked “Open”.
3. Make a hole in the back wall of the “Open” compartment, which is necessary for laying the wiring to the computer. The diameter of the hole should be 17 millimeters. A rectangular one measuring 17 by 10 millimeters is also quite suitable. While drilling, be careful not to touch any wires.
4. The hole is made. Now all that remains is to insert the cable into it.
5. Unscrew the screws from the compartment for small items.
6. Install a special adapter into the compartment cavity. Secure it using the previously removed screws.
7. Connect the signal cable connector (connect to the connector located on the back of the chassis).
8. Install the assembled chassis into the panel and tighten it with four screws.
9. “Place” its removable panel on the on-board computer.
What is included in the Priora instrument cluster
This unit serves to inform the driver about the condition of his car. Devices that project information are divided into three categories:
- Displays.
- Pointers.
- Indicators (control lamps).
Each of them performs strictly defined functions. They are worth considering separately.
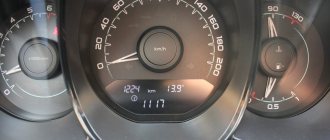
Displays
Liquid crystal screens (LCD) are small in size. In general, they serve as a monitor for the instrument panel ECU. They display the total and daily mileage of the car, as well as some on-board computer data. Switching between information output modes and control is carried out using buttons located on the steering column wiper switch, to the right of the steering wheel. The rules for using this functionality are described in detail in the “Priora Operating Instructions” included with each machine. Therefore, it makes no sense to present them here.
Signposts
These are pointer instruments that have a scale on which the arrow marks the exact value of the observed parameter. The Priora instrument clusters have the following indicators:
- Speedometer (indicates vehicle speed).
- Tachometer (engine speed).
- Temperature indicator (degree of motor heating).
- Fuel indicator (amount of gasoline in the tank).
All these devices operate based on data received from various sensors. They are processed by the internal ECU of the instrument panel and produces the result.
Indicators
This is the most numerous type of dashboard informant. The number of installed indicator lights depends on the type of instrument panel and the Priora equipment class, since almost all additional devices have their own indicator lamps on the dashboard. Although there is a set of indicators required for any car:
- Battery charge indicator lamp.
- Indicator of emergency oil pressure in the system.
- "Check Anger" lamp for ECU control.
- Turn signals, 2 pcs.
- Minimum fuel level.
- Critical brake fluid level.
- Turning on the side lights.
- High beam headlights.
- Anti-theft system warning light.
This is a necessary set, required for every instrument cluster on a Priora. It allows you to track important parameters while moving. But there are also special warning lights:
- Anti-lock braking system (ABS) lamp.
- Electric power steering (EPS) status indicator.
- Airbag warning light.
They are connected only when Priora is equipped with these devices at the factory.
The basis of the Priora instrument cluster
The main element of the entire unit is the computer “chip”. It is he who controls the entire operation of the panel in accordance with the program embedded in it. Even if the sensor sends a signal to the indicator or pointer through the computer and is recorded in the memory of the mini-computer, since the odometer mileage meter is not mechanical, but electronic, it is no longer possible to rewind the readings on the panel display. This operation can only be carried out by a specialist who has a computer with a special adapter and a program for communicating with the instrument cluster ECU. It should be noted that nowadays there are quite a lot of specialists providing such services. Therefore, when purchasing a Priora from your own hands, you should not completely trust the mileage readings on the dashboard screen.
Instrument panel carrier board - all components of the device are compactly mounted on an electronic board. A chip with an ECU, a liquid crystal display, many resistances and transistors, connecting tracks, and most importantly, a connector socket for the wiring cable are soldered to it. This area is worth considering separately.
In the connector for connecting the Priora instrument panel, the plug for connecting the wiring harness has 32 cells. The picture below shows a schematic distribution of all contacts. Having a little skill in reading electrical diagrams, any competent car enthusiast can easily figure out which wire is responsible for what. The meaning of the indicator lights is contained in any Priora operating instructions, so it simply doesn’t make sense to list a couple of pages from this brochure here in full.
AVTOVAZ cars
YOUR ATTENTION!
. . . . . . . . . . 3
VEHICLE DESCRIPTION
. . . . . . . 5
Operation of the remote control system. . . . . . . . . . . . . . . . . . . .
Seats. . . . . . . . . . . . . . . . . . . . . . . 12 Adjusting the steering wheel position. . . . . . . . . . . . . . . . . . . . . . . . 14 Seat belts and airbags. . 15 Airbag. 16 Interior equipment. . . . . . . . . . . 18 Headlights. . . . . . . . . . . . . . . . . . . . 21 Hood. . . . . . . . . . . . . . . . . . . . . . . . . 21 Trunk lid. . . . . . . . . . . . . 22 Fuel tank plug. . . . . . . . . 22
CONTROLS AND INSTRUMENTS. . . . . . . . . . . . . . . . . . . . . 23
Dashboard . . . . . . . . . . . . . . . 23 Instrument cluster. . . . . . . . . . 25 Liquid crystal display. . . . . . . . . . . . . . . . . . . . . . . . . . . 28 Lighting control module 28 Light signaling switch. . . . . . . . . . . . . . . . . . . . . . . . . 31 Wiper switch 32 Ignition switch. . . . . . . . . 32 Gear shift lever. . . . 33
INTERIOR VENTILATION CONTROL. . . . . . . . . . . . . . . . . . . . . . . . 33
Interior ventilation and control. 33 Heating switches. . . . . . . . 33
VEHICLE OPERATION
. . . 39
INSTALLING LICENSE PLATES. . 39
BASICS OF SAFE VEHICLE OPERATION. . . . . . . . . . . . 39
Precautions when operating the vehicle
. . . . . . . . 39 Operating a new car
Preparing the car for movement. . . . . . . . . . . . . . . . . . . . . . . . . . . 42 The driver's position behind the wheel. . . . . . 42 Starting the engine. . . . . . . . . . . . . . . . . 42 Starting the engine in the cold season. . . . . . . . . . . . . . . . . . . . . . . . . . 43 Features of operating a vehicle with a fuel injection system 43 Features of operating a vehicle with an electromechanical power steering . . . . . . 44
VEHICLE MOVEMENT. . . . . . . . 45
Movement in winter. . . . . . . . . . . . . . . 46 Driving in mountainous areas. . . 47
BRAKING AND PARKING. . . . . . . . 47
Anti-lock braking system. . . . . . . . . . . . . . . . . . . . . . . . . 48
TOWING THE CAR. . . . 49
MAINTENANCE AND
CURRENT CAR REPAIR
50
Engine lubrication system. . . . . . 50 Gearbox. . . . . . . . . . . . . . . 50 Engine cooling system. . 51 Brake system. . . . . . . . . . . . . 51 Window washing and cleaning system. 52 Battery. . . . . . . . 53 Tires and wheels. . . . . . . . . . . . . . . . . 54 Replacing the remote control battery. . . . . 55 Replacing fuses 56 Mounting block. . . . . . . . . . . . . . . 57 Replacing lamps. . . . . . . . . . . . . . . . . . . 57 Body. . . . . . . . . . . . . . . . . . . . . . . . . 60 Car storage. . . . . . . . . . . 62
Basic parameters and dimensions. 64 Passport details. . . . . . . . . . . . 67
1. Fuels and lubricants,
approved and recommended for operation of the LADA PRIORA car with engines
delhi 21126. . . . . . . . . . . . . . . . . . 69
Priora on-board computer setup
- Specifications
- Controls
- Dashboard
- On-board computer
- Lighting engineering
- Interior heater
- Air conditioner
- Circuit breakers
- Replacing lamps
- Passport details
The LCD of the on-board computer is located on the dashboard and contains three lines:
- the top line displays the total/daily mileage counter;
- The middle line displays the functions of the on-board computer, the display of which is carried out sequentially, at the choice of the driver:
- The bottom line displays the icon for the selected mode.
To switch between the bottom line display modes, use the keys on the steering column wiper switch: the keys (position 2) located at the end of the switch switch functions “in a ring” forward and backward; the “Reset” key (position 1), located at the bottom of the switch, resets the values to “zero”.
The top line readings (total/daily mileage) are switched by a button located on the right side of the dashboard (under the fuel gauge). If the daily mileage counter is displayed, then to reset it, you must press and hold the button for 3 seconds.
The procedure for setting the clock on the Lada Priora:
- To switch from the current time indication mode to the installation mode, you must press and hold the “Reset” key for more than 3 seconds, while the hours and minutes will begin to flicker;
- The minutes are set by pressing the “ring forward shift” key located at the end of the steering column wiper switch;
- The clock is set by pressing the “ring back shift” key located at the end of the steering column wiper switch;
- When you press the key once, the minutes/hours value increases by “1”; to change the values faster, you need to press and hold the key;
- When setting the minutes, the seconds counter is reset to zero (setting the hour counter does not affect the seconds counter);
- To return from the installation mode to the indication mode, you must briefly press the “Reset” key or, in the clock setting mode, do not press any key for 1 minute.
Detailed information about the displayed functions (their ranges) of the Lada-Priora on-board computer:
- current time
(hour, min) - 0:00-23:59 (resolution 1 minute); - outside air temperature
(°C) - -40°C. +70°C; (resolution 1°C); - driving time
(hour, min), defined as the time during which the engine has been running since the last reset - 0:00-99:59 (resolution 1 minute; to reset, you must hold the “Reset” key for 3 seconds) - average fuel consumption
(l/100km) - 0.0-19.9 (resolution 0.1l/100km; after zeroing, the first 500 meters of the distance traveled are not indicated); - instantaneous fuel consumption
(l/100km) - 0.0-19.9 (not displayed if the speed is less than 1 km/h); - approximate remaining power reserve
(km) - 999-30 (resolution 5 km); - average car speed
(km/h) - 0-250 (resolution 1 km/h; after zeroing, the first 500 meters are not displayed); - amount of fuel consumed
(l) - 0-9999 (resolution 1 l; to reset, you must hold the “Reset” key for 3 seconds).
To the top of the page The on-board computer of a Priora car is: 1) a way to obtain current information about the operation of the car and devices. For example: speed, engine speed 2) this is an indication of errors and a reminder to do maintenance. There are two types of devices on Lada Priora. They show approximately the same thing, but are designed differently: on the pre-restyling version of the VAZ 2170 (Priora), the on-board computer is built into the instrument panel, in the restyled version it is located with a display to the right of the tidy. It may seem like an unnecessary device that is only suitable for an airplane or a racing car, but in fact it turns out to be very useful - especially when you need to analyze the signs of a malfunction in one of the car’s units.
The standard on-board computer on Priora 1 and 2 can be basic; it provides the driver with basic information about the car’s mileage, temperature and other indicators. The “Lux” version provides more functionality - it even changes the appearance of the dashboard display - this is on Priora 2. But you can still install a computer on the car yourself, and not only a standard one, but also an analog one.
The process of diagnosing a car using a tester or a connected computer
Tuning door cards on a Priora
Much more accurate and reliable data when checking a car for faults can be obtained if you use separately connected equipment. But the introduction of such tools and devices gives encrypted readings, therefore, in order to correctly understand and find all the faults in the car, you need to decrypt the data received from diagnostic devices. Of course, manufacturers could have done things easier for Russian-speaking car enthusiasts. It would be possible to write “replace the canister valve” on the device screen after diagnostics, but instead, only a code in the form of p0441 can be found on the display, and code p0130 will appear only due to problems with the oxygen sensor.
But the problem is that Lada Priora is produced not only for the domestic market, it is also produced for sale in other countries. Therefore, such a classification of automobile problems and their code on the testing device was created.
It is easier to enter only a certain number of universal codes into the program than to enter your own language data for each national market. As a result, you can look at a specific code on the display and easily determine the essence of the problem in the car using a list that lists all encrypted codes. A special code is used to indicate error codes on the Lada Priora car. This cipher includes:
- letter fault code;
- digital code for the location of a malfunction in the vehicle design.
The letter “C” is present on the screen only if there are failures in the electronic system of the vehicle chassis. If combined errors occur in several operating systems of the vehicle, the letter “U” will appear on the display. The letter designation is followed by a number.
The zero indicator is indicated by the OBD-2 code. Numbers 1 and 2 show the company code, and the third digit is responsible for the backup code. The subsequent set of numbers conditionally shows the place where errors were detected during diagnostics. A zero code indicates the exhaust system. Number 1 indicates the fuel system, number 2 indicates the air supply system.
If there is a malfunction in the ignition, then the number 3 will appear. If there are problems with additional control, the number 4 will appear. If there are malfunctions in the idle speed, then the number 5 is responsible for this, and if there are problems in the ECU, the number 6 will appear. Numbers 7 and 8 are associated with the transmission In the general code, the very last two digits indicate the error number in the operation.