The Priora's hood is the part of the car with which it is recommended that a beginner begin soundproofing. It will be easy to work with a simple, even shape of small sizes. Let's consider what is needed to soundproof the hood of a VAZ 2170.
The rear shelf of Priora, Kalina and Granta is famous for its crickets, they are especially noticeable on hatchbacks and station wagons. According to statistics, 70% of car owners, after purchasing a domestic car, almost immediately soundproof the rear of the car. Do you know what to do if a shelf creaks?
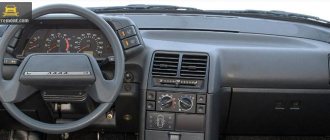
How does a Russian car differ from a foreign car? The main difference is the presence of crickets, creaks and rattles in it. The reason is simple - the low quality of plastic in the cabin, as well as the build quality. This time we are trying to soundproof the VAZ 2170 panel.
The Priora's glove compartment is made of inexpensive plastic, which is not covered with anything inside. Therefore, things that are in it can cause rattling while driving. You can get rid of extraneous noise by soundproofing the glove compartment.
The Lada Priora ceiling initially does not have any sound insulation, except for the upholstery. Sound insulation of the Priora roof, like the hood, does not cause any difficulties, so it is recommended that a “newbie” start with it.
To make the car more comfortable, they try to reduce noise coming from outside as much as possible. Sound insulation behind the Priora panel will reduce engine noise in the cabin, but doing it will require a lot of effort and patience. First things first:
If sound insulation of the trunk of a VAZ 2170 (sedan) is not so important, then for a hatchback and station wagon everything is different. Let's figure out what to pay attention to when installing trunk soundproofing.
Priora door handles have a number of disadvantages, for example, they quickly break and rattle. Both ailments are a consequence of too much play, which is recommended to be eliminated.
After the car was released, many owners began to notice that the Priora gearbox lever began to rattle in the same way as on previous VAZ 2108-2010 cars. It's all about the same type of design of the gearbox control drive. We'll tell you how to remove vibrations in the VAZ 2170 gearbox handle.
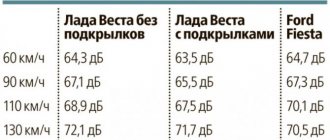
Noise insulation (sound insulation) of the VAZ 2170 is popular for one reason, because it is a Russian car, and they have never been famous for a quiet interior. It has been proven that the main source of noise is noise from wheels and the road, so we are studying the issue of noise insulation of Lada Priora doors in more detail.
Priora hatchback interior sound insulation
Sound insulation of the Priora hatchback is a pressing issue among owners. To overpay at a service station, or to do it yourself, that’s what you need to decide on.
On the one hand, you paid - and everything was done, you don’t need to bother yourself, on the other hand, doing it yourself is much cheaper, and you are sure of the quality.
Is there a need
If we talk about the need for sound insulation in a car, of course it is necessary:
- Firstly , comfort and calm communication without raising your voice
- Secondly , great sounding acoustics
- Thirdly , peace of mind for your well-being and health
No, we are not going to scare you with non-existent dangers, just facts:
- Increased noise causes rapid fatigue and irritation, reduces the driver’s reflexes
- Leads to constriction of blood vessels in the body, which puts unnecessary strain on your heart
- Over time, such a load causes angina pectoris and even a heart attack.
Work order
In Lada Priora, sound insulation is performed in the following order:
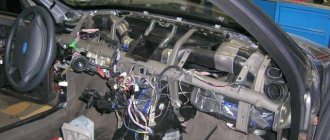
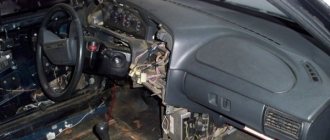
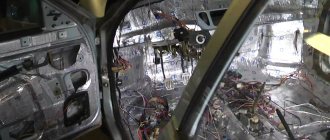
To perform soundproofing of the interior, it will be necessary to remove all the front seats, as well as the center console, remove the steering wheel and dashboard
Interior with the above items removed
- As soon as all the disturbing elements are removed from the interior, we remove the carpet and remove all the factory sound insulation of the engine shield, located on the interior side, photo above
- Then we apply Bimast Bomb to the engine shield in the cabin.
- Accent or Splen of your choice can be applied over this to absorb sound waves from the engine, stereo speakers and other sources.
Engine shield treated with vibration absorber from the interior
We remind you that before applying the vibration-absorbing material, the entire surface is thoroughly wiped from dust, dirt and preservation, then thoroughly degreased with a solvent or alcohol
- Before installing the material in place, it is cut out, then the carefully prepared pieces are heated with a hairdryer, only after that they are applied to the surface
- And after applying the material to the desired surface, it is rolled with a roller (roller) from the center of the attached part to the edges in order to expel all the air, and our material is more tightly attached to the surface
- Inside the engine compartment, soundproofing material is glued to the hood, in addition, to the front shield, all planes that do not have stiffeners, as well as in places that can be glued without removing the engine and dismantling its components
- We cover the motor shield on the engine side with insulation from the top to the point where the shield connects to the floor of the car, in this case we use the material Bimast Bomb or Bimast Super;
- The hood cover is insulated with bimast, and on top there is splen for thermal insulation
- After the soundproofing materials have been applied, we put all the removed parts back in their places, and the work can be considered complete
- Additionally, you can watch the training video
After such a small modification, the noise level inside the car is noticeably reduced, and the ride becomes much more pleasant and much more comfortable. And when all the work is done yourself, this means money saved for more pressing purposes, plus you will be absolutely sure of the quality of sound insulation of your favorite car.
The standard sound insulation of the Priora car leaves much to be desired. Car enthusiasts strive to correct this deficiency with their own hands, since extraneous sounds irritate and distract the Lada Priora while driving. They make noise on the doors, floor, arches, ceiling, engine compartment, hood, trunk, panels, dashboard - after this the Priora becomes a quiet car. The source of extraneous sounds can be a malfunction of the engine, its components, malfunction of suspension parts, brake system, steering, etc. Unpleasant sounds occur when driving on gravel roads due to vehicles passing by, especially heavy vehicles. To get rid of unpleasant sensations, it is necessary to modify the standard sound insulation. You can do this yourself. Depending on the body type: hatchback, sedan, or station wagon, the Shumka technology is slightly different. Read the article to the end and we will tell you how to do it correctly!
It is necessary to purchase materials and acquire tools in advance.
Materials
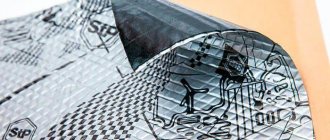
There is no need to invent sound insulation or use building materials, even if their price is lower; today special sound insulation materials have been developed specifically for cars:
- Vibration-absorbing materials (vibroplast, bimast) - serve to dampen body vibrations
- Sound-absorbing materials (accent) - serve to dampen sound waves, their porous structure causes sound attenuation
- Soundproofing materials (Splen) - completely reflect sound waves
- Thermal insulating materials - maintain the temperature inside the car interior (here you don’t need to look for separate materials, sound absorbers and sound reflectors, they will additionally serve as insulation)
- Anti-creaking materials (Bitoplast and Madeline) - to eliminate squeaks, crickets and rattling
Task: installing sound insulation for a Lada Priora car in the “Gold” configuration
The first thing we decided to do for complete sound insulation was to cover the roof of the VAZ car. We carefully remove all unnecessary elements from the roof, including the sheathing on the roof of the vase. Now you can make the first layer of sound insulation on the car ceiling. We install a high-quality damper from SGM Alumast Alfa to neutralize vibration on the vase roof. How much work does this cost us? You yourself can guess by the appearance of the roof in the photo and the effect achieved. The roof of the Lada Priora is not only protected from vibrations, but has also become stiffer. The use of vibration on the roof significantly reduces the overall sound background in a hatchback car. Then you need to make another layer on the roof. For this purpose we use a thick layer of Violon WELL sound insulator. It eliminates unwanted sounds. After installing it, it is almost impossible to push through the roof of the car, and raindrops will definitely not cause any discomfort to anyone. After assembling the upper part of the interior and hatchback of the car, all we have to do is take on the lower part to achieve a similar effect.
Rules for applying sound insulation
The instructions for applying sound insulation are the same, no matter what kind of car you treat:
- Preparing the surface for processing begins with removing the casing, factory sound insulation and anything that will interfere with your work.
- Then, the surface must be washed, if there is rust, clean it and prime it
- After this, you need to degrease the surface
- Now you can cut out the vibration material, it is always placed first, remove the protective film, heat it with a hairdryer, apply it and roll it with a roller to expel air bubbles
- Vibromaterial is placed overlapping, so the protection will be more effective
- A noise absorber or a noise reflector is glued on top of the vibration insulation, it all depends on the place of treatment
- It is self-adhesive, sticks in sheets on all 100 percent of the surface, it does not require heating (vibrating material is enough to stick on 80-90 percent of the entire area)
- Anti-squeak materials are glued in places where the skin comes into contact with the metal, and in places where the skin elements come into contact, around the handles
Roof treatment
It is recommended, especially for beginners, to start from the ceiling or hood, where gluing is much easier:
- Soundproofing a Priora roof begins with removing the sheathing
- Then wash and degrease the surface, after which vibration insulation is applied
The nuances here will be as follows:
- It’s more convenient to glue with an assistant so that he warms up and feeds the pieces, then holds while you roll the material to the roof
- The thickness of the vibration absorber on the roof should be 2-3 millimeters, and the thickness of the sound absorber - 5 millimeters, otherwise it may bend from the weight
Priora roof vibration isolation
- After soundproofing, return the roof sheathing to its place
Hood
Hood processing nuances:
- Vibration insulation is placed only in the recesses (photo below), covering the whole thing is just a waste of material and time, you won’t notice the effect
- But the sound-reflecting material is glued in one piece to the entire surface, it will also serve as insulation
- A material with a foil layer is recommended for the hood, as this will protect it from the effects of temperature
This is how the vibration insulation is glued to the hood, there is no need to glue it anymore
- Under the hood there is a partition between the engine and the passenger compartment (engine shield), it is treated with vibration isolation, then with a sound deflector, through it the hum and vibrations from the engine are transmitted to the passenger compartment, so its treatment cannot be skipped
Salon
Sound insulation of the trunk of a Priora hatchback is carried out in conjunction with interior treatment, for this:
- All rugs and chairs are removed, as well as all floor coverings.
- If there is any semblance of sound insulation, remove it and throw it away.
Tip: when disassembling the interior, it is recommended to remember or write down the sequence of actions, and it is better to collect the fasteners in a box so as not to lose them.
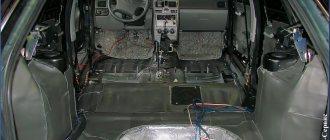
The interior is treated at the same time as the trunk
- Then, wash the surfaces, the floor of the cabin is the most contaminated place
- Don't forget to degrease the surface
- Here, a minimum 5mm vibration absorber is used, and a 10mm sound absorber is placed
Attention: Do not seal the mounting holes, brackets and studs, otherwise problems will arise when assembling the interior.
- Priora hatchback trunk soundproofing has one nuance; the niche for the spare wheel should be glued with thinner materials, otherwise the wheel may not fit back in
- Wheel arches, front and rear, are glued with a double layer of vibration insulation
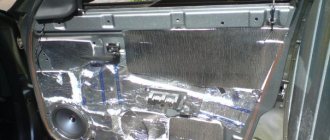
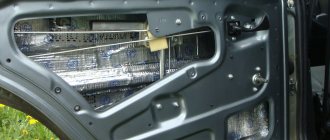
How to “shum” doors
Lada Priora and door sound insulation
Doors remain the most relevant in terms of sound insulation. It is because of their poor insulation that most of the noise from the wheels penetrates into the cabin when driving. In addition, frontal acoustics are often installed on the door - today this is fashionable and justified. If the doors are not “made loud”, the speakers will not play at their full strength.
Note. The process of carrying out noise insulation operations on all cars is the same in almost everything. On the other hand, in each case one should not forget about its subtleties and nuances.
Sound insulation of Lada Priora doors
First of all, the “noise” of the doors begins with the following actions:
- The upholstery material is removed;
- The standard “Shumka” installed by the manufacturer is dismantled;
- The metal surface of the door that opens is thoroughly wiped with some degreaser.
Note. Let us note right away that you cannot remove the anticorrosive agent that covers the bottom of the doors!
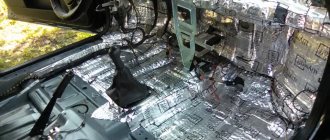
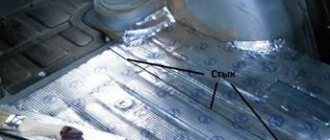
Vibration insulation of the floor, trunk and rear arches of the Lada Priora photo
Now we disassemble, thoroughly clean and degrease all surfaces on the floor in the cabin, after which we install noise and vibration insulation on the floor, trunk and arches. How many layers will be required for this installation? This tariff involves installing Shumka on the floor and arches in the cabin in two layers. At the first level, we lay the material on the floor of the Lada Priora hatchback that we have been working with for a long time and successfully. The properties of Alumast Alfa are worth talking about separately. It is plastic and fits tightly to the floor of the car hatchback. That's why we roll it everywhere, even in the most problematic places on the car floor. On top of it we install another layer of insulation. The most suitable material for this purpose, Bibiton, is laid on top of the vibration on the floor. It is worth saying about it that it is a special foam rubber impregnated with polymers and mastic. On the mounting side it has silicone protection. It absorbs as much airborne noise penetrating through the arches and floor of the car as possible. It has high anti-corrosion characteristics, so the car is now protected from rust. This equipment does not require additional sound insulation inside the interior and hatchback of the Lada Priora. The next step will be to cover the arches and trunk of the Lada Priora
Carefully disassemble the lower part of the hatchback car to get to the arches. Then we wipe and degrease the surfaces of the arches
To dampen the arch, we use the same Alyumast, which does not put extra weight on the trunk and arches of the car. We cover the arches and trunk with another layer of Shumka, for which we use an adhesive-based vialon. The arches and trunk should be well worked on to make the interior of the vase almost silent. For the arches here we did everything we could, and we also covered the niche for the spare tire with Uniton. Now the arches and trunk are completely protected from fungus. And visually, as can be seen in the photo, the arches are in harmony with the trunk. We cover the trunk lid of the vase in the same way as the hood. How the materials are cut can also be seen in the photo.
Installation process after completion of soundproofing work
Factory sound insulation is installed on the top layer of sound insulation, then carpet is laid. There may be minor problems with installing the seats (the old bolts will be too short), because the floor of the car is now slightly higher. The seats can be attached using longer bolts.
Effect of floor sound insulation : Road noise is significantly reduced, the hum of the fuel pump is not audible at all. In winter, my feet began to stay warm much longer, even with the stove turned off. Some say that the running engine can be heard more, but soundproofing the engine shield will correct this.
Video
Soundproofing a Priora floor takes no more than one week.
In preparation for the procedure, it is necessary to purchase soundproofing material and auxiliary tools. ATTENTION! A completely simple way to reduce fuel consumption has been found! Don't believe me? An auto mechanic with 15 years of experience also didn’t believe it until he tried it. And now he saves 35,000 rubles a year on gasoline! Read more"
Necessary materials:
- White Spirit solvent;
- bitoplast 0.3 sheets;
- splen 2mm - 0.5 sheets;
- splen 8mm - 2 sheets;
- bimast - 6 sheets;
- bolts and screws, longer sizes (since the soundproofing layer increases the volume).
Required tools:
- industrial (technical) hair dryer;
- rubber roller or hammer;
- scissors;
- knife (industrial, stationery);
- screwdrivers;
- industrial tape/duct tape.
How to make noise insulation for a Priora floor with your own hands?
Laying the bottom layer (there are two ways):
For laying the bottom layer, sheet vibration-insulating material is often used. First, you need to cut the sheets to the required size (it is more convenient to work with large sheets), then use an industrial hair dryer to heat the bitumen-coated side of the sheet. The prepared sheet needs to be placed on the floor of the car with the heated side and walked over it with a roller several times, pressing it against the metal bottom. The remaining sheets must be installed in the same way, laying them overlapping. The manufacturer, in the instructions for the vibration isolator, indicates how much surface area needs to be covered with this material.
Required tools:
- blowtorch or household hair dryer;
- bimast super (5 sheets);
- bimast bombs (1 sheet);
- bitoplast 0.3 sheets;
- splen 2mm (0.5 sheet);
- splen 8mm (2 sheets);
- White Spirit.
First of all, remove the seats and several parts of the interior. On a Priora, removing the center console will require a lot of time.
- Clear the floor and remove all rugs.
Nuances when carrying out soundproofing of the floor priors:
- It is recommended to wrap the wires with tape/adhesive tape every 20-30 cm to prevent interference in independent work.
- It is recommended to fold bolts and screws according to size.
- The rubber roller can be replaced with a hammer, since the surface is not smooth. And the hammer will make it easier to fix the vibration.
- The joints of plastic parts with the body, as well as the elements themselves, can be covered with madeleine.
- The factory soundproofing layer should be hung and dried.
- Application of vibration materials is carried out overlapping or end-to-end. With the first option, you can later trim off the excess with a knife.
- To apply vibration to a hard-to-reach surface, it is recommended to cut the material into smaller pieces.