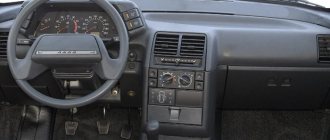
In the interior of the VAZ 2110, the dashboard is the most noticeable part. Every driver wants to sit in a stylish and well-maintained interior. But the standard panel looks angular and gray. This is especially noticeable after long-term use, when abrasions, scratches and cracks appear on the panel. Motorists solve this problem in different ways - some install another standard dashboard from a VAZ 2110, other drivers prefer to install a Europanel - this is the name of the trim from a third-party manufacturer. The trim allows you to transform the interior and turn the “ten” into a foreign car, at least on the inside. Whatever you choose, removing the panel is a must. In this material we will tell you how to properly dismantle the standard panel and install the Euro version.
Alternative torpedo
The alternative dashboard is softer than the standard “tens” dashboard, but the main advantage is the absence of unpleasant grinding and squeaking. Motorists decide to get rid of the standard one precisely because of the squeaking. For the VAZ 2110 car there are several types of panels that differ in design.
The panel is sold as a set:
- The panel itself, which is an alternative to standard plastic.
- Buttons, brackets and inserts for blowers and instrument panels.
- A set of wires and a block for a double switch.
- Buttons for low beam, heating, dimensions and fog lights.
- Plugs for buttons are installed in places where keys are not needed.
The experience of the owners of the “Ten” shows that proper removal and installation of the Europanel improves sound insulation, increases airflow and changes the appearance of the VAZ 2110 interior for the better.
Removing the central tunnel in the cabin on a VAZ 2113, 2114, 2115
Hello, today we will show you how to remove the central tunnel in the interior of a VAZ 2113, 2114, 2115. If you decide to remove the dashboard, replace the hand brake lever. or gear lever, you will have to remove the center tunnel.
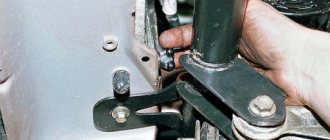
Let's move on to the process of removing the tunnel. At the back of the tunnel, unscrew the 2 lower bolts
Unscrew the bolt
Unscrew the bolt
Now in the front part of the tunnel we unscrew a bolt on each side
Unscrew the bolt
After this, remove the gear knob cover fastening.
Removing the gearshift knob cover
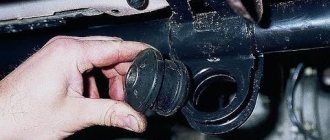
Then remove the plug on the tunnel by prying it off with a screwdriver
Removing the plug
Next, lift the central tunnel, disconnect the seat heating connectors, if any, and remove the central tunnel completely
Disconnect the seat heating connectors
Removing the central tunnel
We install the central tunnel in the reverse order.
nazcar.ru
We remove the torpedo
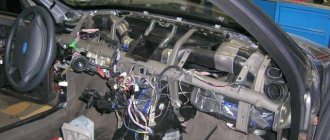
Removing and installing a new torpedo on a VAZ 2110 takes a lot of time, we also advise you to be patient, since there are dozens of connections and wires in this part of the interior. Each action must be careful, since the VAZ 2110 mounts are very fragile and can be easily broken. After this, the panel will no longer fit properly, and the car will noticeably increase in squeaking while driving.
In some cases, it is not necessary to completely dismantle the standard panel. Our article provides a description of a complete analysis.
Necessary tool
To remove the case, you should have in your arsenal:
- Labels with adhesive backing.
- Marker or pencil.
- Set of screwdrivers and keys.
The main assistants in this work will be a 10 mm wrench and a Phillips screwdriver. We need a pencil or a washable marker in order to mark the removed elements. This also applies to self-adhesive labels. There are too many wires and parts, after disassembling you will already forget where each component is located. Markings and stickers will remind you of the location of wires and parts.
Preparatory work
Some people prefer to disassemble without dismantling other components of the interior, but this significantly complicates and prolongs the work. We recommend preparing the interior as you will need room to maneuver. Remove the seats and steering wheel - follow this sequence. It is also worth dismantling the floor tunnel.
To do this, you need to unscrew the screws and move the VAZ 2110 part back. We perform the same operation with the lower part. The next step is to dismantle the glove compartment, now you can remove the mounting block and relay. During the process, each wire must be labeled. You need to be especially careful when handling speedometers.
Removal - step by step instructions
- We find the central panel, on the right side of it there are two self-tapping screws - unscrew them. We do the same with the opposite side. Now we dismantle the shield on both sides, as shown in the photo.
That's it, the torpedo is dismantled, you can replace its individual components, install another panel from a VAZ 2110, or carry out tuning using a Europanel. Assembly proceeds in reverse order. Will there be an overlay installed instead of the standard panel? Then move on to the next section.
Disassembly
Replacing the panel, installing the trim, and do-it-yourself sound insulation require quite a lot of disassembly. Therefore, it is very advisable to mark all removed parts. For example, using self-adhesive labels on goods.
So:
- Remove the front seats;
- The floor tunnel is also subject to dismantling;
- We also remove the steering column cover and the steering wheel itself;
- The steering column switches also need to be removed;
- Next we remove the glove compartment;
- We disconnect the connectors and relays from the mounting block;
- After removing the front pillar covers, remove the instrument panel of the VAZ 2110, disconnecting everything that is possible from it. If you do not have many devices installed other than those standardly provided, then it is better to remove the panel along with the wires.
Also, in order for the sound insulation to be such not only in name, you need to remove the ECU bracket and sills, and then carefully remove the factory sound insulation.
Installing the dashboard trim
The cover will be installed after complete disassembly - it’s easier and more convenient. The instructions say that the trim must be cut around the perimeter. Now you can assemble the case: we place in it the accessories and instrument connectors that came in the kit. Carefully lay out the wiring from the base of the cover. All joints of the new VAZ 2110 panel must be glued with anti-creak.
We attach additional harnesses to the standard wires and tighten them with zip ties. Please note that there are additional buttons on the cover - standard connectors must be connected to them. The cover is attached to the original panel using self-tapping screws. Now you can carry out the installation in reverse order.
Diagnostics and replacement of Lacetti front arm silent blocks
The diagnostic procedure is not complicated if you follow the algorithm.
The front two wheels are subject to inspection, since the design at the rear is different. The inspection is carried out on the side on which the knock is heard. To ensure ease of access, it is recommended to use a hydraulic lift; an inspection hole and a jack will not help much. After hanging the car using a pry bar, check the condition of the lever. A slight wobble of the mount determines its condition. If there are knocks, creaks, or grinding noises, the part is faulty and the front silent blocks of the Lacetti need to be replaced.
At the same time, preventive maintenance is carried out on the ball joint, CV joint boot, clamp, and drive shaft. If these parts show signs of wear, it is advisable to replace them with new ones to avoid critical breakdowns in the future.
Obviously, these are just recommendations, but the owner should listen to the advice of experts.
On a Lacetti, replacing a suspension arm consists of the following steps: hanging the car with a lift, dismantling the wheel, ball joint, and the arm itself. Two silent blocks are removed from the body using a special puller or hydraulic press, depending on what is available. The surface is cleaned of foreign deposits, rust, corrosion, and each “ear” is treated with lubricant. New silent blocks are pressed into the cavity. The assembly procedure occurs in reverse order.
Depending on the diagnostic results, a decision is made to replace the ball joint, boots, clamps, and CV joints. You should also consider replacing the shock absorber if there are signs of leakage.
To change the torpedo trim, it is not necessary to remove it completely!
So let's get started, let's look at the panel overlays, which are divided into:
Euro-1, another name is Caprice and has the index 21104. The features of this lining are that it does not have a passenger shelf.
Euro-2, index 2110L, cover but already comes with a passenger shelf.
Euro-3, a cover without a shelf, but under the instrument panel of Kalina, Priora, and has a climate control module with 3 knobs and an emergency stop button.
There are also exclusive panel that make the VAZ 2110 similar to the Nissan Primera, where the instrument panel is in the center.
In addition to these Euro-overlays, there are overlays that are installed on top of them. For example, the overlay of the Chestnut panel.
It is not difficult to install the Kashtan overlay on the dashboard, so we will not dwell on this, but changing the old panel overlay to the Euro one is already more difficult.
The euro overlay for the panel consists of:
- On the masonry itself
- Inserts for buttons (small insert 2110L-2120031, large 2110L-2120032)
- Air ducts (2114-81080623)
Replacing the torpedo lining of a VAZ 2110
Replacing the torpedo lining of a VAZ 2110
.
How to remove the ponnel on a VAZ 2110
our group on VK.
- Device panel trim (2110L-5325124)
- Double button for turning on the headlights and low beam
- Key for turning on the rear fog lights (with fixation)
- Rear window heating switch (latching)
- Key pads 2 pcs.
- Plugs instead of keys 6 pcs.
Description
The instrument panel on the VAZ 2110 serves to display the necessary information about the condition of the car and contains a tachometer, speedometer, fuel level and coolant temperature gauges, as well as 12 warning lamps. Due to the fact that it is made of plastic of not very high quality, after a short amount of time the plastic begins to crack or the corner of the instrument panel peels off. To remove these defects, it is necessary to remove the entire dashboard, but how to remove the panel on a VAZ 2110?
Installing the Euro trim without removing the dashboard
In this option, you need to have a drill and screws on hand.
Rely on the lining mounting diagram and start in order:
- Remove the dashboard.
- Open the glove compartment and unscrew the three screws from the inside (positions 1,2,3 in the diagram). Trying to unscrew the screw (pos. 9) from the inside near the windshield is difficult, but doable.
- Remove the 4 keys (next to the control module) and unscrew the screws from the inside (pos. 4.5)
- Unscrew or loosen the fastening by adjusting the backlight (pos.

- Open the fuse module and unscrew 2 screws from the inside (pos. 6 and 7)
- Now the panel overlay is held in place only by screws, positions 10 and 11. They cannot be unscrewed, so we break them out or lift the overlay by the right edge and cut them off with a file. (Note: the Euro trim will cover the entire top of the panel up to the windshield, so you don’t have to worry about the appearance when you cut or break the screws)
- Remove the old dashboard trim.
Dismantling
There is nothing complicated about dismantling the instrument panel on a VAZ 2110; you only need a certain amount of free time, a minimum of tools and your own desire.
The dismantling process consists of the following steps:
- Before directly removing the panel, disconnect the negative terminal from the battery, this will avoid future electrical problems;
- Using plastic spatulas, remove the top lining of the floor tunnel;
- Glovebox. Open the glove compartment and use a Phillips screwdriver to unscrew the mounting screws located below. After this, you can remove the glove compartment itself, only you will first need to disconnect the wires going to its lighting;
- Remove the mounting block with the cover;
- Controls. Next, remove the hydraulic corrector mode switching handle; to do this, you only need to pull it out of the panel towards you with a little force. Unscrew the switch nut using the appropriate size socket. Then remove the switch itself from the inside of the VAZ 2110 panel so that it remains hanging on the mounts;
- Air system. After this, it will be necessary to remove the upper side nozzles ; this can be done by pushing down the plastic latch with a plastic spatula and turning the nozzle. After this, the nozzle can be removed. It is also worth doing from the other side;
- Fastenings. The removed side nozzles will provide access to the nuts that will need to be unscrewed. Also unscrew the screws at the bottom of the VAZ 2110 panel on the left, near the hood opening lever, in the niche where the mounting block is attached, on the left and right of the console, behind the glove compartment and at the bottom right;
- Seals. Next, you need to remove the rubber seal from the front pillars of the car, and then use a plastic spatula or screwdriver to pick up the trim so that the plastic fasteners come out of their seats. Now the decorative trim can be removed;
- Wiring. After the previous steps have been completed, proceed to disconnect the wiring. There is a bundle of wires next to the ignition switch; you need to disconnect the block with the wires from the lock. To do this, you need to cut off the clamp that tightens the bundle of wires and disconnect the block. Next, you need to disconnect the connectors with the wires next to the gas pedal, the immobilizer connector, the two connectors to which the brake signal contacts go, and the connectors on the harness under the instrument panel on the driver’s side.
Tools
In order to completely remove the housing, you will need:
- a set of keys and screwdrivers;
- marker;
- adhesive based labels.
The main work will involve a 10 mm wrench and a Phillips screwdriver. You will also need a water-based marker, since it washes off easily, it is necessary so as not to mix up the removed parts. This also applies to adhesive labels. There are too many parts and wires, so you shouldn't rely on memory. Stickers and bullet points will help you remember the starting place of all the components.
How to install a Europanel on a VAZ 2110 instead of an old torpedo
A frequently asked question is where to buy and how to install a Euro panel or dashboard trim on a VAZ 2110 with your own hands. This is not surprising, I’m already tired of dozens of ancient panels and want to somehow update the interior. In this article I will show you what is needed in order to change the old VAZ 2110 torpedo to the euro and many important issues that you will encounter when replacing the old torpedo.
First, let's define what “installing a torpedo on a VAZ 2110” means. In fact, only the panel overlay is different, and the lower part of the panel remains the same. It turns out that the torpedo is collapsible and consists of 3 parts. We are talking about the very top trim, so installing it is not as difficult as replacing the entire dashboard of a car.
Dashboard VAZ 2114
Cars of the Samara 2 family are equipped with a modern VAZ 2114 instrument panel, which is also called the “European panel”. The designers worked on it so that it allows for good forward visibility, a pleasant appearance, combines information content and ergonomics, and at the same time helps the driver cope with ordinary everyday needs. And they mostly succeeded. A block of instruments and sensors installed in front of the driver’s eyes, behind the steering wheel, provides him with the maximum possible amount of information:
- In the central part there are two dial instruments, on the left there is an engine speed indicator, by which the driver determines what load the power plant is working with at a particular moment and, if necessary, corrects this process by switching speeds; in the window under the arrow there is a digital clock. On the right is a speedometer or an indicator of the current speed of the car, in the window under the arrow there are digital readings of the kilometers traveled for the entire period of operation of the car and for the last trip;
- In the upper part, between the dial instruments, there is a turn signal indicator lamp with green arrows pointing left and right;
- In the lower central part there is a red “stop signal” triangle, and below it CHECK ENGINE is a red signal for engine emergency conditions according to information from the electronic on-board unit;
- In the left middle part of the instrument block there is a dial gauge for the engine temperature, or as it is called in the literature, a coolant temperature sensor, above it there is an icon that lights up when the engine overheats. Below it are icons for the throttle, oil pressure, handbrake and battery;
- In the right middle part there is a dial indicator for the presence of fuel in the fuel tank, above it is an icon for a fully filled tank, below it is an icon for the minimum amount of fuel in the tank, as well as icons for low beam, low brake fluid level and high beam.
Ergonomics is ensured by the convenient arrangement of instruments and information icons for visual perception of information, as well as keys, buttons and levers for manipulating them. A standard on-board computer is installed in the central part of the panel, usually a Gamma, Multitronics, Prestige or State computer. The location for its installation was chosen very well and with its help the driver receives expanded information about the state of the operating engine systems and vehicle components.
This information is reflected not only on the BC display, but is also transmitted through other control or information lamps and signs located on the instrument cluster and in other places on the dashboard. In addition, the on-board computer display displays other information, for example about the timing of the next inspection or maintenance.
The glove box, which can be closed, is conveniently located and has a backlight and a fairly large niche underneath it. The central beard also has a niche for storing something and an ashtray. The air duct outlets are quite well made, allowing for efficient glass blowing and preventing fogging.
During the operation of a car, problems constantly arise with malfunctions or failures in various systems. In order to get to some of them, it is necessary to remove the VAZ 2114 panel. Even to remove the instrument panel, you need to figure out how to remove the dashboard on the VAZ 2114 (instrument panel).
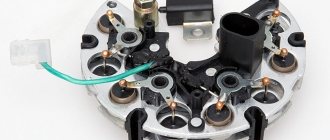
What is included in the design?
To make it easier to remove the entire dashboard or its individual elements, you need to know what the structure consists of. In a VAZ 2114 car, the dashboard includes 11 main elements, which are shown below:
Dashboard base. It contains controls for interior systems.
- Overlays. This part is needed to securely fasten the base.
- Bracket.
- The sealing element is a plug.
- Ashtray.
- Crossbar, there are two of them. The number “6” shows the right one.
- Right dashboard screen.
- A shield that blocks access to the wiring.
- Central bracket.
- Left screen of the instrument panel.
- Left cross member.
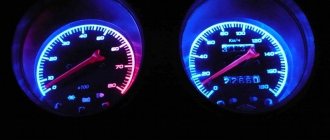
In VAZ cars, you can improve the appearance of the dashboard. To do this, you need to unload the dashboard from the dials. More stylish and modern information devices are usually installed to replace them. The same applies to the backlight; if you wish, you can update it yourself and install modern original LEDs.
By dismantling these elements one by one, you can completely disassemble the dashboard. Below you will find detailed instructions with which the motorist can completely remove the dashboard elements from the car.
Noise insulation
If you think that installing a panel overlay will immediately solve many problems, then this is not entirely true. We still need to work on eliminating the creaking, for which we need to glue and stretch everything with our own hands; we also need to soundproof the panel itself, and at the same time the floor. It is also possible that the air ducts will need to be replaced or modified.
An article dedicated to tuning and soundproofing a torpedo on a VAZ 2110 is located here: https://vazweb.ru/desyatka/salon/torpeda.html
To work you need, based on a VAZ 2110:
- Six sheets of bimast are a self-adhesive material used for sound insulation. It consists of three layers: 1 – thick aluminum foil; 2 – bitumen; 3 – raw rubber. The standard sheet has a size of 60x90 cm;
- Three sheets of splen measuring 100x125 cm and 0.8 cm thick. This is also a self-adhesive material resembling foam;
- One standard sheet of Bitoplast-5 (black self-adhesive foam rubber).
All these materials will be needed in order to glue all the places that make creaking and other noises, and so that the sound insulation in the VAZ 2110 interior is at the level, and not what it actually is.
In order to know for sure that in the future nothing will creak or rattle on the VAZ 2110, irritating those in the car, normal sound insulation is needed. On the floor of the entire front part (up to the rear seats) and on the front panel with your own hands you need to glue the butt joint in the following sequence:
- Bimast (and roll);
- Splen. It can be slightly stretched, while it follows the contours of the surface being pasted;
- Laying factory sound insulation on top.
Preparatory work
Some are satisfied with dismantling without removing the remaining components of the interior, but this takes extra time and complicates the process as a whole. In order not to add more work to yourself, it is recommended to clear the interior for free movement. Strictly observing the sequence, you need to remove:
- armchairs;
- glove box;
- steering wheel;
- disassemble the floor tunnel. To do this, you need to unscrew the screws and move the part back a little.
We dismantle the lower part in the same way. The next step is to remove the glove compartment, after which you should remove the relay and mounting block. As you disassemble, you need to mark all the wires. Particular attention should be paid to the speedometer.
How to remove the long black trim (cladding) of the instrument panel
I think that the problem of panel cladding rattling is familiar to many Kalina owners, especially after several years of operation.
I began to experience extraneous sounds after extreme heat due to the unsticking of this long black trim located along the entire length of the instrument panel at the bottom of the windshield. To remove this lining you will need several tools for faster and more convenient work, namely:
- Flat blade screwdriver
- Phillips bit + adapter
- Ratchet handle
Step-by-step instructions for disassembly
- The first step is to remove the left screen. To do this, you need to unscrew 3 screws, as shown in the photo. Once the fasteners are removed, the left dash screen can be removed.
Now the console can be completely removed if replacement is planned. When performing other repair work, it is recommended to navigate by access to the parts of interest. For example, to access the heater stove, it is enough to remove only the lower part of the dashboard.
Many car owners do not know how to remove the dashboard on a VAZ 2114. We will show you how to do it correctly. Usually the instrument panel is removed to replace the heater, remove the instrument cluster, seal the heater nozzles, glue, etc.