Published: 10/20/2020
- What to do next
- Replacing a radiator on a VAZ 2110
- Instructions for installing a new heater
- Replacing the heater radiator on a VAZ 2110
- Model selection
- How to fix problems
- Causes and symptoms of cooling radiator malfunction
- Choosing something new
- Choosing a radiator for VAZ-2110
- Replacing silent blocks on a car - step-by-step instructions
- Diagnostics of the heating system of VAZ 2110
- modification of the engine cooling system
- We replace the VAZ 2110 stove radiator with our own hands
Removing and replacing the VAZ 2110, 2111, 2112 cooling radiator with your own hands
Sometimes, even after changing the pipes, antifreeze leaks out and accumulates under the radiator.
Also, in such cases, stains and smudges from the coolant are visible on the radiator. To make sure of this, you need to remove and replace the radiator of the VAZ 2110, 2111, 2112. The work is done with your own hands and is not difficult to perform. You will need: a new cooling radiator, a 10″ wrench, a screwdriver, new antifreeze.
Open the hood, disconnect the battery terminal, remove the drain plug on the left side of the radiator and drain all the antifreeze.
We drain the antifreeze from the cylinder block. To speed up draining, unscrew the cap on the expansion tank.
Turn off the radiator fan. For convenience, you can remove the air filter.
Unscrew the bolts on the left side of the radiator.
And also one at the bottom of the radiator
Next, carefully remove the radiator fan.
Unscrew the clamps and disconnect the radiator pipes.
Actually we take out the radiator itself. We replace it with a new one and install it in the reverse order. Fill in new antifreeze.
Video on replacing the cooling radiator VAZ 2110, 2111, 2112
Source
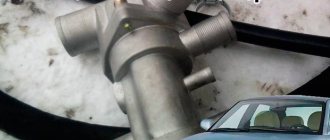
Instructions for installing a new heater
New sample
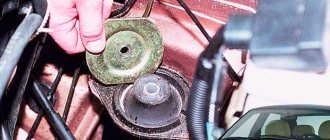
The “new” radiator has the following fastenings: a nut near the filter, a screw on the lower end of the windshield and two nuts located above the intake manifold. If your car has a heated glass system, you need to remove the expansion tank. The stove filter also needs to be removed and replaced if necessary. We remove it by unscrewing 4 screws, and then take out the filter. Now replacing the radiator of the VAZ 2110 stove:
The arrows indicate the fasteners that need to be removed to access the radiator.
- The new model heater is not one piece - it is assembled from two halves. They are connected using three self-tapping screws. Two screws can be found on the front side of the heater radiator, and the third is under the hose that goes to the heater fan. Finding the hose is not difficult - it is L-shaped.
The location of the radiator is under the hood of the car.
The fasteners have been removed, let's move on. Problems may arise when dismantling the heater, so you need to stop here. To remove the left part, we need to firmly grasp it with our left hand, and with our right hand, respectively, the right half. Now press on the heater and lift both parts up. The right side is easier to remove - you just need to pull it to the right with force.
The right side of the stove radiator. It needs to be disassembled into 2 more parts.
We dismantle both parts, then remove the steam exhaust hose through the hole in the soundproofing panel. If the left half of the heater is solid, then the right half is again divided into two parts. Metal brackets are installed as fastenings. We need to dismantle them along with the seal. After this, the right side will decompose on its own. Now a passage to the damper has opened. It’s better to replace it too; the ideal option is glued aluminum.
Disassembled right side of the radiator. The parts are fastened to each other using steel brackets.
After this, you can install a new part using the same principle.
For reference: there should be about 4 liters of liquid. Inspect the antifreeze: if it is relatively clear, then it can be refilled into the new heater radiator.
Old sample
- We follow all the steps to drain the coolant. Now you need to remove the seal installed in the windshield - if desired, you can also change it. Then you should remove the lining itself, which is called the “jabot”. It is secured with a screw located under the master cylinder. We unscrew it.
The arrows point to the frill. We need to take it down.
The main screw that holds the frill. It should be unscrewed.
Next, you need to unscrew the 4 fastenings of the upper clamps. The hoses and wires are held in place by two clamps - remove them.
4 fasteners that need to be removed.
Now you should disconnect the negative terminal of the battery - a standard procedure for repair and maintenance. Let's move on to the left side of the frill, it is held in place by 2 screws. Unscrew them and pull the frill towards you
Important: the frill should not come out completely
Pull out the negative terminal of the battery. This must be done to ensure safety.
The next step is to remove the windshield trim. Behind it there is an antifreeze level sensor - disconnect the plug from it and take out the hot air hose. It comes from the expansion tank.
Washer hose, sometimes difficult to find under the hood.
Now you need to remove the washer hose, which is attached to the windshield with four screws. We remove the heater housing clamps, windshield wipers and trim.
Arrows indicate fasteners that need to be removed.
We have a filter in front of us. He's also filming. As a result, you need to dismantle the steam supply and exhaust hoses, the filter housing, the antifreeze return and the rear part of the fan (not all VAZ 2110 cars have it).
Air filter mounts. After dismantling the filter, you can begin installing a new radiator.
Done, all that remains is to change the heater radiator. The work is performed in reverse order.
Changing the VAZ 2110 cooling radiator with your own hands
Even for people who are quite far from technology, the purpose of a cooling radiator is clear - it removes excess heat from the engine, thereby preventing it from overheating and failing.
However, some time passes, the most important part of the cooling system may fail, or simply leak. Then there is a need to replace the cooling radiator of the VAZ 2110, which can be done not only at a service station, but also with your own hands.
New engine cooling radiator
Tool
Everything you need to replace a radiator can be found in the garage of an ordinary car enthusiast. If there is a need to replace the stove radiator, you will need to buy some materials and spare parts:
- a set of wrenches, preferably with a ratchet and extension;
- figured and flat screwdrivers;
- a set of four new clamps;
- about 4 liters of fresh antifreeze;
- new heater radiator of the sample before September 2003;
- bottle or canister for draining old antifreeze.
Additionally, water and a rag are needed to wash the removed parts, since they may contain old antifreeze, dirt, dust, etc. When working with plastic elements, you need to be careful not to break the latches and fastening points of the screws.
Device
Any radiator on a car, regardless of its brand, consists of:
- Two halves (body);
- Patrubkov;
- Cores;
- Filler plug in the upper part of the radiator, equipped with valves (one is inlet, the other is outlet);
- Drain tap, in the lower half of the body.
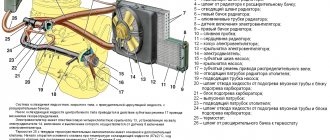
Design (diagram) of the engine cooling system
The body, which can often be made of aluminum, less often copper, consists of two tanks (one on top, the other on the bottom) and adjacent pipes through which the coolant circulates.
The core is rows of brass tubes soldered to cooling fins. They are located inside the case.
Cooling liquid enters the radiator through the filler plug and is drained through the drain valve, if necessary.
In addition, the power unit for maintaining thermal conditions includes an electric fan and a thermostat.
Causes of engine overheating
The reasons for overheating of the VAZ 2110 engine include, first of all, the insufficiently efficient operation of the cooling system. The reasons may be:
- The radiator pipes are clogged. A thing that is rarely seen today, and only when using coolant of extremely low quality. In this case, replacing them will help;
- Low coolant level due to leakage at the attachment points of the pipes or cracks in the pipes themselves. Need to replace fasteners or pipes;
- Housing contamination. Here you should take into account a small detail: the whole car, the radiator in particular, requires care. It should not be allowed to “overgrow” with dirt, fallen leaves, or other debris. Because of this, the efficiency of its work is significantly reduced;
- The radiator is leaking. It is necessary to remove it in order to decide based on the location, size of the leak, and general wear and tear of the unit whether it needs repair or replacement.
modification of the engine cooling system
One of the main systems of the car, the engine cooling system, may not work correctly if the expansion tank cap does not release excess pressure in time. As a result, the pressure in the system will be too high, which will cause leakage of the pipes. Upgrading the expansion tank cap is designed to prevent this situation.
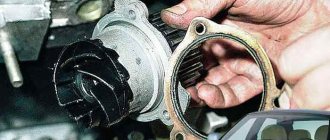
The pump is a simple assembly that consists of a housing, a bearing and an impeller. This cooling system pump circulates the coolant. If the pump does not work, then the engine will overheat. What is the service life of the pump and which pump to choose for the VAZ?
In the summer, the radiator fan of cars of the tenth family often turns on. To make it easier to cool the engine in hot weather, you can install two radiator fans instead of one. What modifications will be required for this and will 2 fans even fit in front of the engine radiator?
There is a known problem with new type expansion tanks, when it is always wet around the cap, and there are leaks in the corner between the engine shield and the fender. The reason is not a thin tank, but a stream of liquid that comes out of the upper steam outlet fitting. It is directed in such a way that it fills the neck of the tank and when the valve is activated, the antifreeze is carried out. We are trying to modify the expansion tank.
A car consists of several systems, one of which is the engine cooling system. If this system works properly, then we don’t even think about it. And if at least one part of the system fails, then a number of problems are possible, including the popular disease when the engine overheats. Let's figure out which radiator is better to choose.
If a car's radiator leaks, most of us resort to replacing it. However, in most cases, the radiator can be repaired rather than replaced. Sometimes no skills are required, but sometimes you can’t do without knowledge in the field of welding or soldering
We learn to determine the condition and try to restore the radiator with our own hands.
If you notice that the engine suddenly begins to heat up, then you should pay attention to the operation of the engine cooling system. The engine cooling radiator takes the brunt of dirt, dust, leaves and poplar fluff. This is why a dirty radiator is one of the reasons for engine overheating
Let's figure out how and how to clean a car radiator yourself.
The engine cooling system (ECS) plays an important role in vehicle operation. If it is not working correctly, then it may be that the engine is not warming up to operating temperature. Then the stove does not heat well and the life of the internal combustion engine is reduced. Either the engine overheats, then the car will “boil”. How to determine a malfunction of the engine cooling system with your own hands?
How a car's engine cooling system will work depends on many factors, but its main component is certainly the coolant (antifreeze/antifreeze). The operation of not only the engine and heater, but also the elements of the SOD itself depends on the quality of this fluid. How to choose high-quality antifreeze for VAZ 2110?
The new VAZ 2110 expansion tanks are installed without sensors, while the old tanks have a coolant level sensor. That is, to install a liquid level sensor at ten, you need to replace the new type tank with an old one..
What are the benefits of changing the Engine Cooling System (ECS) on the VAZ 2110 following the example of the Lada Kalina? How is SOD Kalina better than SOD VAZ 2110? What will be required for such a modification? Answers to these and other questions below..
If you decide to replace the thermostat with a new one, then at the same time you can immediately modify it. Modifying the thermostat brings its pros and cons. In this article we will focus on how you can remake the VAZ 2110 thermostat yourself, and what you will need for this.
Replacing a 5-hole thermostat with a 6-hole thermostat will make maintaining the coolant temperature more stable, and will also make your car noticeably warmer. How to install a 6-hole thermostat in a VAZ 2110? It turns out there are several solutions to this issue.
Installing an additional pump in a VAZ 2110
The cold weather is coming and every heat-loving car owner is wondering how to prepare his car for winter. After all, not everyone wants to freeze in the car all winter. The stove on the VAZ 2110 warms, but not as much as we would like. One of the disadvantages of the heater is its low efficiency at idle. Installing an additional pump will solve this problem.
Latest >>
Model selection
For the VAZ 2110 you can choose either aluminum or copper radiators. To a large extent, the choice depends on what result you need: saving money or durability and reliability.
Their disadvantages and advantages:
- Aluminum. Lightweight, relatively cheap, the price depends on the manufacturer: - Luzar (2110-8101060) - about 1000 rubles; - Pramo (2110-1301012) - retail approximately 1600 rubles. But its thermal conductivity interferes, and it cools the engine worse. In addition, it is subject to fairly rapid corrosion; it takes less time for it to flow;
Aluminum radiator cooling
Copper cooling radiator with 40% increased efficiency
Dismantling and installation
To remove the cooling radiator from a VAZ 2110 with your own hands, you must:
- Drain the coolant through the bottom plug;
- Remove the battery as it is in the way;
- On the injection VAZ 2110, it is also necessary to remove the air filter;
- The upper mount to the frame must be disassembled, simultaneously releasing the fan;
- Remove the electric fan;
- Remove two hoses - for steam supply/discharge;
- Tilt the radiator towards the engine and remove.
That is, removal is quite simple. Now, if the radiator leaks slightly, but is not severely damaged by corrosion, you can repair it. Otherwise, replace it. When choosing a new radiator for a VAZ 2110, be sure to take into account the model of the previously installed one so that the new one fits perfectly.
When installing, make sure that the rubber pads on which the body rests with the lower part fit firmly into the holes on the cross member.
Next, you need to fill in the coolant (you can use the old one by filtering it), and then start the engine.
Source
Removing a non-working tube and its elements
We need a hot rod, we need to put it in the tube and wait, if the temperature of the rod is sufficient, the solder will become soft. Next, the tube with the rod is removed from the tank, and a new one is put in its place and sealed.
Soldering radiator tubes
In case of severe damage, it is better to replace the radiator
Argon-arc electric welding is performed using filler material; most often, specialized aluminum welding wire is used. When using this type of welding, you need to know many nuances, for example: aluminum oxide deposits prevent good weldability. To avoid this, argon is supplied to the welding site, the task of which is to reliably protect the metal from oxidation, as a result of which the weld becomes free of pores and cavities.
Also, after heating to the desired temperature, all substances turn from solid to liquid. During this welding, the temperature rises above 400°C. This temperature of aluminum makes it less durable, and it can crumble even from a slight blow.
We remove the cooling radiator on a VAZ-2110 to replace it with our own hands (+part numbers)
Problems with the cooling system necessarily lead to more serious problems with the engine. And the backbone of this system is the cooling radiator. At the slightest sign of malfunction, you need to think about either repairing or replacing the radiator completely . But first you need to decide which radiator is better for the VAZ-2110 and which one was installed from the factory.
Choosing a radiator for VAZ-2110
The part is not cheap, but the stingy one pays twice. Therefore, in the case of a cooling radiator, it is better to overpay a hundred or two, but provide your engine with a normal operating temperature and save it from overheating.
The original radiator of the VAZ-2110 has lugs for fastening, but some manufacturers produce models without these fastenings.
Signs of malfunction and breakdown
The signs of a malfunctioning radiator that needs to be replaced are clear - an irreparable leak and puddles under the car.
Leaks can be caused not only by physical damage, but also by poor-quality coolants. In any case, repairing radiators using magic additives that close cracks and holes is detrimental to the engine. No one can say that this product will clog the cooling system. Therefore, there are two options - replacement or repair.
Articles
Sometimes repairing a radiator is completely impossible, and sometimes it will cost more than a new one. Therefore, we will immediately consider the market offers and the model. And there are only two models - for the 1.5-liter carburetor engine and for all the others. Later models for all injection engines are suitable for both Priora and Kalina. An old radiator for a carburetor engine has catalog number 2110-0810106000 and costs about 1000-1500 rubles. A new one with article number 2172-1300010, 2112-1301012, 21102-1301012, 2170-1301012-95 can cost from two to six thousand.
On “tens” since 2008 with radiators.
The price of a VAZ-2110 radiator depends on the material and manufacturer:
- Copper radiator . It is produced by only a few factories: Orenburg, SHAAZ and several foreign companies. The high price is justified by its high service life, excellent heat dissipation properties and maintainability. The only downsides are the price and weight. It is heavier both in rubles and in kilograms.
Copper radiator 2-row.
Aluminum radiator 2112-1301012.
Removing the cooling radiator on a VAZ-2110
Regardless of what we have to do, replacement or repair, the radiator needs to be removed . The operation is simple and will only take a few minutes, and all you need for the job is a container for draining antifreeze and a standard set of tools.
It is more convenient to carry out the work with access under the car, and we drain the antifreeze on a cold engine.
We substitute the container and unscrew the radiator cap.
Using a 13 key, unscrew the plug on the cylinder block.
Remove the clamp and disconnect the pads.
We take out the casing along with the fan.
Carefully pull out the radiator; residual antifreeze may leak.
conclusions
We install the new radiator in the reverse order. Before starting installation, it is advisable to check the condition of the pipes and, if necessary, replace them with new ones. Good luck to everyone and stable engine temperature!
Source
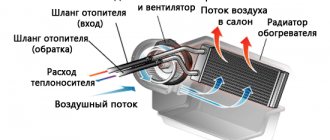
Cooling radiator device
The main structural elements include:
- frame;
- pipes;
- cores;
- drain valve located at the bottom of the housing;
- the fill plug is located on top of the main body, equipped with inlet and outlet valves;
- thermostat;
- fan.
Cooling radiator design: 1 – radiator;
2 – sensor for turning on the electric fan; 6 – rubber cushion; 7 – drain plug. The housing design includes two tanks with attached pipes that transmit cooling. The cores include brass tubes soldered to the cooling fins located in the inner part of the housing. The fill plug directs the cooling liquid into the radiator; the drain valve is necessary so that, if necessary, the liquid can be drained from the cooling unit. The operation of the engine depends on which direction the radiator fan on the VAZ 2110 should rotate; if the system is operating correctly, cooling air should be supplied to the engine.
Reasons for engine overheating
Overheating of the VAZ 2110 engine can occur for many reasons. The main one is a malfunction of the cooling system.
What is the reason? What to do?
- Clogging of the pipes occurs due to the use of low quality coolant. The only way to avoid this is to use high-quality and proven materials.
- The appearance of smudges and leaks reduces the fluid level - the solution is a complete replacement of all components.
- Contamination of the housing; during operation, various debris adheres to the radiator housing: particles of dirt, leaves, dead insects and much more; a preventive measure is periodic cleaning of the outer surfaces of the housing.
- Leaks in the radiator, there is only one way out - dismantling, inspection and subsequent replacement.
Causes and symptoms of cooling radiator malfunction
The driver will notice problems in the cooling system immediately. This will be clearly visible when the engine is running, especially when traveling long distances. If antifreeze begins to boil, and thick, acrid smoke is pouring out from under the hood, it means that the cooling system has outlived its usefulness. It is absolutely unreasonable to continue driving in such a situation. You need to immediately call a tow truck and tow the vehicle to the nearest service station.
It is far from a fact that it was the radiator that failed. For example, replacing pipes or a fan on a VAZ 2110 is carried out much more often. Therefore, first of all, a car mechanic needs to diagnose the cooling system. For this purpose, special equipment is used, which allows you to quickly identify the cause of problems.
Most radiator failures are associated with the use of low quality coolant. It has an incorrect chemical composition, so during operation, traces of scale form on the internal walls of the unit. This phenomenon negatively affects further operation. Firstly, scale leads to destruction of the radiator from the inside. It is impossible to notice this process, and its consequences will force a complete replacement, since it will not be possible to solder or weld the unit.
Secondly, scale particles sometimes break off and thereby interfere with the normal circulation of the coolant. This will lead to system failure and constant overheating of the motor.
Checking the radiator of the cooling system to ensure its serviceability is very simple. You must first remove the device from the car, then plug the pipes and lower the unit into a bath of water. If the radiator has not lost its seal, then air bubbles will not float to the surface. If they appear, it means that there is a leak in the system and the part needs to be replaced. To obtain a reliable result, it is necessary to tightly close the pipes so that they do not allow air to pass through.
Provided that the radiator has retained its tightness, you can try to descale it. To do this, a special liquid is poured into the system, which removes all foreign elements from the internal walls. Then you need to drain it, thoroughly rinse the radiator and blow it with air so that no particles remain inside.
To keep the radiator in working condition longer, it is necessary to fill the cooling system only with those brands of liquids that are recommended by the official manufacturer. All other models may simply be incompatible with the device, which is why it will very quickly use up its working life.
Choosing a new radiator
Choosing a radiator is not an easy task. Before removing the VAZ 2110 radiator, it is important to decide what will be the replacement. The choice is not large, but you should approach it with all responsibility.
There are two options for cooling devices for the “ten” domestic model - aluminum and copper. The choice depends on several indicators: reliability, long-term operation, cost.
Aluminum radiator
Aluminum – light weight, low price. It has poor thermal conductivity, which significantly reduces the engine cooling effect. Corrosion begins to appear after a short period of use.
Copper radiator for VAZ 2110
Copper - heavy weight, effectively copes with the task assigned to it. Thanks to the copper coating, the radiator is protected from corrosion, which significantly increases its service life. It has high mechanical strength, which protects the device from unwanted leakage. Despite all the positive qualities, there is still a drawback - the high price.
It is quite difficult to specifically answer the question: how much does a radiator on a VAZ 2110 cost, as well as how much does a heater radiator on a VAZ 2110 cost, since the price depends directly on the manufacturer and the quality of the product.
Installation of a modified vehicle
On a VAZ 2110 you can easily install a more advanced thermostat from Granta 2190. But you should still know a little about the design of the heating/cooling system in Granta. Its scheme can be easily implemented on the “ten”.
- Original TS Grants 2190 from BEHR;
- The lower radiator hose is from Granta, but the upper one 21214 will also work, or simply matched to size;
- Tee from VAZ 2110 for the cooling system;
- The studs are 8 mm in length - like from the camshaft bed;
- Straight long stove pipe from the “ten”;
- Gasket for thermostat.
We act according to this plan:
- We change the lower radiator pipe to the one from Granta (or similar). You can leave the original one, but connect it to a suitable diameter at a right angle using a piece of pipe. However, remember - the more connections, the more opportunities for leaks;
- We connect the expansion tank pipe through a VAZ 2110 tee: one end goes to the drain from the heater radiator, the other end goes to the supply pipe;
- Drain the coolant;
- We change the studs to longer ones and install the Granta thermostat;
- We twist the temperature sensor.
Next comes a check to see if the modified heating system is working properly. Typically, the Grant vehicle is more stable, provides faster heating of the air in the cabin, and is not subject to temperature fluctuations.
Replacing a radiator on a VAZ 2110
Replacing a VAZ 2110 radiator with 16 valves is simple; you can use the instruction manual or consult a specialist.
Step-by-step instructions that will help you achieve the desired result:
- Using the bottom plug, drain the coolant;
- Remove the battery from the seat, as it will interfere with the replacement;
- In the case of an injection engine, it is necessary to remove the air filter;
- It is imperative to disassemble the upper fasteners of the frame, release and dismantle the electric fan;
- Remove the steam inlet and outlet pipes;
- The radiator can be removed without unnecessary damage; to do this, you need to tilt it slightly to the side of the power unit;
- If small leaks appear without visible corrosion damage, it is possible to repair the radiator, but this is a risky endeavor, because the part, even after a very high-quality repair, can cause many problems;
- When installing new equipment, you should pay attention to the condition and appearance of the rubberized cushions necessary to support the lower part of the radiator housing. It is important that these pillows fit firmly into the holes located along the crossbar;
- Fill the system with new cooling, connect each pipe, install the battery in its place, tighten each plug one by one, check the fasteners on which the VAZ 2110 radiator frame is secured. Only after a complete check can you try to turn on the engine and check its performance, followed by a check replaced cooling element.
Although replacing the cooling radiator of a VAZ 2110 is a simple procedure, we absolutely must not forget about the subtleties, nuances, safety precautions, as well as consistency in work. Or you can simply go to a car dealership and entrust the replacement to specialists.
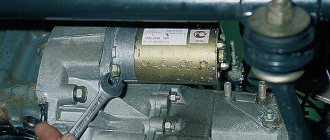
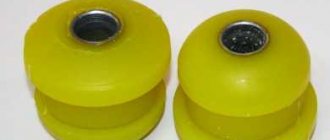
Replacing silent blocks on a car - step-by-step instructions
You should prepare for replacing silent blocks.
You will not be able to do without a jack or pit, a kit for replacing parts and the tools necessary to press out the silent block.
- The vehicle is placed in a “pit” (inspection hole) and the crankcase protection, if present, is dismantled.
- We unscrew the nuts that serve to secure the front arms. Use a #17 wrench to unscrew the nut that secures the stabilizer to the lever, and remove the bolt using a hammer (it’s very difficult to remove it manually).
- We tear off the bolts for fastening the front wheel and lift the side of the vehicle we need with a jack, after which we remove the wheel.
- Next comes unscrewing the next nuts - on the braces. You can't do without a shoulder key here. Note: before unscrewing, the nuts should be treated with VD-40 (a substance known to all motorists).
- After that - a ball joint, which is moved away from the rotary cam, and a couple more bolts, after unscrewing which the lever is dismantled.
- Now, using a special device, the silent blocks are dismantled and the eyes are cleaned of dirt.
- Next is pressing in new elements. In the absence of a special kit, a hammer, chisel and Russian ingenuity are used to replace them. But there is a risk of damage to the element or part of it.
- Next, the pressed silent block is lubricated with soapy water and installed in its rightful place. We return everything to its place, but in the reverse order (except for the old silent blocks, of course).
Important!
After replacing the silent blocks, a wheel alignment procedure must be carried out in case something was broken during dismantling. 7 good reasons to come for wheel alignment adjustment
Of course, if you have talent and minimal knowledge of car design, you can replace the above-described elements yourself.
But if you have the slightest doubt, entrust this labor-intensive procedure to specialists (replacing silent blocks on your own has more than once cost craftsmen a pretty penny). And don’t delay visiting the service station - safety is more important!
AutoPride will help you with replacing silent blocks, where you will find professionals with many years of experience, high-quality modern equipment and affordable prices.
Self-repair of VAZ 2110 radiator
Sometimes situations arise that it is impossible to do without radiator repair work, when you have to take everything into your own hands.
What and how to attach the radiator to a VAZ 2110 is described in the section on replacing the device; a mandatory action is to drain the cooling after the engine has completely cooled. Hoses, clamps, fan, radiator frame 2110 all must be properly disconnected before repair.
Sealing
In this case, you should have the necessary skills in this area and have special equipment. Before starting work, you need to clean the radiator from accumulated dirt. When soldering a small crack, it is enough to make a small seam, which cannot be said about a hole; a plate of the appropriate size will be required; if the tubes are damaged by more than 10%, it will need to be replaced.
Using a recovery agent
Minor damage to the heat exchanger can be repaired by using special products. And so, when repairing a VAZ 2110 radiator, sealant or reducing powder can become indispensable assistants to get to the place of a full inspection and repair. But of course, in this situation it is better to use “cold welding”.
Many car enthusiasts decide to replace spare parts from one car with another, trying to solve an existing problem or save money. And therefore, to the question: will a radiator from a VAZ 2110 fit on a VAZ 2114 - definitely not. The fact is that the radiators of these models are not only different in size, but also have different fastenings.
Source