The clutch plays the role of a link in a car between the transmission and the engine. This element of the internal combustion engine takes on the “impact” and all the loads that arise when transmitting torque from the engine to the gearbox. Therefore, the clutch can be conditionally classified as consumables, since it wears out quite often and requires immediate replacement. It is impossible to influence the wear of the clutch, unless you manage to change gears without its participation, although in this case it will not go unnoticed in relation to other parts of the engine.
VAZ 2110 clutch: main components and signs of malfunction
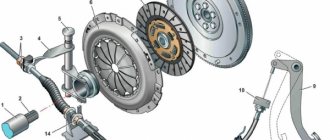
The VAZ 2110 single-disk clutch has a central pressure spring, the drive operates by means of a cable, the casing is attached to the flywheel and to the pressure plate. In short, the following elements can be distinguished:
- a crankcase with a cover and support planes, through which the clutch assembly is attached to the frame;
- casing;
- pressure and driven disks, flywheel and release fork;
- release bearing that disengages the clutch;
- cable wire going to the pedal.
As for breakdowns, the main malfunctions of the VAZ 2110 clutch are associated with its wear. However, there are many other reasons for clutch failure:
- drives the VAZ 2110 clutch, that is, there is deformation of the driven disc, breakage of the friction linings, deformation of the pressure plate, problems with the cable, etc.;
- incomplete engagement of the clutch (slippage) - burning or wear of the friction linings, the appearance of oil deposits on the surface of the discs and flywheel, jamming of the drive, etc.;
- when the clutch is working normally, jerking is observed - jamming in the drive, damage or deformation of the pressure plate, etc.;
- when turning off, the appearance of noise is noticeable - the shutdown bearing is coming out of position;
One way or another, if the clutch is faulty, the driver cannot control the car normally, gears are difficult to shift, the clutch slips, traction is lost, etc. The solution is to replace individual components or the entire assembly as a whole.
By the way, if the clutch is not very worn out, replacing only the failed components in some cases allows you to save significantly. For example, installing a clutch disc will cost less than replacing the clutch basket and disc assembly. As a rule, after troubleshooting, only worn parts of the VAZ 2110 clutch are often replaced (for example, only the VAZ clutch disc or release bearing is replaced).
However, if the condition of the unit leaves much to be desired, a complex failure of its main components is noted (VAZ clutch basket, release bearing, driven pulley, etc.), then this clearly indicates that it is better to replace the clutch completely. It turns out that everything will directly depend on the state of the node.
- As for the selection of clutches, today the market offers both original parts and an alternative to domestic kits (imported clutch kits). As practice shows, when choosing a VAZ 2110 clutch, price plays the last role, since it is important to purchase a high-quality solution.
In fact, the top five kits are:
- Kraft Tech (Turkey) – parts are able to cool well and remove wear products on their own;
- LUK (Germany) - has the property of damping vibrations, which maximizes comfort;
- Valeo (France) – high reliability, softness and wear resistance;
- Sachs (Germany) - thanks to production technology, withstands heavy loads in various operating conditions;
- VIS (VazInterService) is a popular domestic solution that is not inferior to imported analogues in a number of indicators.
How it works and what it consists of
The VAZ 2110 has a single-plate clutch with a central pressure spring. The drive operates via a cable. The casing is attached simultaneously to the pressure plate and flywheel. The design also provides for a driven disk.
The factory clutch system for the VAZ 2110 is called VIS. Many people complain about it because it doesn’t work very effectively, although others are sure that there is no more worthy alternative for the “ten”. So opinions differ on this matter.
The main components of the system include:
- casing;
- Crankcase with a cover and supporting planes with which the unit is attached to the frame;
- Driven and pressure plate;
- Release bearing. It disengages the clutch;
- Flywheel;
- Shutdown plug;
- The cable wire that goes to the pedal (far left in the car interior).
Causes of clutch disc wear
Wear of the mechanism in question is a completely normal phenomenon that occurs sooner or later. But sometimes it happens that the situation is strongly tilted in favor of “early”. Let's try to understand the reasons for the accelerated wear of the friction disc:
- Frequently holding the car on the verge of starting. For example, when you are stuck in a traffic jam, you constantly move without releasing the left pedal all the way.
- Off-road driving. In order not to stall, it is necessary to regulate the speed of rotation of the wheels with the left pedal.
- Sharp gear changes and aggressive driving style. It's no secret that this leads to increased wear of all machine parts.
- Low quality of parts - by saving on spare parts, you have every chance to repeat the replacement procedure in the near future.
The most interesting thing is that the cause of wear can be an incorrect setting of the driver’s seat, in which the left foot regularly holds the pedal in the pressed position.
Signs of clutch wear
We indicated the main sign of wear on the VAZ 2110 clutch at the beginning of the article - disc slippage during acceleration. This symptom begins to appear in the last gears, since the mechanical resistance during acceleration at such speeds is much higher. The more the disk is worn, the lower the speed it becomes noticeable. In addition, a specific smell appears from rubbing against the basket.
Another no less accurate indicator of friction disc wear is the position of the left pedal when starting off. If the car starts to move at the moment when the left pedal is in the upper position, then most likely the mechanism will not “live” long. But this may also be due to incorrect clutch pedal adjustment.
In case of unnatural wear of the disc (fractures, cracks, chips), the car may twitch when moving away, and characteristic sounds may be heard from under the hood.
When is it necessary to install a new clutch on a VAZ 2110 car and why?
Restoring a car on your own has always required not only some effort, but also financial investment. It is precisely because of the last factor that car owners try to carry out repairs themselves, thus saving on payments to service station workers. Clutch repair, of course, is not comparable in labor intensity to changing the working cylinder , but even if you have basic skills, it is quite doable in a garage.
To prevent replacing a VAZ 2110 clutch disc from becoming a waste of time and money, it’s a good idea to find out the symptoms indicating the need for repairs; experienced car enthusiasts already know them, but it will be useful for beginners:
- Loss of engine power.
- Vibrations when pressed or a “cotton” pedal.
- Switching on gears occurs with slipping or is accompanied by crunching and jerking.
- Spontaneous gear shutdown.
- Difficulty switching on speeds.
- Friction lining smell.
It is important to clearly identify the source of the problem; for example, a “stuck” pedal may also indicate that drive cable . Experienced motorists regularly check the condition of the friction mechanism every 80,000 km so that the installation of the VAZ 2110 clutch is fully justified.
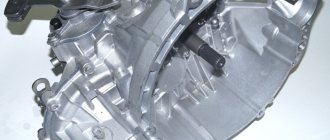
Clutch diagnostics on a VAZ-2110
The VAZ-2110 received the mechanism from the eight and nine virtually unchanged, only the downforce was adjusted, which corresponds to the engine torque.
Clutch diagram.
Nevertheless, every clutch has its time. The resource of the unit greatly depends on the driving style and operating conditions. And besides, from the kit manufacturer. By the way, it is not at all necessary to change the clutch assembly due to a failed driven disk or release bearing; it is expensive.
But replacing any element of the mechanism, as well as the entire clutch, at a service station will cost at least 3-5 thousand rubles , not counting the cost of materials. Therefore, it makes sense to do the repairs yourself. This is not the simplest operation, but it is quite accessible even for a novice driver.
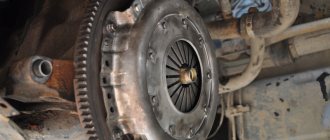
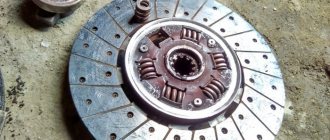
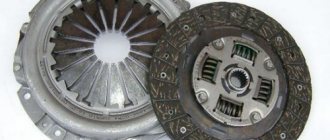
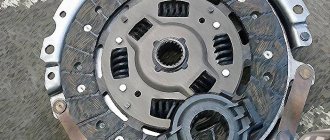
Clutch kit: basket, disc, bearing and mandrel.
Main problems
The clutch mechanism contains important parts, the repair of which must be treated with great responsibility. It consists of:
- pressure plate – clutch basket;
- disengaging clutch with a bearing, in other words, a release bearing.
It becomes possible to simplify the repair and replacement of the clutch basket, this also applies to changing the release bearing, since today in the package you can find clutch parts supplied by the machine manufacturer. Thus, there is no need to change parts separately. Based on car maintenance technology, it is recommended to change them completely.
Signs of a clutch problem include a situation in which the car does not gain enough power. Noise may be heard when depressing the clutch pedal. The car may also jerk and skid when starting off. Most often, certain problems in the clutch appear due to wear of parts. When it comes to novice drivers, the picture is different. As a rule, the driver himself is to blame for choosing the driving mode illiterately. There is often a situation where car owners compete with each other, starting quickly from a traffic light.
Choice
If you plan to simply replace the disk, purchasing a completely new node does not make sense from a financial point of view. But when the old clutch leaves much to be desired due to the quality of its work, it’s worth thinking about completely replacing the unit.
Set
Today the market is represented by an extensive list of alternatives made in Europe and China. We strongly do not recommend using Chinese spare parts, but European analogues should be considered as a replacement for VIS.
According to a study conducted among VAZ 2110 owners, the five best kits for the domestic “ten” were determined:
- Kraft Tech.
- LUK.
- Valeo.
- Sachs.
- VIS.
As we have already noted, VIS is installed as standard and works quite well. An important advantage compared to European counterparts is financial accessibility. But if your wallet allows it, replace the old clutch with a better and more expensive one.
In defense of the VIS system, we note that repairs often require simply adjusting the pedal and tightening the cable . And if you are going to completely change VIS to VIS, it will not cost you a pretty penny.
Which VAZ 2110 clutch is better?
This question is asked by every VAZ 2110 owner when he is faced with the need to choose a mechanism. Below are the results of reviews of devices by experts in the Russian automotive market. It is also worth noting that during the research process, the most popular manufacturers among domestic motorists were considered.
- Krafttek. The kit does not include a bearing, so you will have to buy it additionally, and there is also no quality mark. The basket is equipped with 18 petals and the driven shaft (Y 3200A B0206) has 4 springs. This mechanism is recommended for use in the VAZ 2110.
- German manufacturer Luke (Lamellen und Kupplungsbau). The set is complete, you don't have to buy anything else. The packaging contains the MT14 quality mark. In addition, the driven shaft is marked with markings for proper installation. The element basket also has 18 petals, and the driven shaft is equipped with 6 springs. It is also worth noting that the basket side is marked on the shaft.
- Valeo, manufacturer France. A complete set, you don’t have to buy anything extra. Moreover, this clutch comes with a lubricating fluid for the mechanism, as well as a CD with installation instructions. There are 18 petals in the basket.
- Russian. The kit does not include driven and pressure pulleys, as well as a release bearing. Nevertheless, the product received the AYA70 quality mark. There are 12 petals in the basket, and 6 springs on the driven shaft. The product has been approved for installation in the VAZ 2110.
- Pilenga, country of origin unknown. The kit does not include a pressure pulley and a release bearing, so if you decide to replace the mechanism completely, then these components will need to be purchased. There are 18 petals in the basket. There are 8 springs on the driven shaft. There are no approval marks on the packaging.
Actually, any of the clutches listed above is suitable for VAZ 2110 cars. For example, the Luke cannot produce maximum torque, so engine power will be reduced when driving. Krafttek is a fairly reliable, time-tested mechanism, although you will have to purchase some additional elements to install it.
It is worth noting that this unit also has many positive reviews on the Internet from other motorists. But keep in mind that if the package for this mechanism does not contain lubricating fluid and a CD with installation instructions, then this is a fake. Having installed such a device, be prepared for the fact that it may fail after 5 thousand kilometers.
When is it necessary to change?
The clutch system allows the car to move off smoothly, removing the load from the engine, which reduces wear on its parts and extends its service life. Overloads are caused by an inertial moment formed during the rotation of parts of the power unit if the crankshaft speed has sharply decreased.
There is no specific time frame for replacing the unit, since the service life of this device mainly depends on operating conditions and the driver’s driving style. It is recommended to diagnose the device after 80 thousand km.
Important features of clutch assembly
Proper assembly of this spare part at home involves taking into account some important nuances:
When you are centering a disk, you need to use a mandrel specially designed for this or equip yourself with a primary shaft. This method will allow you to place the gearbox in place. Once the job of placing the shaft spline into the clutch splines is completed, the input shaft can be easily pulled out. The cable is attached to the fork and slightly loosened. Subsequent adjustments are carried out only when the clutch assembly has come to an end.
Don't forget to secure the control levers and traction lever to the panel. Tighten the fasteners well to prevent them from coming loose on the road. Be sure to connect the battery and, finally, connect the filter housing that cleans the air flow.
How to change the clutch basket
Clutch basket for VAZ 21101
As noted above, garage conditions, a jack and several support blocks are quite suitable for changing the clutch basket. Ideally, it is better to use a lift. Before you begin work, you need to familiarize yourself with the repair manual for your car, the mandatory repair methods, as well as car maintenance. So:
- You need to find a catalog of parts, since many of them may be missing or some of them will be superfluous.
- Immediately before removing the clutch from the gearbox, you need to mark how the rotating parts are placed so that there is no vibration during reassembly.
Clutch basket for VAZ 2110
- The shift lever is removed from inside the car.
- There is now clear access to disconnect the gearbox.
- The bolts that secure the basket to the flywheel are unscrewed. When turning the flywheel, you need to hold it with a mounting tool.
- The driven disk and basket are dismantled.
- The clutch release clutch with the bearing is removed.
- During the repair process, you need to inspect the clutch fork, or rather its condition. Also inspect other parts for wear.
- The release bearing is pressed out of the clutch; of course, this is labor-intensive work. Next, replace the clutch bearing. As a rule, it is better to use lubricants recommended by the manufacturer to lubricate parts.
Note! The parts must be thoroughly washed in kerosene, and they must be fault-detected. Do not install clutch elements that are already damaged.
All parts must be cleaned of obsolete lubricants and then lubricated with a new compound. At the end of the work, the treated elements are mounted in the opposite order to disassembly. The removed gearbox with clutch is installed in its place.
Note! It is recommended to pay special attention to the tightening of the bolts; in this case, it is necessary to clarify the parameters of such tightening.
Changing the clutch basket is not as difficult as it seems at first glance; it is enough to have minimal knowledge, skills and the ability to use special devices. To perform the work correctly, it is important to follow the recommendations. Today, with the help of videos and photos, you can repair or change important clutch elements with your own hands. Also, an important role is played by correctly selected step-by-step instructions, without which it is difficult or impossible to complete this or that process. To avoid having to redo the work again, you need to purchase only high-quality spare parts, the price of which directly depends on the manufacturer.
Preparatory stage
Before changing the clutch on a VAZ 2110, you need to prepare a place for repairs and tools. For this process, the most suitable solutions are: a car lift or an inspection hole. If there are no such conditions, due to a hopeless situation, it is possible to replace the clutch with a 2110 in “Spartan conditions”. It is enough to find a flat surface area in a garage box, a parking space or in the yard.
It is more practical for a car owner to ask in advance how much new clutch parts will cost to replace a VAZ 2110. This will help prepare the necessary budget. The price of spare parts varies and depends on the manufacturer. Among manufacturers of quality parts, the leaders are: Sachs, Luk, Valeo and Krafttech. These spare parts are guaranteed to fit the vehicle and have a long service life. Poor quality parts may not fit at all or may fail in the first days after repair.
Step by step instructions
So, if you decide to change the clutch device yourself, but do not want to bother with dismantling the gearbox, then we will look at the replacement process without removing the box. Let's get started:
- Unscrew the screws securing the left wheel of your car and place the front part of the VAZ 2110 on a jack. To protect yourself, place bricks under the car body. Also place wheel chocks under the rear wheels.
- Next, you need to completely remove the wheel and unscrew a few mounting screws that hold the ball joint in place.
- After removing the wheels, open the hood and disconnect the battery. To do this, it will be enough to remove the negative terminal from the battery. This is done in order to prevent short circuits during repair work.
- Now you need to remove the air filter element housing. This must be done in order to gain access to the screws with which the gearbox is attached to the internal combustion engine.
- If there is engine protection, then let's start removing it. Unscrew all the screws around the perimeter of the motor protection and remove it.
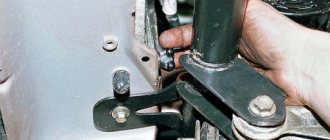
- Remove the long screw that secures the anti-roll bar.
- Now let's get down to one of the most crucial moments in this work process. If you decide not to dismantle the transmission, you will still need to move the unit to the side. In order for the unit to move freely, it is necessary to remove the left mudguard. After this, unscrew all the ball joint bolts.
- Next, move the left strut behind the wheel drive. Otherwise, you will not be able to move the gearbox.
- After this you will need to disconnect two connectors from the transmission. To the right of the unit there is a plate responsible for fastening the jet thrust. By the way, the other part of the plate is located at the gear shift lever. Visually remember the location of the jet thrust fastener, otherwise you will have to sweat later to adjust the unit selector to the working position.
- With the connectors disconnected and the torque rod removed, the transmission is essentially freed from its main mounts. Now you need to disconnect it directly from the internal combustion engine. Here, use wrenches and remove several bolts (usually no more than three) and one nut.
- Now it is necessary to dismantle the rear cushion, which, in fact, attaches the gearbox to the engine. This should be done so that the engine is not released too much, so it is better to place the internal combustion engine on a jack or on supports.
- The same must be done with the gearbox, having first moved it to the required distance. Here you may need help, since it will not be easy to move the unit and place supports under it alone. In addition, everything must be done carefully to prevent mechanical damage to the unit.
- You now have access to the clutch mechanism. Replace it, and then reassemble all parts in the reverse order. Tighten the transmission-to-engine screws securely. After replacing the clutch, you need to center the disc.
A few notes
Taking advantage of the fact that you have climbed quite deep into the inside of the car, you can carry out some additional actions so as not to return to this in the near future.
- It is advisable to change the release bearing along with the clutch;
- You also need to check the clutch paddles and the clutch basket itself. If there is significant wear, do not be lazy to replace them, otherwise in the near foreseeable future you will have to climb into the hole again;
- The driven disk must be centered
. It would be good to use a special mandrel for this purpose. If this is not available, you need to at least select a wooden round of the required size. When the basket fasteners are tightened, if the alignment is done correctly, the mandrel (or its substitute) should come out without any effort. But don’t fall out on your own.
Actually, this completes replacing the clutch on a VAZ 2110 without removing the box and draining the oil. As you can see, nothing super complicated was required, although we did have to tinker. If this is not your first time seeing the jack and keys, the whole procedure will take you no more than 2-3 hours, and even then with smoke breaks. Note: if the box had also been dismantled, it would have taken you much longer, and you might have had to spend the whole weekend fiddling with the hardware.
Replacing the disk yourself
Clutch disc basket VAZ 2109
It should be noted right away that on front-wheel drive cars, replacing a disc is a little more difficult than on classic models. In addition, different brands and models of cars have their own nuances for removing and installing the clutch. First you need to read the instructions and recommendations for changing the clutch yourself. It would be a good idea to consult with experts.
Note! In the process of replacing a damaged part, there is no need to skimp; it is better to immediately replace all elements that cause suspicion. As for rubber products, they need to be changed unconditionally. According to experts, the release bearing also needs to be replaced.
When replacing the clutch on a VAZ 2109, there is no need to completely dismantle the gearbox, drain the oil, completely remove the VAZ CV joints, etc.
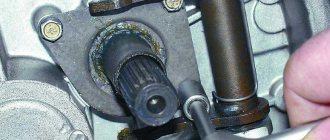
Procedure for removing and replacing the clutch release fork:
1. First, after removing the gearbox, you need to remove the clutch release bearing. 2. The next step is to remove the rubber boot (number 1). You need to pry it off with a screwdriver and pull it off the clutch release fork (number 2 in the photo). If the protective rubber cover has defects (cracked, deformed, no elasticity), then replace it with a new one. 3. Using a screwdriver, pry up the plastic bushing of the fork axle, and using pliers on the inside of the clutch housing, squeeze the petals that fix it and remove this bushing. If this plastic cap is defective (no petals, cracks or other obvious signs of wear), replace it with a new one. 4. Now it’s time to remove the clutch release fork. Lift it and remove its axle from the bushing that is pressed into the clutch housing and remove the fork, removing the axle, and then the lever from the holes in the clutch housing. 5. Squeeze the ends of the fork spring retainer and remove it. If the retainer has defects (no elasticity or even broken), then replace it with a new one. 6. The plug that is responsible for turning off the drive must be replaced with a new one if it has:
- 1 – the fork lever is cracked, bent or deformed;
- 2 – the legs of the part in the area where they contact the bearing coupling also have obvious defects and signs of wear.
7. Inspect the yellow metal bushing; if it has defects, press it in and insert a new one until it stops. 8. Before installing the drive release fork back, lubricate both bushings (metal and plastic) with grease. 9. Now you can safely mount the clutch release fork back in the order of dismantling. But, pay special attention to the protrusion on the plastic bushing; it should fit into the pothole on the clutch housing, and it
What should you pay attention to to clarify the diagnosis of clutch failure?
When accelerating or braking the car to change gears in the gearbox, the crankshaft is constantly disconnected and connected to the power transmission. This operation is performed very often and intensively, so over time the signs of a clutch malfunction become more and more obvious. All clutch malfunctions are divided into two general types: incomplete engagement of the clutch (driving) and incomplete disengagement of the clutch (slips).
Any experienced car owner knows how to check the clutch for complete disengagement. To do this, start the engine at low speeds, fully depress the clutch pedal and engage first gear. If it engages easily, then the clutch has completely disengaged the drive - everything is in order.
When you hear the smell of burning while driving, on a steep climb the car suddenly loses speed, and in general, it accelerates poorly - “slipping” of the clutch is obvious. That is, the clutch does not disengage completely - both discs do not close tightly enough.
A very simple and at the same time very reliable way to independently diagnose clutch problems:
First, warm up the engine so that the cold, thick oil does not create additional resistance. Next, the car is put on the handbrake. This should be done on a flat surface, without steep slopes. After this, the engine is accelerated to 1500-1700 rpm, the clutch pedal is depressed, first gear is engaged, and then the pedal is smoothly released.
As a result, the engine should stall. The engine does not stall, or the engine stalls after some time - the clutch definitely requires repair or replacement.
About the properties of the structure
Before you completely disassemble all the components, you need to understand how it all works when assembled.
The clutch system is required to perform two functions:
- Briefly disconnecting the car engine from the transmission.
- Smoothly connects the engine back to the transmission during gear changes.
The clutch on the VAZ-2109 also protects the transmission from damage and overload during operation, so this unit must be maintained in working order and damaged parts replaced as soon as damage is discovered.
The “nine” has the simplest single-disc friction system. It works according to this principle:
- While the pedal is not depressed, the driven disc is compressed by a spring mechanism between the flywheel and the drive (pressure) disc. In this state, the clutch is engaged and the speed is transmitted through the system to the gearbox.
- When you press the pedal, a mechanism is activated that disconnects the drive disk from the driven one, the connection between the system elements is lost, so the torque is no longer transmitted further.
In this scheme, we are most interested in several details:
- The driven and driving disks, which very often quickly wear out, causing them to lose the necessary performance properties.
- Drive is a device that drives the unit when the pedal is pressed. If it is faulty, you will experience jerking and vibration when trying to change gear.
- Clutch cable - connects the pedal to the system. Over time, its tension weakens, which causes the effect of incomplete activation of the mechanism.
How to get to the desired node?
Now about how to replace the clutch correctly. If you want to get to this unit, you will have to remove the gearbox and several additional parts. To do this, you definitely need a jack, inspection hole or overpass. If necessary, you can make a homemade overpass. You cannot do without such devices, since in order to replace the clutch on a VAZ, you will have to lie under your car for almost a day.
Once you can work normally under the car, you will have to remove the transmission piece by piece. It looks like this:
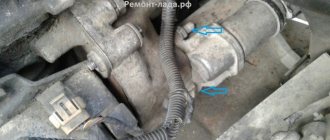
- Disconnect the starter assembly - disconnect all contacts, then unscrew the three screws and remove the device.
- Next you should deal with the gear change drive . Loosen the clamp and pull out the device.
- Disconnect the cable from the speedometer and reverse wires.
- Next you will see stretch marks to the suspension arms . It is necessary to loosen their fastenings, and then move them in different directions.
- Remove the ball joints from the swing arms.
- Pull out the CV joint tip and immediately plug it with some kind of plug, otherwise oil will flow out.
- The lower part of the clutch housing protection is dismantled ; there are only 3 bolts.
- To prevent the engine and gearbox from falling , supports are placed under them.
- Then unscrew the remaining supports , after which you can carefully pull out the gearbox assembly.