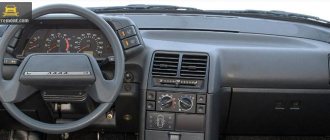
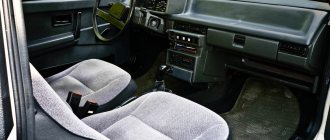
The VAZ 2110 panel or the “tens” dashboard has become a new word in the interior design of Lada cars. Despite its interesting shape and ergonomic appearance, panel 2110 eventually begins to make a lot of unnecessary sounds when the car is moving. This is especially noticeable on cars with high mileage. Therefore, very often the “tens” torpedo is completely disassembled in order to carry out total sound insulation and eliminate squeaks. Let's say right away that disassembling the VAZ 2110 panel is not difficult in principle, but it is a very labor-intensive job that requires time and attention. The fact is that to remove the panel you will have to completely unscrew the steering wheel and disconnect a lot of electrical connectors. In order not to damage the electrics, before disassembling the VAZ 2110 dashboard, be sure to disconnect the battery . This is how the “tens” panel looks schematically.
This figure shows in detail, in the smallest detail, all the fasteners of the VAZ 2110 panel.
- 1 - panel
- 2 - side nozzle for ventilation and heating of the cabin
- 3 — instrument panel trim
- 4 — cover fastening screws
- 5 — panel mounting screws
- 6 - box
- 7 — console trim
- 8 - cover
- 9 — instrument panel panel
- 10 — mounting block cover
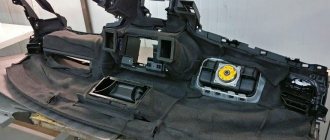
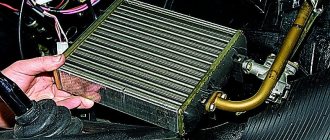
If you remove the panel completely, then only this should remain, look at the photo -
The red arrows indicate where the nuts and screws are attached, and the two large white arrows indicate the special mounting pins. When installing the panel, it must be installed on them; they serve to center the dashboard relative to the body.
VAZ 2110: dashboard - backlight replacement and tuning
New VAZ 2110 dashboard lighting
Very often the dashboard of a 2110 VAZ car breaks down. However, sometimes there are problems with its illumination. Some people simply don’t like the way it shines in the dark. In this case, it is advisable that the backlight be replaced. This article will discuss how to independently replace the new type of backlight on the instrument panel, the operation of which can be seen in the corresponding video review on the Internet.
Wires
The number of wires is amazing. It would seem that the VAZ 2110 is far from the most modern car, which does not have a huge amount of electronics. However, there is wiring in abundance.
Pinout
Many people believe that it is best to remove all the wiring in one big bunch. But this is not the best solution. Having removed all the wires, it will then be incredibly difficult for you to figure out which wiring is connected to what. If replacing the wiring is not planned, do things a little differently.
Disconnect only those wires that relate to the instrument panel. Label them, label them with self-adhesive labels, write down all the designations on a piece of paper. This will allow you to understand where which wiring is connected during the reassembly process.
The easiest way to disassemble the instrument panel is to contact professionals from a service station. After all, you planned to remove it for a reason, but in order to make some adjustments, replace dashboard elements, install LED backlighting, and so on. Therefore, it is not necessary to carry out dismantling yourself in order to go disassembled to a service station. Entrust the entire range of work to specialists.
Loading …
Replacing the backlight on the dashboard
Dashboard sign for VAZ 2110
To do this, you need to use the following algorithm:
- The panel should be removed.
- The illumination designation is determined by special LED bulbs. To replace the backlight, these bulbs must be removed.
Note: this must be done very carefully, because they are quite small. In addition, there is a possibility of damaging the panel itself.
- But before that you need to disassemble it. This is not a difficult task, as to disassemble it you just need to press the latches, thanks to which you can remove the bulbs.
- Everyone has seen that on top of the dashboard there is a “sticker” and symbols (speed, amount of gasoline). It is held on by glue, so to remove it you will have to dig around a little. Remaining glue must be removed.
Note: it is advisable to choose colors that are not very bright and strain the eyes. White or blue colors are ideal.
- To remove the light filter located on the back of the “sticker”, you need to take a utility knife. The light filter is located under the protective layer. First you need to remove it. Do not press too hard with the knife, as necessary parts may be damaged.
Disassembly procedure
Many people are interested in whether it is possible to remove the dashboard of a VAZ 2110 without “demolishing” the floor of the cabin? It's probably possible, but it would be very inconvenient.
Therefore, we act according to this plan:
- Let's prepare a marker and self-adhesive labels (which are usually glued to the product). They can be bought at points where all sorts of small things are sold such as napkins, bags, etc., as well as in stationery stores;
- We remove the front seats from the interior;
- We unscrew the screws on the sides, remove the tunnel (first its upper part, then the lower);
- We disassemble the steering column casing, remove it and the steering wheel. To do this, you need to unscrew 3 self-tapping screws and 4 screws. Please note that the VAZ 2110 steering wheel sits quite tightly on the splines, so you need to remove it by rocking and tugging, but being careful of a sharp blow to the face, if you suddenly overdo it and it will fly out;
- Next are the steering column switches. They also need to be removed;
- Don’t forget to mark everything and write down on a piece of paper what we are filming;
- We unscrew the glove compartment (in “understandable” language - the glove compartment) and also take it out;
- Next comes the disassembly of the mounting block and its cover. To do this, disconnect all connectors and relays;
- Now we have almost opened the instrument panel on the VAZ 2110. All that remains is to remove the strut covers, unscrew the headlight hydraulic adjustment and push it inward;
- Now the main task is to unscrew the screws securing the instrument panel to the body. To remove it completely, you need to unscrew the two studs located under the covers of the tunnels for supplying air to the side windows.
Separately illuminated arrows
LED instrument panel VAZ 2110
If you want the arrows to glow a different color, you can do the following:
- Remove the dashboard.
- Take it apart.
- Install separate LEDs under the arrows.
Note: in this case, the arrows will light up in a different color only when ignited.
Removing the torpedo on the old model 2112
To completely remove the device from the car you will need:
- Turn off the on-board power supply.
- Remove the screws around the panel.
- Move the plastic cover of the shield aside and disconnect the wires from the buttons.
- Unscrew the panel fasteners.
- Then the device moves away from its seat and is disconnected from the on-board network.
How to change the backlight using color film
Old dashboard of VAZ 2110
In order to change the color of the dashboard lighting, it is not necessary to change the LED bulbs. To do this you can simply:
- Take 12 LEDs and an LED strip.
- Remove the light bulbs from the base and insert one LED at a time in their place.
- You need to take the required amount of LED strip.
Note: its length is measured according to the size of the panel.
- The base and LEDs must be returned to their original location.
- The tape should be glued to the plastic of the panel (the appropriate temperature must be maintained).
- Tighten the block well.
When you need it
It should be noted that the instrument panel on the VAZ 2110 is not particularly durable, so it can simply be damaged. Or it has become worn, frayed, scratched.
But often the reason is different: I would like the design to be more beautiful, and not everyone is satisfied with the “standard” lighting. And there are more modern ones, LED, stylish. But in order to change anything or even replace it, you must first disassemble the old instrument panel.
This material will help you change the dashboard lighting on a VAZ 2110: https://vazweb.ru/desyatka/salon/podsvetka-paneli-priborov.html
How to assemble and disassemble the panel
To reset the speedometer or fix the problem that the turn signal light on the dashboard is not blinking, it must be removed. To this end, you should perform the following actions:
- You can remove the cover, but the board will still be locked.
- You need to take a Phillips screwdriver and use it to remove a few more bolts.
- Now you need to unlatch the latches on the panel. You should start from the bottom. If they were disconnected from the bottom side, then you can push them up. This way the fee will be removed quickly.
- The arrows will have to be removed anyway.
Note: some arrows are easy to remove, but the arrows for the gasoline quantity indicator are much more difficult to remove. To remove the arrows, you need to gently pull them.
Note: There are very small LEDs on the board that can also burn out. Because of them, the turn signal light may not blink, so they need to be replaced. This requires working with a soldering iron.
- Find the black daily mileage button on the board.
- Click on it.
Now it is advisable to somehow put the panel back together. This is made even easier:
- Place the board in a plastic case.
Note: It is advisable to have a clean cloth underneath to prevent the surface from being scratched.
- Now you need to screw in the bolts on the panel itself. They do not need to be completely screwed in yet, as the arrows must be put in place first.
- Before putting the hands back in place, they need to be wiped thoroughly, as fingerprints, dirt, etc. will be visible when exposed to light.
Note: the arrows should be set approximately 3-4 mm below zero. It is also important that there is a small gap between the needles and the speedometer, otherwise they will stick. It is much easier to install, as well as remove, long arrows. To install short arrows, you need to act very carefully, as they are more delicate compared to long ones.
- Before installing the glass, it also needs to be wiped. Now snap onto the latches.
- Secure the board with bolts.
- Lastly, screw in the screws on the cover, and then put all the light bulbs in place.
How to get rid of plastic squeaking in the interior of a VAZ 2110, 2111, 2112
STYLE-AUTO Spare parts for foreign and domestic cars in Pervouralsk
Among the many disadvantages of budget cars is the low quality of materials (upholstery, plastic, rubber products, etc.). The unpleasant creaking of plastic, which is found almost everywhere (panel, door cards, etc.), while driving due to vibrations and friction, produces an unpleasant irritating creaking noise, which constantly reminds you that when buying a car you decided to save money...
Car owners come up with everything they can to eliminate the squeaking of plastic panels, some “chemically” do something with their own hands, others put their car in the hands of professionals, others “don’t worry” and just turn up the music louder so as not to hear how the plastic is held together. Today we will talk about whether it is possible to remove the creaking of plastic from inside a car and how to do it correctly and inexpensively.
Almost all automakers use plastic, but it’s different for each one. In expensive cars, plastic can cover up to 80% of the interior surface, and you won’t even hear a hint of a squeak or anything like that. The secret is that this plastic was created taking this feature into account; before going into production, it underwent tests that made it possible to identify the component that contributes to squeaking and exclude it from the composition. Also, for “anti-squeaking” purposes, manufacturers make the surface of plastic parts rough or rubberized, this gives it a more expensive look and makes it pleasant to the touch. There are a lot of options for how to remove the squeaking of plastic in a car, for example: you can lubricate the contact points of the rubbing parts with a special aerosol, you can stick a special tape that has a rough surface, you can cover the part that is prone to squeaking with leather or other material that can eliminate the squeaking. Below we will discuss each of these methods in more detail.
1. Self-adhesives allow you to eliminate the creaking of plastic panels of the car interior, however, the effect is temporary and after a while the problem returns again. In addition, after peeling off the self-adhesive, a sticky trace of glue remains, which is difficult to remove; as a result, dust, dirt and other “inhabitants” of the interior collect on the sticky surface.
2. The second way to remove the creaking of plastic is the so-called “Velcro”, which consists of loops and hooks. This method has proven itself and is widely used by many car enthusiasts; moreover, it is lightweight and reliable. Although this method cannot be called a panacea for squeaking. The fact is that there is a limit on the weight that these “Velcro” can hold. In addition, over time, the loops and hooks become covered with dust and tenacity decreases to almost zero.
3. The most innovative invention today is considered to be the development of an American company, which, in the fight against squeaking plastic, came up with the so-called “fungi” 3M. By fastening together, they do not allow the rubbing panels to rattle and creak. It should be noted that the “fungi” are reusable and can be reused after removing a panel or other part of the interior.
How to eliminate squeaking in the car interior?
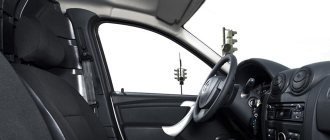
To eliminate the creaking of the door trim, you need to treat all points of contact with an “anti-creaking” agent (for example, “Madeline”). This work is very extensive, because creaking occurs not only due to the friction of the upholstery on the metal door, but also due to the friction of the fastening clips on the metal and door cards.
How to eliminate upholstery squeaking on a metal car door?
There are many options, for example, you can stick a thin layer of anti-creaking agent on the edges of the door trim. In the upper part, the strip may be a little thicker so that the velvets do not creak.
It is better to glue the edges perfectly along the edges so that the anti-creak is not visible. Looseness of the clips on the door trim can be removed by gluing an anti-creaking agent to the area for fastening the clip. If creaking in the car interior occurs as a result of friction between the piston and the seat, then you can install rubber washers under them.
Door trim and screws
If the above options do not suit you for one reason or another, you can go another way, which, of course, is not very practical, but the creaking will definitely disappear.
This is done in the following way: 1. Select the places that are least noticeable and into which you can screw the self-tapping screw. Identify the sources of the squeak and try to screw the screws into the least noticeable places. 2. Self-tapping screws should be for metal with a small pitch. 3. After screwing, the screws can be sealed using decorative plugs. 4. The length of the screws should be different, depending on the thickness of the place into which they are screwed. The screws at the bottom should be the shortest, at the top of the upholstery – longer. The self-tapping screw should not be screwed into the metal by more than 5 mm.
https://www.drive2.ru/l/9464003/
next article:
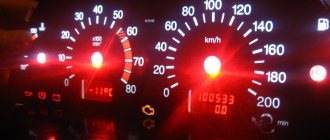
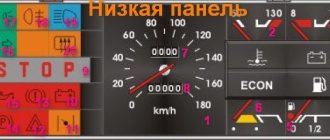
Indication symbols
As you know, all the lights on the control panel come on when the ignition is turned on, and then, when the engine is already running, most of them go out. But when one remains on or blinks, this cannot but be alarming, because not everyone can immediately figure out what malfunctions this indicates, which of the systems needs urgent repairs.
Let's look at the designations of the instrument panel of the VAZ 2110. You should know that regardless of whether the panel is new or old on your car, the designations are almost the same, but the indicators may be located slightly differently.
We remove the torpedo
Removing and installing a new torpedo on a VAZ 2110 takes a lot of time, we also advise you to be patient, since there are dozens of connections and wires in this part of the interior. Each action must be careful, since the VAZ 2110 mounts are very fragile and can be easily broken. After this, the panel will no longer fit properly, and the car will noticeably increase in squeaking while driving.
In some cases, it is not necessary to completely dismantle the standard panel. Our article provides a description of a complete analysis.
Necessary tool
To remove the case, you should have in your arsenal:
- Labels with adhesive backing.
- Marker or pencil.
- Set of screwdrivers and keys.
The main assistants in this work will be a 10 mm wrench and a Phillips screwdriver. We need a pencil or a washable marker in order to mark the removed elements. This also applies to self-adhesive labels. There are too many wires and parts, after disassembling you will already forget where each component is located. Markings and stickers will remind you of the location of wires and parts.
Preparatory work
Some people prefer to disassemble without dismantling other components of the interior, but this significantly complicates and prolongs the work. We recommend preparing the interior as you will need room to maneuver. Remove the seats and steering wheel - follow this sequence. It is also worth dismantling the floor tunnel.
Top part
So let's start from left to right. First, the top part of the control panel:
- Side scale from 50 to 130 and arrow. Shows the temperature of antifreeze (antifreeze) in the engine cooling system;
- Almost round scale (0 – 80) and arrow. Tachometer showing engine speed;
- Two arrows at the top, almost in the middle of the control panel - turn signals (right, left);
- Speedometer. Well, this device, probably everyone knows, shows the speed at which the car is moving;
- A side scale with an arrow and, most often, two images of a filling column (white and red). Instead of a red column there may be a yellow light. This is an indicator of the fuel level in the tank. If the red column (yellow light) lights up, it means that there is very little fuel left in the tank - no more than 7 liters, urgent refueling is required.
The VAZ 2112 instrument panel does not work - reasons
If the panel suddenly stops working:
- When the engine does not start and the dash does not work, inspect the ignition switch. Here the contact often burns out or oxidizes.
- If the machine is working and the panel has failed, you will need to check the corresponding fuse, wiring and lines.
- If the manipulations do not help, you will need to remove the device and test its circuits.
Panel backlight does not light up
There may be damage to the light activation key. It is recommended to check the corresponding fuse.
The panel is blinking
Consequence of deterioration of electrical wiring contacts. The user should inspect the supply wires for cracking or damaged insulation. The contact groups should be disconnected and cleaned of oxides and dirt. Treat the terminals with special oil.
Tidy 2112 stuck
This kind of problem is unexpected, but it occurs everywhere. As a repair, users are suggested to reset the electronic equipment. Remove the terminals from the battery and wait 15 minutes.
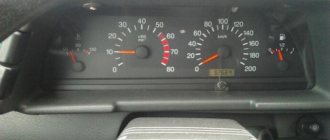
Bottom part
Let's look at the indicators at the bottom of the control panel. If they don’t light up, it means the machine is working normally, and when any of them lights up, this indicates a malfunction in certain components. Most often, this is a signal that repairs are needed, and the sooner the better. From left to right:
- The indicator on the far left at the bottom is the air damper light (if you have a carburetor engine);
- Icon in the form of an oil can. If this light comes on, it means there is insufficient oil pressure in the engine. An alarming signal. You need to stop, find the reason;
- A round icon with the letter P inside on the control panel indicates that you have the parking brake on, which, as you know, should be turned off when moving away;
- Indicator of a fault related to the generator or battery (a symbolic image of the battery is shown on the indicator). Perhaps the battery is not charging from the generator, there is an open circuit, or the generator belt is loose or broken. In any case, your intervention and repairs are needed, otherwise troubles cannot be avoided;
- If the engine is running and the Check Engine indicator is on on the control panel, this is the most unpleasant thing for the driver, since it indicates serious malfunctions in the engine. In general, when this indicator lights up, it is recommended to stop driving and turn off the engine. Most likely it needs repairs;
- Typically there is a red triangle above the Check Engine. It lights up when the “hazard light” is on - an emergency signal sign;
- The headlight light indicates that the high beam is on. Designed to control headlights: when an oncoming car appears, do not forget to switch to low beam;
- A very important indication icon on the front panel (in a red circle) is a signal that there is not enough brake fluid. Perhaps it is leaking somewhere, which it is advisable to find out as soon as possible and, if necessary, carry out urgent repairs and replenish the level;
- The icon of a burning light is a control for turning on the dimensions;
- In addition to the indicated lights, the front control panel has time indicators (and a button for setting hours and minutes) as well as a display that shows the total and daily mileage. On the new panel, this display may be narrow.
Installation and repair instructions
View after dismantling the panel
Replacing the panel, especially if you are installing it on an old VAZ 2112, is a certain difficulty. Older machines do not have some of the functions for which the panel has buttons. The wiring may need to be worked on.
Tools and materials
Standard tools will be required.
But a certain amount of additional materials is needed:
- you will need plugs for extra buttons that are not needed on an old car;
- air duct;
- various inserts, buttons (5 pieces) and pads;
- a new wiring harness suitable for the wiring diagram;
- brackets for mounting the instrument panel;
Algorithm of actions
Shield fully installed
First you need to remove the old panel. This is done in the same way as on other models of VAZ cars.
When installing, you need to replace the ignition switch with a decimal or Kalinovsky one, depending on how many terminals there are on the block to the lock. You can leave the old one and rearrange the wires, but the new one will work and look better.
The instrument panel wiring needs to be replaced. Also, connect the dimensions with additional two wires in Ш4/13 and Ш3/13 on the mounting block. This applies to older units with 11 relay spaces.
Depending on whether it is an injector or a carburetor, the connection has its own nuances. If you bought a solid factory panel, then instructions should be included with it. Briefly, it can be noted that the injector is not equipped with a speed sensor, please take this into account when installing.
The car's electrical circuit can be of great help. If it is not there, you can find it on the Internet. There are some differences between the VAZ 21124, 2111 and other car variants, so find yours.
If the instrument panel does not work after turning it on, check that the wiring is connected correctly - this is usually the error.
Additional panel
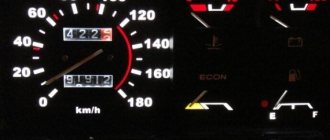
The additional front panel of the new-style BSK control has indicators:
- An oil can is shown. If the light works, check the oil level;
- An icon lights up, which, with some imagination, can be “identified” as working wipers. This indicates that there is not enough windshield washer fluid in the tank;
- Conventional image of a thermometer over a container with liquid - high temperature of antifreeze;
- A crossed out light, which the arrow points to, is a sign that the brake light or parking lights are not working;
- If the light with the image of a wheel with brake pads lights up, it is quite possible that the pads are worn out and require replacement;
- The sign of a man with a seat belt indicates that the seat belt should be fastened.
Ignition and engine control circuit
Here are the control diagrams for the following internal combustion engines:
- 21120 – January 5.1 or BOSCH M1.5.4N, Euro-2;
21120 (Euro-2) - 21124 – BOSCH M7.9.7, Euro-2;
21124 (Euro-2) - 21124 – BOSCH M7.9.7, Euro-3.
21124 (Euro-3)
| Motor | 21120 (Euro-2) | 21124 (Euro-2) | 21124 (Euro-3) |
| Injectors | 1 | 2 | 2 |
| Ignition coil | – | 1 | 1 |
| Candles | 2 | – | – |
| Ignition module | 3 | – | – |
| Diagnostic connector | 4 | B | B |
| ECU | 5 | 3 | 3 |
| Tidy taps | 6 | E | E |
| Ignition relay (6) | 7 | 4 | 4 |
| Ignition fuse (1) | 8 | 5 | 5 |
| Fan relay (4) | 9 | 6 | 6 |
| Fan fuse (2) | 10 | 7 | 7 |
| Fuel pump relay (5) | 11 | 8 | 8 |
| Fuel pump fuse (3) | 12 | 9 | 9 |
| Mass air flow sensor | 13 | 10 | 10 |
| Rough road sensor | – | – | 11 |
| TPDZ | 14 | 11 | 12 |
| DTOZH | 15 | 12 | 13 |
| RXX | 16 | 17 | 14 |
| Lambda probe main | 17 | 14 | 15 |
| Additional lambda probe | – | – | 16 |
| Knock sensor | 18 | 15 | 18 |
| DPKV | 19 | 16 | 19 |
| Canister purge valve | 20 | 13 | 17 |
| APS block | 21 | 18 | 20 |
| APS indicator | 22 | 19 | 21 |
| Speed sensor | 23 | 21 | 23 |
| Fuel pump + level sensor | 24 | 22 | 24 |
| Oil pressure sensor | 25 | 23 | 25 |
| Antifreeze thermometer sensor | 26 | 24 | 26 |
| Oil level sensor | 27 | – | – |
| Phase sensor | 28 | 20 | 22 |
| ABS connector | A | A | A |
| Air conditioner connector | B | IN | IN |
| Fan connector | C | – | – |
| Illumination of the ignition switch (to the blue-white wire) | D+E | – | – |
| Bends to the door harness | – | D | D |
| + battery | F | G | G |
| Weight | G1+G2 | G1+G2 | G1+G2 |
The elements installed in the additional mounting block are indicated in brackets.
Mounting block on the right side under the dashboard
Removal and modification
Here's a quick look at the device and control panel icons. If for some reason she refuses, don’t immediately panic. Most often, the reason is the absence of contacts in some place in the wiring. But of course, if you wish, you can completely change or tune the panel.
For example, remove the cover and replace the light bulbs with brighter LEDs. Such a panel works brighter and the signals sent by the car will be more noticeable to the driver. If desired, you can install a more solid europanel, which will transform the interior.
- Disconnect the “-” wire from the battery;
- Remove the shield by unscrewing the screws;
- Remove the fastenings of the control panel to the trim, remove the instrument cluster from the socket;
- Remove the glass mask;
- Disconnect the wires from the block;
- Make changes to the instrument panel or replace it with a new one. Reassemble everything in reverse order.
Source
Alternative torpedo
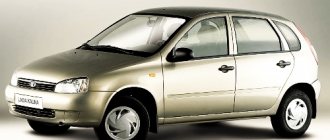
The alternative dashboard is softer than the standard “tens” dashboard, but the main advantage is the absence of unpleasant grinding and squeaking. Motorists decide to get rid of the standard one precisely because of the squeaking. For the VAZ 2110 car there are several types of panels that differ in design.
The panel is sold as a set:
- The panel itself, which is an alternative to standard plastic.
- Buttons, brackets and inserts for blowers and instrument panels.
- A set of wires and a block for a double switch.
- Buttons for low beam, heating, dimensions and fog lights.
- Plugs for buttons are installed in places where keys are not needed.
The experience of the owners of the “Ten” shows that proper removal and installation of the Europanel improves sound insulation, increases airflow and changes the appearance of the VAZ 2110 interior for the better.