On VAZ 2108 2109 21099 cars there are three options for the instrument panel:
- Low instrument panel.
- High instrument panel.
- Euro instrument panel.
The instrument panel is the organ of interaction between the car and the driver. With its help, the driver knows information about the state of all components of the car.
That is, the driver receives all the information by looking at the icons and instruments on the instrument panel. Especially novice drivers need to know and understand the instrument panel display.
So, the very first, and probably the most popular option for the instrument panel is a low instrument panel.
Low instrument panel
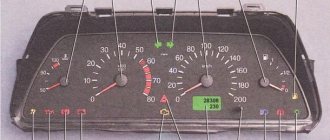
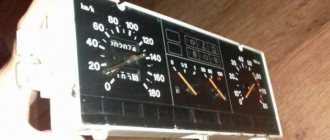
1a - speedometer, to indicate the speed of the vehicle. 2a - coolant temperature indicator. Designed to display engine temperature. The driver must control the engine temperature to prevent overheating. 3a - voltmeter - indication of on-board network voltage. The problem with the low panel is that the voltmeter needle very often twitches along with the direction indicators. This happens due to a voltage drop in the wires from the battery to the mounting block. 4a - fuel level indicator, for monitoring the fuel level in the tank by the driver of the car. 5a - the indicator lamp for the reserve fuel balance begins to blink first and then light up when there are three liters of fuel left in the tank. 6a - econometer - shows the vacuum in the engine input manifold. If you drive when the needle is not in the yellow zone, you will save gas. 7a - daily mileage counter. The driver can reset this counter at his own discretion. 8a - total mileage counter. Total mileage of the vehicle. 9a - “STOP” control panel. It lights up when the car is parked with the handbrake, and also when the fuel level in the brake fluid reservoir is low. 10a - battery charge indicator lamp. If it lights up with the engine running, it means the battery is not charging. 11a - control lamp for covering the carburetor air damper. If it lights up, it means the air intake is not closed. 12a - warning lamp for turning on the hazard warning lights. 13a - warning lamp for low brake fluid level. 14a - indicator lamp for turning on the parking brake. 15a - warning lamp for emergency drop in oil pressure. One of the most important light bulbs on the VAZ instrument panel. If the light remains on while the engine is running, the engine may seize due to lack of oil. 16a - indicator lamp for turning on the direction indicators, blinks when the direction switches are on. 17a - control lamp for turning on the side lights, lights up both when the side lights are on and when the headlights are on low beam. 18a - indicator lamp for turning on the rear fog lights. Rear fog lights only work in conjunction with low beam headlights. 19a - control lamp for turning on the high beam headlights. 20a - control lamp for turning on the heated glass of the tailgate.
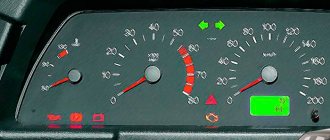
The high instrument panel differs from the low one in the arrangement of the light bulbs. Contains some light bulbs that are not on the low panel, as well as a tachometer.
High instrument panel
1b - speedometer, to indicate vehicle speed and mileage. 2b — handle for resetting the daily mileage counter; 3b - daily mileage counter. The driver can reset this counter at his own discretion. 4b - total mileage counter. 5b - fuel level indicator, for monitoring the fuel level in the tank by the driver of the car. 6b - light panel of the on-board control system. 7b - “TEST” display, system test when starting the car. 8b — “STOP” sign. 9b - warning lamp for failure of brake light lamps and side lights. 10b - warning lamp for low brake fluid level. If it lights up or blinks on bumps, then you need to check the brake fluid level in the reservoir. 11b - warning lamp for low coolant level; if it lights up, it means you need to add coolant to the expansion tank. 12b - indicator lamp for front brake pad wear. This lamp lights up when the sensor installed on the front brakes is working. If the light comes on, it means either the brake pads are worn out or the sensor is working falsely. In rainy weather, many people complain that this sensor responds falsely. 13b - warning lamp for level drop in the washer reservoir. If the light comes on, add washer fluid to the reservoir. 14b - warning lamp for low oil level in the engine crankcase. It is very important to understand the difference between oil level and oil pressure. This light comes on when the oil level in the engine crankcase is low. Not to be confused with the oil pressure sensor. 15b - coolant temperature indicator. Designed to display engine temperature. The driver must control the engine temperature to prevent overheating. 16b - tachometer, shows engine speed. 17b - indicator lamp for turning on the parking brake. 18b - “CHECK ENGINE” control lamp for the injection system. That is, this light bulb is intended for models with an injector. It is issued by the electronic control unit if it sees some kind of error in the electronic injection system. 19b - control lamp for covering the carburetor air damper. Indicates that the carburetor air damper is not fully open, that is, the choke is turned on. 20b - the indicator lamp for the reserve fuel balance begins to blink first and then light up when there are three liters of fuel left in the tank. 21b - warning lamp for drop in oil pressure in the engine lubrication system. Indicates that there is no oil pressure when the engine is running, which means the engine may seize. 22b - control lamp for turning on the right turn indicators, blinks when the right turn is turned on. 23b - battery charge indicator lamp; if it lights up with the engine running, it means the battery charging is not working. 24b - control lamp for turning on the left turn indicators, blinks when a left turn is turned on. 25b - warning lamp for unfastened seat belts. The seat belt buckles have sensors that turn off the light when the seat belts are fastened. 26b - warning lamp for open doors. Indication that a door is not closed operates from limit switches that operate on the door. 27b - indicator lamp for turning on the side lights, lights up both with side lights and low beam headlights. 28b - control lamp for turning on the high beam headlights; 29b - “CHECK ENGINE” warning lamp (“Check engine”) of the toxicity reduction system.
Instrument cluster on the VAZ euro panel:
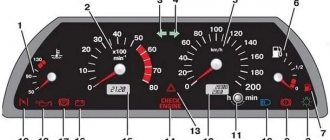
Euro dashboard
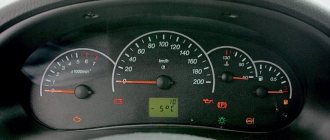
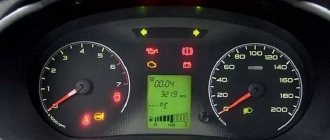
1c - coolant temperature indicator. Designed to display engine temperature. The driver must control the engine temperature to prevent overheating. 2c - tachometer, shows engine speed. 3c - the left turn signal indicator lamp blinks when a left turn is turned on. 4c - the right turn signal indicator lamp blinks when the right turn is turned on. 5c - speedometer, to indicate the speed of the vehicle. 6c - fuel level indicator, for monitoring the fuel level in the tank by the driver of the car. 7v - fuel reserve warning lamp. 8v - fuel reserve warning lamp. 9v - warning lamp for emergency condition of the brake system. 10v - control lamp for turning on the high beam headlights. 11c — reset button for the daily mileage indicator. 12v - mileage indicator. 13v - warning lamp for turning on the hazard warning lights. 14v — control lamp “CHECK ENGINE” (“Check engine”); 15v — indicator of time and temperature outside; 16v - battery charge indicator lamp; if it lights up with the engine running, it means the battery is not charging. The generator needs to be checked. 17v - indicator lamp for turning on the parking brake. 18v - indicator lamp for insufficient oil pressure, shows that when the engine is running there is no oil pressure, that is, the engine may seize. 19v - carburetor air damper control lamp (reserve for a car with a fuel injection system). That is, if the car has an injection system, then this light will not work, since it is for carburetor models.
Designation of icons on the VAZ 2109 dashboard
The indicator panel can be divided into 2 parts. The smaller half of the bulbs are mounted centrally at the top of the board. There are indicators on the bottom line of the instrument panel.
- The meaning of the light is simple - the indicator indicates that self-monitoring diagnostics of the alarms are being performed.
- Indicates that there are problems in the power plant. If the lamp is constantly on, you need to diagnose the motor.
- The brake system is in disrepair. Usually the light indicates a drop in fluid in the expansion tank or critical wear of the pads.
- Coolant level sensor lamp. If it lights up constantly, you need to add antifreeze to the system.
- The windshield washer fluid has run out.
- External lighting lamps are damaged. The thread may have burned out or the contact may have broken.
- The front brake pads are worn to the limit.
- The oil level in the engine crankcase has dropped. It may also indirectly indicate a malfunction of the oil pump.
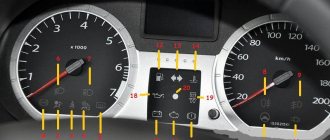
The photo below shows the sequence of light bulbs at the bottom of the dashboard.
| Number | Purpose |
| 2 | High beam indicator. |
| 3 | External lights are turned on and operating normally. |
| 4/6 | Turn signal indicators. On some car trim levels, when the hazard lights are turned on, they light up simultaneously. |
| 5 | The battery is not charging. It is necessary to check the wear of the battery itself and the wiring of the generator. |
| 7 | The engine oil pressure has dropped below normal. It is recommended to perform diagnostics. |
| 8 | The fuel level in the tank has dropped to a critical level. You will need to refuel immediately. |
| 9 | Standard engine fault indicator. |
| 10 | The parking brake is activated. |
What do the buttons on the panel mean?
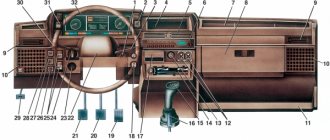
Depending on the configuration and year of the car, 2 types of devices can be installed here. The keys and controls will vary.
Below is a description of the low tidy indicators.
| Number in photo | Decoding |
| 9 | Rear window defroster switch. |
| 10 | Likewise for the stern fog lights. |
| 11 | Emergency button. |
| 12 | External optics switch. |
| 13 | Interior ventilation control module. |
| 23 | Suction |
| 24 | Sound signal. |
| 25 | Daily mileage reset drive. |
| 26 | Button for turning on the instrument lighting. |
| 27 | Headlights corrector. |
| 29 | Switch for direction indicators and headlights. |
Next there is a decoding of the controls of a more modern - high panel.
| Serial number in the photo | Description |
| 2 | Hazard warning light switch. |
| 12 | Power window switches. |
| 14 | Interior ventilation control module. |
| 18 | Suction |
| 22 | Horn switch. |
| 23 | Instrument backlight key. |
| 24 | Hydrocorrector of headlights. |
| 25 | Optionally, a button to activate the heated front seats. |
| 26/27 | Rear/front fog lights included. |
| 28 | Rear window heating activator. |
| 31 | Head optics operating mode switch. |
Dismantling
There may be several circumstances for dismantling the low panel of the VAZ 2109:
- Body repair;
- Repair of panel components;
- Car soundproofing;
- The desire to replace an old torpedo with a new one, etc.
We offer you a step-by-step control that will allow you to remove a small type of panel installed on a VAZ 2109 without outside help.
Dismantling process
- Remove the stove control knobs. A total of three difficulties.
- Remove the heater fan switch knob. To do this, you need to pull it towards you.
- Unscrew the 2 fasteners of the dashboard trims from each side of the console. The cover must be pulled towards you.
- Disconnect the wiring block from the rear fog light switch.
- Disconnect a couple of power connectors and one power wire from the heated rear window switch.
- Disconnect the wiring block from the hazard warning light switch.
- Remove the wiring harness from the exterior light switch.
- Disconnect the power supply for the cigarette lighter illumination.
- Disconnect the cigarette lighter wiring harness and remove the panel trim.
- Remove the 4 heater control panel fasteners.
- Unscrew the 2 fasteners of the device shield visor.
- Remove the visor itself of the device composition.
- The spring clamps need to be compressed.
- Remove the instrument cluster
. - Unscrew the speedometer mounting nut, and then disconnect the speedometer cable.
- Disconnect the block with wires (it is white) from the instrument panel.
- Remove the hose from the econometer fitting, and then remove the cotter pin.
- Disconnect the cable from the speedometer that resets the odometer for the day.
- You now need to disconnect the red block from the instrument cluster
- Remove the instrument panel light switch handle and the headlight hydraulic adjustment handle. They need to be pulled towards you.
- Unscrew the mounting nut of the instrument backlight switch.
- Unscrew the fastening nut of the headlight hydraulic corrector socket.
- Remove the steering wheel and its paddle shifters.
- Insert the key into the ignition and turn it to position 1. This will disable the anti-theft device. Only after this can you turn off the power supply to the ignition switch.
- Unscrew the 2 mounting bolts and 2 nuts of the steering column tube.
- Remove this pipe, taking the ignition switch along with it.
- Pull the choke handle towards you (we are talking about carburetor suction). There should be a craving. After this, the handle is removed from the rod.
- Unscrew the 2 choke guide rod fasteners holding it to the instrument panel.
- Remove the mounting screw on the left side of the dashboard.
- Unscrew the fasteners for the lower panel fixation on the left.
- Similarly, remove the fasteners from the side and bottom on the right side of the dashboard.
- Unscrew the panel fastening screw, which is located inside the glove compartment.
- There remains one fastener on both sides of the panel, which must be unscrewed in order to eventually remove the tidy.
Numerous fasteners
The low panel is assembled in the reverse order unless it is planned to replace it with a more modern one or with a modified design. Then the assembly depends specifically on the panel that you have chosen for your VAZ 2109.
Tidy 21099 injector: icon designations
There are more lights and indicators here than on the carburetor. Additional light bulbs available:
- requirement to check the engine;
- STOP light.
Tidy 21099 carburetor: designations
The decoding described at the beginning of the article can be fully used as an example for this point.
Stop light on the dash 2109
The lamp signals the driver about the presence of unexpected problems in the on-board circuits. When such an inscription is activated on the device, it is recommended to immediately go to a service station and look for the cause.
Messages 11
1 Topic by Andrey08 2009-12-16 13:01:12
- Registered: 2010-08-11
- Posts: 91
- Reputation:
Topic: Not Working: All Tidy, Wipers, Fern Guard on VAZ 21099
Lada Granta controls
My friend has a VAZ 21099 injector.
And recently the following happened: all the instrumentation stopped working (speedometer, tachometer, etc.), the wipers and ferns do not work. the headlights seem to come on
Today I talked to him, they say in the morning everything worked fine, but in the afternoon it immediately turned off right on the go.
I advised him to pay attention to the fuse box (they say the frost has hit, condensation is forming or it’s just wet). I would like to hear your opinion, what do you think about this? mb has this happened to anyone?
I would like to hear your opinion, what do you think about this? mb has this happened to anyone?
2 Reply from maik 2009-12-16 19:38:20
- maik
- User
- Offline
- Registered: 2008-11-25
- Posts: 187
- Reputation:
Re: Not working: All tidy, wipers, fern on VAZ 21099
My friend has a VAZ 21099 injector.
And recently the following happened: all the instrumentation stopped working (speedometer, tachometer, etc.), the wipers and ferns do not work. the headlights seem to come on
Today I talked to him, they say in the morning everything worked fine, but in the afternoon it immediately turned off right on the go.
I advised him to pay attention to the fuse box (they say the frost has hit, condensation is forming or it’s just wet). I would like to hear your opinion, what do you think about this? mb has this happened to anyone?
I would like to hear your opinion, what do you think about this? mb has this happened to anyone?
You can also check the ground on the tidy. (mass is strength))) all troubles come from it.
3 Reply from ils 2009-12-17 06:58:25
- ils
- User
- Offline
- Registered: 2009-06-16
- Posts: 540
- Reputation:
Re: Not working: All tidy, wipers, fern on VAZ 21099
I agree with maik - most likely the mass has moved away. It is attached under the dashboard above the place where the steering shaft is screwed to the body. The second place is the ignition switch relay. I’ve seen two types of such relays - some have a tongue that needs to be screwed to the body (there is one in the engine compartment - it looks like a starter relay), the second has a black wire - it should go somewhere to the body. I checked it on the pile - as soon as the mass disappeared from this relay, the entire tidy died, the wipers also did not work.
4 Reply from SokolOFF 2009-12-17 08:38:33 (2009-12-17 08:42:23 edited by SokolOFF)
- SokolOFF
- User
- Offline
- Registered: 2008-12-25
- Posts: 624
- Reputation:
Re: Not working: All tidy, wipers, fern on VAZ 21099
Judging by the quantity of everything at once, I dare to guess:
- ignition switch contact group
- one of the pads (it seems red) flew out of the block on the passenger compartment side
-a flooded block is also an option
PS I would check in just this order)) Well, first, of course, a visual inspection of the block. As for the mass, IMHO, it’s unlikely. After all, the headlight switch in the same place takes a lot of weight.
By the way, I just remembered another question: are “headlights” HEADLIGHTS (low beam, high beam) or dimensions? And does the car even start? Simply, if the lights are on, but the car does not start, then 90% of the ignition relay is either a contact group (or their wiring). I had such a case.
- Registered: 2010-08-11
- Posts: 91
- Reputation:
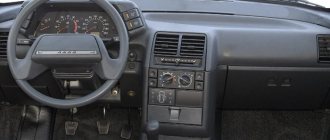
High and low panel VAZ 2109 - the difference
Depending on the year and modification of the car, two types of devices are applicable. The first is considered a low panel, used mainly on carburetor nines and modifications with an injector.
A more advanced version was brought to market in the last years of production. Here there are all the symbols used initially and several indicators of the engine fuel injection system have been added. The dashboard looks more modern, which makes it attractive to car enthusiasts.
Errors on the panel
VAZ versions of on-board computers have a self-diagnosis option, which allows you to read codes yourself without the use of additional equipment. The following is a list of common problems encountered on cars.
| Number | Decoding |
| 1 | Motor control unit malfunction. |
| 2 | The voltage in the on-board circuit is too high. Usually occurs during short circuit. |
| 3 | Fuel level sensor - open circuit or damaged wiring. |
| 4 | The antifreeze level controller is faulty. |
| 5 | The external temperature controller is faulty. |
| 6 | The engine has overheated, you should stop and let the engine cool. |
| 7 | Engine oil pressure is less than minimum. There may be two reasons for this. Loss of lubricant level or pump failure. |
| 8 | Critical voltage drop in the on-board network. |
| 9 | The battery is low. The serviceability of the generator and its mains should be checked. |
| E | EEPROM data packet error |
| 12 | The diagnostic lamp is faulty. |
| 13 | Lambda probe circuit open. |
| 14 | Increased signal coming from the antirfiz temperature sensor. |
| 15 | The coolant temperature controller is faulty. |
| 16/17 | Incorrect voltage in the on-board network. |
| 19 | DPKV refused. |
| 21 | The throttle position control is faulty. |
| 24 | The speed sensor is faulty. |
| 27/28 | The exhaust gas system sensors are sending incorrect signals. |
| 35 | Idle speed is set incorrectly. |
| 41 | The phase regulator is not working correctly. |
| 44/45 | Excessively lean or rich mixture in the cylinders. |
| 49 | Loss of tightness in engine lines. |
| 61 | Lambda probe is faulty. |
Instrument panel lamps VAZ 2108, 2109, 21099
On the instrument cluster of the front panel of VAZ 2108, 2109, 21099 cars there is a large number of different indicator lamps and signaling devices. Let's look at their icons, descriptions and purposes.
Warning lamps and signaling devices
Indicator lamp for turning on the side light
Lights up when the side lights in all headlights of the car are turned on. Green color.
Rear fog light indicator lamp
Lights up when the rear fog lights are turned on. Orange color.
Indicator lamp for high beam headlights
Lights up when the high beam in the front headlights is on. Color blue.
Turn signal indicator lamp
Lights up with a flashing light when the direction indicators on one side or another of the car are turned on. Green color. If one of the bulbs in the direction indicators fails, it blinks at double frequency. On the high panel instrument panel there are two lamps and two different arrows for the right and left sides.
Warning lamp for turning on the heated rear window
Lights up when the rear window heating is turned on. Orange color.
Indicator lamp for turning on side lights
Lights up when you press the exterior lighting switch button and turn on the side lights. Green color.
STOP display
The STOP display lights up when a malfunction occurs in the vital systems of the vehicle; movement in this case is prohibited:
— the pressure in the lubrication system has dropped (plus the lamp lights up, indicating insufficient oil pressure);
The final stage of work
The high panel of the VAZ is dismantled carefully, since there are latches on the left that quickly break. After disconnecting the block from other elements, the entire instrument cluster is dismantled. The final step involves disconnecting the cable from the speedometer. If the Europanel is equipped with additional equipment, then you need to be even more careful. Tuning a torpedo involves disconnecting the block from the following units:
- on-board control system;
- ignition relay;
- remaining panel instruments;
- backlight lamps.
You will need to unscrew the screws for the lower fixation of the torpedo on both sides. Using a screwdriver, pull out the plug and unscrew the screws for the side fixation of the torpedo. The europanel is removed at the final stage. Installation of a new structure of this type is carried out in the reverse order. Upon completion of this procedure, the operation of the switches is checked.
Often, tuning a VAZ torpedo involves dismantling the plastic and removing the panel board. In this case, you will need the following tools and materials:
- soldering iron;
- europanel or insert;
- ultraviolet light bulb;
- wires;
- light bulbs;
- cartridges;
- glue;
- marker.
Initially, you will need to remove the old europanel, remove the glass and the existing edging. The insert and arrows are carefully pulled out. Particular attention should be paid to the new insert. It is recommended to make holes with some margin. This will prevent the arrows from sticking.
Further tuning is based on dismantling the standard backlight. This may break the plastic. Initially, the board is dismantled. Experts advise first drawing on paper the existing connection diagram and connections.
The standard lighting is replaced with neon lamps. Neon is glued to the panel. A plastic protection is fixed on top. In this case, you need to check whether this structure is securely held. The block with which the neon lighting is controlled should be glued to the europanel. To do this, you can use glue or double-sided tape.
Such tuning is easy to do with your own hands. An important point is the installation of the panel and the correct connection of its devices to the network. For this, auto mechanics recommend using books on repair and operation of the VAZ 21099.
Not every vehicle owner has the right to be called a car enthusiast, but only those who care about their beloved car. Beautiful tuning of the VAZ 2109 interior is one of the ways of careful care and care, because in this way your car is given individual features and its own unique design. It is no secret that the interior of the VAZ 2109, which was tuned by hand, will look original and according to the tastes of the owner.
