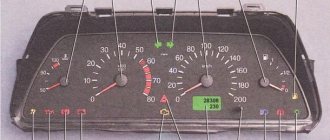
It is not surprising that absolutely every modern car is equipped with a dashboard, because it is thanks to it that the driver can monitor the main features of the car. And the instrument panel of the VAZ 2114, 2115 is no exception. Simply put, such a panel plays the role of a link between a person and a vehicle.
As it developed, the dashboard was equipped with additional sensors and indicators that make driving a car more convenient and safe. If you want to know what elements are on the dashboard of the VAZ 2114, 2115, then be sure to read this article.
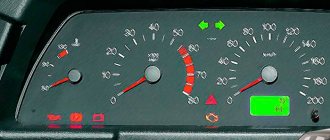
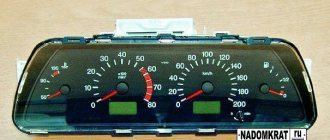
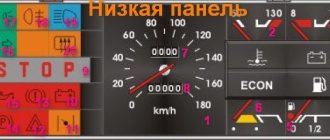
Designation of icons on the dashboard of the VAZ 2115
The following describes the warning lights and panel indications, which are indicated and numbered in the photo above.
| Number in order | Decoding |
| 3/4 | Turn signal indicators. They light up at the same time when the alarm is activated. |
| 7 | Minimum fuel level light. Lights up when the gas tank is empty. |
| 8 | Indicator for turning on external lighting. |
| 9 | The brake system is faulty. The brake fluid level and pad wear should be checked. |
| 10 | The high beam headlights are activated. |
| 12/15 | Information displays, basic information about the daily time and mileage is displayed here. |
| 13 | Emergency light activation key. |
| 14 | Check engine light. If it lights up, further movement is not recommended. |
| 16 | The battery is low. The operation of the generator should be checked. |
| 17 | The indication indicates that the handbrake lever is raised. |
| 18 | The warning light means that the engine oil pressure has dropped below normal. |
| 19 | This indicator is used exclusively on carburetor cars. The light indicates that the throttle valve is in the open position. |
The most common breakdown
Before digging into the inside of the car, check how securely the ground wire leading to the front panel is secured. A restless passenger in front often simply pulls him out of his place with his feet. To prevent the situation from repeating itself, after fastening it is worth insulating the wire from reach.
Its signs are very characteristic:
- All indicators do not work: speedometer, tachometer, odometer, fuel level recorder, coolant temperature sensor;
- The rest of the equipment - optics, radio, even the panel backlight - turn on normally and do not act up;
- The ignition works properly, the car does not refuse to start;
- Fuse F3 is almost 100% blown. It is located in the mounting block and will have to be changed. But first you need to find out why it was covered, otherwise the new one installed will suffer the same fate. In most cases, a short circuit is to blame for burnout. On well-used VAZ-2114, the fuse often blows after each wash. Instead of carrying a spare one, you need to figure out where moisture is getting into it.
If the fuse is intact, this is not a reason to immediately leave it alone. It would be a good idea to remove it and check the contacts: if the fuse is live, but the terminals are oxidized, the circuit will be interrupted, and the device will stop showing any signs of life.
The next weak link: It is the ignition relay. It is located to the left of the steering column, fixed on a pin, so to speak, upside down. You need to remove it and try to make direct contact with the wires. If there are obvious signs of revival on the instrument panel, it immediately becomes clear that the time has come to change the relay.
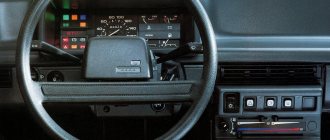
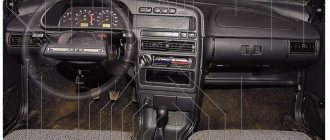
Tidy 2115: description and purpose of buttons and knobs
If everything is simple with the levers on the steering rack, there is a headlight position switch and a turn signal switch on the left. Buttons are more difficult.
On the dashboard, the main keys are placed in a separate “strip”. To understand the essence, we present their decoding from left to right.
- Switch for outside parking lights.
- Activation of low beam headlights.
- Front fog lights.
- Rear PTFs. If not installed, reserve.
- Rear window heating button.
Lada 2115: the oil light on the center panel is on
If an icon in the shape of a watering can appears on the console, this indicates that there are problems in the engine lubrication system. This is caused by a drop in the oil level in the crankcase or a pump malfunction. If the engine is old, the problem may be caused by clogged oil lines.
What does the exclamation mark on the Lada 2115 tidy mean?
On the "tag" the symbol is used in only one form - a red indicator in a circle. The icon indicates a malfunction in the vehicle's brake system. If this symbol lights up while driving, stop and find the cause of the breakdown. Usually it is enough to add fluid to the expansion tank or replace worn pads.
The battery light on the dash is on 2115
A red battery icon indicates that the battery is not charging properly. A complete diagnosis of on-board systems associated with the generator set and its wiring is required.
Car diagnostics
The appearance of a lit “Check Engine” lamp on the instrument cluster signals the driver that a problem has arisen in the vehicle’s electrical system. You need to understand that checking the vehicle yourself and at a service station can give different results. Special equipment available to professionals will allow more accurate detection of faults.
Self-diagnosis
On a VAZ 2115, the owner can do independent diagnostics and find out what errors are stored in the memory of the engine control unit. The procedure is carried out by calling up fault codes on the dashboard or using a diagnostic adapter.
To carry out diagnostics on the electronic instrument panel, you must perform a certain sequence of actions:
- Sit in the driver's seat of the car, insert the key into the ignition and press the daily mileage reset button located on the instrument cluster.
- Turn the lock key to the ignition switch position.
- Release the key, starting the self-diagnosis process. Visually, this will look like turning on the backlight, all signal lamps, possible symbols on the LCD screens and testing the instruments (the arrows will move across the entire scale in both directions).
- Press the key again and release. The second press displays the software version of the instrument cluster on the screen located under the speedometer (inscription like Uer x. x).
- Press the key again, after which the errors in the memory will be displayed on the screen.
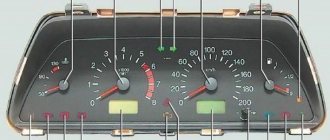
Instrument cluster VAZ 2115, the button is located on the right side of the speedometer
We recommend: Lifan X60
The driver can perform self-diagnosis on the electromechanical panel and the “January-4” control unit according to the following sequence:
- Turn off the ignition.
- Open the diagnostic connector cover located on the center console.
- Connect contact B to the negative terminal of the battery (to the body). Contact A, connected to the engine crankcase, is suitable for this.
- Turn on the ignition. The “Check Engine” lamp will flash code 12, which means the diagnosis has begun. The light signals are given as follows - a long flash, then a pause (about 2 seconds), two short flashes, a long pause (about 3 seconds). Signal 12 is sent three times. If there is no signal, the diagnostic system is inactive or faulty. After this, the Check Engine light will flash and list the errors in memory. Each code is repeated three times. If there are no errors in the memory, code 12 will continue to be transmitted.
Electromechanical instrument cluster Pinout of diagnostic connector
To read controller errors, a special K-Line adapter is used, which is connected to the diagnostic connector using a connector. This connector is located on the center console behind a plastic plug (below the cigarette lighter and ashtray). The adapter has a cord with a USB connector at the end that connects to any laptop. A special program for reading and resetting errors must be installed on the device (OpenDiagFree version 1.4 or 1.6).
The procedure for reading errors is quite simple, you need to:
- Check the level of process fluids.
- Open the connector cover and turn on the ignition.
- Connect the adapter or scanner to the diagnostic socket.
- Launch the software on the laptop.
- View available errors in the program dialog box.
- Decrypt the codes using the program interface or decryption table.
- Eliminate the causes of malfunctions and re-diagnostics.
How to check for errors on the device
The manufacturer has provided the ability for the driver to independently read faults without the presence of additional equipment.
To perform a self-diagnosis, you will need to follow a procedure.
- Sit in the driver's seat, insert the ignition key and press and hold the daily mileage reset button.
- Next, turn the ignition key in the lock, but do not start the engine.
- Release the reset button. Now the on-board computer self-diagnosis process will begin. This is accompanied by the inclusion of all lights and devices.
- Quickly press the mileage reset button again - this will display the version of the software used on the screen under the speedometer.
- If you press the button again, error codes will be displayed on the same screen.
How much does a shield cost?
In 2022, you can find a tidy device from 1000 rubles. If you need to purchase a complete module with all the plastic and instruments, the purchase will cost approximately 8-10 thousand.
The standard dashboard of the Lada 2115 is informative and has a discreet design. The module is easy to read and intuitive even for novice drivers.
Specialization : Graduated from the State Automobile University, worked for 20 years at GAZ-56, now I drive a Zhiguli.
Source
The tidy and on-board computer 2115 do not work: reason
The engine may not start, but auxiliary devices such as power windows or wipers may work.
If this happens, you should check the points.
- Inspect all fuses for damage.
- Check the power supply terminals of the on-board computer and instrument panel. Often the terminals become loose or oxidize, which leads to similar troubles.
- If all the above-described elements are intact, you should remove the BC from the machine and check its functionality.
Where is the instrument panel located?
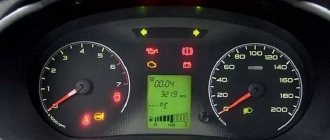
This part is located above the steering wheel, in the upper left part of the “torpedo”, opposite the driver’s seat. Thanks to this arrangement, the person behind the wheel sees the readings of all instrument indicators (signs, icons, as well as pointer devices), and therefore objectively assesses the speed of the car and the operation of all its systems. Some of the icons on the instrument panel of the VAZ 2115 are hidden from the driver by the steering wheel, but during a turn the visibility improves and he sees them, in addition, the activation of each light is duplicated by a sound signal.
Description of faults
Once you understand the self-diagnosis modes, think about the errors encountered during diagnostics.
| Serial number | Decoding |
| 1 | There are problems with the ECU. |
| 2 | The fuel level sensor is providing incorrect data. |
| 4/8 | There are problems with the machine's power supply. |
| 12 | The error lamp circuit is faulty. |
| 13 | Lambda probe – power supply circuit open. |
| 14/15 | Temperature sensor incorrect signal. |
| 16/17 | There is a short circuit in the on-board network. |
| 19 | DPKV incorrect data. At the same time, the car often does not start. |
| 21/22 | Typical TPS errors. Cleaning the damper is usually sufficient. |
| 23/25 | The intake air temperature meter has failed or is stuck. |
| 24 | Speed sensor is broken. |
| 27/28 | DC is faulty. |
| 33/34 | The air flow meter is not working properly. |
| 35 | The idle speed control sensor is faulty. |
| 42 | The ignition system circuits are broken or not working correctly. |
| 43 | The knock sensor is damaged. |
| 44/45 | The composition of the fuel mixture is incorrect. |
| 51/52 | ECU memory module errors, |
| 53 | CO2 setting sensor error. |
| 54 | The octane corrector is faulty. |
| 55 | The composition of the fuel mixture is incorrect. |
| 61 | The oxygen sensor has failed. |
Tidy 2115 stopped working
Occurs after power surges or moisture getting under the panel (condensation). If the device has completely failed, but other elements of the car are working, check the fuse and wiring of the element.
When only part of the panel does not show or the board lighting has failed, perform diagnostics of the illuminators and their contact groups.
Tidy does not light up
If the backlight does not function, as well as the dimensions on the left side of the car, check the corresponding fuse. When the insert is working properly, you will need to diagnose the mounting block for voltage.
Panel 2115 blinks
It happens when the device does not work correctly. The backlight blinks and the elements constantly jump. There are problems with contacts here. The pads may become loose or oxidized.
The solution to the problem is to clean the contacts from oxidation and tighten/replace the pads.
The temperature sensor on the device 2115 does not work
The pointer indicator is a reliable element of the system. But various problems may arise here. Usually trouble is caused by factors.
- Sensor stuck in one position.
- Damage to wiring.
- The motor of the device itself is damaged.
- Problems with the electronic board or ECU.
The solution lies in diagnosing the system and correcting breakdowns.
The arrows on the dashboard 2115 do not work
The fault lies with the blown fuse F3. Before replacing it, be sure to diagnose the wiring and eliminate problems and possible short circuits.
Installation and repair instructions
To replace the PP on a VAZ 2115 tuning, taking into account the pinout, follow these steps:
- First, disconnect the cable that goes to the cigarette lighter.
- Dismantle the control panel cover; to do this, find two self-tapping screws at the edges and unscrew them. Also unscrew the screws that secure the PP at the top and bottom.
- Dismantle the cover; this will require some effort. The pad itself is held on by clamps, so the plate will need to be rocked a little.
- Next, disconnect all the wires that are connected to the control panel - these are the connectors for the light alarm, clock, speedometer, fuel level sensor, etc.
- Dismantle the control panel; to do this, you will need to unscrew four more bolts on which it is fixed. Be careful at this stage - do not damage the wiring.
Actually, at this point the procedure for dismantling the control panel can be considered complete. If you need to change light bulbs, simply remove the sockets and install new indicators. To remove the cartridges you will need to turn them counterclockwise, do this carefully so as not to damage them. Further assembly is carried out in reverse order.