With the onset of the cold season, I have already written a mini-series of articles about tuning VAZ heaters. Let's remember: this is the post “small tuning of the VAZ heater”, the post “heater noise VAZ 2101-2107”. Now it’s the Samara family’s turn...
Actually, what is the problem? A very common thing is that the heater of a VAZ 2108 - 2109 heats up, but not very much; at idle speed, generally cold air blows... As the speed increases, the situation improves, but not much... Is this a familiar situation? Let's try to figure it out.
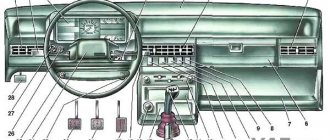
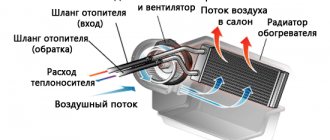
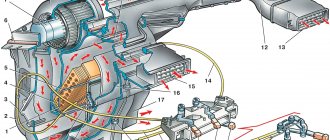
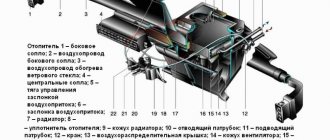
Heater diagram
The heater is mounted in the cabin under the dashboard using nuts on bolts that are welded to the air supply box. The air heated in the heater through channels (air ducts) enters the interior of the cabin. The air ducts are located at the bottom of the dashboard and have sealing gaskets.
If you plan to carry out repair and maintenance work, or replace failed components yourself, you definitely need to study the design of the stove and become familiar with the location of the components.
Based on the diagram below, we will introduce you to the design of the VAZ 2109 stove.
| Item number | What is this |
| 1. | Bracket for fixing stove casings |
| 2. | Heater control damper |
| 3. | Left heater casing |
| 4. | Flap rod for heating the foot area |
| 5. | Radiator gasket |
| 6. | Radiator |
| 7. | Gasket sealing stove |
| 8. | Electric stove motor |
| 9. | Heater fan shrouds |
| 10. | Fan impeller |
| 11. | Heating damper |
| 12. | Air duct for heated windshield |
| 13. | Side nozzle duct |
| 14. | Side nozzle |
| 15. | Center nozzle flap |
| 16. | Pusher (blades); |
| 17. | Blade axis |
| 18. | The blade itself |
| 19. | Center nozzle closing lever |
| 20. | Heated windshield damper rod |
| 21. | Lever for changing air flow directions |
| 22. | Air heating control knob |
| 23. | Windshield air handle |
| 24. | Leg air handle |
| 25. | Bracket for control levers |
| 26. | Rod sheath fixation bracket |
| 27. | Stove valve control rod |
| 28. | Stove control damper rod |
| 29. | Heated footwell flap |
| 30. | Air control lever axis |
| 31. | Screw clamp |
| 32. | Stove valve |
| 33. | Heater valve body |
| 34. | Valve lever |
| 35. | Hoses connecting the faucet to the heater radiator |
| 36. | Internal ventilation duct |
| 37. | Heated windows for rear footwells |
| 38. | Stove tap |
| 39. | Window for heating the driver's foot area |
| 40. | B-pillar trim |
| 41. | Inner cavity of the central pillar |
| 42. | Exhaust ventilation duct |
| 43. | B-pillar trim |
| 44. | Hood deflector lining |
| 45. | Rubber valve |
| 46. | Deflector housing |
| 47. | Exhaust ventilation deflector |
| I | Heater |
| II | Stove operation diagrams |
| III | Stove tap |
| IV | Interior exhaust ventilation |
Having become acquainted with the components of the VAZ 2109 stove, let's find out in more detail how everything is arranged and functions here.
Device location
Assembly
Before assembly, it is advisable to lightly lubricate the mounting points of the dampers with lithol. The halves of the housing must be connected to each other with a sealant; any sealant will do - silicone, acrylic, Hermesil. Then snap the paper clips, tighten the self-tapping screw, and put the damper levers in place.
If the halves of the ribbed wall of the radiator support are severely deformed, then the gap needs to be filled with sealant, and thicker... In general, more attention should be paid to this unit - there should be no gaps between the body and the heater radiator, although this is not so easy to check. To seal the VAZ, they use a thin strip of foam rubber, which is clearly not enough... Therefore, I covered both walls of the case, which the radiator touches, with bitoplast. For installation, I had to use a thick fabric on top of the foam strip - the radiator fit into place “with tension.”
There are instances when the stove fan makes a loud noise, especially at high speeds. This is to blame for the impeller, which can be balanced by winding a wire around the rim of the blades. The winding location is determined experimentally. It can be selected by sticking pieces of plasticine onto the impeller, connecting the motor and assessing the vibration. After all the adjustments, the fan must be put in place, the wires from it must be pulled through the rubber plug in the stove body.
And one more thing about the stocking on the fan casing. Of course, it saves from leaves, but it instantly becomes clogged with dirt/dust and significantly reduces air flow. So the benefit of it is very doubtful...
Principle of design and operation
- The stove includes a pair of plastic casings (left, right). They will be connected to each other with brackets around the perimeter. For sealing, a harness is placed in the grooves of the casings.
- An electric heater fan forces air inside the cabin.
- It is held in place by a pair of screws on top of the stove. The heater is designed in such a way that the fan can be easily removed through the engine compartment.
- An electric motor is attached to the fan casings. On its shaft there is a fan impeller with three speeds. This is possible due to the two coils of the resistor. To obtain the required wheel speed, there is an additional resistor. It is attached to the hole in the heater casing on the left.
- The radiator is located in the heater casings. Mounted to the right one using 3 fasteners and sealed with a polyurethane gasket. The radiator consists of two rows of tubes, cooling plates and plastic tanks. Also two.
- The heater valve consists of a housing, two pairs of pipes and is connected to the cooling system using rubber hoses.
- The liquid circulates through the radiator due to the operation of the cooling system pump.
- On the supply line in the heater faucet body, there is a faucet valve on the axis (it is plate-type), which has a hole for the passage of cooling liquid.
- The valve lever of the faucet is connected to the handle lever by a rod. The handle is responsible for controlling air heating. When the lever is turned, the valve hole opens the line and liquid begins to flow into the radiator.
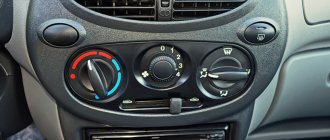
- The stove is controlled using three handles. Their levers are located on the axes of a plastic bracket secured to the instrument panel with 4 screws.
- The heating control handle acts on the faucet lever by means of traction and on the damper drive lever. By moving the handle completely to the right, the valve and damper will fully open, and air will begin to flow with the help of a fan through the radiator, where the heated coolant is circulated.
- In the middle position of the handle, the valve and tap move to an intermediate position. Some of the air goes through the radiator, and the other part goes past it. This effectively ensures the degree of air heating required by the user at a given moment.
- If the handle is in the extreme left position, the valve and tap are completely closed. As a result, the air flowing into the cabin is not heated.
- The upper left handle is responsible for adjusting the air supply to the legs of passengers and the driver. It is connected to the damper lever by means of traction.
- By moving the handle to the left, the footwell heating flap opens and air flows through the casings into the corresponding windows.
- On the left and right, air is supplied to the feet of the front passenger and driver.
- Interior ventilation ducts allow air to be delivered to the rear passengers' feet.
- The handle that regulates the air supply to the windshield is connected to the drive lever for the heated windshield flap using a rod. It can close or open the path for air to pass through the ducts to the glass.
- To provide air supply to passengers and blow off the side windows of the car, the design of the stove provides 4 nozzles - a pair of central ones, left and right. The body of each of them is equipped with a damper with a seal. By closing or opening the damper, you regulate the intensity of air supply. Plus another lever allows you to control the direction of the air coming from the nozzle.
- The VAZ 2109 is equipped with an exhaust or exhaust ventilation system. With its help, air is sucked out of the cabin. In the case of the nine, the hood is located behind the body openings for the side windows. The exhaust also occurs through the vacuum that occurs at the deflectors while the car is moving.
If problems arise with the operation of the stove, you can visit a car service center. Either there is another option - remove the stove yourself and try to repair it, or entrust the work to specialists. In any case, by dismantling the device yourself, you will save a lot of money and gain important experience.
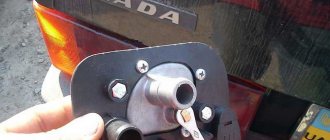
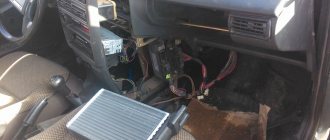
Radiator
It is attached to the stove body with three self-tapping screws. You need to pull it out, but be careful: a little more antifreeze may spill out.
Feature of the “14th” heater: the radiator is located almost horizontally. They say that this is for the best... The standard clamps must be replaced with “NORMA”
The car will be much warmer if the radiator has coolant “swirlers” (turbulators, hydraulic stops). These are plastic spirals that slow down the flow rate of coolant and increase heat transfer from the radiator when the engine is running at low speeds. According to VAZ employees, they should be present in most radiators, especially in new cars... If they are not available, then it is enough to cut aluminum or copper strips 1-1.5 mm thick and 5-6 mm wide (select according to the diameter of the tubes), one end Clamp it into the drill chuck, fix the other one and carefully curl it.
Radiator with rear cover removed. The swirlers are shaped like the letter “U”. No matter how hard I tried, I could not verify their presence without disassembling the radiator...
Removal
To remove the stove, follow the following algorithm.
- Loosen the tension on the clamps and disconnect the pair of hoses from the faucet connections. To do this, you will first need to remove the dashboard from inside the cabin.
- Loosen the clamps and disconnect the hoses from the stove tap pipes. Here the work is already done through the engine compartment.
- Unscrew the heater tap mounting nuts.
- Remove the tap from the front panel.
- Remove the heater tap rod holder.
- Disconnect the rod and valve lever.
- Remove the boot that protects the gear lever.
- Remove the floor trim.
- Unscrew the floor covering fastener at the rear.
- Remove the tunnel lining on the floor by sliding it backwards.
- Remove the internal ventilation air duct and disconnect it from the heater body.
- Disconnect the wires coming from the heater motor.
- Disconnect the wiring from the resistor.
- Unscrew the fastening nuts to the right of the stove.
- Remove the remaining fasteners and remove the stove, taking the control panel with you.
Dismantling works
Further actions directly depend on your level of preparation. For beginners, it is better to take the dismantled stove to specialists. If you have a good understanding of your VAZ 2109, you can try to carry out repair work yourself.
The stove is a complex but very important component in a car. Therefore, it is always necessary to monitor its functionality and detect malfunctions in time. It is unlikely that you will want to be left without heat in the cabin in winter.
Didn't find the information you are looking for? on our forum.
How to repair a VAZ 2109 stove
To ensure a comfortable temperature, a heater is installed in the car. The controller maintains the desired microclimate inside the car in the mode specified by the owner. The maximum deviation should not be more than 2 degrees Celsius. Deviation from these values indicates a malfunction.
This article explains how to repair the stove on a VAZ-2109 yourself.
The air supplied to the cabin is heated by a radiator built into the cooling system. It is then pumped by a fan through deflectors. A special regulator located on the panel is responsible for the intensity of heat supply.
Features of the heating system
Both in more modern models of the “nine” (where a high instrument panel is installed), and in earlier ones (where it is low), the ventilation is of the same type: supply and exhaust. Air enters through special openings installed in the windshield area by gravity or by force when the heater fan is running.
He leaves the cabin through the cracks in the doors. There are valves that allow air to escape outside, but prevent it from entering from the outside.
The heater is built into the engine cooling system and consists of:
- heater radiator installed near the main one;
- faucet;
- pump;
- fan
The stove itself is installed in the cabin under the instrument panel. Entering the radiator, the air is heated and then supplied to the cabin by an electric fan.
If this element needs to be removed, then this must be done from the engine compartment.
The heater tap is connected to two pairs of tubes extending from the cooling system. Directly in its body there is a valve that allows antifreeze to pass through. Its lever is driven by a rod using a handle located in the cabin.
The pump causes coolant to circulate in the radiator.
Opening (full) of the damper and tap occurs if the regulator is moved to the right all the way. At the same time, the fan forces air into the radiator, and the pump activates the movement of coolant.
The operation of the lower sleeves, which supply heat to the feet of people sitting in the cabin, is controlled by the upper regulator, which sets the damper in motion.
A normally operating stove allows you to maintain a comfortable 20 degrees of heat in the cabin at 20 degrees below zero.
Basic faults
As a rule, a heater failure occurs due to the fact that its electric motor stops functioning.
There are several reasons for this:
- combustion of the fuse link;
- breakage of the electrical circuit wires responsible for its operation;
- switch failure.
In the first case, the faulty protective device must be replaced.
If the new fuse burns out, you need to find out why this is happening. Most often this happens if there is damage to the insulation of the wires or their separation from the connecting terminals. The electrical circuit is tested with a multimeter, and if a defect is detected, it is eliminated. The regulator, in turn, usually does not work properly when its contacts burn out. A broken pusher also causes a similar result. The serviceability of this element is determined by measuring the voltage at its side contacts. Its presence when switching the toggle switch indicates operability. Otherwise, this unit will need to be replaced.
In addition, the motor itself may fail. The most common reasons are:
- breakage of armature winding wires;
- brushes sticking;
- collector oxidation.
If eliminating these causes does not correct the problem, then the engine is completely changed.
Sometimes a malfunction occurs due to a break in the wires supplying the mounting block or due to a burnout of the current-carrying track in it.
And finally, destruction of the resistor circuit may also occur - it is checked and the element that has become unusable is replaced with a serviceable one.
Repair
The procedure is performed after draining the antifreeze, in this order:
- from the interior side, disconnect 2 tubes leading to the faucet (you will need to loosen the fixing clamps);
- the remaining two are turned off in the engine compartment;
- unscrew the nuts on the faucet itself (from the bottom) and remove it (from the front);
- the rod is dismantled (you will need to disconnect the holder);
- the protective housing of the gearshift lever is removed;
- unscrew the screw in the gearbox tunnel and remove the floor covering;
- the ventilation hose is disconnected from the heater;
- the wires supplying them are removed from the resistor and the stove motor;
- To the right of the heater there are nuts securing it - they are unscrewed and the device itself is dismantled along with the control panel.
A faulty heater should be sent to a service center for repairs, since attempts to repair it on your own will most likely lead to undesirable consequences.
Other problems
Sometimes, when the stove is operating at full power, slightly warm air comes from the deflectors.
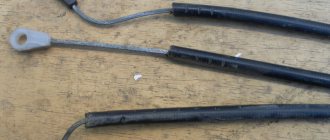
In this situation, adjustment of the dampers will be required. This is not difficult to do: you just need to arm yourself with pliers and patience. Using this tool, tighten the cable located near the gas pedal drive. Moving it to the right will open the damper and hot air will enter the cabin.
In addition, cold temperatures in the car often indicate a radiator failure. There is no need to repair this unit - it is replaced with a new one.
You should proceed as follows:
- the car is parked on a level surface;
- open the stove faucet and drain all the liquid there from the cooling system;
- dismantle the instrument panel.
The last point is performed in this order
- the negative terminal is disconnected from the battery;
- remove the drive cable and damper rod;
- remove all handles that control the heater and fan;
- pull out the protective cover;
- disconnect all connectors of wires leading to the panel;
- all instruments installed there are dismantled, as well as the steering wheel and ignition switch;
- Unscrew the screws holding the panel in place and remove it.
This gives access to the radiator. To remove it, you will need to disconnect the hoses from it and unscrew the fixing screws.
If the problem is only contamination of the radiator, then it will need to be cleaned. If a leak is detected, the entire assembly is replaced with a new one.
Tightening the cable of a stove with a high panel
If during the cold season you notice that the heater warms up the car interior well, while the windshield is not blown with warm air, you should conclude that the VAZ-2109 heater dampers are not functioning as they should. In this case, you will also have to carry out adjustment work, but they differ from the procedure described above. In addition, for work, in addition to pliers, you will need an awl, a Phillips screwdriver and wire cutters.
Read the manual below, which describes how to adjust the VAZ-2109 heater dampers:
- In order to gain access to the drive of the closing elements, it is necessary to dismantle the left screen on the instrument panel, which is secured with three screws located on the right foot of the driver;
- After this, move the drive lever to the extreme, use an awl to remove the metal bracket;
- Next, you need to remove the protective plastic braid from the cable, sliding it towards the tip;
- Using wire cutters, carefully cut one turn of the cable, then pinch the remaining turns with pliers and twist tightly so that they are aligned with the other turns;
- Now install the drive cable in the operating position and test the operation of the heating system. If the problem has been resolved, reassemble in reverse order.
This is how the dampers of the VAZ-2109 high panel heater are adjusted in a garage. Despite the fact that the problem with the heater dampers not fitting tightly for the “Nine” and its modifications is quite common, even an inexperienced car enthusiast can solve it - you just need to follow the instructions.
Leaky ducts
Another factor in the formation of a cold flow instead of a hot one may be its loss in the cracks along the path from the fan, because of this the warm flow becomes weaker and cools down. To get out of this situation, you need to seal and glue all connections along the air flow path from the heater to the output nozzles. To do this, you will have to disassemble the dashboard, which in itself is long and laborious. But as a result, you will feel that the air flows from the heating system deflectors have increased.
Choice
When choosing a new radiator for the stove of your VAZ 2109, you should understand what exactly you want to achieve and what budget you have.
Today, consumers are offered two types of units to choose from.
Radiator type
Peculiarities
A relatively inexpensive radiator option, which is characterized by high thermal conductivity. However, such a device cannot be repaired, which is its main drawback. But in practice, repairs are not carried out so often, so few people pay attention to this disadvantage
If necessary and a leak is detected, the copper radiator can be repaired - soldered. Thermal conductivity indicators are slightly higher when compared with aluminum analogues. But at the same time, the price is quite high - both for repairs and for the radiator itself
Aluminum unit
Due to unprofitability and high cost, most VAZ 2109 owners choose aluminum radiators. But it all depends on your personal decisions and preferences. When actively using a car in harsh winter conditions, a copper radiator is fully justified.
Copper unit
Possible breakdowns of the heating system
The main reasons why the VAZ 2109 stove does not heat well are interruptions or breakdowns of three components of the heating system:
| Radiator | Fan | Air ducts |
The air ducts consist of plastic casings and large-diameter corrugated tubes. The flow of air through them is regulated by dampers. Seals protect against leakage of warm air or penetration of cold air. Problems in the operation of this unit most often arise when it becomes clogged with foreign particles of debris and dust. In this case, after inspection, the air ducts simply need to be cleaned of dirt. Another vulnerable part is the duct seals and dampers. The former can dry out and wear out - this leads to loss of tightness and leaks of warm air. The dampers often do not close completely. As a result, cold air penetrates the system and heating also does not occur.
Damage to the air duct assembly.
The rotary-type blower fan on the VAZ 2109 is powered by electricity from the on-board electrical network through a ballast resistor. The switching itself and the rotation speed are regulated by the vernier on the control panel - it is located on the left side of the valve levers. Most often, the fan itself or the resistor burns out. If this is detected, they need to be replaced.
Fan assembly failure.
Advice! In a home garage, failure of these electrical parts can be detected by testing them with a multimeter.
Need to know
You can add a heater to the car’s heating system yourself; to do this, you need to buy an additional heating element. Or you can try and make it yourself; for these purposes you will need a second radiator and a housing for a new heating element, which can also be made at home.
Where to put
- In the distance between the front seats where the tunnel is located.
- Under the front seat.
Suitable Models
- Technomaster-8110.0500.10 and 8110.0700.10 (Tolyatti). Its price varies within 3000 rubles.
- Helios, Xeros and Zenith (Eberspächer) - are more expensive, from 3500 rubles.