Purchasing a finished part
Many owners of "nines" use the surface of the rear shelf to install additional media player speakers. In this case, you get a VAZ 2109 acoustic shelf. The easiest way is to purchase a ready-made acoustic shelf at a car store. There is a wide variety of options on sale to suit every taste and budget.
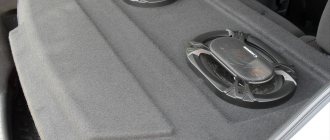
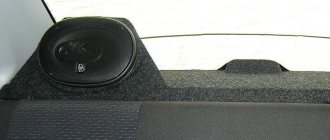
The rear shelf on the VAZ 2109 has an elongated shape along the rear seat with a folding part approximately 250 millimeters deep. This makes it very popular to use 6x9 inch (16x21 cm) coaxial speakers as rear-mount speakers. The mid- and high-frequency speakers of such systems are located on the same axis, one behind the other.
They provide a good filling of deep and rich sound throughout the car interior. But such an arrangement of audio systems, unfortunately, does not ensure that sound arrives from the front, in the listener’s face, as prescribed by feng shui requirements, or simply common sense. Rear row passengers listen to music in the very back of their heads, but it is loud.
Installing a purchased audio shelf can be done by yourself. This element is placed on the standard mounting points. To prevent rattling, Velcro is quite suitable.
It is better to connect the wires to the audio system through a standard connector block to facilitate the removal of the shelf when transporting oversized cargo.
Additional Information
The lid rises with the trunk
If desired, the shelf cover can be connected to the trunk door using springs or rubber bands. Under such circumstances, the lifting part of the shelf will rise together with the trunk door.
In conclusion, you need to study the financial component of the issue. Making your own trunk shelf for a VAZ 2109
will cost the owner of the vehicle even less than the price of the services of a professional service station.
Making your own acoustic shelf
Car enthusiasts who want to assemble and install an exclusive audio system on their car often go to the trouble of making an acoustic shelf with their own hands. The question of the advisability of installing a non-standard individual system on a twenty-year-old domestic small-class hatchback does not have a clear answer. But if the decision on this has already been made, then a homemade acoustic shelf will undoubtedly come in handy.
The question of rattling of such an element of the trunk of the “nine” does not arise at all while driving. Made from 12mm or even thicker plywood, loaded with two speakers with powerful magnets, and sometimes also a subwoofer, this part is securely fixed in place under its own weight. Making an audio shelf and podiums for a VAZ 2109 with your own hands is the most expensive and time-consuming option. But it gives a truly visible (and audible) result.
The shelf is usually cut out of thick plywood or chipboard with an electric jigsaw. You can download the drawing from the Internet or draw it yourself based on the dimensions of the standard part, taking into account the speakers and subwoofer planned for installation. Acoustic system podiums are often made using the technology of filling the structure frame with hardening foam filler.
The technology involves sequential implementation of the following steps.
- A hole is cut out in the center of the planned location of the podium to place the speaker magnet in it.
- A ring element is cut out of thick plywood, which will serve as the end of the podium - a seat for the speaker.
- For each podium, a spacer element is sawn off from a 25x25 mm block, the length of which corresponds to the maximum elevation of the speaker seating element above the surface of the shelf.
- Cut off one spacer element for the minimum elevation.
- Prepare two spacers for the middle elevation points.
- Self-tapping screws secure the landing circle with the desired inclination to the plane.
- The inner cylindrical surface of the podium is formed from kraft cardboard and the podium cylinder is foamed in the spaces between the spacers.
- The open outer surface of the podium is shaped by trimming off the excess filler with a knife, after which the surface is sanded, puttied and primed.
- As a final processing operation, painting or covering with carpet is used.
They install a homemade acoustic shelf on the VAZ in the place where the standard shelf is installed, connect it to the media center and enjoy the music in their “chisel”.
Acoustic shelf VAZ 2115: how to make it yourself
Acoustic shelf VAZ 2115 with subwoofer
For some reason, the following problem may arise: the acoustic shelf of the VAZ 2115 has stopped functioning. Of course, if it is broken, then it will not harm the entire car, so repairing it can be postponed for a while. However, if it cannot be repaired later, then you can try to make an acoustic shelf right at home. A home-made acoustic shelf for a VAZ 2115 will look no worse than the standard one.
Causes of acoustic shelf failure
VAZ 2115 acoustic shelf on your own
Usually it is not the sheer itself that breaks, but the pins with which it is attached. There may be several reasons for this problem:
- Firstly, they could be poorly clamped. By the way, this is the main reason why they break. Therefore, you can simply replace these fasteners by installing the old shelf in place.
- The second reason is that the car was shaken too much on a rough road. Most often this happens in cars whose drivers live in rural areas. However, the breakdown itself may also be the fault of the driver. If you significantly reduce the speed when crossing such a road, then replacing the pins will not even be necessary.
Note: in addition, high speed negatively affects not only the sound system, but also the entire car as a whole.
- Exerting mechanical influences on it. This is in case something falls on it. In addition, it is not recommended to place any heavy objects on it. It is not recommended to install an acoustic shelf in the trunk, since objects of varying weights are usually placed there.
- In addition, the shelf may wear out a little during use. And after a few years it may crack when exposed to mechanical waves coming from the speakers.
Acoustic shelf repair
VAZ 2115 acoustic shelf and its repair
Repair work usually does not take much time. Removal and installation take place in a matter of minutes:
- To replace the pins, you first need to find exactly the same ones as before.
Note: you can choose a more convenient way to attach the acoustic shelf. It can also be installed using self-tapping screws. Moreover, this option will be more reliable and effective.
- To remove them, you just need to unscrew the bolts that held them in place.
- Unhook them from the acoustic shelf in the same way.
- Now connect new parts to the place where the old pins were attached. Then attach them to the shelf.
Acoustic shelf VAZ 2115 classic
In some cases, repairing the acoustic shelf itself is impossible. If it is broken, then a characteristic creak will be heard in the car. This is mainly why it is replaced, because the sounds produced are almost unbearable. If the cause of this creaking is just a small crack, then this problem can be eliminated, and even quite easily: you can simply glue it together.
Note: you need to choose high-quality glue. The best option would be to use epoxy glue.
In addition, many people just want to replace the standard rear shelf, even if it is not broken. After all, most often it is made of rubberized plastic, which is why the sound of the speakers (see How to choose speakers for a car radio on your own) is quite unclear.
Acoustic shelf for VAZ 2115 and its dismantling
Some tips
- Of course, it is best to use some kind of wooden material to make a shelf. What exactly to choose for its manufacture is up to everyone to decide for themselves, because they must be guided by their financial capabilities.
- By the way, all materials have different densities. Therefore, you need to select a material that will be easy to work with. Wood is one of those. It is best to choose a piece of plywood with a thickness of 10 mm.
Troubleshooting solutions
An excellent way out of their current situation is to install the rear shelf of the VAZ 2114 yourself. Today, on numerous websites dedicated to cars, you can find a lot of options for making the necessary design on your own. If you don’t have the skills to work or free time, then an excellent solution is to buy an acoustic platform at an auto supply store. It is possible to select several modifications that differ from each other both in design and in the materials used in manufacturing. The price of the accessory depends on its design and the specific store, on average it ranges from 1,200 to 3,000 rubles.
Benefits of replacing the rear shelf
The main thing that car enthusiasts notice after installing a new, modified element is a more confident design that does not bend under the weight of even the most impressive-sized sound speakers installed on it. In addition, the acoustic characteristics of sound transmission are noticeably improved. This happens due to the fact that wood is the best conductor of sound impulses generated by speakers. In addition, the strength of the shelf and the reliability of its fastening prevent the appearance of unnecessary deformations, looseness, annoying squeaks and extraneous noise.
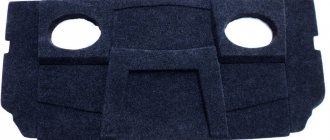
Construction of seat belt boxes and speaker podiums
Using a jigsaw we make the bases for the podiums. In order for the structure to be rigid, it must be reinforced with 40x20 mm wooden blocks; using self-tapping screws and bars we connect the ovals together (as shown in the figure below). We cut out several holes in the shelf for air circulation between the trunk and the passenger compartment.
We fill the voids between the bars of the podiums with polyurethane foam. After the foam has dried, we simply cut it along the edges and sand it with sandpaper to smooth out the unevenness. We strengthen the structure with cardboard, which is impregnated with epoxy glue.
When making boxes for seat belts, it should be taken into account that the belts enter from the side. The boxes are made of timber, which adds rigidity to the structure. After installing the boxes, the rear shelf of the VAZ 2107 is no different from the factory one. To give it an aesthetic appearance, you need to cover it with carpet, the entire shelf is ready, you can install it.
Note: you can make a bass reflex for an acoustic shelf. To do this, make a hole in the middle of the shelf, so as not to spoil the view, it can be covered with a decorative lattice.
Product delivery options
Note! Below are the shipping methods available specifically for this product. Payment options may vary depending on the shipping method. Detailed information can be found on the “Delivery and Payment” page.
Parcel by Russian Post
Available payment methods:
- Cash on delivery (payment upon receipt)
- Using cards Sberbank, VTB, Post Bank, Tinkoff
- Yandex money
- QIWI
- ROBOKASSA
Shipping throughout Russia. Delivery time is from 5 to 12 days.
Parcel by Russian Post 1st class
Available payment methods:
- Cash on delivery (payment upon receipt)
- Using cards Sberbank, VTB, Post Bank, Tinkoff
- Yandex money
- QIWI
- ROBOKASSA
Shipping throughout Russia. Delivery time is from 2 to 5 days. More expensive than regular delivery by Russian Post, approximately 50%. Parcel weight up to 2.5 kg
Express Parcel EMS
Available payment methods:
- Cash on delivery (payment upon receipt)
- Using cards Sberbank, VTB, Post Bank, Tinkoff
- Yandex money
- QIWI
- ROBOKASSA
Shipping throughout Russia. Delivery time is from 3 to 7 days. More expensive than regular delivery by Russian Post, approximately 100%.
Transport companies
Available payment methods:
- Using cards Sberbank, VTB, Post Bank, Tinkoff
- Yandex money
- QIWI
- ROBOKASSA
Delivery is possible to any locality where there is a representative office of the transport company. Delivery time is from 2 to 10 days. Sending large parcels is approximately 50% more profitable than by Russian Post.
Courier delivery in Togliatti
Available payment methods:
What to do?
There are three ways to solve this problem. The choice in favor of one option or another directly depends on your requirements, wishes and sometimes financial capabilities.
Solution option
Explanation
Completely dismantle the sides and shelf
Nothing will make noise in this situation, but you will deprive yourself of space to install an audio system. You can forget about high-quality sound inside the car
Purchase a ready-made podium for durable material with holes for speakers
A good option that requires certain financial costs. All you have to do is install it in place. Disadvantage - it is not always possible to find a shelf that is ideal for all parameters
Make a podium with your own hands
This option provides minimal financial costs and the opportunity to create a shelf that will meet your smallest requirements. The downside is that you have to do the work yourself, which not everyone can handle.
Having a stronger and thicker shelf not only eliminates noise, but also improves the sound quality of the audio system. The thick shelf acts as a highly efficient enclosure.
Today we will look at how you can create an acoustic podium with your own hands, which will be placed on factory sidewalls. You can also try to make an option with your own sidewalls, but it is much more complicated and extremely difficult for a beginner to cope with. Let's not make things difficult for you. The option with standard sidewalls is very good.
2109 creating an acoustic shelf and installing an amplifier and 6x9 pancakes on it
Amplifier MAC Audio Fearless 4000D (nominal 4x150) Kit for connecting a four-channel amplifier Speakers 6x9 Kenwood KFC-E6935 (nominal 60)
Sheet of plywood 1.5 x 1.5, thickness 12 mm (340 RUR) Fabric 1.5 x 1.5 (340 RUR, almost 225 RUR per linear meter cost) Liquid nails 2 cans for a gun, 400 ml each (140 RUR each, the MOMENT of installation was called) Fasteners (corners, screws, screws, nails, hinges) approximately 350 RUR
The tools I needed were: a pencil, a jigsaw, a drill, a grinder, a hammer, screwdrivers, keys, a glue gun, scissors, a stationery knife, a piece of aluminum angle 0.3-0.4 thick (for smoothing the glue), a soldering iron and all the junk for it .
Before starting work, I read everything there was on the Internet about creating shelves, found a couple of templates and sizes, and did not buy a paid one via SMS. I wanted to make a shelf from glass to glass with my own mount instead of the standard plastic ones.
At first I thought of making a template out of paper, trying it on, adjusting it, and then cutting a sheet of plywood from the norm. Having looked at the approximate dimensions of the shelf from glass to glass, I realized that this template would not fit on A1, and A0 in the city I don’t know where to print and I didn’t want to spend money on it. Therefore, I took one of the drawings with dimensions from the Internet and drew it on a sheet of fiberboard, it was approximately similar, but as it turned out after trying it on, somewhere it was small, somewhere it was large.
I spat on all these drawings, took my two standard plastic ones, and a standard shelf, attached it, circled it, and got a template. Because The fiberboard ran out, I took some very thin sheet of plywood from the garage. When trying it on, it fit better than the previous template, but there was still some reserve in some places, because... I cut it with a jigsaw with a reserve.
Product delivery options
Note! Below are the shipping methods available specifically for this product. Payment options may vary depending on the shipping method. Detailed information can be found on the “Delivery and Payment” page.
Parcel by Russian Post
Available payment methods:
- Cash on delivery (payment upon receipt)
- Using cards Sberbank, VTB, Post Bank, Tinkoff
- Yandex money
- QIWI
- ROBOKASSA
Shipping throughout Russia. Delivery time is from 5 to 12 days.
Parcel by Russian Post 1st class
Available payment methods:
- Cash on delivery (payment upon receipt)
- Using cards Sberbank, VTB, Post Bank, Tinkoff
- Yandex money
- QIWI
- ROBOKASSA
Shipping throughout Russia. Delivery time – from 2 to 5 days. More expensive than regular delivery by Russian Post, approximately 50%. Parcel weight up to 2.5 kg
Express Parcel EMS
Available payment methods:
- Cash on delivery (payment upon receipt)
- Using cards Sberbank, VTB, Post Bank, Tinkoff
- Yandex money
- QIWI
- ROBOKASSA
Shipping throughout Russia. Delivery time – from 3 to 7 days. More expensive than regular delivery by Russian Post, approximately 100%.
Transport companies
Available payment methods:
- Using cards Sberbank, VTB, Post Bank, Tinkoff
- Yandex money
- QIWI
- ROBOKASSA
Delivery is possible to any locality where there is a representative office of the transport company. Delivery time – from 2 to 10 days. Sending large parcels is approximately 50% more profitable than by Russian Post.
Courier delivery in Togliatti
Available payment methods:
- Cash upon receipt
- Using cards Sberbank, VTB, Post Bank, Tinkoff
- Yandex money
- QIWI
- ROBOKASSA
Delivery time from 1 to 12 hours.
We make it from scratch
The acoustic shelf of the VAZ 2114 is easy to make with your own hands, you will have to spend a little on materials, and do not regret a little of your time.
The following “ingredients” will be useful:
- Centimeter chipboard or MDF.
- Carpet (other fabric).
- Glue.
- Self-tapping screws.
- Jigsaw.
- Drill.
- Grinding machine (emery, sandpaper).
- Stapler.
- Materials for the layout: cardboard, pencils, drawing supplies.
We will do it like this:
- We are preparing a template, then we will try it on the car, it should be a little larger.
- We cut out the shelf according to the template, remove the irregularities by grinding down the gap included in the template.
- We double-check its dimensions on the car, if everything matches the car and the size of the intended speakers, then the shelf is ready.
- We are preparing materials for covering (pasting), everything should be at hand.
- Apply glue to the plywood, apply fabric, and roll everything out to avoid bubbles.
- We fix the edges with a stapler.
- Let it dry for a day.
Step-by-step instructions for independent production of VAZ 2109
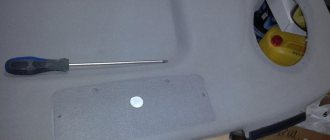
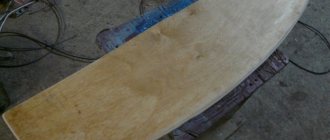
The workpiece is ready.
First of all, you should determine the points at which the decorative handles of the future design will be fixed, and then drill the holes necessary for mounting the clamps and installing the handles in selected places.
Cutting out the moving part
Next, you can proceed to making the shelf template. It is important to consider that the design will have a moving part, which must be marked on the cardboard template using cuts. It is strongly recommended to make sure that if the moving part of the structure is lifted, it does not come into contact with the arches of the trunk of the car.
After all the necessary markings have been made on the cardboard sheet, it should be attached to the plywood and the future shelf should be cut out strictly according to the size of the template. This stage of work requires special concentration, because only if it is carefully cut will the shelf fit into the trunk slot.
Holds on with latches
At the next stage, the lifting part of the structure is cut out of plywood, after which it must be connected to the stationary part of the shelf using hinges. In a horizontal position, the lifting part will be held by latches installed on the edges of the shelf.
After installing the shelf, you can begin to check its functionality. You should make sure that the shelf sits securely in the trunk connector, and only then start sanding it using fine-grit sandpaper.
Provides good access to the trunk
The upholstery of the shelf is carried out with pre-prepared material, the dimensions of which were measured according to the finished shelf with small tolerances. The principle of applying upholstery is simple and is divided into several stages:
- First, a layer of universal PVA glue is applied to the shelf. After some time, when the first layer has dried a little, you need to apply the glue again.
- The upholstery material is then carefully applied to the top of the shelf. In this case, the material can be stretched, because after drying the fabric will decrease in size, and gaps may form on the shelf that are not covered with fabric.
- The lower part of the edge should be upholstered according to the principle of upholstering the upper edge, but if desired, instead of glue, you can use double-sided tape to fix the fabric.
- After the upholstered shelf has completely dried, it can be installed in place. At the same time, you should once again make sure that the shelf sits firmly in its seat. Any defects that were identified during the final inspection must be corrected.
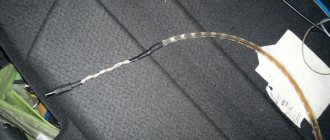
Lock installation
The lock is installed on the same seats on which the rear door wiper motor is attached. They fit well in size. It is not recommended to dismantle the windshield wiper, as some car enthusiasts do. The Nine is a notoriously dirty car, and cleaning the rear window of this car is an absolute must.
The lock's electric drive motor can be used with low power. Opening occurs primarily not due to the traction force of this motor, but due to the spring, compressed during closing and accumulating the corresponding energy. The motor should be connected to the lock actuator with a rigid metal rod, the length of which must be selected according to the location. The lock button is usually placed on the dashboard. Buttons with a pictogram in the form of a profile of a car with an open trunk lid are available for sale.
Over the many years of operation of your “nine”, the gaps in parts of its body may well have moved away from the original values, and the lock may require adjustment and adjustment.
Lighting system
The factory lighting system of the VAZ 2109 is quite good, but does not have a very attractive appearance. The problem with the headlights offered for replacement is their low quality, so you need to make your choice carefully. By purchasing and installing low-quality but beautiful headlights, you will significantly worsen the lighting, and this will negatively affect traffic safety. The lighting system can be modified as follows:
- replacing the headlight unit;
The plastic on taillights often becomes cloudy, which impairs its appearance and quality of lighting. To fix the problem, you can buy new plastic, but sometimes it is enough to polish the one you have. This will improve the appearance of the lights and the brightness of the lighting, making the car more visible at night and in fog.