Publication date: November 15, 2022. Category: Automotive equipment.
Some novice car owners underestimate the importance of car mats and prefer not to spend extra money on accessories that are useless at first glance. However, it is worth considering that by purchasing floor mats for your car, you can avoid several unpleasant situations at once. Firstly, the underbody of your favorite car will be less susceptible to corrosion after the standard coating quickly wears off. Secondly, thanks to these products you don’t have to worry about cleaning the car interior, the appearance of an unpleasant musty smell and constant mud puddles under your feet.
Based on this, these simple elements must be installed in every car. However, determining which models are best to choose is not so easy, due to the variety of different products. Let's try to figure out which rugs are more durable and of higher quality.
DIY car mats
Everyone is pleased when everything in the car is clean and tidy. And to keep the car always like this, it needs daily care. Cleaning is more convenient when there are rugs under your feet. There are a lot of such mats in the car market, but if you want to save money, it is better to do everything yourself.
Rubberized carpet is used in almost all rooms; it consists of 4 layers:
1) primary lining - synthetic durable fibers 2) secondary lining - jute, artificial jute, foamed modified polymerized latex (or letax and rubber) 3) fixing layer. 4) pile layer (textile).
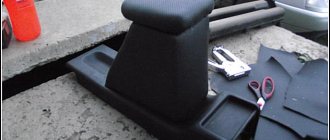
First, we take our old rubber mat, transfer it to the carpet, and measure it.
Next, cut it to the size of the old rug. This is how we make all our car mats.
Then it was necessary to do some stitching to give it a factory look. To do this, I went to the car market and there a master stitched the carpet using a special machine.
Everything turned out beautifully. Instead of such stitching, you can sew some kind of tape along the edges, it will also look good.
And now our rugs are ready. It's time to put them in the car. And I also sewed another small carpet onto the driver’s side.
Such rubberized carpet will serve you for a very long time, and moisture does not pass through them. By the way, cleaning such a rug has become much more convenient. That's all, good luck!
Installation of the thrust bearing and clamps on the mats
Car cellular mats wear out faster in the driver's seat. The cells are pressed through where the driver presses on the gas pedal. A plastic or metal plate - a thrust bearing - is placed in this place.
Companies use special glue to install the thrust bearing. If you make rugs with your own hands, it is safer to use metal fasteners. There are many tips on how to strengthen rugs in this area.
The final stage is to think about how to secure the car mats to the floor.
Light rugs can fly up in a draft. There are special holes on the floor of the car for clips. It is recommended to put additional rubber pads under them. Velcro tape is a fairly reliable fastening to the car carpet.
Tailor's patterns
A pattern is a pattern tool that serves as a template for applying the correct contours to the fabric. It is necessary so that when sewing, all the details of clothing or accessories come together in the correct proportions and sizes.
Tailors use two types of patterns: those with standard curves and those in which the curvature varies. Static patterns are used when drawing typical lines. Patterns with a change in curvature have a movable part, with the help of which the angle and direction of the line changes.
Professional tailors constantly use patterns for sewing clothes or other things (photo: domikpozitiva.com.ua)
Types of patterns used by tailors:
We sew our own car mat
Once you make a pattern for sewing car mats, you can easily sew more than one accessory. With their help, you will make smooth, symmetrical lines, and also save time for creating new rugs when needed.
Materials from which car mats are made:
Often the material is combined to improve the quality and service life of the product.
Methods for taking measurements of car mats
Before sewing a car mat, you need to take measurements from the bottom of the car interior.
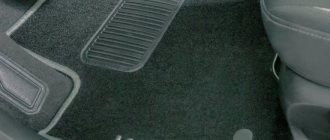
First way. Trace the old car mats onto the new material and cut them out.
Making car mats yourself will cost less than buying them (photo: avtokovrik102.ru)
Second way. Take plastic film, lay it on the bottom of the cabin and secure it with pushpins so that the material cannot move. Make changes to the shape of the rugs as desired. Using a marker, draw the edges and places for the cuts in it. Do not make the place for resting your feet (to the left of all pedals) too wide so that the right pedal does not cling to the mat. Cut off any unnecessary parts on the template and trace it onto the carpet material. Make the final adjustment of the accessory to the shape of the bottom of the cabin. Label each pattern so you know which part of the salon it belongs to.
Patterns for sewing car mats (download)
Patterns for EVA rugs or textile analogues are not particularly different. You can download some examples of such templates online. Here are several patterns available for downloading (pattern forcarmats.ru, pattern 2 www.carpet4car.ru). After downloading the files, the patterns for car mats need to be printed in full format on several A4 sheets, cut out and glued.
pattern forcarmats.ru
pattern 2 www.carpet4car.ru
You can try to download electronic patterns for car mats for free from Torrent.
Where to buy patterns for carpets
Companies that deal with components for cars or specifically car mats offer to download patterns for EVA mats or other materials for a small fee, starting from 20 rubles per piece. You can download such patterns in PDF or JPEG format.
There are two ways to replace floor mats in your car: buy new ones or make them yourself. For the second option, you will need a rug template. How to make patterns for car mats yourself, see the video below.
Source
Review of RuEVA.RU
I ordered rugs from the St. Petersburg guys RuEVA.RU. I found out about them thanks to a well-thought-out advertisement, which I saw for quite a long time in various sources. They have 4 studios in St. Petersburg, I ordered at 59 Babushkina Street, building 2. They have a small room there where everything is done turnkey. A caring young man took care of my cars, asked me about details, found out my preferences, and suggested ways to place the mats and their shape. We took into account important little things, for example, whether the gas pedal is pressed all the way and whether the rug is in the way.
Everything in Nissan is pretty standard; we didn’t have to get too creative. But for the bus, the mats turned out to be 100% custom. I was infuriated that dust and dirt from the cabin constantly fell onto the floor of the living area when we walked back and forth. Now, both in the cabin between the seats and immediately after the cabin, mats have been laid in the cabin, which, with their honeycombs, collect this dirt and prevent it from spreading throughout the cabin. This is very cool, it was worth ordering these rugs just for this. So I recommend these mats and RuEVA.RU if you decide to order.
Volkswagen Tiguan 2.0 TDI 4motion › Logbook › DIY pile fabric mats!
I always bought textile carpets on previous cars, I think that Sotra 3D is the best in its class! When the need arose to buy carpets for this car, I was a little taken aback by the price for the Sotra! From RUR 4500 per set!
Recently I got a triple feed sewing machine for working with heavy materials and then I decided to make pile carpets with my own hands! I don’t think it’s justified to spend that kind of money on carpets when you have the opportunity to make them yourself.
What we need for production: 1. Car carpet A) For warm periods of time or with a minimum. Three layers will be enough for your budget! Price quality! The thickness of the material is 6mm (pile 5mm, backing with polyethylene 1mm). According to the manufacturer, it does not allow water to pass through, but this is actually not the case. Still, after some time, water seeps through the carpet. B) For year-round use or winter, the best choice would be thermoplastic rubber with a material thickness of 5-8mm (pile 3-6mm, rubber backing 2mm). For a set of carpets and one lintel, 2 square meters is enough.
2. Tape for edging rugs. Here again there are a lot of options: sling (3-4cm), nubuck tape, Microtex tape, leather tape. The budget option is a sling, at least 4mm is required if you are edging it manually without a special device (you will understand later). The set will require about 17 meters.
3. Threads and needles There are a lot of options for threads, the main requirement is 100% polyester, I don’t recommend taking cheap ones, the machine may simply not sew with them. I consider Synton/Penny to be the optimal price/quality ratio. The edging will be with 20 thread and 120 needle groz-beckert or schmetz (the best in their segment)
4. AV2 clip for VW You need 4 pieces for the front floor mats to secure it to the floor. I didn’t put it back, it’s up to you.
5. Thrust bearing Here again there are two options: Factory made plastic/aluminum ones, or we make them ourselves from carpet. The factory-made thrust pad is optimally suited for thermoplastic rubber carpeting due to its thickness. It will still be a bit thick for a three-layer carpet. I will use both, on two different sets (factory - winter, homemade - summer)
6. Polyethylene film 150-200 microns In order to make precise patterns for future rugs. Requires 3 sq.m.
7. Stationery buttons For fixing the film on the floor of your car
8. Cardboard or thick paper. Necessary for transferring patterns onto hard material.
I bought all the basic materials HERE
I can say with confidence: No one will make the perfect patterns for your car better than you! By trial and error, you can independently determine the ideal geometry of the carpets, specifically for your car!
And so we begin to create a pattern on the driver’s side)))
We cut out a piece of film with a margin, stretching it in place and attaching it to the buttons. The film should sit without any folds, this will affect the future geometry of the rugs. Carefully mark with a marker the border of the future rug. We are doing this work in other places.
Note:
The original fabric and rubber shoes (were installed BEFORE) I hate that they have the foot rest area always open, dirt and water flow onto the factory surface.
And also they are so “averaged” in size that any speck tries to get under the rug) You can say this is what pushed me to create my own carpets. We cut out the pattern from the film and go try it on in our car, adjusting it on the film if necessary. Next, we transfer it to a denser material, for ease of work, again, at any time you can sew any number of mats for YOUR car!
If you are perfectionist No. 1, go and try on the already tight pattern in your car again and make adjustments if necessary!) Next, we unroll our carpet, which is in a roll on the table or floor, lay out the patterns and begin to “assemble the puzzle” so that there is enough space for everyone. No one has canceled space saving.
If you are perfectionist No. 2, go and try on the finished carpet in your car again and make adjustments if necessary!)
Next, we prepare the sewing machine, thread 20 threads, also wind 5-6 bobbins with thread, and install new needles. We take our sling and a piece of unnecessary carpet, and set up the machine on it: stitch 3.5mm, tension closer to the top. We check it carefully again and start sewing.
Having placed the sling on the carpet along the entire circumference, measure the required length with a margin, cut it off and burn it with a lighter so that the sling does not diverge.
This is the first time I’ve done this work, you could say I’ve driven the car for the first time! I don't have a special one. edging for such work and I don’t see any point in buying it yet, manufacturers are robbing people by selling a piece of steel plate for 8-15 rubles! Therefore, I will sew as the situation allows me) We apply a sling to the front side of the carpet and align it flush with the edge of the carpet. We step back from the edge of the workpiece, lower the presser foot, as a result, the right side of the presser foot should be flush with the material, about 0.6-0.7mm. Lower the needle, make a “tack” and start sewing at low speed)
Let it be better for a long time, but with high quality!) Returning to the starting point of sewing, we sew our sling 3-5 cm above the initial one and make a tack. We cut the threads on both sides.
Note:
Initially, you need to decide on the place where to start sewing the ribbon.
This place should be invisible to the eye and preferably in the “middle part” along the side of the material. Next, on all the outer radii of the tape that are sewn to the carpet, you need to make cuts along the entire perimeter of the turns, relieving the “tension” in these places! On the internal turns, on the opposite side of the sling (which we will fold under the rug in the future), it is necessary to make several cuts so that the sling does not move too much and there is no “tension” when the tape is pulled onto the wrong side of the carpet. Also, the cut parts of the sling must be set on fire with a lighter so that the tape does not unravel.
Note:
Before starting the next stage of sewing, check the bottom thread in the bobbin; it may run out at the most crucial moment.
Next, we begin to bend the tape from the front side to the wrong side, check everything in advance and take aim. We start sewing from the same point where we started/stopped. It is also necessary to correctly position the material under the foot with the needle, the correct condition: It is necessary to sew with a needle, between the border of the edged tape and the carpet. The needle should not fall on the tape, but should pass next to it; under such conditions, the edging will have an ideal appearance. Be careful when sewing all turns! Very carefully and slowly! It’s better to practice in advance on a separate piece, cutting out a piece with different turns. Be sure to control the tape from the inside out so that it is always stretched over the workpiece. At the end point, we also sew a couple of cm and make a tack.
We unfold the part and trim off the excess parts at turns and bends, later scorching these places with a lighter. We do all the work with the rest of the workpieces slowly.
Source
Rug woven from shreds
Materials needed for making it yourself:
- thick fabric (carpet base)
- pieces of fabric
- black thread
- needle
- scissors
- fabric glue
- adhesive tape
- spray for protective coating (if desired)
1. Select the size of the carpet and prepare a cloth of the appropriate size.
2. Prepare long strips of fabric. Each strip should be approximately 6-7 cm longer than the main part of the carpet.
3. Prepare several bundles of 3 strips and start braiding. You need several blanks so that you can combine them into one carpet. For convenience, secure the ends of each piece with adhesive tape. Don't weave all the way through - leave some of the fabric unwoven.
4. Apply glue to a thick canvas. No need to skimp on glue.
5. Carefully place the blanks on the canvas so that they stick.
6. Connect all the pieces together using a needle and thread.
7. Remove the duct tape from the ends. Trim the ends so they are even.
The rug is ready!
Tailor's patterns
A pattern is a pattern tool that serves as a template for applying the correct contours to the fabric. It is necessary so that when sewing, all the details of clothing or accessories come together in the correct proportions and sizes.
Tailors use two types of patterns: those with standard curves and those in which the curvature varies. Static patterns are used when drawing typical lines. Patterns with a change in curvature have a movable part, with the help of which the angle and direction of the line changes.
Professional tailors constantly use patterns for sewing clothes or other things (photo: domikpozitiva.com.ua)
Types of patterns used by tailors:
We sew our own car mat
Once you make a pattern for sewing car mats, you can easily sew more than one accessory. With their help, you will make smooth, symmetrical lines, and also save time for creating new rugs when needed.
Materials from which car mats are made:
Often the material is combined to improve the quality and service life of the product.
Methods for taking measurements of car mats
Before sewing a car mat, you need to take measurements from the bottom of the car interior.
First way. Trace the old car mats onto the new material and cut them out.
Making car mats yourself will cost less than buying them (photo: avtokovrik102.ru)
Second way. Take plastic film, lay it on the bottom of the cabin and secure it with pushpins so that the material cannot move. Make changes to the shape of the rugs as desired. Using a marker, draw the edges and places for the cuts in it. Do not make the place for resting your feet (to the left of all pedals) too wide so that the right pedal does not cling to the mat. Cut off any unnecessary parts on the template and trace it onto the carpet material. Make the final adjustment of the accessory to the shape of the bottom of the cabin. Label each pattern so you know which part of the salon it belongs to.
Patterns for sewing car mats (download)
Patterns for EVA rugs or textile analogues are not particularly different. You can download some examples of such templates online. Here are several patterns available for downloading (pattern forcarmats.ru, pattern 2 www.carpet4car.ru). After downloading the files, the patterns for car mats need to be printed in full format on several A4 sheets, cut out and glued.
pattern forcarmats.ru pattern 2 www.carpet4car.ru
You can try to download electronic patterns for car mats for free from Torrent.
Where to buy patterns for carpets
Companies that deal with components for cars or specifically car mats offer to download patterns for EVA mats or other materials for a small fee, starting from 20 rubles per piece. You can download such patterns in PDF or JPEG format.
There are two ways to replace floor mats in your car: buy new ones or make them yourself. For the second option, you will need a rug template. How to make patterns for car mats yourself, see the video below.
Interior arrangement: choosing covers and mats
Car covers and mats are car interior items that make it more cozy and comfortable, protecting it from all kinds of external factors such as dirt, dust, dampness, and so on. It’s hard to disagree with the fact that car mats and covers are very useful and practical things. However, in order for these assistants to be able to fully perform the duties assigned to them, the procedure for selecting them must be approached correctly. In today's article I will tell you how to do it correctly.
Car seat covers serve to protect the car seat upholstery from the above factors, while creating comfortable conditions for the occupants of the cabin. The covers are quite practical and easy to use, have a reliable fastening, and in addition, to clean them you just need to remove them and throw them in the washing machine. A variety of materials are used to make covers, such as leather, fabric, fur, etc.
The most popular and widespread, of course, are fabric versions of covers. Everything is explained by the reasonable price and ease of cleaning. However, they are most suitable for the summer.
The second option is fur covers. These are capable of creating not only comfort, but also provide warmth to their owner, which is why fur covers are usually installed mainly in the autumn-winter period. The disadvantage of such covers is their maintenance.
The third type is leather cases. Thanks to leather covers, you can give the car interior a special look, give it gloss and luxury, and a rich look; in addition, such an interior is very practical; in order to clean it, just arm yourself with a damp cloth or rag. If necessary, the leather interior of the car can be tinted or completely restored, but this will cost a little more. By the way, it should be noted that not only leather is popular, but also expensive alternative options for leather substitutes.
When choosing covers, you should pay due attention to the material, as well as color. Of course, everyone chooses for themselves, as they say: “Based on taste and color...”, however, you should take into account that you will not be in the salon for five or ten minutes, so think carefully before choosing bright red or any some glamorous pink color for the covers. The color should not be very bright; in no case should it distract or irritate. A long stay in the red salon can create discomfort or worsen your well-being. Also avoid overly light colors, no matter what the car is like - there is road, dust, sometimes moisture, dirt, and so on. We cannot exclude the possibility of a breakdown or the need to travel outside the city, for example, to go outdoors, fishing or picking mushrooms.
Next, as for car mats...
Despite the obvious underestimation of these, at first glance, unimportant elements of the car interior, their benefits are more than real. Thanks to car mats, motorists are able to avoid moisture getting on the upholstery and the inside of the body, thereby preventing the possibility of corrosion.
Today, rubber models of car mats . Their advantage is that they are more durable and practical because they do not absorb moisture and are easy to clean. In addition, thanks to the sides, all moisture and dirt remains where it should be. When the snow melts, it remains on the mat; if necessary, you can easily throw it out without spilling a single drop into the interior. When choosing rubber mats, pay attention to the design of the product; if it is too small and complex, it will be much more difficult for you to care for.
Analogues of rubber mats are rag fleecy mats. Undoubtedly, such rugs have a more aesthetic appearance, and in addition, they cope with moisture quite well, although in their own way. Unlike rubber ones, pile and velor ones absorb moisture, but this is their main drawback. Moisture in a car is unacceptable and everyone knows this; wet carpets cause car windows to fog up; in addition, over time, the car begins to smell bad due to dampness and all the ensuing consequences, such as mold, mildew, rotting products, and so on. In addition, the service life of velor or pile mats is very short.
I would recommend choosing combined options that consist of rubber and also have pile on their surface. This combination allows them to cope well with moisture and provide a more aesthetically pleasing appearance to the car interior. And besides, the service life of these is much longer than that of their ordinary rag counterparts. Cleaning such rugs is also not particularly difficult; it is enough to vacuum everything properly, or simply beat it out using a special “beater”.
Looks like we've sorted it out. I hope everything is clear to you, if I missed anything, please add it. Good luck with your selection of floor mats and car covers.
Interior arrangement: choosing covers and mats Please rate this page
Communities › Kulibin Club › Blog › DIY rugs!
Guys, hello everyone! I recently decided to make my own car mats with my own hands. At work I found a piece of car carpet with a waterproof backing. Cut to size and shape. And then the question arose: how to arrange them?! And I came up with the idea of finishing them around the edge with black lace, kind of like overlocking them! To do this, I had to use a punch to punch a million holes around the perimeter of the rug!)))
I made holes every centimeter and a centimeter from the edge.
Let me tell you that it took a whole carload of time!)))
And now the holes are finished!
Then an even more tedious process began: threading the lace through the holes!)))
Each rug took approximately 6 meters of lace! And in order to prevent the rugs from rolling underfoot, I glued regular Velcro to the back side, after sanding the area where it was supposed to be glued!
Well, here is the finished result:
Rugs for the summer! I am very pleased with the result!
Drawing a contour and obtaining a pattern in electronic form
We restore the shape outlined in the red line, obtaining an exact shape in size, but still a rough shape for further processing and obtaining accurate patterns for the rugs.
Rough mold for making patterns
Next, we make adjustments: straight lines and right angles are made straight, parallel lines are made parallel, the “waviness” of the hand-drawn outline is removed, the corner radii are selected, etc., to obtain an accurate and beautiful shape. In fact, the layout is drawn in a graphic editor according to the resulting contour.
Finished outline of the driver's mat
The patterns for the remaining rugs are digitized in the same way. Next, the locations of Velcro, nameplates, and fastenings are noted, and the finished rug patterns are electronically sent to the workshop, where cutting takes place directly on CNC equipment.
Mat patterns in electronic form ready for cutting
What to do if the carpets in your car are slipping
It is important to know! Every motorist should have a universal device for removing scratches on a car of any color. The effect is visible within 10 minutes, and the action of RENUMAX will pleasantly surprise you with its simplicity and effectiveness. Read more >>>
A legal and 100% reliable way to protect yourself from fines. Having familiarized ourselves and carefully studied this method, we decided to offer it to you.
DIY bath mat (36 photos): and you can do it!
Otherwise, the stones will peel off from the base over time.
Soft rug made from old fabrics
Required material:
- scissors
- pieces of old (unnecessary) fabrics, maybe old clothes
- bath mat (with holes)
1. Cut the fabric into small strips
2. Using tweezers or a hook, begin pushing the strips through the holes.
3. Tie all fabric strips with a simple knot.
What is car carpet
Currently, a car is a necessity, a means of transportation, a second home, anything, but not a luxury. They spend a lot of time there, sometimes as much as at home. Therefore, it is necessary to arrange the salon as it is done in an apartment or house, that is, to take maximum care of your own comfort.
It goes without saying that for cleanliness and convenience you have to buy some things. These special items help create the interior of the cabin. It all starts with the covers and ends with the carpet. The use of mats will help protect your car from dirt.
Car carpet is used not only to create an aesthetic appearance of the interior, but also to provide real assistance to the owner. It is designed to protect the floor from erosion, which can occur from moisture and dirt. And this is its most important purpose. The coating is used not only in the cabin, but also in the trunk. It is a pile material with a rubber base.
So, car carpet is used as a floor covering. Different types of rugs are made from it. They are cut out according to pre-prepared patterns for each make of car. This material is used to cover floors in offices and other premises. It gained wide popularity due to its special qualities.
EVA car mats
This type of rugs appeared quite recently. “EVA” is Ethylene Vinyl Acetate, which is a special foam rubber that meets all environmental requirements. The main feature of products of this type is the absence of the usual sides. Their role is played by numerous cells into which sand, water and dirt are clogged. When the mat is tilted at 45 degrees, moisture remains in the cells, so you can safely remove the product from the car without fear that all its contents will spill onto the floor. This feature also applies to how to dry the rug. To do this, simply turn the mat over with the cells facing down and all the water will drain out. After this, you need to wait a little until the product dries. In addition, such mats retain heat well, so they continue to dry even after the engine is turned off.
Carpet characteristics
Carpet made from two-layer and three-layer material is popular among consumers.
Double-layer – has 2 layers. Its structure is as follows: the top layer is a fairly durable pile of synthetic material, and the bottom layer is a rubber coating. Its cost is quite affordable. If such a carpet is made conscientiously, then it will easily cope with the tasks assigned to it.
Three-layer, respectively, includes 3 layers. The top and bottom layers are the same as in a two-layer, but between them there is a waterproof layer or layer of polymers. Such material will certainly protect against negative influences.
Today, it is not difficult to buy the required type of car mats from any manufacturer. It’s rather difficult to imagine a salon without them. When purchasing a car, the owner already thinks about the floor covering. The alternative, of course, is to cut it yourself, but does that make sense?
Types of car mats:
Model - made for a specific individual brand of car. They copy the geometry of the floor without leaving any gaps.
Universal - a simpler option. They cannot be laid as perfectly as the previous ones. And it is clear that they will cost less than model ones.
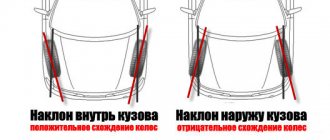
Choice of coverage
To make the right choice of material, you need to approach this issue very carefully:
Firstly, the density of the topcoat is very important. The higher the density, the better. The coating will last longer and will not allow dirt and moisture to pass through longer, because the fibers are well pressed against each other.
Secondly, it is advisable to choose a coating with low pile. It will retain its original appearance longer. While the high pile will fall quickly.
Thirdly, if you are thinking about which carpet to choose? Colored or plain, you need to know that colored will fade faster and lose its original color.
Installing carpet in a car is not so easy. Especially if you do it yourself, without outside help. But, in principle, the process does not take much time.
Replacing the floor covering in a car can be done for completely different reasons. For example, the old carpet has ceased to cope with its responsibilities, or the existing covering is of poor quality.
A high-quality carpet will rid the salon of dirty and wet floors. Having realized the importance and necessity of this material, you can begin installing it yourself, remembering to follow the instructions:
The carpet installation is now complete. If the work was done with your own hands, then you need to think again whether to fix the coating or not. If yes, then you can use glue or double-sided tape.
And also, good advice from seasoned car enthusiasts. Before laying the covering, the floor must be treated with mastic. If there is rust, it is cleaned and treated with an anti-corrosion compound. And this must be done to protect the carpet from damage.
After installing carpet flooring, it’s time to think about the need for rugs. They are easy to make. You can cope with your own efforts and do everything with your own hands.
How to make a rug "French bracelet"
Required material:
- old fabric of 2 colors (you can use old T-shirts). The width of each piece of fabric is 20-25 cm and the length is 3 meters. If you are using old T-shirts, you can join several pieces together with a thread and a needle.
- scissors
- needle and thread
- adhesive tape
1. Arrange 5 strips of different colors in the order in which you want them to look on the future carpet.
2. Next to the 5 laid out strips, place another 5 strips in a mirror image.
3. Take the first strip, in this case the pink one, and tie it as shown in the image. First, fold the fabric to form a number 4.
4. Continue tying the pink strip around the remaining strips until you reach the middle.
5. Start doing the same on the opposite side, tying another pink stripe around the other 4 stripes. Start also with the number 4, but in a mirror image.
6. When the two pink stripes meet in the middle, tie them together.
7. Repeat the same with the subsequent remaining strips. Choose the length of the rug yourself.
8. Start another rug, choosing the same colors. After this, connect both rugs with thread and needle.
Tip: If you wish, you can make one or more similar rugs, which can then be sewn into one large rug.
9. Excess parts can be cut off and the ends secured with thread to prevent them from unraveling.
The process of making rugs
To ensure that the carpets in the car interior lie flat, without bunching or bare areas along the contour, an initial measurement is taken. An old rug is used as a stencil. If it is not available, you will need to take measurements with a tape measure and make an appropriate paper template.
The second stage is to cut out the rugs from the selected material. If the edges turn out to be disheveled, it is recommended to burn them with a lighter or treat them with glue.
The connection between the base and the top can be done using a strong thread, sewing the edges to each other. An adhesive connection is less reliable, but if the rug is not expected to be used for a long time, you can simplify the task by gluing the base and the decorative layer.
Yaroslavl, st. Polushkina Roshcha, 16, workshop 28 Moscow, Rublevskoe highway 48/1 OGRN: 1127606003678 / INN: 7606087683
Almost every car is equipped with floor mats. This element is an important and useful attribute that requires careful care. If you find defects in the carpet covering, you can fix them in the car yourself. Drivers will need to prepare a patch and means to attach it. The procedure is not difficult.
You can repair car mats in the garage with your own hands in a few hours (even if you have no experience in such procedures).
Preparation
Any quality work on making anything begins with thorough preparation. In this case, you need to do the following:
- Measure the floor of the car (and if necessary, the bottom of the trunk).
- Transfer the result obtained to a sheet of Whatman paper (A3 is enough).
Important! It is important to make patterns in advance because you need to know how much material will be needed. The approximate amount of material required for work is 1 m in length and 3 m in width. You can also use old rugs as patterns.
FakeHeader
Comments 15
Hi all. Can anyone help me find EVA (polymer) material the same as for rugs with cells (website) where you can buy a roll or by square meters. Thanks in advance PM.
You need to dust off your feet! I drove with my original pile mats all winter, no problems. And so yes, if from a snowdrift to a salon... Make beautiful pile ones with a rubber backing and put them on the side!
Yes, for a long time they have been selling sets of rubber mats along with fabric ones, that is, you have both rubber troughs and fleecy carpets, which, if desired, can be removed, and only ordinary rubber ones will remain. That’s all, I can’t force myself to buy them; the price in our city is 1600 rubles for almost all car models, either in stock or on order.
In my experience of using shag carpets, they do not need edges. How to make sides? No way, unless there is special equipment and materials. I found an office on the Internet that produces so-called 3D (as this abbreviation is fashionable now...) carpets. They look like the same rubber, molded carpets, but only pile ones. Price tag 2-2.5 thousand rubles. Specialized stores sell office carpeting with medium-length pile; on the reverse side there is rubber with 1-in-1 studs, like on some good automobile ones. There was an idea to buy a linear meter of this, its width is 2 m. It would be enough for the entire interior and trunk, but I couldn’t find it in black. There was, but with white fluff, like gray hair.
Carpet, do you mean carpet?
...the purpose of pile carpets is to absorb moisture...and the rubber component is to prevent it (moisture) from getting onto the carpet..."a rubber bath" is not needed here...
As soon as I remember how much water there was in winter from the snow, I immediately want to make sides.
...well then you'll have to forget about aesthetics...and use boring rubber troughs :)
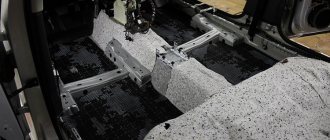
Replacement of floor covering and removal of soundproofing material on VAZ 2108-VAZ 21099
Removal
1) Remove the front seat together with the slides installed on it (instructions are described in the article: “Replacing front seats”)
2) Remove the floor tunnel lining. (explained point by point in the note: “Replacing the floor covering”)
3) Using a screwdriver on both sides, pry out the decorative plugs covering the seat belt bracket lower mounting bolts.
4) After removing the plugs, unscrew the two belt mounting bolts on each side.
5) Remove the brackets from both sides, taking them out together with the unscrewed mounting bolts.
Note! There is a metal sleeve on the bolts, be careful not to lose it!
6) Next, unscrew the 2 screws securing the middle pad to the stand and remove the pad.
7) Now move to the side front doors. On each side, unscrew the three screws securing the upper sill trims.
 Remove the screws from the car.
9) Using a screwdriver, remove the four screws securing the front lower sill panels.
10) Remove the covers from the machine.
11) Go to the rear doors of the car and use a screwdriver to remove three screws at the rear sills on each side.
10) Remove the pads and use your hand to pick up the carpet, lift it up and remove it.
Note! There is sound insulation below the carpets - if necessary, replace it with a new one.
Installation
This is done in the reverse order of removal, taking into account the following nuances:
1) Check the sound insulation for moisture, dry if necessary.
2) You must begin installing the sill overlays in the following order: lower – upper – middle overlays.
3) There is no need to tighten the cover screws too much to avoid damage.
Share on social media networks:
Car enthusiasts like it when the interior of their “iron horse” is decorated beautifully and unusually. It turns out that you can make your own car mats with your own hands. If you do everything correctly, you will reliably protect the car interior from snow in winter and dirt in rainy times. Externally, such rugs will look no worse than store-bought ones, and their working life is longer than that of factory ones. So, how to make car mats with your own hands? The procedure will be as follows.
Carpet characteristics
Carpet made from two-layer and three-layer material is popular among consumers.
Double-layer – has 2 layers. Its structure is as follows: the top layer is a fairly durable pile of synthetic material, and the bottom layer is a rubber coating. Its cost is quite affordable. If such a carpet is made conscientiously, then it will easily cope with the tasks assigned to it.
Three-layer, respectively, includes 3 layers. The top and bottom layers are the same as in a two-layer, but between them there is a waterproof layer or layer of polymers. Such material will certainly protect against negative influences.
Today, it is not difficult to buy the required type of car mats from any manufacturer. It’s rather difficult to imagine a salon without them. When purchasing a car, the owner already thinks about the floor covering. The alternative, of course, is to cut it yourself, but does that make sense?
Types of car mats:
Model - made for a specific individual brand of car. They copy the geometry of the floor without leaving any gaps.
Universal - a simpler option. They cannot be laid as perfectly as the previous ones. And it is clear that they will cost less than model ones.
Possible difficulties and disadvantages of this method
So, difficulties may arise if your vehicle has a “complex” floor, or if you want to make it with sides. In the first case, the rug will have to be bent. If you really need it, then use a hair dryer.
EVA reacts well to a hair dryer. Therefore, the mat can be heated, shaped into the desired shape, and then allowed to cool. The product will keep the shape you specified.
As a disadvantage, we can highlight the fact that a homemade rug will not have an edging. However, we don’t lose much from this, and handmade products are 2 or even 3 times cheaper than purchased ones.
There is no need to worry that without edging, the rugs will begin to deteriorate. Foamed polymer is a fairly wear-resistant material, so it will not collapse at the edges.
But if this doesn’t convince you, and you still want rugs with edging, that’s your right. We buy a needle, strong threads and textile tape. With a little time and effort invested, you will get what you wanted.
Choice of coverage
To make the right choice of material, you need to approach this issue very carefully:
Firstly, the density of the topcoat is very important. The higher the density, the better. The coating will last longer and will not allow dirt and moisture to pass through longer, because the fibers are well pressed against each other.
Secondly, it is advisable to choose a coating with low pile. It will retain its original appearance longer. While the high pile will fall quickly.
Thirdly, if you are thinking about which carpet to choose? Colored or plain, you need to know that colored will fade faster and lose its original color.
Installing carpet in a car is not so easy. Especially if you do it yourself, without outside help. But, in principle, the process does not take much time.
Replacing the floor covering in a car can be done for completely different reasons. For example, the old carpet has ceased to cope with its responsibilities, or the existing covering is of poor quality.
A high-quality carpet will rid the salon of dirty and wet floors. Having realized the importance and necessity of this material, you can begin installing it yourself, remembering to follow the instructions:
The carpet installation is now complete. If the work was done with your own hands, then you need to think again whether to fix the coating or not. If yes, then you can use glue or double-sided tape.
And also, good advice from seasoned car enthusiasts. Before laying the covering, the floor must be treated with mastic. If there is rust, it is cleaned and treated with an anti-corrosion compound. And this must be done to protect the carpet from damage.
After installing carpet flooring, it’s time to think about the need for rugs. They are easy to make. You can cope with your own efforts and do everything with your own hands.
Repair of fabric rugs
Repair of pile (and fabric) products follows a similar method, but with the exception of the use of glue. Experts and advanced drivers recommend applying a special pattern using a sewing machine. This is a more reliable and aesthetic way.
After completing the entire procedure, be sure to take it for a test drive. In dry weather, pour a special amount of water into the carpets. If after driving for 24 hours the product retains liquid, then the repair was carried out professionally. In case of leaks, it is necessary to remove the patch and then do the procedure all over again. It is better to detect defects immediately than during heavy rains and snowfalls.
Now you know how to repair rubber and fabric mats for any model and make of car with your own hands. Investments are minimal: purchase of glue and patches, and if the rugs are fabric, then plus a patch. Most car enthusiasts usually already have all the materials in the garage.