Until recently, the domestic giant of the automotive segment AvtoVAZ did not apply the practice of installing a multimedia complex in its own models, including the LADA Vesta. But the situation has changed, and the devices have become exquisite attributes that decorate the interior. Unlike MMC versions, which are widespread in foreign cars, such devices in products of domestic origin can be flashed at the request of the LADA Vesta owner. Updating the MMS for the Lada Vesta audio complex is not always successful.
Assembling the radio requires the presence of the following components:
- seven-inch panel with touch technology;
- switching output with a USB connector;
- slots for integrating SD media;
- Bluetooth module, etc.
How to flash MMS on Lada Vesta
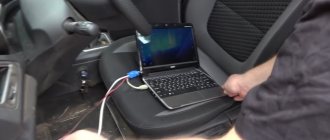
To change the mms firmware, you will need a memory card with a fat 32 file configuration. The car owner will need to follow the procedure:
- Extract the firmware from the archive, install the file on the memory card;
- Install the card into the car radio;
- Click arrow key 1;
- A menu will appear on the monitor in which you need to click one by one on four items indicated by arrows. The interval between the points and the edge is at least half a centimeter;
- A new list of operations appears on the monitor. From the available keys, click “software”;
- After clicking, the menu opens again. Select “sw upgrade”;
- From the new list, select “upgrade”;
- Select one of the options: update radio, update navi, update os;
- Click ok.
During installation, it is prohibited to press control panel keys, turn off the ignition, or disconnect the power supply. After the update is completed, click the ok button again. Installation completed successfully.
Description
Kan Panel for MMC Lada Vesta (without menu skin).
- Allows you to display car tire data on the screen, read CSUD errors and reset them, for VAZ 21129, 21179 engines
- Turn on the engine cooling fan at the temperature you set
- View video in motion (now this item can be configured in the channel panel).
- Also, when installing the panel, you get an automatic dimming of the MMC screen when you turn on the low beam headlights.
- Two screensavers in the form of an on-board computer and a screensaver with a clock and date on a black background for comfortable movement at night.
- Constant synchronization of time, date, day of the week via GPS when the CAN PANEL is operating (setting the time on the MMC is no longer required, even after disconnecting the battery)
Basic principles of successful MMS firmware in Lada Vesta
— select the software as specified by the manufacturer;
— use the official version of the software;
— download files from an official car dealer;
- act according to instructions, follow the queue in actions;
— wait until the end, do not interrupt the process;
— do not touch the keys during reboot, do not turn off the power;
— if you are not sure that you can perform the procedure yourself, contact the service center.
Remember that the official dealer is not responsible for errors caused by unsuccessfully performing the procedure on your own, and will not correct defects under warranty service.
Tips for selecting and installing a speaker system
For better surround sound, it is recommended to use a two-component system. These speakers use both a high-frequency tweeter and a mid-bass speaker. With their help, you can competently arrange the sound stage. It is recommended to install such speakers in the front. A coaxial speaker system is installed at the rear, which is used to complement the front speakers. Installing tweeters will require additional wiring.
Tweeters are best mounted in the triangle of the rear view mirror. If such a scheme seems too expensive, you can get by with a cheaper coaxial speaker system. In all cases, no additional adjustments are required, with the exception of adjusting the equalizer.
Even a beginner can install sound systems on Lada Vesta cars. It is enough to follow just a few simple rules:
dismantling work should be carried out as carefully and accurately as possible so as not to damage the plastic casing; the manufacturer has already taken care of the audio preparation, so there is no need to connect and install the connectors yourself; It is impossible to cut off standard pads if they do not fit the new radio; it is better to purchase a special adapter. Flashing a multimedia system should only be done as a last resort.
It is better to entrust this procedure to specialists or contact the service center of an authorized dealer
Flashing a multimedia system should only be done as a last resort. It is better to entrust this procedure to specialists or contact the service center of an authorized dealer.
Updating maps using the utility
Required
: Windows version no lower than Windows 7, CityGID version no lower than 7.9, utility
Attention
: The utility is at the beta stage.
1. Unpack the archive and run the executable file wince_uploader_vesta.exe if you want to update maps for LADA Vesta or wince_uploader_vaz.exe if the update is necessary for other LADA models. 2. Insert any SD card you already use (or will use) to update the maps. 3. Click the Auto Detect button.
4. Check the countries you want to add, uncheck the countries you want to remove, leave the check mark on the countries you want to update.
5. Start the map update process on the SD card and wait for it to complete.
6. If there are no updates, the message “No updates found” will appear.
7. If the process ends with the message “Completed, insert the SD card into the MMC and start the update,” you can exit the program, remove the SD card and go directly to updating the maps in the car.
8. After the process is completed, the Updates directory will appear on the SD card with all the data necessary to update the cards in the MMC. Insert the SD card into the MMC and start updating the maps (2) (optionally, you can delete all maps before updating (1) if you changed the set of maps when using the utility - for example, unchecked some countries and regions).
Key words: cassette player Lada Vesta
USB, SD card and supported file formats
The file system of the connected device must comply with the FAT16 version (2 GB). The maximum number of primary partitions should be no more than 4. Each external media connected to the MMC should contain no more than 1024 files and 256 folders (including root directories).
MMC Vesta supports SD cards, which its closest competitors do not:
- SDHC up to 32 GB;
- SD up to 4 GB;
- USB 2.0 up to 64 GB;
- USB 3.0 up to 64 GB (with USB 2.0 support).
The manufacturer warns that the more files/folders on the media, the longer the files will take to download. It is recommended to use external media that contains only audio files, images and video files.
It is strictly forbidden to place files with the extension *.bin in the root directory of external media, as this may lead to the inoperability of the MMC and loss of warranty. In other words, “Firmware”.
- The video file parameters should be as follows:
- resolution 320x240px;
- video codec WMV3;
- WMA audio codec;
- frame rate 25 fps;
- video stream speed (bitrate) no more than 750 kbit/s;
- audio sampling frequency 44100 Hz;
- audio stream speed (bitrate) 128 kbit/s.
To convert video files, AvtoVAZ recommends using the free video converter Freemake Video Converter.
An important note in the operation of the radio: photo and video files are played back in the order in which they were recorded. Therefore, the playback order may not match the input order specified by the user
Instructions for updating the MMC system software
You will need: SD card with FAT32 file system (with standard cluster size).
Procedure:
- Unzip the firmware to the root of the SD card and insert it into the radio (OMMN).
- Enable OMMN
- Press the arrow button “1”
- In the menu that opens, click sequentially on the 4 points indicated by the arrows, stepping back from the edge of the window about 5 mm
- In the menu that opens, press the “SOFTWARE” button
- In the menu that opens, press the “SW UPGRADE” button
- In the menu that opens, press the “UPGRADE” button
- In the menu that opens, select: Update Radio, Update Navi, Update OS (for firmware 27.0.0.4119 you need to select all items).
- Then click the "OK" button
The update process will start. During the update, OMMN will reboot several times. Please wait until the update is completed! Do not turn off the power supply, turn off the vehicle's ignition, or press any buttons during the update. Once the update is complete, click "OK".
Let us remind you that we previously told you how to flash a Vesta radio using a programmer.
Found an error? Select it and press Ctrl Enter..
- AvtoVAZ will have a logistics complex in the Tver region
- Spare parts catalog for Lada Granta (sedan and liftback)
- Refinement of the hood seal of the Lada Vesta
- How to remove the instrument panel on Niva 4x4 (VAZ 2121, VAZ 2131)
Replacing the standard audio system
- 7010B and 7023B. Radio tape recorder made in China. The cheapest option will cost about 3 thousand rubles. Equipped with a 7-inch screen with a resolution of up to 800x480 and 1 GB memory. Runs under Windows CE OS.
- 7021G. Operated by Windows CE 6 OS. Seven-inch screen with a resolution of 800x480, F1C500TM processor. Estimated price – 4-5 thousand rubles.
- RK-A701. Chinese radio, 7-inch screen with a resolution of 1028x600, 4-core RK3188 processor, 1 GB of memory, OS – Android 5. Price – up to 8 thousand rubles.
- AD-UNI707. Manufacturer – China, OS – Android 6, seven-inch touch screen resolution – 1024×600, 2 GB of memory, processor – AllWinner Quad Core T3. Cost – up to 13 thousand rubles.
- Prology DNU-2630. The 6.2-inch screen with a resolution of 800x480 has high operating speed and excellent sound. The average price is no more than 13 thousand rubles.
- MEKEDE MKD. Radio tape recorder on the Android operating system, eight-inch touch screen with a resolution of 1024x600, memory capacity - 2 GB, cost - 16 thousand rubles.
- NaviPilot DROID4. 8-inch touch screen, resolution – 1024x600, memory – 2 GB, cost – 28 thousand rubles.
DVM 2117IQ. Equipped with a solid ARM11 600MHz processor, 8-inch touch screen and Windows operating system. At a price of more than 30 thousand rubles - only 256 MB of memory, screen resolution - 800x400.
To install any radio on the Lada Vesta, you will need an adapter frame for a 2DIN radio. You can buy it at any auto store.
Installing a standard radio
The depth of the standard seat for the MMC is 150 mm. If the dimensions of the new radio exceed this figure, then using a hacksaw blade or any other similar tool you will need to cut down the mount in the dashboard. The manufacturer has prepared all the wire blocks for connection in advance.
To install the multimedia system, you need to remove the plastic blanking strip from the dashboard. Immediately behind it are the ISO, USB, AUX connectors, as well as Fakra – connecting the radio antenna. Next, a standard MMC or any 1DIN radio is inserted into the hole. Things are more complicated with the installation of 2DIN media systems - you cannot do without modifications.
Installing an alternative MMC
First you need to carefully inspect the seat. In most cases, the installation of a 2DIN radio on the Lada Vesta will be prevented by a plastic partition in the depth. This partition must be removed.
INSTALLING THE LADA VESTA RADIO LADA VESTA on Android MMC Android 6.0.1
To do this, you can use a file and sandpaper to level the surface. From the standard plug you may only need a frame with which to adjust the width. For connection, a standard ISO connector is used, which is available on all Vesta trim levels. Next, you need to turn on the radio and check the operation of the modes. In addition to the new audio system, it is recommended to install speakers in the door cards. The process will not take much time.
Problems after flashing
After the manipulations have been carried out, it may happen that the MMS firmware will not function, and the radio in the Lada Vesta will go into “freeze” mode.
Next, we present an action algorithm that allows you to correct the unpleasant situation that has arisen.
- First, make sure that the USB port is free.
- Now we try to disconnect the device from the power supply by removing the terminals from the battery terminals. We wait a few minutes, about 10-15.
- After completing the creation of a zero file in the USB root, named explorer.txt, we resort to rebooting the device. We expect the desktop to appear on the display.
Firmware for the standard Lada radio can not only help optimal performance, but also cause harm.
Installing the update
Several problems that may arise.
After modification, the car's multimedia firmware may not load and may freeze on the logo. The following steps will help you deal with this problem:
- First you need to make sure that the USB port is not in use;
- Next, you need to try to turn off the power from the radio by removing the battery terminal for five to ten minutes;
- Finally, after an empty file called explorer.txt is created in the USB root, we reboot the multimedia. The desktop should appear on the touchpad.
Additional help includes formatting the SD card into a different file system, as well as a new flashing of the Lada Vesta multimedia into normal mode with a different card.
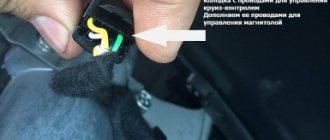
Key Features and Controls
The Lada Vesta radio is located in the standard central location of the dashboard. Main controls and information transmission:
- radio button;
- monochrome display;
- functional music control buttons (previous/next track);
- MUTE mutes the sound;
- SCAN combines several functions;
- DISP – clock display;
- RADIO, AUDIO – switching the radio to radio broadcasting modes and playing music media;
- buttons numbered 1 to 6 are responsible for switching radio stations and other functions;
- multifunctional rotating washer;
- buttons to start and end a call using the Hands free function;
- RESET resets the current settings and reboots the system;
- microphone;
- SD card slot;
- The AUX connector is designed to connect an external sound source to the audio system;
- The USB connector allows you to connect external devices (mobile phone, MP3 player).
Head unit Lada Vesta
Setting up the radio
The radio receiver of the standard radio operates in three frequency ranges: FM, AM and VHF. To make it easier to search for radio stations, the radio panel has six buttons, each of which can be assigned a specific radio station. For the FM band, you can store up to 18 stations. The search is carried out both manually and automatically.
Audio system functionality
The Lada Vesta car radio works together with four factory speakers installed inside the car. The device menu pleases with a solid number of settings. In addition to several equalizer modes, you can choose how to play tracks: in order, scattered within one folder or all folders, repeat track, repeat folder.
Hands free system
Thanks to the built-in Bluetooth, the Lada Vesta audio system can operate in telephone mode, which allows the driver to receive incoming calls without being distracted from the road. When you press the button with the green handset, the hands-free mode is activated and finds nearby mobile phones with bluetooth enabled. Then the radio displays a password that must be entered on the phone. To disable this mode, just click on the “red tube”.
Updated firmware for Vesta is already on sale
Car enthusiasts focus on some inaccuracies in the operation of the car’s multimedia system. This is due to the monitor fading spontaneously, or when connecting a smartphone. Users of the system note a change in sound strength. To eliminate unpleasant phenomena, an update is necessary.
AvtoVAZ offers a modified version of the software, when used, there are no freezes or interruptions. This version includes the ability to analyze the rear view camera image.
The multimedia system is designed for the comfort of car operation. Over time, the system may malfunction and errors may occur. This means a software update is required. Vesta owners can do it themselves or by contacting official dealers. The kit of each version contains instructions with a detailed description of the functions, capabilities of the program and the rules for its installation and operation.
Car radio 1DIN Pioneer MVH-29BT (short chassis, USB receiver, bluetooth) Article number: 99999000410019
Recommended price: RUB 12,233
Car diskless receiver with RDS tuner, Bluetooth, USB, AUX and FLAC support.
Car radio 1DIN Pioneer DEH-3900BT (CD/USB receiver, bluetooth) Article number: 99999000110519
Recommended price: RUB 7,679
CD receiver with Bluetooth, AM/FM tuner, USB, Aux input, support for iPod/iPhone and Android smartphones.
Passive cabinet subwoofer Pioneer TS-WX254, maximum power 1100W (345*325*365) Article number: 99999002544602
Recommended price: RUB 7,908
Passive cabinet subwoofer TS-WX254 (1100 W).
Combo device 3 in 1 ACV GX-7000 Article: 99999000700016
Recommended price: RUB 15,868
A combo device with improved functionality and an ergonomic design.
Hidden video recorder AVILINE DVR-B Article: 99999000001717
Recommended price: RUB 17,522
Hidden stationary installation device with the highest recording quality, rotating display and triple theft protection.
On Lada Vesta multimedia systems (MMS), CityGID is used as navigation software. If you update cards according to standard instructions, the process may take up to 30 minutes. However, it is possible to install cards in a simpler way, which may be much faster and more convenient for you.
Yandex Auto price for Lada Vesta
The cost of the system is 29,900 ₽. But there is a special price for Sberbank clients: from 1081 rubles per month.
What do you get for this amount without additional payment:
- Delivery and installation
- Six months of subscription to Yandex.Music
- Six months of free internet
How does the multimedia system work?
Voice control is one of the main features. Also interesting is the typical Yandex interface, which is maximally adapted to the psychology of users. You won’t need to get used to the Yandex.Auto multimedia system for Lada Vesta for a long time, since it is built like widgets from a computer desktop. It is possible that you run several applications at once that work simultaneously without problems.
Which voice assistant do you think is the best?
AliceSiri
The main thing that captivates us about the Yandex.Auto system is the emphasis on the convenience of drivers. It is for them that the development was made. Let's look at the main functions and services built into the on-board computer.
Navigator
Allows you to see the optimal routes on a large screen. You won't have to strain to figure out where to go and ask the neighbor on the right for help. The system takes into account traffic jams and even repair work. It warns about the presence of cameras and road signs. Read more about the features of Yandex.Navigator.
Voice control with Alice
The well-known assistant Alice is a convenient alternative to managing services. Previously, it was necessary to take your attention from the road and adjust the necessary functions manually, which to some extent created the risk of an accident. Now it will be enough to give the voice command “Listen, Alice” and interact with the robot as quickly as possible. For example, you can dictate an address, give a command (find the nearest gas station or parking), or search for something on the Internet.
Music and radio
Convenient tuning of music and radio stations. It is even possible to select it to suit the mood or style of a certain era.
For everything to work well, you need an Internet connection, but routes can be easily built without it. You can always connect from your mobile device. However, in the future, in some cases, routers will be built in during production. Updates are downloaded while driving on the road.
Transfer route from phone
You can create a route in Navigator on the way to the car. To do this you need to use your mobile device. The display will show it immediately after you start the car.
See where the car is parked
If the car was left far from the place where you were going, it doesn’t matter. Searches will no longer waste precious time. The app will tell you where the vehicle is located.
Open a window or trunk
If you don’t want or have the ability to get the keys, give a voice command to Alice or use the corresponding function of your smartphone.
Start the engine from a distance
To save time on warming up your car in winter, you can now start the engine right from home while you're still getting ready to go out. However, the function is relevant at any time of the year. Cooling or heating is done via a smartphone and the Station.
Pay the parking fee
Yandex.Auto eliminated the need to worry about paying for parking. The system fully automates the process, accurately determining the location, price and writing off the required amount.
Find out about evacuation
If the car begins to be towed or moves for some reason, the system will send a corresponding notification.
Pay for refueling
Paying for fuel at gas stations has also become easier. This is especially nice in cold or rainy times, since you don't even have to leave the vehicle.
Determine location without GPS
If there is no signal, Yandex.Auto will not stop “understanding” the location of the car. The data will come directly from the wheels.
MMS modes
The multimedia complex involves the use of the following modes:
- "Radio". Allows you to receive and play radio signals, search for radio stations with an automatic memorization function for up to 8 positions. Displays the current radio station on the screen.
- "Audio". Intuitive audio player that plays audio files through 6 speakers. There is an equalizer with the ability to select presets or customize it yourself. Audio files can be played via Bluetooth from an external device, but in this case information about the file being played is not displayed on the screen. Supported formats: MP3 up to 320 kbps, WMA up to 320 kbps, WAV up to 24 bits and FLAC.
- "Video". To view videos, you will need a converter. Video files must meet the following requirements:
- AVI with a frame rate of up to 30 frames per second and a resolution of no more than 720x536;
- MP4 with a resolution of no more than 1920x1080, frame rate up to 30;
- MOV with support for standard codecs;
- MKV with support for standard codecs, frame rate up to 30 and resolution 1920x1080.
- "Photo". For viewing photos, the radio screen in the car is not the best option. But if necessary, you can view images in most formats.
- "Telephone". Used for hands-free phone calls via speakerphone. You first need to synchronize your smartphone with the system and download the phone book.
- "Navigation". Movement according to maps and according to the guidance of the navigation program "CityGID 7". Allows you to install third-party cards. Disadvantages include the lack of image rotation, the inability to download maps online, the lack of construction of alternative routes, it does not show traffic jams over long distances, and there is no satellite view.
Additionally, it is possible to use the “Rear View Camera” mode. When you engage reverse, it is activated automatically with a slight decrease in the radio volume. For the convenience of reverse parking, markings appear on the screen allowing you to see the distance to the obstacle. The green dotted line corresponds to a distance of 4 and a half meters from the rear bumper. The yellow line is one and a half meters, and the red line is 30-40 cm.
Navigators
The standard MMS is equipped with the CityGuide navigator. Flashing allows you to change the navigation system. Vesta owners download Yandex.Maps or install Navitel. The first option is more difficult, since Yandex programs do not work with Windows CE installed on the MMS.
CityGuide, ways to update the navigator on Vesta
CityGuide 7 allows you to download maps from third-party manufacturers. You can update the navigator on Vesta via SD media. Among the functions of CityGuide: changing the angle of the map, zooming, silent mode. You can set a route in the search bar, by address and coordinates, or by manually placing a point. The route history is saved, several trajectories can be added to “Favorites”.
The City navigator is convenient, but there are some disadvantages:
- the card cannot be rotated manually;
- there is no satellite browser;
- no online maps;
- The navigator does not offer alternative driving directions.
Drivers note difficulties in assessing the real size of a traffic jam: only a small section of the route is shown on the screen. It is difficult to plan a route in advance and avoid traffic jams. CityGuide navigation updates for the Lada Vesta are released regularly. We can hope that the developers will fix these shortcomings soon.
How to install Navitel on standard MMS
You can install the offline version of the Navitel navigator on Vesta for free. Before installing Navitel Navigator, you need to make sure that AppLauncher is present on the MMC. This utility launches third-party applications.
To install Navitel on the Lada Vesta MMC, the navigation program itself, maps of the required countries and the latest version of speedcam files are loaded onto the SD drive. The amount of information must be less than 5 GB: it no longer fits in the internal memory of the car radio.
From external media, the Navitel and NavitelContent folders are transferred to the MMC. To launch the navigator, a shortcut is placed on the desktop.
You can install the official version of Navitel. Then the navigator will work online. In a specialized service, the price of the service starts from 500 rubles.
Setting up Yandex.Maps
You won't be able to download maps from the official Yandex website. You can find a hacked program. The CAB format utility is installed from SD media. Yandex.Maps can be launched via AppLauncher or from a shortcut on the main MMS desktop.
Starting from 2022, the Yandex.Auto multimedia system can be installed on Vesta independently. This will cost the owner almost 30 thousand rubles. AvtoVAZ has not yet given any official statements about which cars the system will be standard on.
Owner reviews about MMC Vesta
Roman, Izhevsk: “Compared to the basic version, the price is somewhat high, but the comfort and driving pleasure are much greater.”
Boris, Novosibirsk: “AvtoVAZ” really unexpectedly demonstrates progress in the domestic automotive industry. The multimedia system only confirms this and keeps the high bar set by the plant’s new flagship.”
Timofey, Kazan: “Instead of the factory radio, it was decided to install a cheaper one from China. It is more functional, convenient and practical. One problem - I thought all the connectors were the same, I had to spend a lot of time searching and buying adapters, and the space for the radio had to be modified. Some people don’t like China, but for me it’s a good alternative at an affordable price.”
The multimedia system can rightfully be called a breakthrough for a domestic car. It is far from ideal, it has many shortcomings, but the constant updating is encouraging - the system is being finalized and improved. Perhaps car enthusiasts will see something completely new in the next generation of VAZ cars.
To restore, follow these steps:
- Place the firmware files on the memory card;
- Install the card in the Lada Vesta multimedia device;
- Dismantle and disassemble the device;
- Connect suitable wires to the connector;
- Connect to the adapter;
- Activate the software, set the settings in accordance with the personal com port;
- Click “open”;
- In the software frame, press and hold the spacebar;
- Next, activate the Lada Vesta multimedia;
- A list of available actions appears on the monitor;
- Select item number four: update image from sd/mmccard;
- Then select the first item and wait for the recovery to complete.
Displaying the phone screen on MMS
EasyConnected or EasyLink is a program that allows you to display the screen of an Android smartphone on an MMC (the phone must be connected to the MMC via USB).
How to start EasyConnected
- Allow installation of third-party software: Settings {amp}gt; Security{amp}gt; Unknown sources. Allow installation of applications from unknown sources.
- Become a "developer": Settings {amp}gt; About the device {amp}gt; Build number. Click on this menu many times.
- In the “for developers” menu, enable USB debugging.
- Install the application EasyConnected_V4.6.1.apk.
Powerful audio player
SinglePlayer is a powerful audio player for consoles running WINCE 6.0. Made for an alternative shell for SingleMenu and NewMenu.
Using an audio player will make the sound more interesting (there is an equalizer). The player also has an Internet radio (an access point can be made using a smartphone). You can also listen to radio stations on your smartphone and transmit them to MMS via bluetooth.
- High performance and speed - Finger-oriented - Powerful design engine, allows you to create any skins - 13-band equalizer. Fine-tuning equalizer parameters. - Effects: reverb, echo, horror, flanger, tempo, pitch, compressor, distortion, phaser, freeverb, autowah. Fine-tuning effects. - Filters: high, low, bandpass, peakingEQ, notch. Fine-tuning filters. - Anti-banner corrector - Full playlist (adding, moving, sorting, deleting from disk, playback, navigation, cleaning) - Track search, allows you to search for tracks in the current or all playlists, in titles and tags.
- Built-in keyboard, supports up to 10 layouts. - Play queue, allows you to create a list of tracks that will play regardless of the playlist. - Supports multiple playlists, up to 20 - Supports id3v1, id3v2, vorbis(flac) tags - Rewinding tracks - Favorite tracks in playlist - Favorite tracks in a separate folder - Switching playback of tracks by album - Multiple selection of directories and tracks to add to a playlist - Saving the position and track number for each playlist and automatic playback when switching to the desired playlist - Swipes through Explorer and playlist - Search for USB drives and fast playback of their contents - Playing mp3, flac, wav, ogg, aiff, m4a (aac, alac), mpc formats - Outputting the album cover and Internet radio logo in the screensaver/player - Adding one track, directory, subdirectories to the playlist.
- Sorting the playlist using the quick sort method - Saving the position of the track when exiting - Playing tracks scattered, in a row, one track - Playing playlists scattered or in sequence - Removing a track immediately from the disk - Internet radio - Smooth sound fading when you stop playback and increasing at the start of playback - Fast and convenient navigation through the file system, displaying files and folders in a grid or list - Playing tracks according to the set genre in the equalizer. The genre is read from the tags and if it matches the current equalizer style, it is played. - Automatic adjustment of the equalizer to the track genre - Output of visualization, in the form of a Spectrum, in the splash screen and the main window of the player - Support for skins (set via the menu) - Display of processor load - Broadcasting and receiving control messages
FakeHeader
Comments 51
I mean, I have a cool firmware, but I'm wondering about installing it
You're right, they are only similar in appearance, as far as I know the firmware and hardware are different
Hello, what will happen if you install Grant firmware on the West?
99.9% that she will become a brick
Got it. EasyConnected works with Android 6.
I just came to this myself...
Got it. EasyConnected works with Android 6.
what did I do it doesn’t load
EasyConnected 1. Install 2 files on your smartphone. 2. Allow USB debugging on the smartphone 3. Connect the smartphone and the MMC with a cord. 4. Give permissions on the smartphone (all sorts of windows pop up) 5. To transmit sound to the MMS, you need a BT connection or an AUX cable. With a BT connection there is a delay in sound when watching a video.
Until recently, the domestic giant of the automotive segment AvtoVAZ did not apply the practice of installing a multimedia complex in its own models, including the LADA Vesta. But the situation has changed, and the devices have become exquisite attributes that decorate the interior. Unlike MMC versions, which are widespread in foreign cars, such devices in products of domestic origin can be flashed at the request of the LADA Vesta owner. Updating the MMS for the Lada Vesta audio complex is not always successful.
Assembling the radio requires the presence of the following components:
- seven-inch panel with touch technology;
- switching output with a USB connector;
- slots for integrating SD media;
- Bluetooth module, etc.
Several ways to get directions
As in other navigation systems, the route in CityGuide is laid from the starting point to the finishing point. It is compiled taking into account the shortest and most convenient route, and also allows the driver to make his own adjustments if he needs to stop at a gas station, store or any other place along the way.
You can get directions using one of the following methods:
- By typing the name of a street or locality into the search bar;
- By selecting the name of the starting and finishing point from the list in the search;
- By pointing at a point on the touch screen by pressing your finger;
- Using history data (if you've been down this path before).