I have been using the cruise for the third month now - the perfect smoothness of the ride and precise adherence to the speed limit (108 km/h highway, 128 Ring Road) delight me, my passengers and my wallet.
I wanted to install cruise even before buying the car) At that time, the Comfort-Multimedia package was not on sale, and the toad animal did not allow me to overpay for 16-wheel drive, heated windows and other features I didn’t need. It whispered in my ear - “it’s a shame that no one has set up a cruise yet, this is probably a one-two task, set a couple of buttons and go!” It turned out, not really... So, how it was: I started with these reports. www.drive2.ru/l/10378423/ Everything seems to be fine, only a case is described when the equipment is luxury. And there really is a freebie) Here is a description for comfort and classics: xn--80aal0a.xn--80asehdb/…a-klassik-i-komfort.html# Everything would be fine, but there are not enough details. I will try to supplement it myself and outline the missed subtleties that I had to solve during the process. Well, here people are also actively discussing the process, some useful thoughts came from there, but there are also a lot of useless ones - www.lada-vesta.net/showthread.php?t=813
Preparation step by step: 1. Buy a multifunction steering wheel 8450006832, 5000 RUR. 2. Buy a steering column switch - 8450006924, 8000 rub. Moreover, from there you will only need to take a penny snail, which fundamentally differs from ours in several wires! Scheise! 3. Buy wires - I used a 6x0.22 mm2 network cable. To the radio you need 5 wires less than a meter long, to the ECU you need 3 - I ran all 6, two of them. This is not the best choice - it is better to take 3 slightly thicker wires (up to 1mm). 4. Buy any compact connector with 10-12 contacts (You’re unlikely to find the original 1379662 TE, so here’s lifehack where to get it) 5. BLS contacts for the ECU, like these: sklep.avt.pl/media/produc…big_BLT. jpg?lm=1450095426 6. Mini-ISO C3 connector blue 7. Electrical tape, heat shrink tube, soldering iron (optional) 8. Warm season or garage. I did it at 0 degrees outside – BRRRRRR!
Working step by step:
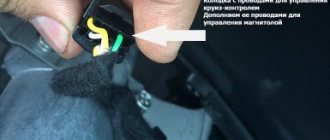
1. Remove the steering wheel with the wheels in a strictly straight position. 2. Remove the old steering column switch 3. Replace the snail on it - the rotation sensor and levers will all remain the same. You need to be very careful with the rotation sensor and snail. The first one is afraid of blows, and the snail cannot be twisted. If you do twist it, then: from lock to lock it makes about 6 turns - check that you have the same number, turn it three times and fix it that way. 4. Next, you need to insert a connector into the cochlea from the back side, from which the wires will go to the ECU and radio (see diagram). So far no one seems to have been able to find it (1379662 TE), so people suggest using separate BLS pins or 2 BLS-6 connectors. The first option is bad because it may not hold tightly, the second is even worse - you can actually bend and break the pins, because their distance is not the same. In the end, I simply cut off the required connector from the wires that come out of the cochlea - the same one is used to connect the buttons to the cochlea! But because Here you can change both parts, so let's do it! In the photo, only the response part has been preserved, which is being replaced and is not used anywhere else, but we need a “dad”.
Having replaced the connectors, in the steering wheel we now have the usual 10-pin male-female pair (choose any one, as long as it fits into the hole in the steering wheel).
And the released connector can now be used to connect the entire device to the steering column switch on the engine side; the process of connecting (and disconnecting, if necessary) to the snail will be much more reliable. 5. Let's continue. So, we have 10 wires that, according to the diagram, need to be connected to this plug. Of the 10 wires, 5 are the radio control connection. I will not duplicate the description - it is well covered by previous authors, everything is simple and without pitfalls. 6. Three more wires go to the ECU, contacts C2, C3, E3. Enjoyment is below average. This is where warm weather or a garage is very desirable. Otherwise, you will freeze and break the plastic on the connector. We begin to work from the ECU side only when we remove the wires from there and connect them to our connector. a. We remove the battery, disassemble everything that will prevent us from working with the connector.
Connecting a steering wheel with buttons
So, a block with wires is already connected to the steering wheel, so maintaining a given speed and the limiter will work immediately after installing the multi-steering wheel ( left button panel ).
To activate control of the radio or multimedia system ( right button panel ), you will have to modify the design. We add 5 wires to the block (which already has wires for cruise control), and put a miniISO block on the other end and insert it into the radio (how to remove it).
Wiring diagrams for the Vesta multifunction steering wheel (radio control):
As a result, using the buttons on Vesta’s steering wheel, it will be possible to control the radio, cruise control and speed limiter, and the button backlight will also work.
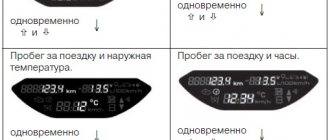
The only difference from the standard implementation is that there will be no indication of cruise control operation on the instrument cluster. To do this you need to flash it. By the way, during the panel test, pay attention to the cruise control indicators (icons in the speedometer well at about 140 and 160 km/h); if they are on, then the firmware is correct.
Here is the cruise control indication on Vesta, which has a multifunction steering wheel from the factory:
Let us remind you that the “Multimedia” option package includes not only a multifunction steering wheel, but also a rear view camera. We looked at how to connect a camera to a multimedia system earlier. By the way, another way to modify Vesta is to install fog lights.
The multi-steering wheel on the Lada Vesta car ensures comfortable movement in the car. In addition, the steering wheel is an element of the interior, a lever for controlling the behavior of the car and additional options. The Lada Vesta multifunctional steering wheel, also known as the multifunction steering wheel, is present in the top-end and luxury configurations of the Lada Vesta. In other variations, its capabilities do not go beyond the standard. Finishing materials are not of high quality. But it can be connected using a special adapter for the multifunction steering wheel.
Installing a multifunction steering wheel on a Lada Vesta car is possible, even if it is not included in the factory equipment. This function allows you to put buttons on the steering wheel, increasing the level of safety while driving, since climate control and the operating mode of the multimedia system are adjusted using the keys on the steering wheel. You can change the covering materials (braid, leather trim, trim - also known as a cover) yourself if you know the size and diameter of the Lada Vesta steering wheel. You can also do heating. The heated steering wheel function on the Lada Vesta is especially pleasant on frosty days in winter. After reconstruction, you will get a multifunctional unit. Read the article to the end and master all these repair skills!
How to install multifunction steering wheel on other configurations
In simple configurations of the Lada Vesta, the design will have to be modified more. You will have to connect the cruise control system yourself, as this is not provided in the packages. Additionally, you will need a set of three wires with a snail.
The Lada Vesta multi-steering wheel in such cases is installed in the following order:
- Remove the regular steering wheel from the car.
- Install the new multifunction steering wheel, being careful.
- Route the wiring harness.
- Connect it to the connector. All operations are carried out by analogy, as in the “Lux” configuration.
The three-wire harness is pulled through the technological hole, which is located above the pedals. The harness is routed to the electronic control unit. The electrical connection must be made according to the diagram shown below.
Contact No. 11 of the block should receive 12 volts. Check this parameter using a voltmeter or multimeter.
The second end of the wiring harness is inserted into the block to connect the cochlea. This end of the harness runs along with the radio wiring.
Connecting cruise control keys
To connect the cruise control keys, follow the procedure.
Subsequence
Route three wires to the computer through the window above the pedals (the source is located in the engine compartment) and connect to the block. Study the diagram according to which the wires for the buttons are led from the electronic unit. The snail with wires for the buttons has blocks from which the wires should lead to the corresponding blocks on the electronic unit.
| Block on the snail |
Block on the electronic unit
Using the installed keys, you can turn cruise control on and off, or turn it off for a certain time interval.
Connecting buttons to the radio
Connecting the buttons on the steering wheel begins with completing the wired cruise control system with the radio wiring. Connect the wiring to the multimedia device into the blue connector. To avoid mistakes, study the wiring diagrams.
If a new radio was installed during operation, you will need an adapter for the specific type of audio system.
After connecting, test the functionality of the new functions. As a result of a correctly completed connection, the keys will highlight and select the operating modes of the radio:
- switching music files;
— selection of menu items;
— selection of file storage media;
- Instant volume mute.
Cost of steering wheel with buttons
The price for the model with buttons depends on the store. Most Lada Vesta car owners purchase products with keys in virtual stores. The order is placed for article number 8450006832. The cost ranges from 5000 to 7000. If the vehicle owner needs an airbag, the price increases by another 1000-15000. For leather covering you will have to pay another 2000-2500 rubles.
To save money, you can use an overlay with keys on a standard steering wheel. This option is more difficult to connect and difficult to find, since it is not popular.
How to install multifunction steering wheel
In addition to the steering wheel itself, you will need several small elements:
- A special blue mini-ISO connector labeled C3.
- The contact connector for the snail is BLS.
- 5 pieces of wire 3 meters long with a cross-sectional diameter of 0.5 mm. But it is better to buy a ready-made wiring harness so that the connection is convenient.
Tools and materials needed to connect to the radio:
- Insulating tape.
- Several types of screwdrivers, nails and knitting needles. Such a tool may be required to remove the airbag.
- Torx bit T50 (TORX). The multifunction steering wheel is secured with a bolt with the same type and size of head. It is difficult to unscrew the bolt with another wrench.
Installation on the “Lux” package is more convenient. It has wires for connecting the cruise control system, a “snail” (a switch under the steering wheel with wires for the buttons). This is easy to check. You need to remove the top half of the steering wheel cover and see what's there.
The multifunction steering wheel can only be installed with the ignition switch turned off. In addition, it is recommended to disconnect the negative cable from the battery. Otherwise, you risk short circuiting the wiring.
Instructions for luxury equipment, which has gray wires
- There are holes on both sides of the Lada Vesta steering wheel. Insert the rods into them and press.
- The base of the airbag rises. You need to carefully remove it.
- Carefully separate the wires.
- Unscrew the central locking screw and pull the control wheel towards you without any effort. The wires should exit through the hub opening.
- If it is necessary to install the steering wheel, carry out all the steps in reverse order.
The steering wheel in the car is locked tightly. Therefore, when removing it, do not make any effort, gently swing it.
If you connect the gray wires to the steering connector, you can access the cruise control controls. To control the multimedia system, you need to connect five wires to the block using bls terminals. On the reverse side of the bundle of wires, a mini ISO connector is installed, which connects to the audio system.
Test the correct connection. All keys must function as intended. If the backlighting of the cruise control keys does not function, then a flashing is required. After checking, the airbag is installed.
Manufacturers and prices
The multi-steering wheel for Vesta is produced by several enterprises that cooperate with the LADA plant in Izhevsk (assembly takes place in this city). We are talking about Alpine, Pioneer, Sony and even JVC. It makes sense to equip your car with simple (and cheaper) models.
Photo source: https://www.drive2.ru/l/504226412845073015
When choosing a multifunction steering wheel for Vesta, check the price at different dealers - there are great offers:
- An X-Ray Vesta multifunction steering wheel with heating can be purchased for 10,500 – 18,000 rubles, depending on the finish of the casing (its price is up to 15,000 rubles) and the brand of the heating system itself (sometimes the same amount comes up). All your expenses depend on the weather in your home region: not every one is suitable in the Siberian winter, but in southern Russia - any one.
- The alternative provided for the configurations indicated at the beginning of the review is much more profitable in cost - amounts from 3,500 to 5,500 rubles.
- A kit with an airbag is usually estimated at 6,500 rubles.
- You can actually buy an X-Ray Vesta multifunction steering wheel without heating (insert and cruise control) for 3,500.
- Just an overlay with buttons is available for 2,000 – 2,500 rubles (however, if you are not a pro, then simply do not install it on your existing steering wheel).
There are no fundamental differences between the proposals. There are only additional bells and whistles that cause the price to vary.
Instructions for other configurations of Lada Vesta where there are no gray wires
This connection option is more complicated, since the connection to control the multimedia device is carried out independently. You will need a bundle of three wires and an additional block for the cochlea. Dismantle the old model and replace it with a new one. Wires are pulled from the audio system and connected to the steering connector. A pre-prepared bundle of three wires is supplied from the electronic control unit to the audio system. Together with the multimedia wires, it is connected to the steering block.
How to remove the steering wheel
It's not difficult to remove. It is enough to study the sequence of events and strictly follow them. The main condition is that the ignition is turned off.
Sequence of actions for removing the old steering wheel
- We insert metal rods into the holes on the sides of the steering wheel and press on them;
- The base of the pillow rises, which makes it possible to carefully remove it;
- After removing the cushion, it is possible to unscrew the central fixing screw using an extension and a bit. The wheelbase is in a straight position;
- After removing the bolt, pull it towards you without any effort;
- Lead the steering wiring through the central hole;
- Remove the fuse (red on the right side) and install it in the center of the circulation device.
Needed or not
You can buy a multifunction steering wheel and install it on your Lada Vesta yourself. This will make your car much more comfortable and convenient. You don't have to reach for the stereo to change the song or adjust the cruise control. The difficult part in installation is strict adherence to the wiring diagram.
If your Vesta is not “Lux”, but a regular package, and there are no gray wires in it, then the likelihood of mixing up the connection is greater. Therefore, be more careful when connecting the multifunction steering wheel.
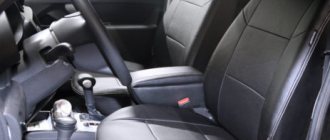
Braid
The steering wheel is covered with high quality leather. A leather version of the Lada Vesta steering wheel is installed on luxury and top-end trim levels of the car. This finish looks very elegant, sophisticated, and increases the operating comfort of the steering wheel. In the economical configuration, the steering wheel pad is made of more modest materials. Vesta owners are improving the finishing quality of the control wheel. You can purchase and change the braid yourself. In addition to the finishing itself, the kit contains everything you need for replacement: threads, glue, knife, leather trim, plastic clamps for fixing, instructions. The cover for the Lada Vesta multi steering wheel is selected by color and depends on the interior trim.
If the MMC control buttons on the steering wheel of Lada Vesta, XRAY do not work
Lada Vesta and Xray cars (from 2022) use the same type of steering wheel. During operation, malfunctions may occur, for example, the radio control buttons on the steering wheel stop working. How to solve this problem is described in the plant’s technological instructions.
If you experience malfunctions associated with the lack of response of the multimedia system (MMS) to controls mounted on the steering wheel, first of all, make sure that the remote controls and electrical circuits on the side of the car are working properly. To do this, check the integrity of the wires and insulation of the wiring harness to the MMC connectors and buttons on the steering wheel.
Inspect the connectors of the MMC and buttons on the steering wheel, the harness pads for completeness and correct alignment, for the serviceability of locks and contacts, for the quality of connection of the contacts with the wire. Then, disconnect the wiring harness connectors from the MMC connectors and the buttons on the steering wheel.
- between contact “B15” of the block “X2” to the MMC and contact “12” of the block to the steering wheel buttons;
- between contact “B16” of the block “X2” to the MMC and contact “5” of the block to the steering wheel buttons;
- between contact “B34” of the block “X2” to the MMC and contact “4” of the block to the steering wheel buttons;
- between contact “B35” of the block “X2” to the MMC and contact “3” of the block to the steering wheel buttons;
- between contact “B36” of the block “X2” to the MMC and contact “1” of the block to the steering wheel buttons.
Eliminate the detected malfunction.
If the fault persists, connect the wiring harness block to the buttons on the steering wheel. Check that there is no short circuit to ground on contacts “B15”, “B16”, “B34”, “B35” and “B36” of the block to the EnjoY Pro MMC. Eliminate the detected malfunction.
If the fault persists, perform a test replacement of the MMC. If the problem persists, replace the buttons on the steering wheel. If the malfunction is eliminated, replace the faulty MMC.
Source
Lada Vesta steering wheel reupholstery
Many owners of basic cars do the reupholstery of the Lada Vesta steering wheel with their own hands. The leather version looks solid.
To install a braid made of high-quality, expensive material, you will first need to remove the steering wheel.
See the sequence of actions above.
- If control keys are present, remove them.
- The braid is applied so that the seams match each other exactly.
- Along with the braid, the set contains clamps. They fix the position of the braid. Mark the position of the recesses.
- Using the knife included in the kit, easily make indentations on the surface. The recess size is 3-4 mm. Same depth. Several such slits are required to remove all the edges of the braid.
- Check the alignment of the joints again.
- Apply the adhesive composition to the back surface of the steering spokes, and in the same area on the inner surface of the leather braid.
- After 5-10 minutes we glue the surfaces. Using the same method, we connect all parts of the leather braid.
- Take a piece of thread from the kit no longer than 80 cm. Wind the thread into the groove of the seam. Thread will be needed to fasten the lower steering parts.
- Then a piece of thread 1-1.3 m long is required. It is needed to sew together the most voluminous section - the upper part from one iron rod to another.
- Use a needle to thread the thread through the holes, removing it to the front surface.
- Burn the ends of the thread with fire.
- Hold the ends of the braid with your hands and adjust the tension with a thread.
- Use a small screwdriver or knitting needle to secure the thread in each stitch of the selected stitch.
- Having stitched to the edge of the second metal rod, secure the thread in the same way.
- When the entire braid is stitched, tuck the edges of the material into the prepared holes.
Do-it-yourself reupholstery is not a complicated, but labor-intensive process that cannot be rushed and requires care.
How to make a heated steering wheel on a Lada Vesta
The need for a heated steering wheel function is especially felt in cold winter weather. The warm surface will warm your hands, which is very pleasant in the cold. To make the steering wheel heated, follow the procedure:
- Remove the steering wheel;
- Use wire as a heating element. You can use copper, chrome. Diameter 0.3-0.4 mm;
- Make a bundle of 4 pieces of wire;
- Make two entrance holes;
- Wrap the wire around the surface of the control wheel (you can only wrap it on its upper part - this will heat up faster and more efficiently);
- Make small slits on the back surface so that the wire threads cut into them and subsequently do not move or unwind;
- Connect the wire harness to the power supply (you can use a sound signal - it is suitable for power);
- Select the heating on/off button;
- Install it on the side from which it is more convenient to press;
- Fold the wiring, install the airbag, install the steering wheel;
- Test the installed function. Normally, after 1.5-3 minutes the surface will not be cold; after another 1.5-2 minutes it will be noticeably warm.
How to connect a rear view camera
The standard multimedia system, when reverse gear is engaged, supplies a camera supply voltage of 6.2 V to pin C7 (mini-ISO connector). And the Mekede radio on Android only receives 12 volts to pin 6 (section K) and does not supply the power supply voltage for the camera. To connect a 6V camera, you will have to make a voltage level converter using a 7805C stabilizer and two 1N4148 diodes. As a result, a voltage of 6.6 V is formed at the output of the converter. You can also get by with one 6 V stabilizer 7806 (KR142EN5B) without using two additional diodes.
The process of controlling the Android radio using the buttons on the steering wheel is shown in the video:
Source