Any car slows down due to the fact that the pads press the disc after pressing the brake pedal. The working brake system of a car is a complex mechanism. Front and rear pads for a Lada Vesta car are consumable spare parts that have their own resource and are only part of this mechanism. Vesta, by the way, is a car with good brakes. Because in inventive activities more attention is paid to brakes than to engine modernization - everything is done for the safety of the driver and passengers. Like all parts, the pads, especially the front ones, are not of good quality, sometimes they creak when they are cold. This is due to the quality of workmanship and not a perfect fit to the disk. Poor quality pads can quickly eat up the metal of the disc, or quickly wear out on their own. The braking distance must be minimized, even when the car is traveling at the “maximum” speed. The rear pads come in drum and front disc versions. Depending on the modification, Lada Vesta has both options. But which engine costs 1.6 or 1.8 does not affect the choice of pads at all - they are the same everywhere.
A large load when braking falls on the front pads of the car, which “catch” all the energy on themselves. Parts of the brake mechanisms (especially the front ones) wear out over time, and they wear out even faster if the driver has a jagged driving style with sharp braking to a complete stop. The front pads of the Lada Vesta are good enough to withstand full braking, but even they can be “upgraded”.
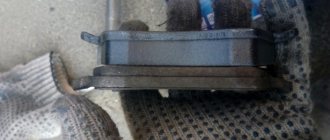
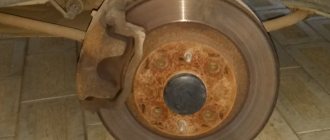
wear of the front pad in relation to the old one to the new one
The importance of the service braking system cannot be underestimated. The rear pads of the Lada Vesta experience considerable load when braking and eventually fail. The force with which a car brakes directly depends on the condition of the working brake system, including the rear pads.
RDT (Rear disc brakes) are available in the Lada Vesta SV Cross and Sport modifications. They provide greater braking effect and are more durable due to their design - they overheat less, but have a shorter service life. Drum brakes are available on other versions of the Lada Vesta; they are considered less effective when braking, but longer lasting.
Replacing rear brake pads is more difficult with a drum. The nut must be rotated carefully, otherwise the mechanism will be damaged. Combined with the care with which you have to handle the springs and small parts of the mechanism, you can say that the mechanism is rather weak, but in fact it has been tested over the years and boasts a long service life.
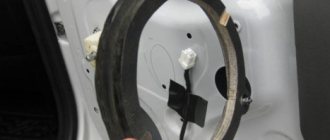
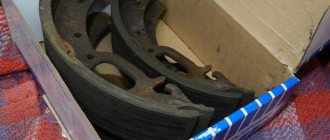
The rear drum mechanism with pads looks like this
Lada Vesta brake pads are recommended to be inspected after 15,000 km. According to the regulations, replacement is carried out after 60,000 km, but experts advise changing them at 30-45 thousand km.
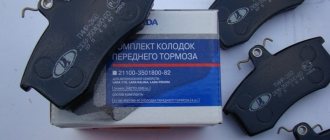
- Standard front pads - article number and price
- What you need to replace brake pads
- Basic faults
- When to change pads on Lada Vesta according to regulations
- Removing and installing front pads
- What front brake pads can be installed on the Lada Vesta - manufacturers, analogue prices
- Rear brake pads Lada Vesta - replacement
- Replacement with calipers
- To replace the rear disc pads of the Lada Vesta you need
- How to change with drums
- What can you tell by the wear of the rear brake pads?
- Analogues on calipers and drums
Standard front pads - article number and price
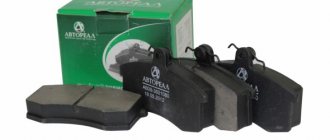
On a Lada Vesta car of any modification and in any body, consumables manufactured by Renault are installed - be it a sw station wagon, sw cross, sport, etc. On the Lada Vesta St. Cross, the consumable parts can withstand the load - they wear out at the same rate as on other modifications.
Standard components of the Lada Vesta brake system received catalog number 8200 432 336. Their cost in stores starts at 1,400 rubles and ends at approximately 2,000 rubles.
Safe driving
You learned how to check brake pad wear, and such diagnostics can save a person’s life. The brake system is the most heavily loaded area of a vehicle. By regularly paying attention to this part of the car, you extend the “life” of the vehicle itself and respect the right of other citizens to live safely.
You learned how to check brake pad wear, and such diagnostics can save a person’s life. The brake system is the most heavily loaded area of a vehicle. By regularly paying attention to this part of the car, you extend the “life” of the vehicle itself and respect the right of other citizens to live safely.
Standard rear brake pads - article number and price
The article number for a set of original pads comes in two types – for drum and disc brakes. The catalog number of the kit for the VAZ Lada Vesta with disc brakes is 11196-3502089-00. It costs about 2000 rubles.
Drums
The kit catalog number for the version with drum brakes is 8450076668. It will cost 4,000 rubles, but, again, it will last longer.
Complete set with calipers
Disc brakes complete with calipers are not sold everywhere, but you can purchase additional calipers. Article - 11196350201100, cost - from 9000, produced by AvtoVAZ.
Basic faults
If we exclude the possible defective parts and poor quality from the manufacturer, then the main reason why the front pads on the Lada Vesta become unusable is wear. They actively interact with other parts of the brake mechanism, and therefore a look at the nature of damage to the friction linings will make it clear what is wrong with the operation of the brake system. By correcting this error, you will increase the service life of not only the pads, but also the entire mechanism.
The nature of the malfunctions can be noted:
- Uniform wear - it manifests itself in the fact that the friction layer is worn evenly, this shows that the brakes are working well.
- Severe wear of the friction layer, brake rivets are visible - this means that you have been using the “outdated” parts for too long. The rivets could damage the disc, so it would be a good idea to inspect it for damage.
- The friction layer is worn evenly around the entire circle, but one of the sides is worn out more than the other - one of the parts of the brake system (guide or piston) does not distribute the braking force correctly. Cleaning all “live” parts and applying a new layer of lubricant will help. Naturally, everything will have to change.
- Both components are worn unevenly, the surface is strewn with irregularities and roughness. The reason for this outcome is a malfunction of the caliper guide pins - they swing and do not give an even trajectory of movement. You will have to clean them, then reapply lubricant.
- The friction lining is cracked - in this case, the “trouble” is caused by the brake discs themselves - they wear unevenly. Everything will have to change.
- Uneven wear of the friction layer means that the parts were installed incorrectly. They will have to be changed.
After performing a visual inspection of the damage, you can independently make a verdict about the breakdown. And besides this, there are several other signs by which you can find out about a faulty front pad while sitting behind the wheel.
Creak
If a squeaking noise occurs from the front when braking, this means that the pad and disc are not mating. This happens when a cheap analogue was purchased to replace the original component. But not everything is so bad - sometimes this analogue can last a long time, but the real reason is dirt that has gotten into the moving parts and reduces the contact area of the moving parts.
Vibration at speed: what is it?
Vibration at speed appears when the pads do not fit the discs - there is some incompatibility that does not manifest itself in the operation of the “original” parts. If, when braking, you still get “full contact” of these parts of the brake mechanism, this means that the wear of the hub discs themselves is haunting, and they will have to be replaced.
Engine
There are a lot of complaints about the engine. For some reason, the same engine mounts are installed on Logans, and they remain there for the entire service life. No one had any trouble with them. On Vesta, everyone struggles with the same supports, they start knocking. I think there is an error in the design, or the fourth support is missing. When you start it, the engine vibrates.
I'm going to change the timing belt kit in a week. I want to do everything myself. The only thing I don’t like is the TZA pump, there are a lot of complaints about it. At 50 thousand, the impeller breaks, antifreeze leaks, and jams. The Gates belt performs well. AvtoVAZ gives it a guarantee of 180 thousand. But the pump or the roller may jam. I drove 75 thousand, but still decided to change the timing belt and ordered a Gates kit.
Many people complain that the 1.6 liter engine eats up oil and the pistons knock. I did not notice any piston knocking or lubricant consumption. I fill it with Shell Helix Ultra and put the filter on Mann. Perhaps oil consumption is related to driving mode. Many people drive in creeping mode, keep the revs to a minimum, and save fuel. But this spoils the engine, which does not like low speeds. It is advisable to switch to 2500 rather than crawl.
The plant gives an engine life of 220 thousand. It is repairable, the block is cast iron. I can also say that there may be oil leaks from under the valve cover or pan. My engine has already been modernized, but I don’t particularly like the Euro-5 firmware.
Removing and installing front pads
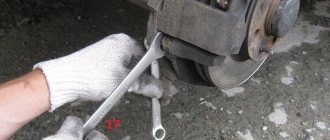
Before starting work, prepare the following tools:
- Keys for 13 and 15;
- Brake system parts cleaner (a regular rag will not be able to completely remove dirt and used lubricant residues);
- Flat screwdriver;
- High temperature grease.
The procedure for replacing parts is as follows:
- Secure the vehicle in place by applying the parking brake. Turn off the ignition. Raise the front of Vesta with a jack;
- Proceed to remove the wheel. Remove the cap, loosen the bolts one turn. Continue this action in a circle with all the bolts;
- Remove the brake fluid reservoir cap and pump out a few milliliters. This will prevent the liquid from coming under pressure. Press the brake cylinder inward with a screwdriver;
- Use a 15mm wrench to hold the caliper guide pin, and use a 13mm wrench to remove the two bolts. Do not let the free part of the caliper fall to the ground;
- Pry up the outer pad with a screwdriver and carefully remove it. In the same way, remove the inner block;
- The spring retainer, which is responsible for uniform wear, will have to be cleaned and then re-coated with lubricant;
- Install a new part - first the external one, then the internal one;
- Clean the guides and also coat them with lubricant;
- Put all the parts back;
- Tighten the fastening bolts, install the wheel, clockwise, one rotation at a time, secure all the bolts.
About the main types of pads
The auto industry has come a long way in the near future. A modern car, you have an advanced braking system, is the presence of computer-controlled systems. This should include Abs, directional stability system, etc. The constant development of cars leads to progress in the types of brake pads. The following types are distinguished:
- with a semi-metallic friction layer (65% copper, iron powder, wire);
- organic friction layer (rubber, glass, Kevlar);
- from organic matter and iron inclusions in a ratio of 70/30);
- clay friction layer with a small inclusion of copper.
Which of the above types has its own strengths and weaknesses. For example, a semi-metallic friction layer has good heat dissipation, but it wears out quickly and makes a lot of noise during operation. But organic brake pad linings actually do not create noise and work smoothly, but during the process they emit a lot of dust that settles on the wheel disk. It is safe to see that pottery is more desirable. They do not create noise and do not wear out very quickly. Their only drawback. highest price.
What front brake pads can be installed on the Lada Vesta - manufacturers, analogue prices
The following analogues of front pads are common:
- Front brake pads HI-Q Sangsin Brake (SP 1564) – 1400 rubles;
- SAT (ST4106000Q0K) – 450 rubles;
- Brembo (P68033) – 1600 rubles;
- Galfer (B1G10207412) – 1250 rubles;
- Zekkert (BS-1221) – 700 rubles;
- Blitz (BB0292) – 750 rubles;
- Hagen Sangsin Brake (GP 1564) – 1400 rubles;
- UBS (BP1105007) – 1500 rubles;
- ATE (13.0460-2709.2) – 1700 rubles;
- LYNXauto (BD5739) – 850 rubles;
- TRW (GDB 3332) – 1700 rubles.
Rear brake pads Lada Vesta - replacement
The moment to replace and repair the rear pads on a car is determined by the fact that they are in a state of maximum permissible wear. You should also start planning a replacement if the linings are oily, or if chips, cracks and damage are visible on them, as well as a gap between the base of the consumable and the lining.
It is important to understand that the consumables on the rear wheels need to be changed as a set - so that the force is uniform, otherwise the car may skid when braking, and the braking itself will be ineffective. You need to install all four parts.
Is it possible to change the pad on one wheel?
Smooth braking of the vehicle is achieved by simultaneous activation of the braking system on all wheels. Replacing the pads is provided in pairs for the front and rear axles of the car. The pads located on the rear axle of the car are less susceptible to wear than the front ones, and they need to be changed, on average, 3 times less often.
(382 votes, average: 4.50 out of 5)
Oil gets into antifreeze: what is the reason and how to fix it
Why is the shock absorber knocking?
Related Posts
Replacement with calipers
Replacement with calipers is carried out in the same order, only at the stage when the entire mechanism is disassembled, using keys 13 and 15 you need to remove the caliper and put new parts in its place.
To replace rear disc pads on a Lada Vesta you need:
- Place the car on the ramp and lock it in gear;
- Bring the brake fluid level to a little less than half;
- Raise the rear of the machine and secure it with the support stand. Remove the wheel;
- Install the disc removal tool from the hub;
- Place the central part on the axle, and the rest will create pressure on the disk;
- If something won't come off, treat it with wd-40. Remove the bolt that secures the disc to the hub. Do this carefully, because if the edges of the bolt come off, it will be more difficult to remove;
- Remove the brake pads;
- Check the condition of the brake system. Put the new components in place and reassemble everything in reverse order;
- Bring the brake fluid level to about and adjust the brake pedal.
Indirect indicators
It is not at all necessary to wait for the next maintenance or immediately remove the disks for inspection. There are some external signs of brake pad wear. For clarity, let's look at them in order:
- Grinding, whistling and other unpleasant and suspicious sounds are made when you press the pedal. This is a clear sign of severe abrasion of the material. Some car owners specifically install a pad wear indicator or buy them with existing limiters. The absence of an indicator indicates the creaking of the most completely worn out car part.
- The accumulation of dirt (metal shavings and dust) between parts rubbing against each other can cause it to become stuck between them. Such an undesirable moment leads to the car stopping at the wrong time and in the wrong place. Repair in this case is inevitable.
- Does the car skid in the same direction? This means it’s time to check the braking system from this side. Complete abrasion of the spare part leads to skidding even on dry ground.
- Does the pedal not return to its place after pressing? This means that the degree of wear on the rear or front pads is 100%.
- Too sluggish or, conversely, hard braking indicates the need to replace the brake system. A sudden blocking and stopping of the machine indicates complete wear of the linings.
- Extraneous noise and beating remind the car owner of the unfavorable condition of the brakes.
How to change with drums
You can remove the old ones and install new rear drum pads on the Lada Vesta using the following algorithm:
- Place the car on the overpass and turn off the handbrake. Secure the car by putting it in gear. It is better to reduce the brake fluid level and make it a little less than half of the norm.
- Raise the rear of the car slightly and secure it with a support stand. Remove the wheel.
- Using a flat-head screwdriver, rotate the ratchet nut away from you (“pushing” it along the thread). This reduces the length of the spacer bar and brings the pads together.
- Insert the chisel under the cap and use a hammer to knock down this cap protecting the drum bearing.
- Unscrew the hub bearing nut using a 30 mm socket.
- Carefully remove the brake drum along with the bearing. Notice the anti-lock brake sensor at the bottom under the ratchet nut (it looks like a small black plastic lever). Your task is not to damage it.
- Take a screwdriver, pry the release spring behind the hook, and then the stand. Take them off. Also remove everything on the front pad.
- Using the same screwdriver, pry the lower tension spring by the hook and remove it.
- Try not to damage the cylinder boots.
- Hook the upper tension spring on the hook and remove it from its engagement with the front block, and then dismantle it.
- Remove the front block and then the bar from the mechanism.
- Disconnect the end of the handbrake cable from the rear shoe lever.
- Before assembling the mechanism, the rear tip of the spacer bar must be recessed - the length of the spacer bar will be minimal.
- Brush the working surface of the drum with a wire brush to remove dust and dirt. Use the brush to avoid touching the ABS sensor reference ring.
- Install the mechanism in reverse order.
- Tighten the hub bearing nut to 175 Nm. As a recommendation, it is worth mentioning that it is better to install a new self-locking nut.
- After the work has been carried out, it is worth checking the brake fluid level in the reservoir.
- It is important to place the parts in the correct working position. Press the brake pedal several times and then hold it in the down position.
- Raise then release the handbrake (but only with the button engaged to deactivate the ratchet).
- Instead of handbrake clicks, you will hear other clicks - this is how the gap in the brake mechanism between the discs (drums) and pads is adjusted. Repeat these steps until the clicking noise disappears. If necessary, adjust the parking brake.
About what not to do
Not every car owner regularly checks their brake system. How to remove Mazda headlights, replace the headlight. Replacing the rear brake pads of a Mazda 6. This leads to a variety of consequences, including accidents on the road. This is still good if you crash into a tree in your yard, but what if the brakes fail on the highway? Of course, experienced motorists will use engine braking, but not everyone will have time to figure out what’s going on.
So, never allow the brake pad linings to wear down to metal. This will damage the brake disc and ultimately cause the system to fail. Check the condition of the brakes regularly. It’s not difficult to do this yourself. You shouldn’t crawl under the car every 5 thousand km, but when the time comes, don’t be lazy.
What can you tell by the wear of the rear brake pads?
Pad wear means:
- Wear of the friction layer;
- Damage to the friction layer (for example, cracks);
- Friction layer bevel;
- Carbon deposits on the discs or drum.
These “illnesses” can appear when:
- Light knocking sound when braking. This should not be confused with ABS;
- Poor braking efficiency;
- Whistling, grinding noise when braking;
- Dust, chips on the discs.
Any car repair operation is a treatment. But a separate operation may not be a treatment, but a concealment of the symptoms of a real disease. If consumables are changed due to their “natural death” - the mileage mark has simply reached 60,000 km, then other parts of the mechanism clearly should not be blamed for this.
But if the consumables failed earlier, then replacing them may not solve the problem, and soon you may have to change not only them, but also other parts of the mechanism. This is due to another malfunction in the mechanism:
- Insufficient brake fluid level;
- Caliper malfunction (causes uneven wear of the friction layer), insufficient amount of lubricant or unsuitable lubricant;
- Faulty guides (for example, damaged boot);
- Incorrect adjustment of the service brake system, failure to release the handbrake;
- Low quality friction layer;
- Damage to oil seals;
- Depressurization (airing) of the mechanism;
- Uneven operation of hydraulic cylinders supplying unequal forces;
- Brake hose leak;
- ABS jamming;
- Warped brake disc.
Minuses
Drivers say that the front discs wear out very quickly on any version of Vesta. You have to change them at 50 thousand km or earlier.
This depends on the operating mode. If the car is used in a city with rapid acceleration and braking, then the wheels can be worn out within 30,000 km. If the driving is mostly suburban and quiet, then you can drive 150 thousand km or more. But you shouldn’t see this as a problem, because the main thing is that the car brakes effectively. My car is 6 months old, I have driven 6000 km.
If you have already replaced the wheels on your car, share your opinion in the comments at what mileage this happened. If they are not worn out yet, then write what kind of car you have and how worn the discs are.
Analogues on calipers and drums
There are analogues for Lada Vesta drum brakes on the market:
- Fenox (BP53013). Cost 980 rubles; (BP53168) Price 1340 rubles;
- Hella Pagid (8DB355002-411). Price 2780 rubles;
- JP Group (1563900810). Price 1490 rubles;
- Mintex (MFR516). Price 2550 rubles;
- Patron (PSP8742). Price 730 rubles;
- Remsa (4137.00). Price 1110 rubles;
- Textar (91057300). Price 3130 rubles.
There is an analogue of Lada Vesta disc brakes. It is produced by TRW, article number gdb1384, cost – 1400 rubles.