How does the rear seat recline on a Priora?
The rear seats on the Lada Priora hatchback car fold down, thereby forming a huge space in the trunk.
But for some, even this space is not enough to transfer a certain load, so sometimes you have to completely remove them and take them out of the cabin. True, this method of increasing free space is very rarely resorted to. Also, seats have to be removed for the banal reason of replacing them with new ones or for dry cleaning purposes. In any case, to complete this procedure, you will need no more than 10 minutes of time and a tool, the list of which is given below.
- Socket heads for 10 and 13 mm
- Extension
- Ratchets or cranks
Tip 4: How to remove roof trim in Priora
Fans of the Lada Priora like everything about the car, but they also notice that the car’s ceiling lining is rapidly wearing out. In order to update the ceiling by covering it with a different covering, you must first remove the dilapidated roof. But how to do that?
You will need
- -screwdriver;
- -wrench.
Instructions
1. In order to remove the inner headliner , remove all interior parts that are in one way or another in contact with the roof. Pay attention to the order in which the parts are disassembled. Pre-prepare a place where you will then neatly place the fasteners and the parts themselves.
2. Start with the ceiling light. It is best not to drop the lampshade, because it is made of a very fragile material. All ceiling lighting fixtures must be unscrewed in order. After this, proceed to dismantling the sun visors and handles in the car interior. They also need to be removed with caution.
3. Pay attention to the soiling of the ceiling material. Before you begin the process of dismantling the interior of the ceiling of a Lada Priora, stock up on two liters of water and detergent.
Removing and installing the rear row of seats on Priora hatchback 2172
So, the first step is to remove the lower part of the seat, since it is the easiest to dismantle. To do this, use a flat-head screwdriver or use your hand to pry up the canopy cover, as shown in the photo below:
And in the recess we unscrew the nut using a 10 mm socket:
Now the canopy is moved to the side, because nothing else holds it.
We perform the same procedure with the second half. Then, by pulling the special belt in the back of the seat, on both one side and the other, we lift them and remove them from the passenger compartment.
As for the back, everything is also quite simple to do here. First of all, we recline the backrest, lifting the clamps next to the headrests, and from the inside we see several fastening nuts, both on one side and on the other. We unscrew them with a key number 13.
To show everything more clearly, below is another photo.
Also, on the back side there are still nuts that need to be unscrewed:
On the other side we do the same. After which you can begin removing the seats from the Priora. Once again, it is worth noting that the fastenings on the sedan will be different, so this procedure will have to be considered in the following articles. Installation occurs in reverse order.
Friends! Can you please tell me whether the rear seat backrest folds down on all Prior sedans? Maybe it depends on the configuration or something else? Where do you need to press or what do you pull to make it fold? Thank you in advance!
Comments 21
yeah, only these ropes tend to fall to the bottom and have to be pulled out of the trunk with a screwdriver. They really couldn’t come up with anything more serious.
yes yes, they wrote about it. Apparently I didn't have enough imagination =)
To be honest, it’s better not to touch the backrest unless absolutely necessary, the rear backrest locks are made of such rubbish that after opening the closures a few times they will stop latching…
To be honest, it’s better not to touch the backrest unless absolutely necessary, the rear backrest locks are made of such rubbish that after opening the closures a few times they will stop latching…
I'll keep that in mind, thanks!
If the straps fall, then pass a thin wire into the trunk and hook it to the straps there. Pull them into the cabin and open it. But it doesn’t fold up, it can be removed (the back) You’ll shoot it when you fold back the 2 buttons of the trim and see 2 hooks at the bottom
Thank you! I'll keep it on mind. but I would like to hope that they still didn’t fail =)
The only catch is that the trunk upholstery is riveted to the backrests.
This is how... it turns out that they will need to be “unriveted?” Are they holding tightly?
To be honest, I don’t even know, but I reclined the seats a couple of times and 3-4 rivets vomited out. I didn't try to fasten them back.
Are they reusable or not, these rivets? or just pulled it out and that’s it...
There is a rope behind the headrest that you pull and the backrest opens. When I wanted to remove my backs, to my surprise, I didn’t find them. I had to open them from the trunk with a screwdriver. The trick was that these straps just fell into the gap between the back of the seat and the rear parcel shelf.
We invite you! What will still be included in the list of useful information, you ask? Firstly, we will show you the main everyday things that a person should know about car seats, and specifically we will show you clearly how to remove the headrests from the seats, and similarly we will show how it is necessary to correctly fold out the rear seat of a car in order to transport large items oversized loads and a little more useful information will be given about the seats.
Note! Real seat adjustment is an integral part of any car, because when it comes to purchasing a new car, everyone is different and in order for each person to sit comfortably in the car, you need to adjust the seat specifically to it (We are talking about front seats), but remember once and for all, the seat It is recommended to adjust only when the car is stationary (applies only to the driver), since when adjusting the seat, for example by length, you can lose control of the car because if you incorrectly fix the seat on the car, in other words, the possibility that it will suddenly move backwards and thus you can lose control over the car, so be careful!
1) At the beginning, the conversation will be about how you can adjust the front seats on a car, so if you set a goal to adjust it, for example, in length (according to scientific longitudinal), you need to pull the locking lever upward with your hand as shown below in the photo and only after that use body movements to adjust the front seat because it is enough, alas, if you release the lever, move your body either forward or backward, and thus you will fix the seat and it will stand clearly in one place.
3.5) On the side of each of the front seats there is a handle that is made of a round shape, so thanks to this handle it is possible to adjust not the front seat itself, but only its back, for this purpose it is necessary to turn this handle in the appropriate direction and thereby achieve position that is comfortable for you.
How to remove headrests on a Priora? Methods to choose from
There may be several situations in which you need to know how to remove head restraints on a Priora. This includes general cleaning of the interior, purchase of new covers, repair of holders if it is not possible to adjust them in height or tilt, and the need to transport something large in the car. It would seem that the procedure is the simplest, but many owners of this domestic VAZ model encounter difficulties. Moreover, problems with removing head restraints arise with both the front seats and the rear sofa, but for different reasons. For some they cannot be pulled out, for others they jam and become distorted, but sometimes everything happens because the driver, when dismantling this element of the car interior, shows excessive zeal and does not act according to the instructions, which can lead to the impossibility of further adjusting the headrest and even its failure. How to remove the head restraints on a Priora, of course, is described in the included manual. However, push-and-pull recommendations are either technically difficult to implement or do not work. In addition, the instructions may be lost if, for example, the machine is not new. In principle, there is nothing particularly complicated in the design of these chair parts intended for convenience; you just have to look closely and you can figure it out on your own. The main thing is not to make sudden movements, but to act as carefully as possible. Removing the front head restraints Their organization is extremely simple: 2 pins that fit into the sockets and are not clamped by any clamps. In theory, removing the headrest is easy - just pull it and take it out. In practice, it turns out that the legs of the part often come out with great difficulty. Some car enthusiasts were unable to dismantle one of the head restraints on their own, and had to contact specialists at a service station. The logical justification is that the pin is deformed or a foreign object has entered the socket and jammed the riser. However, this does not make it any easier if you absolutely need to free the chair. We must pay tribute to the Priora designers: they installed the fastenings under the headrest rigidly, the sockets do not simply pull out under the influence of force. There is not enough height to apply this same force. You have to be creative.
- The seat back reclines back at approximately 60 degrees. A sharper angle will make further manipulation more difficult;
- The headrest extends as far as possible. If he categorically refuses to move, we try to push him deeper, and then pull him towards us again - it usually helps. Or we use progressive rocking movements alternately on each side of the part;
- Use a syringe or pipette to drip oil or WD-40 onto each rod. You shouldn’t pour it generously; you’ll stain the upholstery or covers. We need the liquid to flow only into the sockets;
- The driver rests his knees on the back of the seat and with all his might, with a sharp movement, pulls the headrest towards himself.
It is also possible to work from the front. Then we place ourselves facing the back and tilt it slightly towards ourselves. However, this driver’s position is much less convenient: the emphasis when pulling is not the same, and the angle of inclination is too steep, the ceiling will still get in the way. In addition, the steering wheel will be in the driver’s seat and cannot be moved anywhere. Removing head restraints from the rear seats Note that these additions are still removed from the rear more often than from the front. To the usual reasons for dismantling is added the need to transport something oversized, that is, to increase the volume of the trunk. In the Priora, the back of the rear seat folds only if all the headrests are removed from it, otherwise they are placed on the “shoulders” of the front seats. The design of the rear headrests, on the one hand, is more familiar and does not require much physical effort when removing, with on the other hand, it is probably designed for a three-armed person. These headrests are held in place by clamps, but each of them has 2 latches, located on the sides so that it is impossible to operate them with one hand. You need to simultaneously press both latches and at the same time pull the object being removed up. Doing this alone is extremely inconvenient, and two people fussing around the headrest is quite cramped. The owners of Priora developed the following strategy. The back of the sofa tilts forward and rests on the front seat. The rear door opens from the side of the removable headrest. One person kneels on the front seat with his back to the windshield, the second leans into the open door. The second one presses the latches, number 1 pulls the headrest towards himself. If you use this algorithm, the headrests are removed within seconds. At the same time, the trunk immediately expands. Of course, there are other methods for removing headrests on a Priora - both rear ones and stuck ones. But those described above have been experimentally tested and found to be very convenient. AutoFlit.ru
Front seats
The front seats can be removed regardless of the Priora body type, that is, the seats will be removed the same way on all types of cars.
In order to get started, you need to prepare the tool.
To remove the front seats of the Priora you will need:
- Ratchet;
- Torx head E10;
- Head for 10 and 13 mm;
After preparing the tool, you can begin to work.
Removal process
- Initially, you need to disconnect all wires connected to the seat, such as heated seats and the seat belt indicator. We find these connectors under the seat and disconnect them.
- Remove the springs pushing the seat forward numbered 1 and 2 by pulling them up from the plastic retainer.
- Next, use a 13 mm socket to unscrew the 4 nuts securing the front part of the seat.
- Then, using a torx E10 head, unscrew the 5 bolts securing the slide.
- We take out the seat through the front door of the car.
Installation is carried out in reverse order.
Lada Priora rear seat lock broken
For any support for the development of the channel. Immensely grateful! Repair and...
Now the canopy is tilting to the side because it is no longer holding anything.
The same procedure is performed with the second half. After this, pull the special belt at the back of the seat
, both on one side and the other, lift them up and pull them out of the cab.
As for the back, everything here is also done quite simply. The first thing we do is tilt the backrest, lift the locks next to the headrests, and on the inside we see the fixation of several nuts, both on the side and on the other. We unscrew them with a key of 13.
To show more clearly, another photo will be given below.
In addition, there are also nuts on the back that need to be removed:
On the other side
, we do the same. You can then start removing the seats from the Priora. Again, it's worth noting that the mounts will vary on your sedan, so consider this procedure. Installation is performed in reverse order.
How to open the rear seats on a Priora
nik_bel72, I had a metal creaking in the place where the backrest clings to the body from below, I wrapped this place with electrical tape, the sound disappeared, then it appeared again, there was already a problem in the shelf: the body plays on bumps and the shelf creaks, I screwed it in with self-tapping screws, now it’s quiet
Same symptoms. The creaking at the bottom of the backrest disappeared after removal, now it creaks in the area of the shelf on large bumps. We will treat...
There are 2 options: 1, try to snap it firmly or press harder; 2 cut a little splen around the fastening.
I also glued it with 8mm splenium, everything turned out fine for me, just like my own :)
and tried this way and that: on one side it closes, but on the other it doesn’t work. I'm already stuttering)))) what other options??
Hm. Does your seat not reach the mount or does it not fit into it? Is the seat screwed down well and level? Alternatively, look at the lock on the seat.
Has anyone ever had this happen? The ribbon has come off and you have to pull it so that the hook will come off :))) How can I recline the seat now?
Try unscrewing the two front hinges under the seat (they are covered with plastic covers). Approach the nuts on the side with a 10mm wrench. Unscrew it, lift the seat, and then reach the hook.
It didn’t come off for me, but it happened that I fastened the back and there was a ribbon inside)) well, nothing came out of the trunk, something like an electrode, only a thin one (the knitting needle was opened))
You can try this too.
Then it is not a “loop”, but a handle for the back lock. If the T-shaped plastic handle is not lost, then it is put in place and secured through the hole with a new cotter pin or piece of wire. I've already had this happen. If it is lost, then you buy a new one in the store, complete. I think if you look in stores, you will find it.
Communities › Lada Priora Club › Blog › How to fold the back of the rear seats?
Friends! Can you please tell me whether the rear seat backrest folds down on all Prior sedans? Maybe it depends on the configuration or something else? Where do you need to press or what do you pull to make it fold? Thank you in advance!
Comments 21
yeah, only these ropes tend to fall to the bottom and have to be pulled out of the trunk with a screwdriver. They really couldn’t come up with anything more serious.
yes yes, they wrote about it. Apparently I didn't have enough imagination =)
To be honest, it’s better not to touch the backrest unless absolutely necessary, the rear backrest locks are made of such rubbish that after opening the closures a few times they will stop latching…
To be honest, it’s better not to touch the backrest unless absolutely necessary, the rear backrest locks are made of such rubbish that after opening the closures a few times they will stop latching…
I'll keep that in mind, thanks!
If the straps fall, then pass a thin wire into the trunk and hook it to the straps there. Pull them into the cabin and open it. But it doesn’t fold up, it can be removed (the back) You’ll shoot it when you fold back the 2 buttons of the trim and see 2 hooks at the bottom
Thank you! I'll keep it on mind. but I would like to hope that they still didn’t fail =)
The only catch is that the trunk upholstery is riveted to the backrests.
This is how... it turns out that they will need to be “unriveted?” Are they holding tightly?
To be honest, I don’t even know, but I reclined the seats a couple of times and 3-4 rivets vomited out. I didn't try to fasten them back.
Are they reusable or not, these rivets? or just pulled it out and that’s it...
There is a rope behind the headrest that you pull and the backrest opens. When I wanted to remove my backs, to my surprise, I didn’t find them. I had to open them from the trunk with a screwdriver. The trick was that these straps just fell into the gap between the back of the seat and the rear parcel shelf.
Ok, if I can’t find it behind the headrest, I’ll look in the trunk) Thanks!
How to fold the seat of a VAZ 2111 and VAZ 2112
| The large trunk of a VAZ 2111 or VAZ 2112 makes this car more versatile, but it is inconvenient to spend the night in it, because not everyone can fold the seats flat. However, there are at least 2 ways to make the floor level for comfortable sleep. |
Method No. 1
In the summer of 2004, ZaRulem magazine published an article “Feet Forward,” in which it was proposed to modify the car’s interior to obtain a comfortable sleeping place. To do this, the rear seat backs need to be made easily removable (slightly bend the lower hooks) and the armrest frame needs to be modified. We connect its brackets with a steel angle, put it on the standard body studs and no longer tighten the nuts - the frame is held quite securely, and can be removed in one movement. We lay the backs of the rear seats back to front on the front cushions, tilt the front backs and spread the carpet.
Method No. 2
Another method involves disengaging the front seat back hooks (one on each side) from engaging the cushion.
To reach them you need to stand with both knees on the front seat cushion, facing the backrest. Then we find the hooks with both hands and rotate them out of the mesh. After which the backrest lowers towards the windshield. To avoid scratching the upholstery, it is recommended to first recess the seat belt buckle. The flat floor for sleeping is ready! By the way, do you know how to make seat ventilation with your own hands? xn--2111-43da1a8c.xn--p1ai
Necessary tool for replacing seat upholstery on Lada Priora
To reupholster the rear and front seats on a Priora, you will need the following tool:
- Pliers or side cutters (or a pair of pliers).
- Crosshead screwdriver.
- Awl.
- Nylon ties 2.5×150, or 3.6×150.
The new upholstery was from, a more classic pattern, the fabric itself is pleasant to the touch, and the seams are even and do not tear. If your style is business, then you can choose “Skif”, although it will be more expensive.
Naturally, you need to change the upholstery on all seats, but if you are going to reupholster it for the first time, we recommend starting with the back row, it will be easier with it than with the front ones.
see also
- Is it possible to put 98 gasoline in a Priora?
- Restyled bumpers for Priora
- Priora brush size
- Priora wiper sizes
The wipers stopped working on the Priora- Size of wipers on Priora hatchback
- Priora electronic gas pedal
- How to properly bleed the brakes on a Priora
- The license plate light does not light up
- Where is the idle speed sensor on the Priora?
- Where is the immobilizer located on the Priora?
Tuning
Modifications to the rear seat of the VAZ 2110 are not that common. In this case, these structural elements are most often heated. This is quite easy to do. It turns out that such a modification is not too expensive in terms of money. And it becomes much more comfortable for passengers to travel. This thing will seem especially useful to drivers with large families living in the northern regions of the country.
For installation, you can use a commercially available heating kit - “Emelya”. You can also use a heater removed from another car. This element from Priora is best suited. The heating should have two parts (for the seat and backrest). To install, it is not necessary to completely remove the seats; partial dismantling is sufficient.
Heating is installed under the casing. The connection is made in the same way as on the front ones. The power buttons are located on the rear doors. It is best to display the power indicators on the dashboard. This will allow you to control the operation of the device. You also need to monitor the position of the device. It should not touch the seat springs.
. For various reasons, any driver has to deal with the need to remove seats. Therefore, it is important to know how to remove the rear seats on a VAZ 2110 and 2112. This will make your task much easier. Like any seat assembly, they can break; this happens rarely, but it does happen. You can always fix the problem yourself.
Relay and fuse blocks on a LADA Priora car
The VAZ Priora passenger car, regardless of the type of engine installed, is equipped with several junction boxes. They are located under the hood and inside the car. The use of several boxes made it possible to separate circuits with high and low currents. In addition, separate small-sized mounting blocks were installed, introduced as the configuration expanded.
Main power fuse block
The vehicle's power circuits are protected by inserts installed on the positive terminal of the battery. The block is designed to protect circuits with maximum currents. To gain access to the fuses, you need to remove the plastic cover; this can be done without the help of tools.
Block diagram and its location in the car
The removal of the most powerful circuits on the Lada Priora into a separate unit located close to the battery ensured maximum protection of the car's electrical system from overloads.
The location and designation of the inserts is indicated in the photo. Depending on the year of manufacture and installed equipment, it is possible to install fuses of different ratings.
Priora power insert block
How to remove the rear seats on a VAZ 2110 and 2112? When you really need it
Before removing the rear seats on the VAZ 2110 and 2112, check all the nuances of this work. This is not difficult to do, but it has its own peculiarities. Although this model is the progenitor of several models, from 2111 to Lada Priora, it still differs from its brothers in some elements. True, not too much. At one time, the Ten was positioned as a completely modern car. For the first time, a carburetor with automatic choke and many other new products were used on domestic cars. How to remove the rear seats on a VAZ 2110 and 2112 is a question often asked by the owners of this car. The design of the seats and their fastenings is as simple as possible, but at the same time reliable. This allows you to remove the seats at the right time. At one time, entrepreneurs who used the car for work pulled out the seats when they needed to travel for goods. After which they were easily and quickly put back.
Electromagnetic relay
An electromagnetic relay is a switching device designed to relieve contacts. The work is based on the law of electromagnetic induction.
In cars, relays are used to unload contacts on control buttons, so that they, in turn, do not melt or heat up when more current appears on them. The relay consists of moving and non-moving contacts, a DC coil, a return spring, a coil core and an armature.
Relay operating principle
When a current appears on the relay coil, a magnetic field is formed in it, which in turn begins to attract the armature to which the movable contacts of the relay are attached. As a result, the moving contacts close with the fixed ones and the electrical circuit is completed.
How to reupholster the rear and front seats of Priora
The first thing you need to do is disassemble the back row, then put it in a place convenient for you, maybe right in the middle of the room. The whole procedure consists of straightening the metal rings, rearranging the knitting needles and stretching the new upholstery using not rings, but ties.
- The old upholstery is attached to the body using steel rings; we unbend them. If you try to snack on them, it will be a rather labor-intensive task. Therefore, simply use side cutters to twist the ring clockwise, and it will come off. If that doesn't work, use pliers.
- To give the upholstery a shape, it is attached using a knitting needle with rings to a knitting needle in foam casting, and we also unbend them.
- We remove the old upholstery, take out the knitting needles and insert them into the new one.
- Using a screwdriver or an awl, we make holes in the upholstery along the spokes and connect the holes made with a tie to the spokes in the foam casting. Instead of steel rings, it is better to use ties; the work then becomes much easier. And in terms of strength it is no worse than rings.
- We tighten the ties evenly, bite the edges and remove the locks inside so that they do not stick out from the upholstery. When tightening the clamps, watch the tension; when tightening, folds will appear that cannot be removed.
- We also make holes along the contour of the upholstery and connect it to the body with clamps.
With the backs everything is absolutely the same. The only thing I would like to talk about is the removal of the headrest clamps. There is no information on how to remove them on the Internet at all. To remove them you need to press on one of the tabs with a screwdriver and pull it up. Quite difficult to remove.
Priora armrest and headrest reupholstery
Armrest . There shouldn’t be any special problems here, the upholstery is simply attached with Velcro. Don't forget to make holes for further fastening.
Headrests . We unscrew the protective cover, pry up the upholstery and remove it from the hooks. We insert the knitting needles from the old upholstery into the new one, stretch it and hook it onto the hooks. Screw the cover back on.
The spokes in the headrest are of different lengths, do not mix them up.
Detailed video on reupholstering seats, headrests and armrests on a Priora with your own hands
How to recline the rear seat on a Prior sedan
We invite you! What will still be included in the list of useful information, you ask? Firstly, we will show you the main everyday things that a person should know about car seats, and specifically we will show you clearly how to remove the headrests from the seats, and similarly we will show how it is necessary to correctly fold out the rear seat of a car in order to transport large items oversized loads and a little more useful information will be given about the seats.
Note! Real seat adjustment is an integral part of any car, because when it comes to purchasing a new car, everyone is different and in order for each person to sit comfortably in the car, you need to adjust the seat specifically to it (We are talking about front seats), but remember once and for all, the seat It is recommended to adjust only when the car is stationary (applies only to the driver), since when adjusting the seat, for example by length, you can lose control of the car because if you incorrectly fix the seat on the car, in other words, the possibility that it will suddenly move backwards and thus you can lose control over the car, so be careful!
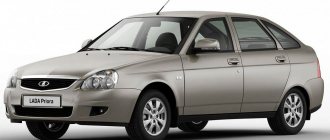
Which is better - Priora or Daewoo Nexia? Budget cars against each other
In the eternal dispute between domestic and foreign manufacturers, which is better than Priora or Daewoo Nexia, the final word, of course, will be with the final buyer.
And as a result, it is the driver who wants to buy a car who has to choose. Many, moreover, are rather biased towards VAZ’s developments, but the Russian auto industry also does not stand still, but applies (and quite successfully) some technological developments. And Nexia, to be honest, is not such a foreign car: after all, it is produced in Uzbekistan, in the vast expanses of the former USSR. Which is better than Priora or Daewoo Nexia? Let's try to compare these two models. Perhaps the analysis, although rather cursory and superficial, will help you in making your purchasing choice. After all, both cars overlap in the price segment. So, let's look! Who is who? Evil tongues say that Nexia is generally “Uzbek” and, literally, just a little bit “Korean”. Well, there is some truth in this, because the car is produced in the former sunny Soviet republic, only under the license of the main company. In addition, since 2008, this model has not actually been updated or restyled. The Lada Priora, first released in 2007, has already been improved several times with significant technical improvements. By the way, many mechanics, specialists in Russian cars, claim that it was as a result of these restylings that Priora managed to achieve quite high results and rise to a fairly competitive level. Plus the eternal national love for “ladushka” and “ten”, which also has a purely moral significance in terms of purchaseability. After all, if you take a closer look at the car, you can’t help but miss the painfully familiar outlines: Priora was created structurally on the basis of the famous VAZ 2110, this is an inalienable fact! Moreover, the very first priors generally looked like “daughters” of dozens. Of course, a lot of water has passed under the bridge since then, but something recognizable remains in general terms. Today Priora is a car loved by both young and old. It is responsive and picks up speed well, is equipped with airbags and is the most expensive item in the VAZ sales catalogue. Some features and characteristics Many of them are almost the same. Body type – sedan. Number of seats – 5. Number of doors – 4. Engine volume – 1.6 l, petrol. Maximum speed – 185. Drive type – front-wheel drive. Length, height and width are almost identical. But there are also significant differences, which we’ll talk about. Unlike the VAZ model, Nexia has a fully welded body. The front seats are perfectly adjustable and do not raise any questions. The sofa in the back is not so spacious, and the three of us already have to push elbows. The car body is elongated, and the hood is tilted downwards. Modern light optics give the Daewoo a head start and add solidity. But the Priora has a more decent ground clearance, clearly tailored for Russian roads. The Lada will pass where the Nexia will practically crawl on the bottom. The Priora also has wider doorways, which can be a good plus for possible transportation of large items. The Nexia is traditionally considered a family and classic car, which is why its interior is a little conservative. The interior looks like a modest four: the faded colors of the design evoke sadness, and the finishing materials themselves are inexpensive and harsh. By the way, in terms of interior decoration, Priora can boast that its design was developed by specialists from Italy. High-quality materials are used, the interior is ergonomic: everything is at hand, nothing is superfluous. The torpedo looks impressive and beautiful. The seats are comfortable for both passengers and the driver. Comparing the instrument panel, it can be noted that both models have quite large gauges. In the Priora, the optics control mechanisms are located on the left of the steering wheel: dimensions, fog lights, main headlights. And in front of the driver is an on-board computer monitor, which creates additional driving comfort. The presence of a control unit driver's airbag, power steering, immobilizer, front power windows, radio - in the basic configuration. In terms of visibility, the Priora occupies the best position. In Nexia, the headrests can block the rear view, and a distorting effect is noted in the mirrors. Trunk: In Nexia it is 100 liters more than in Priora - 530! Among the shortcomings: the rear seat back does not recline, so it is not possible to create additional space. What is successfully solved in the Lada: Engine, gearbox, fuel consumption: The most powerful of the engine options for the Nexia is 109 horses. Priora has 106, so they are quite comparable in these indicators. They are equipped with a 5-speed manual transmission. It is noted that Priora has a more flexible lever. The gluttony of iron horses is approximately at the same level: in the city - a little less than ten, on the highway Lada - 5.6 liters, Daewoo - 6.5 liters. To summarize: Thus, we have established that in the question of which is better Priora or Daewoo Nexia , there is simply no clear and unambiguous winner. Some prefer the Korean Uzbek product, while others prefer the familiar Lada of the domestic automobile industry. In addition, the price range is almost the same. Some consider the Nexia to be a more reliable car - it’s still Korean. But I think a certain stereotype in thinking is at work here. AutoFlit.ru
How to remove the back seat from a Priora
To perform work on removing the rear seat you will need: a 10mm wrench and a Phillips screwdriver.
Press the seat cushion lock handle.- Raise the edge of the pillow
- In the same way we release the second side of the pillow
- We remove the pillow.
- Pull up the seat back lock strap.
- Remove the backrest by lifting it up.
- We also remove the second seat back.
- Unscrew the screw securing the armrest to the hinge.
- Unscrew the screw securing the armrest hinge to the body.
- We remove the loop.
- In the same way, remove the second armrest hinge and the armrest.
- If the pillow clamp is broken, then unscrew the screw that secures it.
- remove the lock
- Either we change the spring, or we change the retainer assembly.
- Reinstall the rear seats in reverse order.
Seat removal video:
Removing the front seats of Lada Priora
Required tools : flat screwdriver, 13mm socket, Torx E-10 socket (or regular 8mm socket).
- Move the driver's seat back as far as it will go and disconnect the torsion bars using a flat-head screwdriver.
- Remove the torsion bars from the mountings and remove them.
- Unscrew the 4 nuts securing the pillow base strut brackets using a 13mm socket. Remove the brackets from the studs.
- Tilt the driver's seat back. Remove the 2 front bolts securing the seat slide to the body using a Torx E-10 socket.
- Tilt the seat forward and move it to the full forward position. Similarly, unscrew the 2 rear mounting bolts for the slide using a Torx E-10 socket.
- Remove the Priora seat from the car interior.
Installation of the front seats is carried out in reverse order.
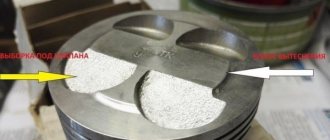
Priora engine compartment photo
The small class car VAZ-2170 Lada Priora with a four-door sedan body (class C according to the international classification) is designed for operation at ambient temperatures from -40 to +50 °C on public roads with hard surfaces.
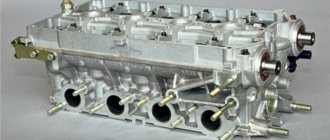
The Lada Priora is equipped with an injection 16-valve engine mod. located across the engine compartment. VAZ-21126-00 with a working volume of 1.6 liters. The engine is equipped with a distributed fuel injection system and an exhaust gas catalytic converter, structurally made in a single block with the exhaust manifold (catcollector).
The body is load-bearing, all-metal, of welded construction, with hinged doors, front fenders, hood and trunk lid.
The driver's seat of the Lada Priora is equipped as standard with an airbag, and in an optional version - with a front passenger airbag, as well as front seat belts with pretensioners and load limiters, which significantly reduces the likelihood and severity of head and chest injuries in a traffic accident.
The airbag only deploys when there is a strong impact to the front of the vehicle. In minor frontal impacts, vehicle rollovers, rear or side impacts, seat belts are the primary means of protection.
The transmission is made according to a front-wheel drive design with drive wheels of different lengths.
The front suspension is independent, spring, with anti-roll bar, with hydraulic shock absorber struts. The rear suspension is semi-independent, lever-spring, with hydraulic shock absorbers.
The front wheel brakes are disc brakes with a floating caliper, the rear wheels are drum brakes.
In a variant version, Lada Priora cars are equipped with an anti-lock brake system, which prevents wheel locking during braking and maintains controllability and directional stability.
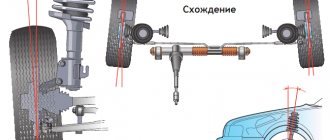
The steering is injury-proof, with a rack-and-pinion steering mechanism, with an electromechanical booster that changes the transmitted torque depending on the speed of the vehicle.
Lada Priora cars are equipped with a remote control system for locking or unlocking door locks (in an optional version and locking the trunk lid lock) with simultaneous activation or deactivation of the vehicle security mode. In addition, remote activation of the alarm system in case of violation of vehicle security zones and blocking of all doors by pressing a button from inside the vehicle are provided.
This system also includes an electronic engine locking system (immobilizer), which provides additional protection against unauthorized engine starting.
The overall dimensions of the car are shown in Fig. 1.4, technical characteristics are given in table.
Elements of the engine compartment of the VAZ-2170 Lada Priora are shown in Fig. 1.5, the location of the main components and assemblies is shown in Fig. 1.6 and 1.7.
Figure 1.4. Overall dimensions of the Lada Priora car (mm)
Figure 1.5. Engine compartment of the car:
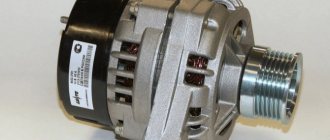
1 - engine; 2, 14 — power unit supports; 3 — steering mechanism; 4 - throttle assembly; 5 — reservoir of the main brake cylinder; 6 — expansion tank of the engine cooling system; 7 — main fuse block; 8 — washer reservoir; 9 - battery; 10 — air filter; 11 — mass air flow sensor; 12 - alarm signal; 13 - generator; 15 — hood stop
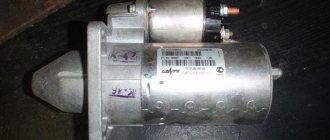
Figure 1.3. Location of the main components of the vehicle components (bottom front view, engine splash guard removed): 1, 3, 13 — power unit supports; 2 - generator; 4 — radiator of the engine cooling system; 5 — electric fan of the engine cooling system; 6 - starter; 7 — cross member of the front suspension; 8 — front suspension extension bracket; 9 — front suspension stretch; 10 — shock absorber strut of the front suspension; 11 — stabilizer strut; 12 — left front wheel drive; 14 — gearbox; 15 — exhaust pipe of an additional muffler; 16 — engine oil sump; 17 — catalytic collector; 18 — right front wheel drive; 19 — anti-roll bar; 20 — front suspension arm; 21 — front wheel brake mechanism
Removing the rear seats of Lada Priora
Required tools : 10mm socket, Phillips screwdriver.
- Release the latch by pulling the loop.
- Fold the right side of the seat back forward and unfasten the fastening buttons for the trunk trim.
- Pull the backrest hinges out of the body hooks and remove the right side of the backrest.
The left side of the seat back is removed in the same way.
- Press the latches on both sides of the seat cushion.
- Remove the pillow.
- Unscrew the 2 screws of the upper fastening of the plastic partition using a Phillips screwdriver.
- Unscrew the 2 nuts securing the armrest hinges to the body using a 10mm socket.
- Remove the armrest.
- Remove the plastic partition.
Installing the rear seat of the Priora is carried out in the reverse order.
Dismantling the upper and lower lining of the floor tunnel
First of all, it should be noted that the lining should be removed after cleaning the floor in the cabin, after which disconnect the “?” terminal. from the battery and perform the following steps.
1. There are two mounting screws on the right and left sides of the floor tunnel lining. Unscrew them and remove both trims.
3. The lining, which is located on the facing, is removed by pressing its front part under the parking brake lever. Take it off too.
4. Remove the gear shift lever handle by pulling it up.
5. The car gearshift lever cover is attached to latches on each of the four sides. To remove it, press out each one with a screwdriver.
6. Now you can move on to the cladding itself. Unscrew the central fastening screw.
7. Fold the front seat back, which raises the front edge. This will open access to the middle fastening of the cladding. Remove the screws on both sides of the cladding.
8. Slide backwards and remove the top lining of the tunnel. It is installed in the reverse order of removal.
9. Move the seats forward. There are air vents underneath them. They can be removed by unscrewing the fastening nuts.
10. The lower tunnel lining is secured with six nuts. Unscrew each one and remove the lining itself.
11. When the manipulations to repair the required unit have been completed. All that remains is to install the lower lining of the car floor tunnel
This is done in the reverse order of dismantling. Pay attention to the air vent pipes: both should fit into the holes on the lower lining
As you can see, there is nothing difficult in dismantling the floor tunnel lining. This event requires attention to detail and adherence to order.
Disconnect the negative battery from the terminal, and for ease of work you can remove the front seats. Then:
- Unscrew the nut of the air duct securing to the legs of passengers in the rear seat, using the socket “10”.
- Remove the air duct. Similarly, remove the second air duct on the right side.
- Raise the armrest and pry the pad onto the armrest hinges.
- Remove the armrest of the Priora Lada.
- Unclip the latches to pry open the storage container for small items. Pull it out. Unscrew it.
- tunnel 2 bolts securing the armrest hinge from the head using “10”, and remove it.
- Unscrew the 4 screws of the floor fastening tunnel using a Phillips screwdriver.
- Through the opening, press the latch and remove the block with wires from the trunk lock button control.
- Unscrew the 2 fastening tunnel nuts using a high 10mm socket.
- Place the front seats in place and move them forward as far as possible. self-tapping screw Unscrew the tunnel fastenings to the base on the left and right - similarly, using a Phillips screwdriver.
- Remove the plastic plug at the bottom of the cup holder using a flat blade.
- screwdrivers, self-tapping screw for securing the cross-shaped tunnel. Unscrew.
- self-tapping screw Unscrew the fastenings of the front part of the tunnel using a Phillips screwdriver. Unscrew the self-tapping screw on the right side in the same way.
- Unclip the latches and remove the Priora gearbox cover. Leave the frame with the cover on the lever. Unscrew.
- Gearbox 2 screws securing the tunnel to the instrument panel console using a Phillips screwdriver.
- Raise the tunnel up.
- Press the latch and disconnect the cigarette lighter plug from the wires. Remove the central tunnel of the Priora.
lining Installation of the tunnel is carried out in the reverse order.
Installation of torsion bars for the front seats of Priora
We place the taller plastic bracket (No. 1) closer to the threshold, and the less tall one (No. 5) to the floor tunnel. In this case, the hooks (No. 2) of the brackets should be directed towards the front of the car. We insert the short end of the torsion bar (No. 3) into the hole in the bracket (No. 5) and insert the torsion bar (No. 3) into the hook (No. 2) of the bracket (No. 1). Then use a mounting spatula or a powerful screwdriver to place the long end of the torsion bar (No. 3) behind the hook (No. 6) of the pillow base post. We install the torsion bar (No. 4) in the same way. The long ends of the torsion bars should be directed towards the front of the car.