A car is a complex complex of various systems that are inextricably linked. The failure of one unit can provoke unpleasant consequences for both the car and the driver. Almost all mechanisms included in the control system operate in difficult conditions: large amounts of dirt, dust, water, snow, chemical reagents, negative temperatures. For this reason, they are very vulnerable, and their technical condition must be treated with increased attention, especially when operating a vehicle on unpaved roads.
What are tie rod ends used for?
Steering tips are responsible for turning the wheels, both on Kalina and on other cars. If the steering rack did not have movable tips, then there would be no question of any softness of the suspension when hitting bumps and getting into potholes.
Tie rod ends operate on the ball joint principle. But do not confuse the ball joint with the steering ends - these are different parts.
On Kalina, good quality steering ends usually last from 20 to 50 thousand kilometers. If a person takes care of the pendant, then the tips take longer to take care of.
The service life directly depends on the following factors:
- quality of roads;
- season;
- driving style.
Steering tips serve to transmit driving force from the steering column to the wheels. At the same time, all steering tips are hinged.
All tie rods are similar in design. So, replacing these parts, which are considered consumables, most often follows the same algorithm.
Is it necessary to do a wheel alignment?
It is necessary to do the alignment if you did not count the turns when unscrewing the old tips, and you also want to check if it has gone astray.
We advise that even if you have counted the turns, check the camber as a preventive measure, since problems may arise later: the car will pull to the side or start “eating” the rubber.
The tie rod end is an important element of the car, the function of which is to transmit translational energy from one steering unit to another, provided that the angle between them can change. The tip is made in the form of a hinge - a device with moving elements. As a rule, the number of these components in different models may differ - much depends on the type and design features of the steering. In particular, the number of rods ranges from four to six.
Device Features
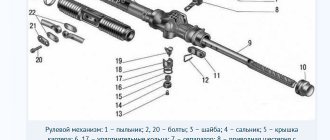
Tie rod ends consist of several main components - a casing with an axle shaft, a ball pin (it has a special thread cut into it), a Teflon liner (the task is to ensure full movement and fixation of the ball pin), a boot (protects the unit from dust and dirt), a cover on body (also protects the unit from various debris). In addition, the design of the tips includes a special elastic ring (designed to hold the cover on the finger), the nut of the finger itself and the spring of the cover (it is used to secure the edge to the body).
Where to find tie rod ends for Lada Kalina
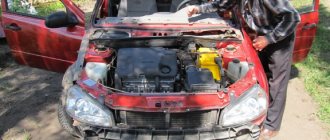
Before you start replacing tie rod ends on a Lada Kalina, you need to clearly understand where they are. You can see the traction ends without even removing the wheels. It is enough to simply lift the body on jacks on both sides or on each side in turn.
The ball ends are attached to the trunnion arm. By turning the wheel, you can free up visibility and space for repairs.
How do you know when it's time to change your tie rod ends?
It is quite simple to determine that it is time to change the steering rods on the Lada Kalina. To do this, you need to pay attention to the steering play. When driving at low speeds in a straight line and on a level road. Rotate the steering wheel in different directions a few degrees and evaluate the play. When the front wheels get into potholes, the broken steering ends will make a knocking sound that can be felt through the steering wheel.
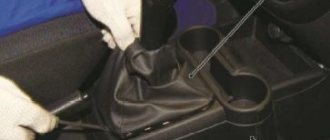
For those who have not yet learned how to identify suspension faults while driving, it will be easier to visually assess the condition of the steering rods. We turn the wheel out, lift the car on a jack, and look at the tip.
If the anthers are torn, then they need to be replaced without hesitation. If the anthers are intact, the play can be determined using an ordinary mount.
If you don’t believe in your abilities, it’s better to go for a suspension diagnosis. It’s inexpensive, but you’ll know exactly which parts need to be changed, and at the same time see where they are.
How to adjust the spring and tune the amplifier?
Rail
The spring requires adjustment due to its natural tendency to stretch over time. The tightening should be done after disconnecting the steering unit shaft. The action does not imply the need to remove the entire mechanism from the car.
Repairing the steering rack involves correctly setting the amount of gap observed between the shaft gear and the rack itself.
- To do this, the rack assembly will need to be set to the central position and secured against spontaneous displacement.
- Remove the rubber plug.
- Place the indicator probe inside the opened hole and make sure it comes into contact with the stop (close).
- We rotate the gear shaft, with the help of which the stop is pushed out. We measure the length of its movement with an indicator, which should be within 0.05 mm.
If we observe an excess of the measured value beyond the designated limit, we resort to eliminating it by rotating the adjusting nut. After completing the procedure, we check whether the electric power steering rack rotates easily in the crankcase by rotating the steering wheel all the way in both directions.
Note that the adjusting nut should be rotated with a special wrench. Do not try to tighten this nut with great force, as this may cause difficulty in turning the steering wheel, especially in extreme positions. It is advisable to make adjustments in stages. First, turn the key 20-25 degrees and check the assembly for absence of knocking during the rack movement. If the knocking does not disappear, then we add the angle of rotation by about 10-15 degrees and again resort to control. It happens that a lift does not lead to the expected result. This hints at repairs, and perhaps only the steering rack will need to be replaced.
What tips are best to buy for Lada Kalina
When purchasing spare parts for any car, the manufacturer recommends using the original. In the case of the Lada Kalina, everything is the same, only the original is produced by VIS LLC.
Owners of Lada Kalina cars recommend foreign-made analogues - they take better care than the original.
If we talk about specific brands, we can recommend the following tie rod ends:
- Lemforder;
- Fenox;
- Sevi;
- MANOVER and so on.
Spare parts sellers may recommend that you replace the entire steering rod, including the tip. But, as a rule, it is the tips that break; there is no need to spend money on the rod assembly.
Replacing tie rod ends on Lada Kalina
We figured out where the tips on Kalina are located, determined whether they were broken and bought new spare parts. Now it's time for replacement. The procedure is not complicated, but requires special attention. Incorrect installation may damage other mechanisms. Your safety while driving depends on this.
Preparing to replace tie rod ends
It is better to work on a lift or in a pit, but if there are no conditions, you can get by with a jack. Before you begin replacement work, you need to prepare the following tools:
- A set of wrenches and socket heads (keys 10, 17 and 22 are required);
- pliers;
- a torque wrench is desirable;
- a puller for pressing out the tip will simplify the work;
- hammer;
- mount.
Don't forget about safety. We place stops under the rear wheels, two for each wheel on different sides. After lifting the car with a jack, be sure to place a block for insurance. Some drivers also put the removed wheel under the bottom just in case.
Procedure for removing the steering rod
First of all, we remove the wheel to simplify access to the tip of the Lada Kalina. We see the tip and, using pliers, remove the cotter pin that secures the nut on the hinge pin. Then unscrew the nut with a 17 wrench.
We loosen all the nuts that secure the steering tip, then press out the tip itself using a puller. If you don’t have a puller, then take a pry bar and a hammer. Carefully knock out the steering tip, pressing it at the same time with a pry bar.
It all sounds quite simple and easy, but in fact you will have to work hard to unscrew the nuts. Nuts often stick tightly, and the threads can be stripped. So, if the nut doesn't fit, take WD-40 and pour it thoroughly on all the nuts. You may need to soak the nuts for several hours.
If time is running out, it will be easier to remove the tie rods along with the ends and heat up all the tie rod nuts. Tap them with a hammer and then they will come off without any problems. For heating, a gas burner or special gas cans are usually used.
It is not difficult to remove the entire rod - unscrew the nuts and remove the protective cover. We bend the locking plate and unscrew the rod from the steering rack. We press out, press out or knock out the tip pin from the steering knuckle with a hammer and pry bar.
Of course, it is better to do without removing the traction, but it depends on your luck. If the car has been serviced on time, then removing the linkage when replacing steering wheel ends is usually not required.
When unscrewing the steering ends, it is advisable to count exactly how many turns the old ends were screwed in. When you screw in new tips, screw them in the same number of turns.
Of course, this will not save you from the need to go to the wheel alignment after the work has been done. But you can get to the service station or drive for several days without any special consequences.
Well, if you don’t have a torque wrench, then you’ll have to count the number of revolutions all the more. Otherwise, the new steering tip will have to be screwed in by eye.
Installing a new tie rod
Work on installing a new steering end is carried out in the reverse order. There will no longer be any problems with tightening new nuts on Kalina.
The only thing you need to pay attention to is the cleanliness of the thread and the presence of lubricant on it. There is most likely no grease on the threads for a long time. Therefore, we lubricate all threaded connections with graphite lubricant.
The nut securing the steering tip to the lever must be tightened with a certain force. In some operating and repair manuals for the Lada Kalina you can find information that the tightening torque should be on average 70 Nm.
In fact, the tightening torque is 27-33 Nm. This is why we counted the number of turns. And if you haven’t, then a torque wrench will help us.
Don’t forget about the cotter pin, which must be used to secure the nut so that it does not unscrew while the car is moving.
If you want to be as confident as possible that the steering tips will last as long as possible on your Lada Kalina, it is recommended to check the amount of lubricant under the tip boots. The boot is removed from the new tip carefully so as not to tear it. Next you need to remove the O-ring and spring ring.
Kalina's steering tip finger should be covered in grease. Unfortunately, this is not always the case. If there is not enough lubrication, then fill the boot with lithol-24, then install it back on the steering tip and put on the O-rings.
Design features
The structure of the Lada Kalina steering unit includes:
- electric amplifier;
- steering column, adjustable for reach and tilt;
- electric power steering rack with gear ratio change mechanism;
- rods with tips, as well as rotary levers.
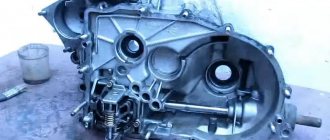
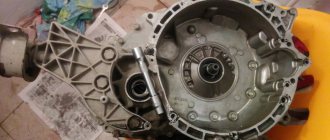
In the mechanism housing there is a unit with mechanical gearing, where the main operating element is a helical gear, the pitch of the teeth of which varies depending on the length of the rack.
The figure shows the design of the Lada Kalina rack and pinion unit.
The pressure in the rack-and-pinion pair is carried out by means of a spring, and the plastic liner present is designed to reduce the friction force. The compression level of the spring element is adjusted using a nut. The factory gap between the steering shaft and the rack is 0.1 mm in the LADA Kalina model.
If a knock appears inside the unit, it can be eliminated by adjusting the gap with your own hands. The steering shaft is centered using two bearings, one of which is located in the column bracket, and the second is located inside the electric power steering housing. The bracket is connected both to the pedal mounting unit, or rather to its front part, and to the body. Structurally, the bracket together with the pipe forms a hinged connection from a pair of plates. This unit provides a change in the position of the steering wheel, where the width of the range of movement is limited by slots in the designated plates.
The specific position of the pipe is fixed by a lever, which is connected to a special bushing that performs an adjustment mission. It is screwed onto a coupling bolt located just in the slots of the plates. When the lever is turned, the sleeve rotates synchronously. At this moment, the fixation of the plate weakens, and the steering wheel begins to change its position. Springs located in the middle of the bracket and plates, when the fastening is loosened, pull the pipe in the upward direction.
Let us repeat, the steering unit of the Lada Kalina has two rods and rotary levers. The rod design includes two tips, one of which is external, and the second is internal. The process of adjusting the length of the rod is carried out by rotating the threaded bushing present here. Having completed the adjustment manipulation, the position of the tips should be fixed with specially designed bolts. The outer rod end is connected to the swing arm bracket via a ball joint.
The power steering mechanism, operating on an electric drive, changes its degree of gain depending on the driving speed. When the car is stopped, the amplifier produces maximum torque, and the steering wheel turns very easily. As the speed increases, the force on the steering wheel of the Lada Kalina increases, which is facilitated by a decrease in the torque generated by this unit. The mechanism is based on an electric motor, which transmits rotation through a gearbox “hidden” under the column casing. The amplifier is controlled using an electronic unit, which is supplied with impulses from speed sensors, recognizes the amount of force when rotating the steering column shaft, and also reads the number of revolutions of the engine shaft. The instrument panel has a special indicator that allows you to monitor the operation of the amplifier.