Timing belt tension
On many modern internal combustion engines, the timing belt is tensioned automatically; the mechanic only needs to fix the position of the tensioner roller. But there are also quite a few power plants where the belt is tensioned with manual checking. As a rule, the hands of an experienced craftsman cope with this task with a bang. It will be much more difficult for a beginner to do this. In this article we will try to provide recommendations and advice that will greatly facilitate the task of diagnosing the tension of the timing rubber ring.
VAZ "Ten"
A popular car equipped with an engine with a timing belt drive. The manufacturer recommends replacing the rubber band of the GRS mechanism after 40-45 thousand kilometers, but diagnostics cannot be neglected before this period. The principle of “installing a new belt and forgetting about it” must be eradicated, understanding that being guided by this rule will not lead to anything good.
Attention. It is very important to regularly diagnose the technical condition of the belt and its tension.
In order to check the tension today, special electronic devices are used, although you can do without them. Only on the timing rubber product itself there should not be a drop of oil, dirt or signs of tear. Everything must be almost perfectly clean, without delamination, for the diagnosis to be most effective. Otherwise, it is better not to bother with diagnostics, but to immediately replace the belt with a new one, eliminating the reason why it was worn out or lubricant got on it.
Another important condition: the check must be carried out on a cold internal combustion engine.
The checking and adjustment process itself is as follows:
Now directly about the diagnostic process:
Attention. If the tension is accurate, the deflection should be 5.4 mm. Otherwise, adjustments will have to be made. If the value is less, then the tension is too strong; if it is more, the belt is too loose.
The adjustment is carried out as follows:
Note. The nut should be fixed so that the roller does not move and cannot be released.
It is also important to remember that excessive tension on the rubber timing ring reduces its service life and can easily lead to failure of the tensioner roller and even the pump. You should not listen to those false masters who claim that strong tension will supposedly eliminate all problems with the belt.
Weak tension always means the belt jumps over the teeth of the camshaft sprocket, which inevitably leads to disruption of the phases of the hydraulic valve mechanism. On the contrary, a strong tension is wear by the bearing of the same roller or water pump, as well as direct wear of the belt.
The tension can also be checked using a special device, such as “Contiteg”. The principle of its operation is quite simple, you just need to measure the amplitude of the belt vibrations.
The device always comes with a detailed description of its operation in a case. It consists of a device with readings, as well as a sensor, which must be brought to the belt (at a distance of 1 cm).
Attention. It is extremely important that the sensor “overlaps” the belt with only half its length.
A natural question arises: why do we need a video?
The composition of the roller is small: it is a roller mount, an internal rolling bearing with a protective seal, and the working fluid of the roller itself, which is in contact with the belt. According to the principle of their operation, timing rollers are divided into two groups:
1. Idler rollers, or parasitic rollers as they are also called, which are designed to obtain the desired belt trajectory.
2. Tensioner rollers, which are needed to ensure the necessary belt tension.
In different types of engines, the number of rollers may be different and vary from one to four pieces.
Let's try to figure out how to tension the timing belt with rollers. So:
1. Tension the belt manually. In this case, the degree of skill of the specialist performing this operation is extremely important. If it is not tight enough, the belt will beat, which can lead to a belt break; if it is over-tensioned, there will be increased wear on the belt itself and the mechanism of the rollers themselves, with the same consequences - a belt break. In the event of a break, expensive repairs cannot be avoided.
Audi 100
In general, Audi modernized almost all engines in 1991. Thanks to it, the optimal power values have shifted in the direction of cutting speed. Thus, this directly affected the nature of the tension of the rubber timing ring.
You should know that initially the belt on the Audi was tensioned using a pump. This was actually done only once, and then when replacing, a new belt was installed without any adjustments.
After modernization, instead of a stationary roller, a movable one equipped with a temperature compensation system was installed. This roller assembly was supplied assembled and cost about $130, but the owners rarely used the original ones and installed duplicates for $20 in order to save money when replacing them. But as a result of this, some Audi owners began to have problems; the belt periodically shifted and slipped out of place.
The task of adjusting the Audi timing belt comes down to ensuring that the belt can be twisted 90*, or in other words, one quarter of a full turn. Below are instructions on what and how to do if the tension is too strong or too weak.
Attention. If distance “A” is less than the above values, the roller should be replaced. The thermal roller performs several functions on Audi. Depending on the temperature of the internal combustion engine, the device changes the belt tension. You should know that when the motor gets very hot, the tension is automatically weakened.
This thermal device lasts for approximately 150 thousand miles, but there are exceptions.
Kia
On Kia cars, you first need to figure out where the belt is. Depending on the specific Kia model, the belt may be shaped like a semicircle or come out as a tensioner bolt.
Other important recommendations:
- The mark on the crankshaft pulley must match the mark on the cylinder head cover.
- When adjusting the tension, be sure to use the correct size wrench.
Tension is carried out by turning the bolt with a wrench in the opposite direction. If the tension is incorrect, the internal combustion engine will not function properly. And if it starts to whistle and make unusual noise, this is a clear indication of insufficient tension.
How to check timing belt tension
How to check the timing belt
Replacing the timing belt is one of the key vehicle maintenance procedures. The process takes only 30 minutes, and its implementation guarantees uninterrupted engine operation.
The main thing is to promptly check the condition of this working node, otherwise serious problems may occur.
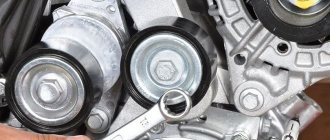
Timing belt, tension roller
Why check the timing belt
The operating time of the timing belt in modern cars ranges from 50,000 to 100,000 km. When this mark is passed, a new belt has to be installed, as well as tension rollers, pump and pulleys.
The timing of replacement is precisely regulated in the vehicle instructions by each manufacturer. But you should not rely entirely on official instructions, since in reality the part may wear out earlier than expected. Auto mechanics recommend checking the part every 40,000-45,000 km.
The timing belt is an element that synchronizes the operation of the pistons and the ignition system. It is tensioned on the pulleys of 2 shafts - the camshaft and the crankshaft. At the same time, the water pump is activated. Using a special roller, the toothed belt made of rubber and nylon is given the necessary tension.
If you do not monitor the technical condition of the belt in advance, it will break. This will cause the intake and exhaust valves to collide with the pistons. This is a breakdown that will require expensive repairs.
Cracks on a worn timing belt
How to check the timing belt. Self-test steps
Access to the unit is difficult - the belt is hidden behind different covers. For inspection, it is often necessary to partially disassemble the engine. Next, in addition to the belt itself, it is important to check the rollers. If they jam, the belt will break again.
The step-by-step process for checking the timing belt looks like this:
The tension can be easily adjusted by changing the position of the tension roller. If abrasions, scratches or cracks are found, the belt should be replaced to avoid serious damage.
Checking the timing belt tension
What signs indicate a timing belt replacement: 6 signs
Visually visible cracks and tears are not the only signs of possible failure. There are a number of other symptoms:
Conclusion
Checking the timing belt is a simple but important operation. This helps prevent major breakdowns. Auto mechanics recommend monitoring the car’s mileage, age and external condition of the part.
Let's move on to replacement
When replacing, the tension roller must also be changed (in addition, it is recommended to replace the cooling pump every second belt replacement). Operating procedure:
- Stop the car with the handbrake, then place chocks under the rear wheels.
- Raise the front right side with a jack and unscrew the wheel.
- Remove the wheel and protective mudguard
- Using the “10” key, unscrew and remove the timing case
Removing the timing cover
- To remove the generator pulley bolt (you can lock the flywheel by inserting a screwdriver or pry bar through the inspection window on the gearbox housing)
- Remove the alternator belt, then the pulley
- Unscrew and remove the timing belt protective cover
- Align the engine according to the marks (one is located on the camshaft, and the second is on the flywheel)
Timing belt tension: algorithm of actions
The timing belt is an element in the engine design that connects the camshaft and crankshaft, organizing the timely opening and similar closing of the valves. The belt drive must always be well tensioned; as a result, engineers have introduced special tensioners into the design of the gas distribution mechanism. Few people know, but not only the service life of the belt itself, but also the unit as a whole depends on proper tension settings. We will talk in more detail about how to tighten the timing belt, and when such an operation may be required, in the article given today.
A few words about the importance of correct tension
Many motorists know that improper functioning of the timing belt can cause very serious engine damage. This is due to the principles of operation of the mechanism, which boil down to the timely and high-quality opening/closing of the engine valves. This approach not only allows you to adjust the valve timing of the internal combustion engine, but also differentiates between sensitive valves and constantly knocking pistons.
If the timing belt begins to work incorrectly, the gas distribution order is disrupted, as a result of which engine elements begin to wear out at an accelerated rate. Similar disturbances in the functioning of the engine can also occur due to improper belt tension.
Note! A break in the belt drive while driving not only negatively affects the condition of the engine, but can actually severely bend the valves. Repairing a car with such a breakdown often costs motorists five-digit sums of money.
In addition, drive tension that does not meet the standards accelerates wear of the main timing elements, the list of which includes:
Repair of each of the marked timing parts takes much longer than normal belt tensioning. Well, there is nothing to say about the cost, if you can tighten the drive yourself and completely free of charge, then you will have to pay for replacing the components of the mechanism.
When does the belt need to be tightened?
Having considered the previous paragraph of the article, it was probably not difficult to understand that monitoring the correct functioning of the timing belt is quite important. In particular, it is worth keeping the belt drive tension at the proper level. By the way, stretching is carried out only in two main cases:
In situations that do not correspond to those noted above, it is simply not worth touching the belt drive of the mechanism. Especially if the motor runs stably, without pronounced problems.
Stretching procedure
Let's say the timing belt on your car is literally slipping, or its tension is slightly off from the norm. What to do? Naturally, tighten the drive. Fortunately for many motorists, the tightening procedure is not so complicated and is completed within 5-10 minutes. To carry it out you will need the following tools:
The actual tensioning procedure goes like this:
Note! During repair work, you need to act carefully, without damaging adjacent timing elements. Often, the carelessness of inexperienced car repair workers complicates their lives by requiring additional repairs.
Perhaps this is where the most important information on timing belt tensioning has come to an end. We hope that the material presented today was useful to you and provided answers to your questions. Good luck in operating and maintaining your car!
Signs of a faulty alternator belt tension roller
First, make sure that the alternator belt tensioner pulley needs to be replaced. Signs of its malfunction are listed below:
- the generator does not fully charge the on-board network or it does not receive electricity at all;
- from the side where the belt is located, a sound similar to squeaking is heard;
- a hum is heard;
- the roller or belt vibrates a lot when the power plant is running;
- there is play in the video;
- The belt is worn on one side.
Some of these symptoms may indicate a problem with the components that drive the roller. A hum and squeaking noise may indicate wear on the bearings of the power steering pump, air conditioner or compressor. The malfunction may lie in the generator itself.
How to check timing belt tension
it is necessary to ensure that the deflection is 5-6 mm precisely due to the excess length on a cold engine, avoiding elastic deformation.
I recently had it replaced - when cold it hits the casing...
Please tell me, when tensioning the timing belt, do we use the method where the tension was checked by turning the belt 90 degrees? or 45? Or are these all fictitious stories of checking tension, and can you only check by belt deflection?
Dear, tell me how you can check the tension of the timing belt at 16 cl, besides the specified method in the Murzilka (about 5.4 mm 10 kg)? If possible, the most accurate verification method.
Volkswagen
As you know, Volkswagen cars are equipped with timing belts and chains. According to the service book, the belt tension should be carried out so that one branch of the belt can be rotated 90*, as is the case with the Audi. Only here a few questions arise.
Timing belt tension on Volkswagen Passat
For example, one of them concerns the rotation force of the belt. Some people have strong fingers, others have weak ones. For this reason, it is recommended to carry out a combined tension and take the average value. More details below:
- Do not tension the belt too much, and in this case, when the engine is accelerating, the belt will slam noticeably.
- Pull the belt tightly, and then the belt, together with the tensioner roller and the pump, will make a characteristic unpleasant sound.
You should push off from the golden mean, when the belt does not clap or make noise.
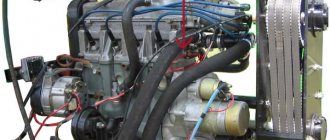
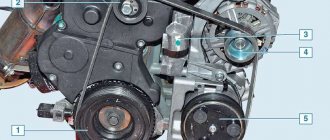
Tensioning the timing belt on a VAZ-2112 16 valves: checking the tension, drawings and video
The VAZ-2112 engine was installed on LADA cars of the “tenth” family: 2110, 2111 and 2112. Two timing shafts in this engine are driven by a belt. When replacing a belt, you need to be able to control the tension, and it seems that special equipment is produced for this. We believe that tensioning the timing belt on a VAZ-2112 can be done using a dynamometer. In this case, the tension force can be set without errors. You just need to make a technological plate used instead of a tension wrench. The drawing will be given below.
The following video shows how exactly the tension is checked, without even using a dynamometer.
The process of tensioning the timing belt “from start to finish”
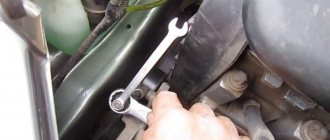
We perform all operations on a cold engine . Let's say the belt is now being replaced and the nut on the roller is not tightened. Then just skip "step 1":
- We take a crocodile clip for the battery and fix the belt on the pulley. Then use a 17mm wrench to loosen the nut (see photo).
First step before adjustment
How to set tension
On a VAZ-2112 engine, the timing belt tension depends on the force applied to the adjusting key. The force should be 2.0 N*m. And our distance from the axis to the “ear” is 51 mm (see below). Multiply 0.051 by 39.2266 (4 kgf in Newtons) and you will get what you need.
Plate drawing
The plate shown in the drawing is made from steel 2 mm thick. The pattern must be made based on the characteristics of the bending equipment. When bending, the length decreases, which means that the dimensions of the pattern will be larger than 94x75 mm.
Threads for M4 screws are cut in the standard way. Each screw should protrude 7 mm beyond the plane.
If the plate is not made
Everyone knows that on a VAZ-2112 engine, tensioning and replacing the timing belt is done using a key. Its appearance is shown in the photo.
Tension adjustment key
You can make a slot on the handle, and then, installing a dynamometer, adjust the force as shown above.
If the force is 4 kgf, then the distance from the slot to the midpoint between the pins should be 49.5 mm.
The difference between methods “1” and “2” is very simple: in the second case, the plate (key) is not fixed. This means that the key will have to be held at the same level while tightening the nut. Make a choice.
Another method for checking belt tension
It is convenient to check the tension when the timing cover is installed:
The role of the probe can be performed by a tube, steel rod, etc.
Error warning
If we talk about the VAZ-2112 engine, the timing belt tension can be increased or decreased. In this case, you must adhere to the recommendations:
The result of correct and incorrect settings is shown below.
Left - which is correct
Turning to the right should correspond to a loosening of tension. And the one who did the opposite, then let him take offense at himself: the belt will wear out very quickly!
If all recommendations are followed, the holes cannot be at the top (as in photo 2).
Replacement with a self-tensioning roller (automatic tensioner)
On engines 11194 and 21126, rollers with an “automatic tensioner” are installed. It would seem that the automatic roller is suitable for any VAZ engine. But don't rush.
Two different tension rollers
The roller from the VAZ-2112 engine is equipped with protrusions on the sides. There are no protrusions on part 21126-1006238. This is the problem.
Don’t take unnecessary risks - you only need the original roller 2112-1006120 or its equivalent.
What did we try for?
If the timing belt malfunctions, the VAZ-2112 engine successfully bends its valves, requiring their replacement. Violations include belt breakage, as well as jumping over several teeth. The second malfunction occurs when the tension force is too low, and the first is the result of wear on the belt as a whole. Draw conclusions.
Regulations and articles
Check the timing belt tension every 15 thousand km - this is the regulation. We will not give the belt part number - we were not talking about replacement. And if you decide to change the tension roller, find part 2112-1006120-XX. Instead of XX there may be numbers from 00 to 10, and all of these are products of domestic factories (00 is VAZ).
Components produced in Russia
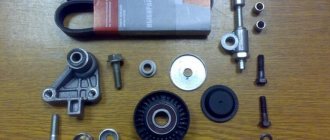
Chevrolet Lacetti Removing the coolant pump
We replace the pump assembly if there is noise from the bearing or in the case of tight rotation of the pulley with the drive belt removed, large radial play of the pump shaft, or fluid leakage from the inspection hole. Drain the coolant (see Replacing the coolant). Remove the timing belt (see Checking the condition and replacing the timing belt).
Using a 10mm head, unscrew the four bolts securing the bracket for the right support of the power unit (for clarity, shown with the engine removed)…
...and remove the bracket.
Using a 12mm socket, unscrew the lower fastening bolt of the rear timing drive cover.
Using a 10mm socket, unscrew the second bolt of the lower...
...and two bolts for the upper mounting of the rear timing cover.
Remove the rear timing drive cover.
Use a 5mm hex to unscrew the three screws securing the pump.
Remove the coolant pump.
Remove the pump O-ring. Before installing the pump, clean the mating surface of the cylinder block. We install a new rubber o-ring into the groove of the pump housing.
When subsequently adjusting the timing belt tension, it is necessary to turn the pump installed in the cylinder block socket.
Therefore, to maintain the sealing properties of the ring, we recommend applying a layer of silicone grease to it, which reduces friction in the moving joints.
Install the coolant pump in reverse order.
In this case, it is necessary to ensure that the groove on the pump body is located as shown in the photograph. The final tightening of the pump mounting screws is carried out after installing the timing belt (see Checking the condition and replacing the timing belt).
Adjustment
Lada Kalina Sport 1.6 Logbook Tightening the alternator belt
In the meantime, the adjustment procedure must be carried out regularly. This ensures that the unpleasant effect that was described in the previous section of the article will not occur, and you will not have to spend money on expensive and time-consuming engine repairs.
What do I need to do? In order for the adjustment to take place properly, it is highly advisable to arm yourself with a dynamometer. It will allow you to understand exactly how much adjustment to make in one direction or another, in order to avoid chafing of the thin rubber layer when operating the car.
Of course, you can do without a special tool. However, it is worth remembering that this is just a temporary measure. What can this be useful for? For example, the motor may fail along the way. Or the engine can be repaired independently, in a garage, and after that you need to drive to the service center on your own, so that the tuning can be done there with the help of special equipment more efficiently and accurately.