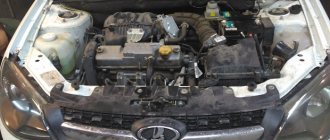
As you know, the Lada Kalina generator belt (belt of attached units) gradually wears out, stretches, etc. during the operation of the car. For this reason, you should constantly check the tension of the generator belt, and also assess the condition of this element for delamination, cracks and other defects.
The fact is that if the alternator belt is worn out or loose, the alternator itself may work worse, which leads to problems with charging the battery. You can also note the appearance of extraneous noise (for example, the alternator belt whistles or makes noise). In such a situation, a worn belt needs to be changed or, at a minimum, tightened if possible. At the same time, the condition of the generator belt rollers should be checked.
It often happens that the belt itself is in good condition, without obvious defects. However, it cannot be tensioned due to the fact that the Kalina belt tensioner has failed. Next, we will look at how to replace the alternator belt on Kalina with your own hands, as well as how to change the Kalina tension roller.
Lada Kalina: alternator belt, tensioner and features
Let us immediately note that not all modifications of the Lada Kalina have an alternator belt tensioner. For example, there are versions with an 8-valve internal combustion engine, where there is no such tensioner initially (Kalina generator belt without a tensioner). In turn, there are also 8-valve versions with a tensioner and 16-valve engines with a tensioner.
Taking into account such features, it is necessary to pay attention to certain nuances when replacing a belt on a particular type of internal combustion engine, as well as when selecting rollers, the belt itself, etc. Let's figure it out.
First of all, it is important to understand when to change the Kalina alternator belt. On a VAZ Lada Kalina with air conditioning, the service life of the alternator belt usually does not exceed 30-35 thousand kilometers. On versions without air conditioning, the belts may take longer, but many owners believe that replacing the Kalina alternator belt is still advisable after 30 thousand km.
Moreover, it should be remembered that the belt may become unusable even before the specified period, which indicates the need for regular inspection (usually every 10 thousand km).
The basic rule is that if there is noise or whistling, or problems with battery charging are noticeable, you need to check the alternator belt. During visual inspection, the presence of cracks on the working surface (track), as well as delaminations and defects on the outer part of the belt, is not allowed. If damage is visible, the element must be replaced.
At the same time, it is important to make the right choice of alternator belt for Kalina, since depending on the modification, different types of belts can be used on Lada Kalina:
- on an engine without air conditioning and tensioner, the belt length is 823 mm.
- the version with a belt tensioner without air conditioning has a belt of 882-884 mm.
- for an engine with air conditioning and tensioner, the length is 1018 mm.
- on a 16-valve engine with air conditioning and tensioner, a 995 mm belt is used.
As for the tensioner, in this case the Kalina belt tensioner may also sometimes require replacement. At the same time, the task of selecting a part is simplified, since the tensioner for all types of internal combustion engines where it is installed is the same (item number for the Lada Kalina tensioner is 2123–1041056).
2302-6-01-03_cr
So far, we have shown operations that will allow, if necessary, to change the tension of the accessory drive belt. But to replace the belt, we have to dismantle the right support of the power unit, since it passes through the belt.
From the bottom of the car, remove the middle and right mudguards of the engine compartment. You can see how to do this in the article “Replacing Lada Granta coolant”. Next, we should remove the fender liner of the right front wheel or, having freed all the fastenings of the fender liner in the front and middle parts, bend the fender liner by the brake disc of the wheel.
We hang and remove the right front wheel and release the fender liner fastenings according to the diagram.
Replacing the alternator belt on Lada Kalina
Let us immediately note that it is easiest to replace the belt on engines that do not have a tensioner. At the same time, replacement on other types of internal combustion engines (with a tensioner) is also not particularly difficult and can easily be done independently.
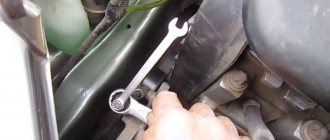
- Let's start with the first option. On an 8-valve engine without a tensioner, replacing the belt will require a 13mm wrench, as well as a small flat-head screwdriver. Please note that on this type of internal combustion engine the belt is very tense.
It is recommended to use only a suitable belt (eg POLY-V six-ribbed belt). It is not advisable to use other belts, as they are rigid and can reduce the life of the generator bearings.
To change the belt, the lower mounting bolt of the generator is unscrewed a couple of turns. Then you will need to unscrew the upper fastening nut, then push out the bolt using a screwdriver and remove the bolt. Afterwards, the generator is lowered to the bottom so that the eye passes through the gap formed between the radiator and the TV body.
Now all that remains is to remove the old belt, then install a new one. If the belt is difficult to tension on the pulleys, you need to know how to tension the alternator belt. You can usually tighten it with a screwdriver. The process is completed by raising the generator, which will allow the belt to be fully tensioned. The top bolt is inserted back, the nut is tightened. Then the bottom bolt is tightened.
- On an 8-valve engine with a tensioner, the process for replacing the belt is somewhat different. We also note that if the Kalina generator belt tensioner fails, replacement can also be performed within the framework of strictly removing and installing a new belt.
First of all, you need to prepare keys for 13, 17 and 19 (socket or regular). You also need a head 8 with a ratchet, open-end or simple wrench. At the same time, you should prepare a flathead screwdriver, a needle, cleaner, rags, a cleaning brush and a clean container. Let's add that you will also need to have lubricant for CV joints.
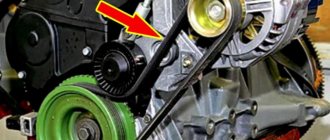
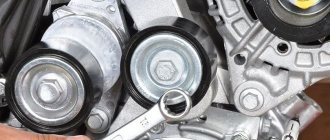
So, to adjust the degree of belt tension on Kalina, a mechanical tensioner is used. Please note that the Kalina generator roller, or rather the Kalina generator belt roller, often requires replacement or maintenance every time the belt itself is changed. As a rule, prevention, which includes applying lubricant, is sufficient.
- So, to replace the belt and service the tensioner or replace the belt tensioner, you must first loosen the reverse threaded pulley bolt. Next, remove the plastic plug on the roller using a flat screwdriver;
- Afterwards, the locking nut located on the belt tensioner rod must be unscrewed a few turns. Then you need to reduce the belt tension by rotating the rod nut clockwise. You need to rotate until the rod begins to rotate in its installation location.
- Next, unscrew the bolt on the side, designed to secure the end of the rod near the tension roller;
- The tensioner can now be removed. If it needs to be replaced, you need to install a new tensioner assembly or replace/serve only the roller (will be discussed below).
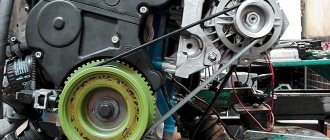
When replacing the belt, removing the tensioner allows you to remove the belt. Removal begins with the generator pulley. It happens that it is not easy to tighten the belt; you need to carefully pry the belt off with a screwdriver. Next, the belt is removed from the crankshaft pulley.;
- Then the roller bolt is removed and the protective rubber bearing caps are pryed off with a needle. Now the bearing can be washed with cleaner (if it is not available, regular gasoline will do). Then apply grease and put the bearing caps in place;
- The process is completed by reassembling and installing the roller (the sleeve sits in the bearing on the side where the bracket is located). Now you can install a new belt, which is mounted from the crankshaft pulley to the generator pulley;
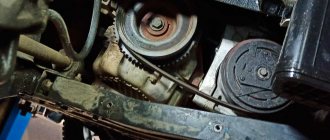
- Next, install the tensioner, after which the nut is rotated counterclockwise, tightening the belt. The nut itself is twisted until resistance is felt. A normally tensioned belt, when checked, is only slightly pressed when pressed by hand;
- After tensioning, tighten the tensioner rod lock nut and check how the alternator belt works. Normally, after starting the internal combustion engine there should be no noise, whistles, squeaks, etc. If a whistle is heard, the belt is further tightened.
How to replace the alternator belt on a Kalina with a 16-valve engine
The main difference from the process discussed above on an 8-valve internal combustion engine is the need to remove the front engine mount. To do this, prepare a head for hexagonal sprockets 11 or Torx E14, a pair of jacks, as well as a key or head 17, a head with a ratchet 8.
As part of the replacement, the car is jacked up, the right wheel and the wheel arch liner are removed. At the same time, the support boot is dismantled. A support is placed under the bottom and the engine protection is removed.
Next, you need to use a second jack to slightly raise the engine, placing a wooden spacer between the jack and the engine crankcase. Then you need to unscrew the TORX E14 bolts that secure the engine support to the bracket.
We also recommend reading the article on how to check and repair the VAZ 2109 generator. From this article you will learn how to check the VAZ 2109 generator, as well as what needs to be taken into account when diagnosing the 2109 generator.
If the bolts are difficult to unscrew, use the lower jack to slightly change the position of the engine to make unscrewing easier. You also need to unscrew the 3 TORX E14 bolts that secure the support to the side members.
Then release the belt tension by unscrewing the locking nut. The nut is rotated 8 mm clockwise until the belt is completely loosened. Now you can remove the belt, and then thread a new belt through the place where the support stood. If necessary, lubricate the tension roller according to the scheme already discussed above.
Having installed the belt, it should be tightened by turning nut 8 counterclockwise. The degree of tension is checked by hand by pushing the belt. Having received the desired tension, it is fixed with a nut 19.
Afterwards, reassembly is performed and the engine is test run. In order for the check to be carried out correctly, the belt must be loaded by turning on powerful energy consumers, as well as the air conditioner.
If the alternator belt whistles, it needs to be tightened. To do this, do not turn off the engine, since it is enough to loosen the lock and slightly tighten the tensioner rod. The tightening is carried out until the whistling disappears. When the whistle has disappeared, all that remains is to tighten the lock nut. Finally, we note that if initially there was no whistling of the alternator belt, but it appeared later, the tightening process needs to be repeated.
Recommendations for choosing a belt drive
Gates
drive as standard.
.
As a replacement on the first models, you can use Dayco 825
.
Here you need to take into account that elastic specimens are marked with the “ Poly-V
” symbol; if it is absent, the product has a rigid structure.
Alternative drives for VAZ 1118 with air conditioning
:
- Roulunds Rubber 6PK1015;
- Dayco 6PK1005;
- Bosch 6PK1015;
- Gates 6PK1019.
Alternative drives for VAZ 1118 without air conditioning
:
- Bautler 6PK883;
- Dayko 6PK888;
- Finwhale BP6 883;
- Luzar LB 0118 1118-3701720 6РК 884;
- Roulunds Rubber 6PK884;
- BRT 882 mm (Balakovo plant).
Drive system repair
Let's sum it up
Taking into account the above information, it becomes clear that the Kalina generator tensioner is no less important than the belt itself. In practice, the presence of a tensioner allows you to increase the service life of the generator bearings. The main thing is to use this solution correctly, avoid over-tightening the belt, and also maintain and change the tensioner if the mechanism fails.
We also recommend reading the article on how to replace the timing belt on a VAZ 2114 with your own hands. From this article you will learn about the features of the replacement, how to replace the VAZ 2114 timing belt, as well as what subtleties and nuances you should pay attention to as part of this procedure.
As a result, let us remind you once again that the quality of the generator’s operation and battery charging will directly depend on the condition of the tensioner and the alternator belt itself. Also, if the belt slips, malfunctions in the operation of other attachments cannot be ruled out. For this reason, the generator belt must be checked regularly, as well as the belt and tensioner itself must be changed according to regulations or, if necessary, in case of emergency situations.
Snapshot53252323
In order to improve visual control, remove the plastic engine casing. To check the condition of the belt, engage fifth gear in a manual transmission, push the car (or rotate the suspended wheel) and inspect the belt along its entire length. On a car with an automatic transmission, remove the right mudguard of the engine compartment and, by rotating the crankshaft by the bolt of the auxiliary drive pulley, check the condition of the belt.
With any of the gearboxes, the following method is also possible: apply chalk marks to sections of the belt and, turning on the starter for short periods of time, turn the crankshaft at small angles. We inspect the belt along its entire length, checking the areas covered by the marks.
Repair technology for the auxiliary drive system
Sequencing
is similar for both models with and without air conditioning and consists of the following items:
- Remove the engine protection.
- Remove the right wheel and fender liner.
- Remove the expansion tank.
- Jack up the right side of the engine and unscrew the mount.
- By tightening the tensioner mechanism pin, loosen the belt tension.
- Remove the drive from the roller and then from all pulleys.
- Install the new part and reassemble in reverse order.
- Adjust the tension.
It is advisable to carry out work in an inspection pit in compliance with all safety measures. When changing the flexible connection, it is recommended to simultaneously install a new tensioner roller, but this depends on the desire of the owner and the condition of the unit.
When to change?
VAZ Lada Kalina vehicles use a belt drive for auxiliary units. On cars with air conditioning, the service life of such a belt is no more than 30 thousand km. On simple versions of cars, the strap can last longer, but most owners try to change it after the same 30 thousand kilometers traveled. For various reasons, the belt may fail earlier, so it must be checked periodically during vehicle operation. There should be no cracks on the working track, and delamination on the outer part of the belt is unacceptable. If such defects are present, we immediately change the strap. Another signal to replace this element is a whistle or other noise when the unit is operating.
The process of replacing the belt on a Kalina with air conditioning (sixteen valves) is presented in a video from the user Alexander.
Signs of breakdown and vulnerable spots
In any tension roller design, the weakest point is the bearing. The part is subject to loads of a constant nature, in addition to which temperature differences contribute. Under such conditions, element failure can occur quite often.
Let's take a closer look at the list of main signs, due to the presence of which the roller can be considered faulty:
- The battery no longer receives a full charge;
- the car's energy-intensive current collectors began to show disturbances in their functioning;
- a characteristic hum coming from the area where the generator unit is located;
- presence of play during roller operation;
- The working surface of the generator set drive belt shows signs of uneven wear.
conclusions
Replacing the belt and generator roller on an 8-valve Lada Kalina is very easy and simple. A wide range of product choices will not suit every consumer's taste. Moreover, even analogues of original parts are of fairly high quality. Diagnosing faults is easy and can be done by any motorist.
I didn't think it was that simple. Before, I didn’t even really look under the hood, but now I’ve changed the belt itself to a new one. Useful material.
Some kind of bullshit. A belt with a length of 1018 is for Kalina with an air conditioner, but for cars without an air conditioner the belt is shorter, I don’t remember the exact numbers. Everything in the article is mixed up. The torn timing belt was especially annoying, even though it was an alternator belt. Even on Kalina with an air conditioner, in order to change the belt, just the 1018th, you will have to remove the engine mount.
Design
Lada kalina or lada kalina cross: luxury versus cross
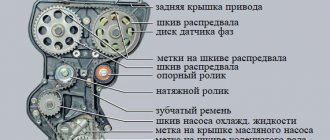
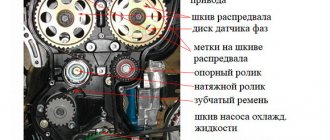
The main element of the tensioner is the pressure roller. It is made of plastic, and a sealed bearing is pressed inside. The roller is mounted on its own bracket, which, with the help of a threaded rod, can move in a vertical plane. This ensures the required moment of pressure on the belt. To prevent the bracket from moving spontaneously when the car is moving due to engine vibration, the pin is tightened on top with a locknut. The entire structure is placed on the generator bracket. There are two holes in it for attaching the Kalina generator belt tensioner.
Fault diagnosis methods
When checking the correct operation of the tension device in the Lada Kalina, it is recommended to follow the following algorithm of actions:
- First, we carry out visual observation of the belt and the roller itself. To do this, you need to open the hood and start the LADA Kalina engine. When inspecting rotating components, we evaluate them for the presence of vibration.
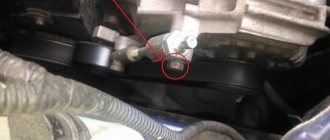
- We control the tension force of the belt drive. To do this, stop the engine. We take hold of the belt branch with our hand and try to rotate it 90 degrees relative to the longitudinal axis. Rotate clockwise. If this manipulation is successful, then the tension is correct. When the angle obtained as a result of turning the branch is different from the indicated optimal value, further adjustment is required.
- Now you need to check the tensioner itself. To do this, you need to remove the belt. Before direct dismantling, remember the original location of the consumable element. Loosen the adjusting nut on the roller, after which the belt can be easily removed. We scroll through the video and observe the absence of jamming and noise. We inspect the protective cover and check for the presence of play. We pay special attention to the working surface, which comes into direct contact with the belt. It should be smooth, and the presence of deep ditches or other damage is unacceptable. If any of the indicated signs occur, then such a tensioner must be unconditionally replaced.