April 29, 2016 Lada.Online 105 652 14
The dashboard of Granta or Kalina can be called modern. This can be confirmed not only by its appearance, but also by the use of LEDs, rather than lamps, to highlight readings and indicators. Let's look at how you can change the standard green color of the instrument panel backlight.
Which LEDs to choose for instrument panel illumination
To highlight the readings in the Granta or Kalina instrument cluster, green SMD-3528 LEDs are used. Instead, you can use SMD LEDs of different brightnesses. Here are the most commonly used:
- very bright SMD 5050 (luminous flux - 15 Lumens);
- bright SMD 3825 (brightness 7-9 Lumens)
- medium brightness SMD 3528 (about 5 Lumens);
- medium brightness SMD 3028 (about 5 Lumens);
- not bright SMD 3020 (about 4 Lumens);
- not bright SMD 3014 (about 3 Lumens).
The numbers after SMD mean the ratio of width and length, for example, an SMD 3528 LED has dimensions of 3.5 mm by 2.8 mm. You can buy everything you need on AliExpress (see catalog).
The approximate difference in LED brightness is shown in the photo:
Please note that using very bright LEDs to illuminate the instrument panel, reading readings in the dark may not be comfortable (they will dazzle). In this case, you can reduce the brightness by tinting the dashboard with a film (we select the light transmittance to taste). We recommend using SMD LEDs with a luminous flux of up to 5 Lumens for tuning the instrument panel.
Reviews
| № | Positive |
| 1. | Mikhail Aleksandrovich , 41 years old (drive2.ru): I have one of the first models, the dashboard lighting in bright weather is insufficient, but I have already adapted. I didn’t reflash it, I darkened the side windows a little, and readability improved. |
| 2. | Vitaly Nikolaevich , 38 years old (prom.ua): I reflashed the dashboard, the brightness of the dashboard illumination increased. Now instrument readings are visible at any time of the day. |
| 3. | Gennady , 30 years old (autotoday.com): I ordered the installation of a 2-channel PWM controller from a service station, the guys completed it in an hour and a half. Now I have adaptive backlighting for the dashboard: when the ignition is turned on, it is brighter, when the high beam is activated, the DRL is dimmer. |
| 4. | Gavriil Stepanovich , 42 years old (rozetka.ua): I bought the car second-hand, the previous owner slightly modified the panel board, updated it with version 035. I like it, the information content is good in any weather. |
| 5. | Saveliy Timofeevich , 40 years old, (avtoflit.com): I recommend installing a PWM regulator, tested from personal experience. I installed it myself and finished it in half an hour. Purchasing a KIT kit cost 700 rubles. |
| 6. | Vasilyevich , 36 years old, (autotoday.com): A year and a half has passed since the installation of the 2-channel KIT, there are no complaints about the quality of work, it works as usual. |
| 7. | Petr Nikolaevich , 42 years old, (drive2.ru): in general, I’m pleased with the quality of work and efficiency of the KIT, the backlight is bright, the data can be read well in any lighting. |
| Negative | |
| 8. | Sergey , 30 years old (prom.ua): I reflashed the electronic control unit, but the quality of lighting did not improve significantly, I expected more. |
| 9. | Georgy , 25 years old, (avtoflit.com): I reflashed the ECU for the first time, but didn’t notice any significant changes. On the advice of my friends, I installed a 2-channel PWM controller, the backlight became adaptive. |
| 10. | Kostya , 24 years old, (drive2.ru): The PWM regulator worked for a little over a year, after which it failed. Wasted money, effort, time. |
| 11. | Dmitry , 26 years old, (autotoday.com): sad experience of using KIT, I do not recommend installation. |
How to change the color of the instrument cluster illumination
1. Use SMD of the desired color. For example, use white LEDs to illuminate one part of the panel, and blue LEDs for the other.
2. Use a light filter (electrical tape or film of different colors) together with white LEDs. We stick it on the desired area, as a result of which we get the illumination of the desired color. To change the color, you do not need to use a soldering iron, just disassemble the instrument panel and stick a film of a different color.
It is worth noting that the hands have an orange coating. To change the illumination of the hands, wipe off the varnish with nail polish remover and, if necessary, apply a new varnish of a suitable color. Another option is to use LEDs for the arrows of the desired color.
You can change the backlight of the screen (display) not only by replacing its LEDs, but also by turning the film over. First, we tear off the film from the display, clean the remaining adhesive with a solvent and glue the film on the back side. This results in an inversion of the panel display:
3. Use RGB-SMD LEDs. If you want to change the backlight color at once. In this case, you will have to additionally output switching control.
Adviсe
Antifreeze leaked into the cabin
To prevent problems with the heater core, you need to carefully monitor it. For example, from the first days of buying a car, periodically look under the car to see if there are dark spots there. And in the engine compartment it would be a good idea to observe the condition of the cooling system hoses. If you notice traces of antifreeze in any of these places, you need to immediately seek help, or carry out repairs yourself.
If possible, the hoses for connecting the heater radiator should be replaced with new ones, having coated the connection points with sealant. But some do not agree with this opinion. After all, sealant from the hose can get inside the cooling system and cause damage to the pump. As a result, the timing belt will break and the valves will meet the pistons.
Do-it-yourself dashboard overexposure
You will need: remove and disassemble the instrument cluster, SMD LEDs (unsoldered from LED strip or LED lamp), soldering iron.
The process of replacing LEDs on the instrument panel board consists of unsoldering the standard SMD LED and soldering a new one in its place. During such tuning, there are several important points to consider:
- take your time so as not to damage the conductive traces of the board;
- observe the polarity (SMD LEDs have a bevel on one side, install a new LED in the same position);
- do not overheat the LEDs; high temperatures may cause them to fail;
List of sensors and signal indicators on the panel
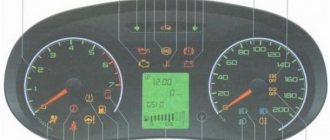
The diagram shows a detailed layout of the devices present.
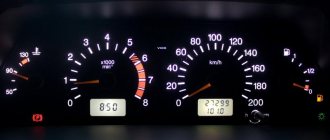
The instrument cluster on this car, as the instructions show, has the following sensors:
The dashboard will definitely tell you the following:
If, after starting the engine, the engine status indicator does not “disappear,” then this implies a malfunction in one of the components of the unit or its attachments.
If the low oil pressure lamp in the Lada Granta engine continues to blink after starting it, then it becomes necessary to check the operation of the lubrication system components (pump, pressure reducing valve, etc.), as well as the condition of the cylinder-piston group.
The ABS indication, if this system is in good condition, should be deactivated after a couple of seconds from the moment the engine starts.
The lamp, indicating an excessively high coolant temperature in the engine cooling circuit, stops lighting 5 seconds after the engine starts. When this phenomenon is not observed, there is a likely risk of engine overheating. Here it is recommended to check all components that influence the maintenance of a “normal” (working) temperature indicator.
If the brake symbol is active when the engine is running, you should check the level of the corresponding fluid (reservoir under the hood) and top up if necessary.
The activated indication of the unit that provides directional stability “tells” that it is disabled.
A signal appeared from the fuel reserve lamp - it became necessary to replenish the tank with fuel.
If the status indicator of the electric power steering mechanism lights up, this fact confirms the presence of a malfunction in this unit.
When the pressure inside the LADA Granta tires reaches a minimum, the corresponding symbol informs about this moment.
When the engine is running, the lamp responsible for indicating the airbag cannot be illuminated.
From this it can be seen that the entire list of sensors and indicator symbols that the instrument cluster contains around the perimeter is endowed with a traditional character. They are informative and understandable even for customers who have touched the steering wheel of a Lada Grant for the first time.
Disassembling the console
Initially, you need to disassemble the dashboard: remove the protective glass, then the arrows, but keep in mind that they are very fragile, and in order not to damage them, it is better to slip thick paper under the screwdriver; it does not require much effort.
And to remove the dashboard backing you will need a knife, with its help you need to cut through the layer of sealant around the entire perimeter.
After removing the “cover”, use a knife to carefully scratch the filter; it is a special paint. Then degrease this area with acetone or alcohol.
WE ADJUST THE WIPER WORK
The wipers work as follows:
- The windshield washer switch is assigned a short/long press limit of 492 ms (about half a second), with a short press on the washer the wiper makes one stroke, with a long press three strokes after releasing the handle.
- Parking of the wipers is carried out by a signal from the contact block in the gear motor.
According to the first point, you can set the limit for short/long pressing of the handle and the number of strokes under this condition.
According to the second point, you can set a delay for turning off the wipers at the place where they are parked, i.e. The wipers will stop when they go up and the wiper blade changes direction.
Select the UCH Parameters
, press the
Lecture
(reading) and get the current settings of the TsEBKS.
To change data, you need to enter the required parameter in the selected window of the Ecriture
(record) column and click the corresponding button in the
Envoi
(send) column.
How to make dashboard arrows backlit
The color of the speedometer and tachometer needles is important. If they are white, then you can leave them as they are. But if not, then you need to remove the old paint with a knife and treat them with alcohol, then paint them with white varnish or regular paint.
The color of the arrow should be white, because only it conveys the entire gamut of LEDs.
You can try and highlight the arrows separately. This requires LEDs with a diameter of 3 mm at 12 V.
Important! In the car network, the voltage is 12 V; if the LEDs are designed for a lower value, then they cannot be connected directly. They should be connected through a stabilizer.
If the diameter of the LEDs is larger, you will have to make additional holes for them.
It is recommended to place LEDs either along the entire scale or opposite those values near which the arrow is most often located.
Tuning with “protection elements”
During a complete transformation of a car, it is worth thinking about its safety. Most often, the protection system concerns the rear and front bumpers. They are equipped with special elements made of stainless steel or polymer coated. These pads are used to prevent damage to the rear bumper from damage, for example when loading luggage through the rear doors. To protect the wheels from various stones and dust, wheel arch liners are used.
A rubber seal is installed on the rear doors of the car, which serves as a soundproofing element. To protect the radiator, you can install a special mesh (most often black or chrome is used), its cells allow air to pass through perfectly, and at the same time protect the radiator from various types of foreign bodies (stones, dust, insects).
Carbon film is an excellent element of protecting the body from minor scratches, which will also give a stylish look to your car. There is a huge selection of different colors and materials.
Thus, in order for your improved “steel” friend to serve you for a long time and reliably, tuning should be approached comprehensively. In any case, after tuning, the quality and appearance of the Lada Largus depend on the amount of money invested, as well as the skills and patience of the owner.
Schemes for smooth switching on of the backlight
To smoothly turn on the backlight of the scale and arrows, you need to spend a little effort, and more specifically, re-solder the circuit.
Below are two diagrams, in the first case - the dashboard, and then - the arrows. The circuits can be implemented on small pieces of a circuit board, which are sold in radio parts stores.
Consider one important factor: if the LEDs differ in power, they will not light up at the same time, some ahead of time, others late, but in general the backlight will turn on smoothly. This also applies to the LEDs on the scale.
PRODUCT NUMBER ONE
You can probably handle replacing the air filter on both modifications. Considering that the cover is attached with self-tapping screws, we recommend that before installation you feel for the entry of the thread: after turning the fastener counterclockwise, catch the gap and only then turn it clockwise. This way it will be possible to preserve the thread, and therefore the body itself, for many years.
Neither a fuel nor a cabin filter is provided - a huge minus. If you can live carefree without the first, as the experience of using Logans shows, up to 200 thousand km, then sometimes you can’t do without the second on our dusty roads. “Garage workers” propose to embed a filter from a Nissan-Micra (or Renault-Modus) into the body of a standard heater, cutting through a window 150 × 38 mm (ZR, 2008, No. 9). Most likely, this technology will also take root at AVTOVAZ official dealers. But why doesn't the plant improve the heating system?
We collect
When everything is ready, we begin to slowly assemble the console. First of all, we install the substrate. Apply sealant to the back side and glue it to the panel.
Then we put the arrows and protective glass in place. After modernization, the instrument panel looks bright and unusual.
LED lighting not only looks unusual and bright, but is also a good addition to the car in terms of economy, which helps save battery power, since LEDs consume 80% less energy than a regular light bulb.
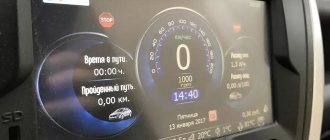
An optitron is a special illumination system for the instrument cluster. It works this way: when the car's ignition is turned off, the instrument cluster remains invisible. After turning the key, the arrows on the instruments should come to life first, and only after them the instruments themselves - the speedometer, tachometer and other sensors.
Optitron has a special anti-reflective background, thanks to which all signs are clearly readable in any conditions.
Next, we’ll look at how to make such a backlight for the dashboard with your own hands.
How to adjust optics yourself
- cover the right lantern with a sheet of cardboard or other dense material that absorbs sunlight;
- turn the hydraulic corrector to position 1;
- open the hood, look for the screws necessary for adjustment, turn them;
Attention! When adjusting the left headlight, the light should be at the top level of line N, and at the bottom it should reach line P. After adjusting one headlight, adjust the second one, cover the first one with cardboard. after adjusting one headlight, adjust the second one, cover the first one with cardboard
After adjusting one headlight, adjust the second one, cover the first one with cardboard.
If car headlights shine too low when adjusting the light, the headlights need to be raised. Otherwise, the driver will not see the pedestrian in poor visibility conditions. With a high incidence of light, the car will “blind” pedestrians and oncoming traffic.
Upgrade option
In case of minor modifications, you can increase the brightness of car headlights. Full adjustment of headlights with your own hands is carried out in a clear sequence:
- First you need to remove the glass from the headlight. A simple hairdryer is suitable for heating the sealant. After the sealant becomes soft, you can remove the headlight glass with a regular knife.
- The reflective pad is removed.
- Unscrew the low beam blocks.
- We shift the lens 10 mm towards the reflector, or grind off the modular ring.
Other headlight adjustment options
If you follow all the rules for adjusting car headlights with your own hands, if the vehicle load changes, you will have to change the angle of the light beam. Such problems can be solved by using a hydraulic corrector.
This part is non-separable, so if the hydraulic corrector malfunctions, you will have to replace it with a new one. The main cause of the malfunction is a fluid leak or a “wedge” of the pistons.
Advice! To prevent wear and tear on the corrector, it is better to immediately install a modern electric corrector, which includes a headlight adjustment control, as well as a mechanism with O-rings and electrical wires.
How to change a hydraulic corrector
The negative terminal of the battery is removed. After pressing the lock, turn the hydraulic corrector clockwise and remove it. The headlight O-ring is removed, replaced with a new one, and a modern electric corrector is installed. The hydraulic corrector of the second headlight is replaced in the same way.
Manufacturers of automotive optics offer adjusted headlights, but after some time they require additional adjustment and adjustment. Among the situations that force the car owner to carry out unscheduled adjustment of the optics, we highlight:
- emergency situations;
- planned body replacement;
- repair of suspension struts, change of springs.
Correct operation of the vehicle does not imply significant changes in the location of the headlights; it is enough to make minor adjustments.
Required Components
The Mayak lamp is a donor of lighting components.
Lighthouse lamp, rear view.
SMD LEDs are exactly what I was looking for in a lamp. The size is about 3 by 4 mm.
Entire lamp, consumption in “dimensions” mode.
Entire lamp, consumption in stop light mode.
LEDs, 330 Ohm resistors.
Printed circuit board blanks, cut on a lathe.
The boards are marked for installation of components. The black dots between the tracks are where the LEDs are installed.
Marking of “tracks” on the board. Here is the fifth, the inner track is superfluous, I wanted to do a two-color backlight first, but I changed my mind.
Tuning work for the Lada Largus interior
Installing the backlight for the handle
This process takes place in several stages, so each action must be performed carefully and thoughtfully, since careless movement can lead to damage to the item. First of all, you need to remove the seat trim
Next, the actual preparatory work begins: unscrew the screws located under the plastic tabs and remove the clips, after which you need to disassemble the handle. To attach an LED, you need to drill several holes on the moving part of the object, and they must be at a certain angle. Pass the wires pre-connected to the LED through the holes.
Making an optitron
I'm trying to clean the filter at the edge of the scale. The peculiarity of these scales is that they are designed for the use of ordinary light bulbs, so they have an additional layer of dark filter (dots) applied to them, which ensures uniform illumination (closer to the light bulb, darker). A yellow filter is also visible under the white scattering layer. I would leave the yellow one, but removing black and white without affecting the yellow is unrealistic.
This is what it looks like in the light. Despite the white backlight, the numbers are still yellow thanks to the yellow filter, so you will have to remove it, although I didn’t want to.
Illuminated fuel and temperature gauges. I was afraid that there would not be enough three LEDs for the scale, but it turned out to be in vain - the scale is illuminated evenly, the gradient is not noticeable to the eye. Yes! As a result, only 3 tracks remained.
Rear temperature and fuel gauges. The light filter has been partially removed in the right places.
Ready-made temperature and fuel scales.
I remove the light filter on the tachometer. I use nail polish remover and pieces of cotton pads (we take everything from my wife/mother/sister’s arsenal). The technology is as follows: soak the pieces in liquid and apply to the area for a minute. While we are making the next one, the previous one soaks and the coating can be easily removed with a fingernail. Carefully! The front side is very sensitive to solvents, especially alcohol!
Installing tachometer backlight. Hot glue from a “gun” serves as supports and at the same time fasteners. The downside is that in this version the tachometer is not removable.
Finished tachometer scale.
"Combined" lighting. LED tachometer, regular speedometer. The temperature scale and fuel gauge are double backlit. Here the photo does not convey the effect quite correctly.
Speedometer backlight board. The main difficulty, it turned out, was precisely here. Due to the built-in odometer, the speedometer device is very bulky and there is very little space left for illumination. As a result of trimming and pointing, very little remained of the scarf.
Rear speedometer backlight board. I had to restore the path this way
I'm installing the speedometer light. Two lights didn’t fit, so I moved them to the side surface
I turn on the speedometer light and check it. Between the tachometer and speedometer, the common plus and minus are brought out into the T10 socket; a protective diode and a common current-limiting resistor (all from the same lamp) are also installed in it, plugged into the standard socket from under the backlight lamp.
Finished speedometer scale
Complete tidy. Currently in finished condition.
Features of choosing thresholds for a car
A careful study of the market allows you to understand which product option is best to choose.
The functional purpose and design features should be taken into account
Attention! If thresholds are required only for practical purposes, a wide model must be selected. The main goal is to create additional opportunities for human weight to be supported
Such accessories ensure that getting into the car is easier. People of short stature, children and teenagers will experience the greatest relief. It is noted that the thresholds can increase the door opening of the car and reduce the ground clearance by 0.5–1 centimeter. An additional benefit is that dirt that accumulates on the platform is washed away and can be successfully removed to keep the vehicle clean.
High-quality plastic covers for Lada Largus are ideal for protecting the car from impacts on a bad road or from unwanted stones. They cannot withstand significant loads, but at the same time they look quite neat. By choosing classic plastic trims, you can prevent serious changes to the appearance of the vehicle. In addition, plastic linings are pleasingly affordable and do not require regular polishing.
This is interesting: Review of Mercedes E-Class W212
Another option is metal thresholds, which are made from chrome-plated steel or polished aluminum. Such products are highly expensive. Metal thresholds should guarantee protection of the body from any type of damage, but periodic maintenance is required. Over time, metal thresholds become covered with scratches, so polishing is required.
conclusions
— The inner edges of the numbers are slightly obscured by the protruding parts of the instruments; — I didn’t make the inscriptions shine through, I didn’t want to overload the panel with light - I had to seal it with black tape from the inside; — The odometers turned out to be dimly lit (one must think); — The arrows were not illuminated, I left the usual light bulbs.
The panel is in working order. In the photo it looks close to the real thing. Time: afternoon, summer. It’s a bit bright at night, and out of habit, it’s a little distracting. I hope that the brightness will go down over time.