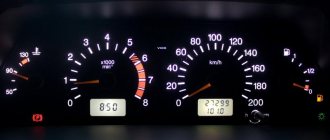
The dashboard allows the driver to monitor the main operating parameters of the car, read the readings of various sensors, indicators and instruments.
Over the past few years, instrument panels have changed from analog to digital, and instrument panel lighting has also changed to make information easier to read and improve overall information content.
For this reason, many drivers are replacing conventional dashboard lighting bulbs with more modern solutions:
- to improve the appearance of the interior;
- in order to improve the quality of information reading.
At the same time, replacing the light bulbs in the dashboard can be done independently on almost any car. Read more in our article.
Step-by-step life hack: replacing the dashboard lights yourself
Although dashboard light repairs are inexpensive, they can be done yourself. This will require a little time and certain skills from you. Most of the time is spent dismantling plastic parts. Despite all the apparent simplicity, this is exactly the part of the job when it is quite easy to break something.
Start with theory.
On thematic forums there are quite sensible diagrams for dismantling the dashboard. It would also be a good idea to purchase a set of plastic mounts. An indispensable thing for this kind of work, and not necessarily only in the car. You shouldn’t skimp on such a trifle: using a screwdriver can easily ruin the appearance of the finish. see also
Dashboards from the 90s, which few people remember (photo selection)
Let's start dismantling the plastic elements of the dashboard. Do not use force: you will feel where and what to pry and where to pull. The work is neat and responsible: try not to scratch or break anything.
Purpose of additional lighting
The main purpose of the backlight bulbs in the dashboard of a car is a comfortable display of the main sensors, allowing the driver, regardless of the degree of illumination in the cabin, to receive reliable information about the main characteristics of the working units and systems of the car during operation. Depending on their location in the electrical circuit, backlight lamps perform the following role:
- Message about a sharp decrease in pressure in the engine lubrication system.
- Reduction below the maximum permissible level of fuel in the fuel tank.
- Displays the initiation of ignition of the turning lights.
- Illuminated dimensions.
- Turning on the high beams.
- Emergency condition of the brake system.
- Connecting emergency lights.
- Battery low display.
- Engaging the handbrake.
- Awareness of the state of the power unit.
- Opening the air supply system.
Modern dashboard lighting systems may contain several dozen bulbs. Some of them are responsible for monitoring events in the most important components of the car, others are simply illumination, and the third notifies about the operation of auxiliary systems and mechanisms. As a rule, if just one element fails, the entire “tidy” stops working partially or completely. To restore its functionality, it will require disassembly, diagnostics and repair.
Note! The color of the backlight directly depends on the importance of the signaled devices. For example, a malfunction is indicated in red, and non-emergency information is displayed in orange or green.
Let's move on to the step-by-step diagram
This is what the dashboard looks like on a Renault Duster. Let's start the renovation.
Using plastic tools will make it easier and safer to remove plastic interior parts.
The center console has two backlights for the heating control panel, and the window, central locking and hazard warning switches have their own backlight buttons.
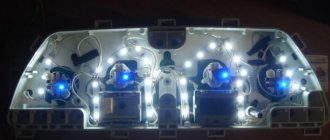
LEDs are the optimal solution for lighting devices. They are more durable and take up less space. Light and signal diodes are located on the electronic board; replacing them requires precision soldering of small parts.
To get to the lamps, remove the panel: unscrew the screws.
Source
Location of lamps on the instrument panel of the VAZ 2107
Before we start replacing the light bulbs, let’s see where they are located on the PCB board and what the VAZ 2107 is responsible for illuminating or indicating.
Layout of dashboard lamps on a VAZ 2107, where:
- Fuel level.
- Instrument lighting.
- The direction indicators are on.
- Engine control controller malfunction.
- Exterior lighting is on.
- Emergency oil pressure.
- The parking (hand) brake is on.
- High beam headlights are on.
- Battery charge indicator lamp.
Replacing warning lamps and backlight bulbs
We lay the VAZ 2103 dashboard on a smooth soft surface face down and see the backlight and indication lights (see the very first photo). I hope that before removing the dashboard, you found out which bulbs burned out and, using the recommendations above, purchased new ones of the right type. As I already indicated above, backlight lamps can be sold both with sockets, ready for installation, and without them.
We can easily remove the lamp together with the socket directly from the rear side of the instrument panel of the VAZ 2107 (in the photo is the PP of another VAZ model)
If you purchased lamps with sockets, then simply install a new one to replace the burnt one and fix it by turning it clockwise. If the light bulb was purchased without a socket, then you need to first remove the burnt one from the socket and install a new one in its place. The lamp is removed by lightly pressing it and turning it counterclockwise.
To remove the light bulb from the socket, you need to press it and turn it 90 degrees.
After this, we install the finished light bulb-socket set in its place. All that remains is to put the PP in place, not forgetting to connect 3 power connectors, 3 wires of the heater switch, the speedometer drive and the vacuum hose.
Recommendations
- As a rule, when replacing instrument backlight bulbs, many owners want to obtain high clarity and brightness. Please note that if the lights on the dashboard are too bright, this brightness is sufficient on a sunny day. However, at night the panel may glow too brightly, making it uncomfortable to look at the instruments. The result is high eye fatigue and difficulty reading information in the dark.
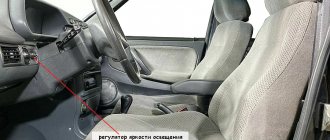
- To get maximum comfort, it is better to immediately install an additional brightness control in parallel with the diode lamps. This will make it possible to adjust the brightness of the instrument panel illumination. To change the brightness, you need to connect the backlight through a variable rheostat. This solution will allow you to adjust the intensity of the glow taking into account different conditions. Typically, such regulators are on sale in the same place where the diode backlight bulbs themselves are sold. It is important to determine in advance where these regulators will be installed.
Source
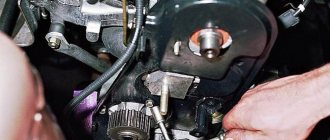
Removing the instrument panel and preparing for replacement
To change the lamps in the instrument panel, the latter will have to be removed. It cannot be said that the PP can be removed with one movement of the hand: the designers of the VAZ 2107 made dismantling a little more difficult than on other cars of the VAZ family. Nevertheless, dismantling the PP is quite feasible in a garage or even a parking lot. In this case, the operation does not require any special knowledge. The tools we will need are:
I think all this will be found in the trunk of any VAZ 2107, and we can get started. First of all, we remove the plastic handles from the heating control knobs by prying them off with a flat screwdriver.
Removing handles from the seven's interior heating system
We unscrew the nut securing the daily counter reset button (marked with a red arrow), and push the button itself inside the shield.
Removing the daily counter reset button
Now you need to unscrew the screw that is located under the plug and secures the decorative trim. Remove the plug using a flat-head screwdriver and unscrew the Phillips screw.
Removing the fixing screw of the PP decorative trim
After this operation, the right side of the panel will move away so that you can get to the flexible speedometer control shaft.
Releasing the right side of the control panel on a VAZ 2107
The shaft is removed with bare hands: simply unscrew the nut securing it.
Removing the speedometer drive
Now remove the instrument panel from the clamp that secures its left side and pull it out slightly to get to the vacuum hose connected to the econometer. It can also be removed with bare hands, but be careful not to tear it.
Removing the vacuum hose from the econometer to the PP
It remains to disconnect the three power connectors of the instrument panel and the three wires on the VAZ 2107 heater switch. Before disconnecting, it is advisable to mark them so as not to confuse them when assembling the panel.
Disconnecting the power wires from the heater switch
We remove the decorative trim along with the PP and unscrew the four self-tapping screws securing the shelves (two on each, I marked them with red arrows) to the decorative trim, and the instrument panel can be removed.
Main conclusions
Light bulbs in the dashboard of a car are intended both for its general illumination and improving the perception of information at any time of the day, and for the following specific tasks:
- Notification of emergency situations in the operation of particularly critical units.
- Signaling for turning on and off elements of the optical system.
- Display of the operation of additional mechanisms (handbrake, emergency lights).
Bulbs are most often replaced when they burn out, as well as when it is necessary to install brighter and more reliable backlight sources for the dashboard. Lamps can be with a base, socket or without it. LEDs are often installed in the dashboard. Despite the fact that they are expensive, they work an order of magnitude longer than usual. To reinstall them, you will need to remove the decorative trim, unscrew and remove the panel itself. In this case, you need to follow the instructions and recommendations specified in the passport of a specific car brand.
Previous
Car lightAll about connecting DRLs on a car
Next
Car light What to do if the backlight of the VAZ 2114 instrument panel does not light up
Explanation of symbols
A description of the lamps and indicators will allow the car owner to understand the information that can be found on the car’s dashboard. Modern cars have many icons on them, which are not easy to understand at first glance. Most of the Spectra dashboard indicators are from 2006, some changes occurred only in 2007 and all of them are presented below.
| Number on the diagram | Purpose |
| 1, 13 | Reserve lamps |
| 2 | Rear fog light control lamp |
| 3 | Rear window heating control lamp |
| 4 | High beam control lamp |
| 5 | Low oil pressure warning light |
| 6 | An electronic tachometer showing the crankshaft rotation speed; the readings moving into the red area signals a danger to the car’s operation. |
| 7 | The left turn signal control lamp, its blinking indicates its malfunction |
| 8 | Speedometer for measuring speed |
| 9 | Combined total (one cycle equals a million km) and daily mileage counter |
| 10 | Right turn signal indicator lamp |
| 11 | Solution temperature indicator in the cooling system: when moving to position H, stop the machine and let it cool down |
| 12 | Airbag warning |
| 14 | Immobilizer malfunction signal lamp: its operation for more than five seconds indicates a malfunction of the immobilizer |
| 15 | Battery discharge signal lamp: its constant operation indicates problems with the flow of current to the motor |
| 16 | Brake system stay signal lamp: indicates a critical level of special fluid |
| 17 | Door open signal lamp |
| 18 | ABS warning light: indicates reduced braking performance |
| 19 | Electromagnetic fuel level indicator |
| 20 | Lamp for monitoring the reserve fuel level: works when moving to a reserve fuel balance of 9 liters |
| 21 | Trip odometer reset button: holding it down for more than a second resets the trip odometer to zero. |
| 22 | The driver's seat belt warning lamp turns on together with the buzzer |
| 23 | Overdrive lock indicator lamp (for vehicles equipped with an automatic transmission): lights up when the fourth gear lock is engaged |
| 24 | Engine control system monitoring lamp: operation of the lamp while driving indicates a malfunction of the engine control program. |
Replacement instructions
To replace the light bulbs on the dashboard of any car model, you will need to dismantle its main parts, especially the upper decorative elements. The general instructions are as follows:
- Dismantle the instrument panel by removing the trim and unscrewing the mounting screws.
- In some models, the steering wheel must be moved to the down position.
- After removing the cover, you need to unscrew the screws securing the panel itself.
- After this, pull the instrument panel towards you and disconnect the power cable connector.
- The instrument panel itself must be carefully placed face down, not forgetting to place a soft lining so as not to disturb the instrument needles.
- Use a tester to identify burned out light bulbs and replace them with new ones.
In order to unscrew the light bulb from the socket, you need to turn it counterclockwise a quarter turn. After installing the new one, you need to reassemble the panel in the reverse order and check its serviceability.
What kind of lamps are needed?
Before disassembling your VAZ, it makes sense to drive it to the nearest auto store and stock up on new light bulbs. But which ones to buy? Judging by the first photo, the backlight and indication lamps have different sizes. The choice is simple: if the backlight bulbs have burned out (position 2 in the same photo), then you will need AMN 12-3-1 (T3W) bulbs. If they are indicator ones, then A 12-1.2 (Wl.2).
LED light bulbs
If you are tired of changing light bulbs in the power supply of your VAZ or are just a fan of modern tuning, then you can install LED light bulbs instead of incandescent ones, since the industry also produces those that have the same standard size, base, socket and operating voltage.
LED lights for the dashboard illumination (left) and indication for the VAZ 2107 car
Important! The battery charge indicator lamp cannot be changed to an LED one - the battery will not be charged properly.
How to remove the tidy
To disassemble the Spectra panel it will not take much time and you only need the following tools:
- flat screwdriver;
- Phillips screwdriver.
The procedure for removing the shield in this model is as follows:
- Disconnect the negative terminal of the battery.
- Remove the top trim.
- Remove the 2 top mounting screws.
- Use an insulated screwdriver to pry up the sides of the trim.
- To open the latches, pull the facing with force.
- Unscrew the mounting screws - the plugs for the radio.
- Disconnect the wires.
- When the trim is removed, unscrew the two right and then the two left screws securing the tidy.
- Pull the panel towards you.
- Disconnect the wiring harness connectors.
Installation of all parts is carried out in reverse order.
How to replace a light bulb with your own hands
We have figured out the type of light bulbs for interior lighting, now we will try to replace them with our own hands, without contacting a specialist. To disassemble the interior lamp without breaking anything, you need to at least roughly know its structure.
So, structurally, the salon light consists of a body and a lampshade made of organic glass. The lampshade is made movable - it can swing vertically to switch modes, the swing axis is located in the center.
In both positions, the lampshade, which also acts as a switch, is fixed, providing two modes of operation of the lamp:
- The light is always on.
- The light comes on when any of the doors is opened.
Design of the VAZ 2110 flashlight
In the photo above the numbers indicate:
- Frame.
- Ceiling lamp.
- Swing axis.
Two ebbs on the glass, which are the swing axis, are the only lock that prevents the lampshade from falling out of the lamp body. Thus, to remove the lampshade, it is enough to insert a screwdriver between it and the body and press the body outward, releasing the ebb. We will insert the screwdriver, of course, next to the ebb on the lampshade.
Healthy! You can bend the edge of the case without using a screwdriver, just with your finger. This is easier and safer for the glass of the lampshade.
You can press the edge of the lamp housing with your bare hands
We press, pushing this side of the lampshade out, disengage the second latch and remove the glass.
Removing the lampshade from the interior lighting of a VAZ 2110
Under the lampshade we see a light bulb clamped into spring contact brackets.
Lantern with lampshade removed
Push the light bulb towards one of the contacts and pull it out.
We install a new one in place of the burnt one and snap the lampshade into place. To do this, we engage one of the clamps, press the second side of the lampshade, slightly bending the wall of the housing with a fingernail.
You can see in more detail the process of replacing a light bulb in the interior lighting of a VAZ 2110 in the video below.
Replacing a lamp in a VAZ 2110 interior lamp
As already noted, in some modifications of cars, in addition to the ceiling lamp, an individual backlight is installed, located between the driver and passenger. You can see how to replace the light bulb in it in the video below.
Replacing a light bulb in a VAZ 2110 individual backlight
Why and how often to change the backlight
Dashboard lighting bulbs are replaced primarily when they burn out. Sometimes the owner may not like the color scheme. In this case, the light sources are also reinstalled. Often people try to replace them with brighter and more durable led elements. The specifics of such work require knowledge of the basics of electrical engineering and the ability to correctly calculate the characteristics of the devices used. Otherwise, you can simply damage the equipment. Therefore, if you have insufficient experience, it is better to contact a specialized car service center for help.
Which lamp does what?
- Illumination lamp for coolant temperature scale and fuel quantity.
- Speedometer and coolant temperature illumination
- Tachometer and speedometer backlight
- Tachometer backlight
- Odometer screen backlight
Lamps in other indicators, such as “Check Engine”, etc. don't change. They are lit by LEDs that are soldered into the panel's motherboard. Failure of these LEDs is very rare.