Print this article Font size 16
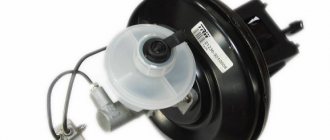
First you need to figure out what this vacuum amplifier actually is.
- This is a casing within which the valve is located. The element is structurally divided into two parts, which are separated by a layer of rubber - the diaphragm;
- One part of the amplifier is atmospheric, and the second is vacuum - it is connected to the inlet pipe from the power unit;
- The amplifier valve is a plastic casing containing the main elements that are subject to wear. It is because of them that the operation of the gearbox is disrupted. To be more precise, the gearbox begins to rattle;
- The composition of the valve is as follows: there is a rod on the bushing, adjacent to the buffer and piston. There is also the valve itself on the pusher and return springs with a filter.
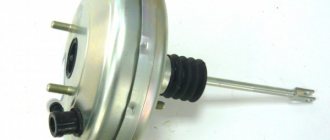
Appearance of the device
How to check the vacuum booster?
The first cause for concern will be tight pedal pressure and poor brake performance. At idle, when you press the brake pedal, does the engine speed drop or increase? Most likely, the fault lies in the VUT.
There are several ways for self-diagnosis:
- It is necessary to turn off the engine, start pressing the brake pedal (5-6 times), then fix it in the pressed state. We start the engine and at this moment the pedal should go down 2-3 cm and remain in that position. If it goes to the floor, then the vacuum seal is faulty.
- The engine should run for 2-3 minutes after starting. Then turn off the car and press the brake 3 times. If the pedal is soft on the 3rd press, then the VUT is faulty and there is an air leak somewhere.
- With the engine running, press the brake pedal all the way and hold it. After turning off the engine, keep it for about 1 more minute; if the pedal does not begin to press on your foot in an attempt to rise up, then the VUT is operational. Also, when pressed there should be no hissing sounds of air.
Useful : Replacing brake fluid on a VAZ 2114
When you have carried out diagnostics and discovered one of the listed reasons, it is better to immediately engage in repairs. At some point, due to a malfunction, you may have too tight a brake or lose it completely, and you won't be able to maneuver quickly when you need to. Thus, you can create an emergency situation or harm someone.
Design and principle of operation of VUT
The vacuum amplifier is a metal “barrel” consisting of the following parts (the numbering in the list coincides with the positions in the diagram):
- The body is cylindrical in shape.
- Pressure rod of the main brake cylinder.
- A cover connected to the body by point rolling.
- Piston.
- Bypass valve.
- Brake pedal pusher.
- Air filter.
- Buffer insert.
- Internal plastic housing.
- Rubber membrane.
- Spring for return of the inner housing with membrane.
- Connection fitting.
- Check valve.
- Vacuum pipe.
The internal cavity of the amplifier is divided by a rubber diaphragm into 2 working chambers
The letter “A” in the diagram indicates the chamber for supplying vacuum, the letters “B” and “C” are the internal channels, and “D” is the cavity communicating with the atmosphere. Rod pos. 2 rests against the mating part of the main brake cylinder (abbreviated as GTZ), the pusher pos. 6 is attached to the pedal.
The unit is capable of operating in 3 modes:
- The engine is running, but the driver does not press the brake. Vacuum from the manifold is supplied through channels “B” and “C” into both chambers; the valve is closed and does not allow atmospheric air inside. The spring holds the diaphragm in its original position.
- Standard braking. The pedal is partially pressed, the valve releases air (through the filter) into chamber “G”, which is why the vacuum force in cavity “A” helps to press on the GTZ rod. The plastic body will move forward and rest against the piston, and the movement of the rod will stop.
- Emergency braking. In this case, the effect of vacuum on the membrane and housing is not limited; the master cylinder rod is squeezed all the way.
Due to the pressure difference in the two chambers, the membrane helps to put pressure on the master cylinder rod
After releasing the pedal, the spring throws the body and membrane back to their original position, and the atmospheric valve closes. The check valve at the inlet of the pipe serves as protection against sudden air injection from the manifold.
Gas breakthrough into the intake manifold and further into the brake booster occurs on extremely worn engines. The reason is a loose fit of the intake valve to the cylinder head seat. During the compression stroke, the piston creates a pressure of about 7-8 atm and pushes some of the gases back into the manifold. If the check valve does not work, they will begin to penetrate into the vacuum chamber, reducing the efficiency of the VUT.
Video: how a vacuum brake booster works
Necessary tool
If you decide to do the repairs yourself, it is better to approach the process carefully. Collect all the necessary tools from the list:
- Screwdriver Set;
- Pliers;
- Collar;
- Extension;
- Kardanchik;
- Socket head 13;
- Open-end wrench for 10 and 13.
In addition, you should keep a container of brake fluid on hand. You may need to top it up after installing a new part. Also choose a suitable place for repairs; it is best to do this indoors, where weather conditions will not interfere with you. Let's look at the question “how to replace the vacuum booster on a VAZ 2114.”
Also check out
- It is often recommended to disconnect the tubes that complicate the process of removing the VUT, but you can do without this.
- Three of the four tubes coming from the brake cylinder make it difficult to remove the cylinder. To dismantle the cylinder, you can unscrew only one nut to “10”.
- Disconnect the hose that goes from the intake manifold to the vacuum booster valve.
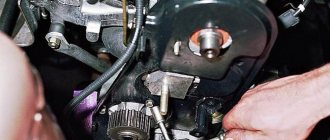
- Remove the mounting bracket. It is better to use a special cardan (its image is in the photo). The VUT itself is attached to the body with four turnkey nuts “13”.
- Move the mounting bracket to the new vacuum brake booster (you will need to unscrew a couple of nuts to “17”).
Reassemble in reverse order.
Replacing the vacuum booster on a VAZ 2114
The entire process of replacing the vacuum seal on a VAZ 2114 takes place in the engine compartment according to the following points:
- To access the VUT fasteners, we need to remove the air filter housing.
- We also loosen the adsorber clamp and move the mechanism to the side without disconnecting the hoses.
- Now you can unscrew the two nuts securing the expansion barrel. This is done with a key of 13.
- Remove the pipe from the check valve flange.
- Now we unscrew the amplifier itself. It is attached to the body with 4 nuts; it is convenient to unscrew them using a wrench, an extension and a cardan. We do this with a 13mm head.
- Remove the spring clip from the pin securing the vacuum seal to the brake pedal and disconnect the mechanism.
- We take out the VUT by pulling it towards ourselves.
- Remove the bracket that secures the element to the car body.
At this point, the dismantling process is completed; installation occurs in the reverse order. The most important thing during installation is to install the rod evenly so that it immediately fits onto the pedal, and fasten the pin from inside the car.
Purpose and location of the unit
The first classic Zhiguli models (VAZ 2101–2102), produced without amplifiers, were distinguished by a “tight” brake pedal. To stop the car suddenly, the driver had to exert considerable effort. In the 70s of the last century, the manufacturer began equipping cars with vacuum boosters (abbreviated as VUT), which significantly increased braking efficiency and made the driver’s work easier.
The unit in the form of a metal “barrel” is installed on the bulkhead between the engine compartment and the interior of the VAZ 2107, on the driver’s side. VUT attachment points:
- the body is screwed to the partition with 4 M8 nuts;
- the master brake cylinder is attached to the booster in front on 2 M8 studs;
- the push rod of the element goes inside the passenger compartment and is connected to the brake pedal lever.
The vacuum booster of the brake system is located on the wall of the partition between the passenger compartment and the engine compartment
The booster's job is to help the driver apply pressure to the master cylinder rod using vacuum force. The latter is created using vacuum taken from the engine through a special pipe.
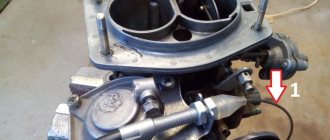
The vacuum selection hose is connected to the intake manifold from the side of the channel leading to cylinder III. The second end of the pipe is connected to the fitting of the check valve installed outside the VUT housing.
The VUT vacuum pipe (on the left in the photo) is connected to the fitting on the suction manifold
Essentially, the vacuum booster does the physical work for the driver. The latter only needs to lightly press the pedal for the car to begin to slow down.
Signs of a faulty vacuum brake booster
When understanding the signs of a faulty vacuum brake booster, it is worth noting that its failure can be caused not only by the membrane, but also by adjacent components. Therefore, when a malfunction occurs, each component of the system must be checked. When the VUT fails, the following symptoms can be observed:
- The engine started to stall. This occurs due to air leaking through the system;
- The efficiency of the braking system has significantly decreased;
- The brake pedal is pressed with great force;
- A knocking sound is heard when braking hard;
- When you press the pedal, you can hear a hiss of air.
In some cases, the brake system failure indicator on the dashboard starts to light up, but this is not a clear sign of a failed VUT; the error may also appear due to a problem in other components. We talked about this in this article.
Unit repair - diaphragm replacement
This operation is unpopular among Zhiguli owners; usually car enthusiasts prefer to change the entire amplifier. The reason is that the result does not correspond to the effort expended; it is easier to buy and install the VUT assembled. If you definitely decide to disassemble and repair the vacuum amplifier, prepare the following tools and consumables:
- assembly spatula, powerful flat screwdriver;
- pliers;
- hammer;
- brush with metal bristles;
- large bench vice;
- repair kit for vacuum amplifiers VAZ 2103—2107;
- silicone sealant.
When replacing a damaged diaphragm, it is recommended to change all VUT rubber products - the rod seal and O-rings
It is best to buy a repair kit from the Balakovo Rubber Products Plant. This company is a direct supplier of parts for AvtoVAZ and produces high-quality original spare parts.
To carry out repair work, the VUT must be removed from the vehicle, as described in the instructions above. Disassembly and replacement of parts is carried out in the following order:
- Place a mark on the body with a marker, flare the connections with the cover, bending the edges of the shell with a mounting blade.
The mark is necessary for assembling the amplifier in order to correctly align the cover with the body
- Carefully separate the elements, holding the lid with your hands, as there is a large, powerful spring installed inside.
- Remove the rod and seal, remove the diaphragm from the inner housing. When disassembling, lay out all the parts one by one on the table so as not to confuse anything during the installation process.
To avoid confusion, it is better to lay out all VUT parts on the table during disassembly.
- Clean the housing and the membrane contact areas with a brush. If necessary, dry the inside of the chambers.
- Reassemble the vacuum booster elements in reverse order, using new parts from the repair kit.
Before assembly, the new membrane is stretched onto the plastic body
- Aligning the marks on the cover and body, insert the spring and compress both halves in a vice. Roll carefully using a pry bar, hammer and screwdriver.
If desired, the repaired VUT can be painted using an aerosol can.
- Check the tightness of the VUT using a rubber bulb inserted into the hole in the vacuum hose.
After assembly, install the unit on the car, having adjusted the rod extension in advance (the procedure is described in the previous section). When finished, check the operation of the amplifier while running.
Video: how to change the VUT diaphragm on a “classic”
Vacuum brake boosters rarely bother Zhiguli owners with breakdowns. There are cases when the factory VUT worked properly throughout the entire life of the VAZ 2107. If the unit suddenly fails, there is no need to panic - a malfunction of the vacuum booster does not affect the operation of the brake system, only the pedal becomes hard and uncomfortable for the driver.
Service replacement cost
You may not be able to change the part yourself because you don’t have enough tools, knowledge, or a place where you can do it. In this case, you can contact a car service; the repair price will be around 1000 rubles, taking into account the average prices in Russia. In this case, the total repair budget will be around 3,000 rubles , unless replacement of additional elements is required. There is one important advantage when contacting a service center. When people who know their stuff work there, they will be able to identify other shortcomings of the system during the analysis and show them to you clearly so that you know exactly what you are paying for. Remember that repairs should be made immediately when the problem is diagnosed, since driving with a broken vacuum booster is very dangerous. For this repair you do not need special knowledge, so you can easily replace the vacuum booster yourself, saving a third of your budget.
Master brake cylinder
Now let's talk about the master brake cylinder on a VAZ 2110 car. If you do not want to allow the brakes to fail while driving, they should be checked periodically, and if problems arise, take appropriate action immediately.
A common reason for replacing the master brake cylinder of a VAZ 2110 is precisely the fact that the brakes are lost.
Symptoms of a problem
Of course, brakes can completely lose their effectiveness for various reasons, but now we are talking specifically about the master cylinder. If the reason lies therein, then it can be determined by the following signs:
- The master cylinder shows signs of brake fluid leakage;
- The pedal has an idle motion, that is, when it is pressed, no force is created;
- The brake pedal simply won't press.
Replacement
The most difficult process is disassembly. Therefore, let's talk about it in more detail.
Carefully disconnect the master cylinder from the pipeline. Disconnect the block, which is equipped with wiring, from the emergency brake fluid indicator. The connection to the “ten” is made by terminals. Cover the pipe and assembly openings with something to prevent brake fluid from leaking. It will pollute the interior space, which is undesirable. Now remove the cylinder along with the reservoir. To do this, simply unscrew the fastening nuts that connect the element to the vacuum booster. After removing the brake fluid level sensor, drain the brake fluid present from the cylinder and the cylinder itself. If there is no serious need, you should not remove the tank. But for complete assembly, the tank is removed and then installed in place in strict order. Before reassembly, each element is washed with purified brake fluid.
A good alternative is isopropyl alcohol. Do not forget to dry the parts with a compressor and wipe with a clean, dry cloth. Carefully avoid contact of the main cylinder with fuel or kerosene. Pay special attention to the O-rings. If you wash them with special alcohol, do not keep the rings in this liquid for more than 20 seconds.
After processing, immediately dry and wipe the seals. Treat the surface of the piston and mirror to remove all rust. When replacing the master cylinder, new O-rings must be installed, regardless of their current condition. Check the elasticity of the piston springs under load. Refer to the VAZ 2110 repair manual, which indicates the appropriate loads and forces for testing. When free, the length of the spring should be 59.8 millimeters. If the indicator deviates from the norm, be sure to replace the springs.
https://youtube.com/watch?v=gYLFHjMr2Fk
Leveling up
If you think that after replacing the brake master cylinder you can safely go out on the roads, then you are mistaken. In fact, a complete repair of brake cylinders on a VAZ 2110 includes bleeding.
The procedure is not complicated, but requires following the instructions.
- Find someone who will help you in this matter. One will be near the car, and the second will be directly in the cabin.
- Inflate the brake pedal by pressing it several times.
- The assistant presses the pedal, and meanwhile you slightly unscrew the fitting on one of the brake system pipes.
- This should release air, as well as a small amount of brake fluid. Don't be alarmed by leaks, this is completely normal.
- Retighten the fitting using the same wrench as when unscrewing - 10.
- Command your assistant to lower the part.
- The procedure is repeated until air bubbles begin to come out when unscrewing the fitting.
- Each of the four circuits is pumped using similar actions.
- First make sure that the brake fluid in the expansion tank is filled to the required level.
Actually, at this point the repair work related to the master brake cylinder can be considered complete. Experience in operating a car like the VAZ 2110 suggests that you should always store a container of brake fluid in the trunk. All sorts of situations happen on the road, and you need to be prepared for them.
Unit cost
It is better to find out how much a vacuum brake booster for a VAZ 2114 costs directly from the stores. Since the regions are different, the price categories are different and it’s easier to navigate the area locally. The approximate cost is from 2,000 to 3,000 rubles. Installing it in the service will cost a third, or even half, of the cost. Despite the inaccessibility of the unit and some inconvenience, it is much easier to change the amplifier yourself. The frequency of breakdowns or replacements directly depends on the quality of the track, driving style and the general wear and tear of car parts, in particular the chassis. Therefore, it is difficult to say that there is any specific regulatory period. The only thing you need to remember is about timely diagnosis: sometimes it’s worth getting confused and going over your fourteenth with the eye of a caring owner. And, of course, you shouldn’t delay repairing or replacing the unit.
Source
Checking the amplifier assembly
The answer to the question of how to check the vacuum brake booster is suitable not only for the fourteenth VAZ model, but can also be applied to the thirteenth and fifteenth.
- Press the brake to the floor 4-5 times with the engine not running. This will create uniform pressure in the two parts of the amplifier. When you press the brake, the valve will immediately show itself: if it squeaks, then you need to seriously think about it.
- After the pressure has become uniform, start the fourteenth. But at the same time you need to keep the brake to the floor. If everything is in order with the brake booster system, the pedal will rise after the engine starts. If this does not happen, then repair is definitely required.
- In the event that you realize that there is a problem with the amplifier, you need to look to be sure how the hose is secured and what condition the flange is in. If the fastenings at any point do not correspond to the norm, this may affect the fact that the pedal does not lift, and in fact the fault will be on a separate incorrect fastening, and not on the entire system as a whole.
When to repair and when to replace?
- The VUT will have to be changed if the diaphragm, return spring or one of the valves is damaged. Then the car owner will simply be forced to remove the VUT and replace it. Moreover, this will need to be done as quickly as possible. Replacement in this case is the most reasonable solution, since it is not always possible to find individual spare parts for VUT on sale (this is especially true for diaphragms).
- It is advisable to carry out repairs in case of damage to external hoses. The hose may crack, the clamp on it may become loose, which leads to a loss of tightness, etc. All these problems can be eliminated without replacing the VUT. A leak in the system is, of course, bad, but it is not a critical failure (unless the driver is annoyed by the hissing in the cabin).