The main purpose of the gas distribution mechanism is to transmit torque from the crankshaft pulley to the camshaft of the car.
Failure to follow the manufacturer's maintenance recommendations, aggressive driving style, and a number of other reasons contribute to premature belt wear.
At high speed driving conditions, the drive most often breaks into pieces. The operation of the valve mechanism and cylinder block is blocked. There are frequent cases of holes in the block wall. In this case, the cylinder head must be replaced; restoring the original part is impossible.
The process of replacing the drive yourself is not at all complicated, but it requires attentiveness on the part of the technician. Violation of technology is not acceptable. If you encounter any difficulties with repairs, contact a service station specialist for help.
On cars of the VAZ 2110 family, timing belts are used. Unlike wedge and poly-wedge, they have a long service life, but are more expensive. On previous modifications, chain drives were installed, but they are not as efficient and have a higher noise level during operation.
Replacing the timing belt for a VAZ with a 16 valve engine
We put the car on a flat surface, raise the handbrake and put it in first gear. Remove the decorative engine cover and the protective cover of the timing belt. Using a 19 mm spanner or a wrench, turn the generator pulley until the mark on the camshaft pulley aligns with the “tendril” of the protective casing mounting bracket on its left side. We move to the right and remove the rubber plug in the clutch housing to make sure that the marks on the flywheel match the triangular cutout on the scale, which is located there.
After all the marks match, loosen the tension on the generator drive belt and unscrew the bolt securing the pulley to the crankshaft gear.
We remove the gear and check the alignment of the marks on the oil pump cover and the crankshaft gear. The generator pulley mounting bolt must be installed back in order to subsequently rotate the crankshaft to check the correct valve timing. Next, you need to loosen the bolt securing the tensioner (tension roller) and use a special wrench to turn it clockwise until the timing belt tension is released. Now you can remove the old belt.
We put a new belt on the crankshaft gear, then on the camshaft gear, tension roller and pump. Once again we make sure that the marks match. Let's move on to belt tension.
Attention! Due to inexperience, you may encounter the following problem: when trying to tension, the mark may “run away” from the crankshaft pulley and flywheel. This happens due to the fact that you do not tension the drive belt branch (the one that “enters” the camshaft gear) loosely.
Tension it as much as possible and, while turning the tension roller, guide the belt teeth with your fingers into the teeth of the camshaft pulley so that torque is transmitted to the crankshaft. There is another option - make an allowance of half a tooth - a tooth on the camshaft pulley. After putting on the belt, turn it until the mark coincides with the “tendril” on the bracket, and carefully tighten the loose branch of the belt (from the side of the tension roller and pump) by turning the roller counterclockwise
This happens due to the fact that you do not tension the drive belt branch (the one that “enters” the camshaft gear) loosely. Tension it as much as possible and, while turning the tension roller, guide the belt teeth with your fingers into the teeth of the camshaft pulley so that torque is transmitted to the crankshaft. There is another option - make an allowance of half a tooth - a tooth on the camshaft pulley. After putting the belt on, turn it until the mark coincides with the “tendril” on the bracket, and carefully tighten the loose branch of the belt (from the side of the tension roller and pump) by turning the roller counterclockwise.
Replacing the timing belt of a VAZ 2112 with a hanging wheel
If you are changing a belt with a wheel hanging out, then while tensioning the belt, install the wheel and lower the car to the ground. Engage first gear. This will also prevent the crankshaft mark from running away. Having ensured that the tension is correct, the car will still have to be raised so that it is possible to rotate the timing drive to check the marks. But there is a way out! Ask a neighbor or assistant to simply depress the clutch pedal.
Checking the timing belt tension
A well-tensioned belt should bend 90 degrees from the force of your fingers. If you overtighten, there will be problems with the tensioner and pump bearings. If you don’t tighten it enough, the belt will either jump (which will disrupt the valve timing) or fall off altogether.
So, the belt is tight. We turn the crankshaft twice to make sure that the marks match. If the marks match, then return the generator pulley to its place, tighten its drive belt and install the protective and decorative elements of the engine back. After 2 - 3 thousand kilometers of the car, check the belt tension and its condition again. The optimal service life of the timing belt before it is replaced again is 40 - 60 thousand kilometers. The frequency of checking its tension is 15 thousand kilometers.
Dear friends, today we will tell you the basics of setting timing marks using the example of a VAZ 16 valve engine. It's no secret that correctly set timing marks are the key to proper engine operation. If the marks are set incorrectly, then normal engine operation is impossible.
It is also important to tension the belt correctly, this greatly affects its durability. So, when do we have to deal with the procedure for setting timing marks? When, according to the regulations, we need to replace the timing belt at the next maintenance, by the way, the rollers are also necessarily changed along with the belt in this case
Top 5 best manufacturers
- Gates is a US brand that produces drive belts with an increased degree of resistance to temperature extremes. The company uses nitrile as part of the materials, which can withstand high loads at extreme operating conditions. Statistics on premature wear and defects of Gates products speak for themselves: two failures per 6 million units.
- Bosch is the largest concern from Germany, supplying a huge range of components and spare parts for most brands of European cars. About 30% of all engines in the world are equipped with Bosch belt drive kits.
- Lemforder is a German manufacturer focused on the Korean automotive market. It is the official supplier of drive mechanisms for many brands that are installed in factories. Lemforder belts are distinguished by their classic manufacturing method and relatively low price.
- Contitech is a subsidiary of the Continental concern, known for its advanced developments in tire production. The materials of belt drives of this brand have increased wear resistance, thanks to the special structure of rubber and metallized tape in the cord.
- Dayco is an American company that provides affordable timing belts at low prices. Ideal for budget cars of various classes.
Replacing the timing belt Priora 16 valves
Replacing the timing belt on a 16-valve Priora is a little more difficult than on 8-valve engines, however, this procedure is accessible to almost every car enthusiast.
A belt in a car engine is one of the main parts for transmitting torque from one mechanism to another. But it is worth remembering that everything has an expiration date. We will outline the nuances of working and replacing the belt in the article below.
Tools and spare parts
Let's start with the fact that to replace the timing belt on a Priora 16 valves you will have to stock up on a very specific set of tools.
This is definitely a set of hexagons, a set of torx bits, and a set with a small 1/4-inch ratchet will not work, we’ll tell you why later.
In addition, you will need a device for tensioning the roller, but the usual one from 2114 will not work, you need a slightly wider one. If you have enough strength, you can tighten the roller simply by leaning against it with a mounting tool; many people do this.
The fact is that initially the 16-valve 21127 was designed without air conditioning. Everything was simple. The pump is driven by the timing belt, the alternator belt is no longer responsible for anything. In general, it couldn’t be simpler.
Crankshaft and generator with tensioner, without rollers.
The designers were faced with an almost unimaginable task - to install an air conditioning compressor, which they accomplished. Yes, not perfect, but we did it. And therefore, two additional pulleys appeared here - a compressor and a tension roller.
By the way, many car owners later began installing these same brackets with a tensioner in order to dismantle this circuit.
Replacing the timing belt on a Priora 16 valves
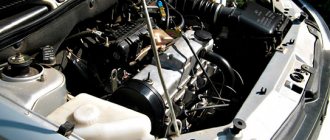
Let's get to work. First, unscrew the oil filler neck, then pull off the plastic casing. Then there are two development options. We will look at a more complex one, with air conditioning. Its difference is in the additional video, this has already been said. The whole point is that it also needs to be unscrewed, because it simply interferes with removing the protective cover.
Here you need a 15mm head. Unscrew the roller and remove the alternator belt. On the way, we listen to the video so that it doesn’t buzz, otherwise we need to replace it. Next, the timing belt casing opens before us. Remove the front upper and lower parts of the casing. To do this, unscrew the 8 Torx bolts.
There is also a surprise here if you use a ratchet. One of the bolts, the one closest to the passenger compartment, will have to be unscrewed using a simple Torx wrench, because the head with a tip and a ratchet will not fit between the engine and the spar.
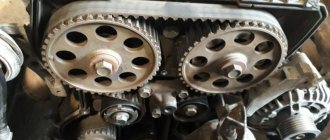
So, we removed the casing, in front of us is the timing belt and all the rollers.
It is best to rotate by the camshaft - it is easier than by the crankshaft. It is not advisable to rotate the camshafts separately from the crankshaft. A maximum of 10 degrees to correct the marks if they misalign by a tooth or two.
Then we turn the wheel all the way to the right, someone removes it, which is not necessary. We unscrew the 4 bolts securing the mudguard using a Torx and one using a Phillips screwdriver to gain access to the crankshaft pulley.
conclusions
Despite such a variety of timing belts, the choice should be made based on needs and financial capabilities; fortunately, it is possible to buy a high-quality belt for relatively little money.
Hello everyone) It's time to replace the timing belt.
For my car, the replacement schedule is 45 thousand km. I have already driven more than 50 thousand km, I can drive until the last minute, because... on a 124 engine the valves do not bend. But I don’t want to get up somewhere because of him, especially since it’s winter outside. Let's start with choosing belt manufacturers. Conventionally, we can determine the three most reliable belts. 1) Gates2) ContiTech
3) Dayco
At the moment there is a reinforced timing belt repair kit from Gates, no complaints have arisen during operation.
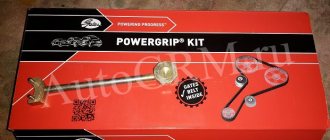
Although it happened, I changed it in late autumn and with the advent of cold weather, a “chomping” sound from the rollers appeared, but then disappeared. This time I decided to try a timing belt repair kit from ContiTech. And in this post I will try to identify whether my repair kit is counterfeit or not!
Well, as they say, you meet people by their clothes) Let's start with the packaging:
1) The first thing you get into your hands after purchasing is the box. It must be made of normal high-quality cardboard, from normal high-quality materials. All inscriptions must be well printed, have clear, even contours, and there should be no vagueness. Of course, this is a rather indirect sign, because good, high-quality fakes have been learned to be made well, having good equipment. Visually, it is quite difficult to distinguish by the quality of the print.
2) A distinctive feature of belts from Contitech is that they do not seal their box like other manufacturers do. So there is no need to be confused and afraid of this.
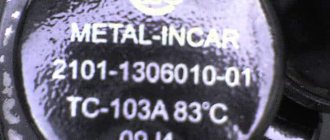
3) The packaging must contain an article number and the name of the belt, in this case CT 996 K1.
A list of engines for which this belt is suitable is listed, the number of teeth is indicated, an installation diagram is drawn, and a QR code, by scanning which you can go to the page for this product on the manufacturer’s website. 4) All these inscriptions and drawings are made on a sticker that is glued to the box. Very often, if you come across a fake, all these inscriptions are applied directly to the box, without a sticker. 5) If this timing belt is made in Europe, then you can see that this sticker is translucent, applied to film, and not on paper.
6) On the side of the box the country of manufacture is indicated, the expiration date of the spare part is written. Also, make sure that the belt in the box is neatly folded, without kinks or strong fractures. All diameters and roundings must not be sharp. In addition to the belt itself, the package contains a sticker with a good, high-quality print. If the seller tries to convince you that the sticker was lost during transportation, you can be sure that this is a fake.
We're done with the packaging and let's move on to the belt.
1) The sticker itself with the inscriptions must be different from the color and texture of the belt.
If the belt feels more rubbery to the touch, then the sticker feels plastic. It often happens with a fake that these inscriptions are made directly on the belt, and not on a sticker. 2) The article number of the belt and the country of origin are indicated. An inscription stating that the belt should not be bent. The expiration date indicated on the box must match the date printed on the belt with a difference of 5 years. The shelf life of the belt is 5 years. 3) The belt itself, its inner side, is made not of smooth rubber, but of rough one. In fact, in appearance it resembles black fleecy electrical tape made of fibers. The teeth may have slots due to the shape of the pulleys.
4) The cord sticks out from the belt in places. This is the norm. The fact is that belts are made in huge reels and then cut to size.
Since I have a repair kit for a 16-valve engine, it includes 2 more rollers (tensioner and parasitic). I couldn't find any information on the videos on the Internet. I would be very grateful if anyone could complement it. I am attaching information about the videos included in this kit.
Am I the only one who thinks the tension roller is asking for help?)))
The mileage of the car is almost 200 thousand km, how often do the camshaft and crankshaft pulleys change?
As soon as free time appears, there will be a report on the condition of the timing belt and rollers from Gates power grip and on replacing it with ContiTech. Now the car is already depressed in anticipation of its replacement)))
Good luck to everyone and see you in the open spaces of Drive)
Hello everyone, people, I want to discuss a hackneyed topic that doesn’t raise questions for many, but someone gets up to this rake more than once and complains like “...oh, what a f*** this AvtoVAZ is...” Honestly, it’s boiling to read the posts and watch the video about how people’s belts break, valves bend, and some people know that if the belt breaks, the valves will bend, but somehow they don’t try to solve this issue. What's so complicated about that, you ask? The cars of the AvtoVAZ concern are designer, 90% of the spare parts between the models are the same (I mean technical ones, not wings, hood, headlights, etc.). Now cars are coming off the assembly line mainly with 16-valve engine models, for example 21127, 21129, etc., that’s not the point. They all have some differences from each other, but there is one mechanism that is structurally invariably passed on from generation to generation - this is the timing mechanism from the 126th engine
.
Yes, yes, if anyone didn’t know, the timing mechanism on modern Lada engines and, so to speak, the “older” ones has not changed at all, and maybe slightly different casings and gears, that’s not the point. I think many people know the main problem of the timing mechanism of the 126th engine, its weak point is the timing pulley. Unlike the roller of the “old” VAZ 2112 model, which had a 2-row bearing in its design, the new roller 21126 has a single-row bearing + the roller mount was changed, a bolt was installed instead of a stud. This is where Achilles' heel lies. A single-row roller cannot withstand the load and, as a result of friction, simply falls apart. Okay, okay, we figured out the roller, but there is one more part in the timing mechanism that can cause the belt to break. Guess what it is - it's a pump
.
It is no secret that the TZA plant supplies pumps to the conveyor. Yes, the pump can leave the factory quite a lot from 60 to 130 thousand km. And when the time comes to change it, people hope to think, “This is from the TZA factory, it’s been around a lot, I’ll install it.” Nooo guys, remember, what is in the factory and what you buy in the store (supposedly from the factory) are two different things. What solutions can there be to these problems? Let's start with the pump.
Today there are a huge number of pumps on the market, including TZA, Hepu, Belmag, Bautler, Fenox, Luzar and others.
I want to focus my attention on the last one. Personally, I used it in my car, and recommended it to friends and acquaintances, because I never had any problems with it. Yes, right now you can start writing “here I bought Luzar, crap, passed 10 thousand, fell apart, leaked, etc.” I always ask such people, what was the fundamental factor for you when buying a pump and where did you buy it? And 99% of the time, you know what I hear? “Price, I took what was cheaper, it’s a VAZ, why buy expensive ones? And so it seems, I took it at the market.” Guys, remember one thing, there is a good Russian proverb on this subject: “The miser pays twice.” Well, just think about which manufacturer or private company will sell its goods at the market, it’s ridiculous in the 21st century. There are a lot of video reviews on the Internet on how to distinguish the original from the fakes. Personally, in order to avoid running into a fake, I always go to the manufacturer’s website and look at the Official Representatives in the region
, and buy only there.
I don’t advertise a product, no one paid me, I just want to share my experience so that people don’t step not only on their own rake, but also on other people’s. The second problem is the video, what's wrong with it?
There are two solutions to this.
The first and most budget-friendly, and in my opinion the most reliable,
is to install a idler pulley from 2112. The outer diameter of these rollers (2112 and 21126) is the same + instead of a bolt, I recommend installing a pin from a tension roller with an 8-valve engine (I’ll warn you in advance about shorten 1 cm).
Yes, someone may say that it is better to leave the bolt, guys, you are right, only after the 3rd or 4th time of unscrewing/tightening the bolt when the thread breaks, remember my words. If you don’t believe me, ask any engineer working with metal that parts should be fastened to aluminum through studs; this should be the case a priori. The second way
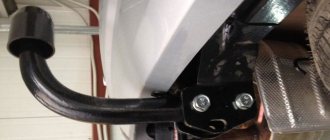
is to install a foreign-made double-row bypass roller, for example from Marel. I don’t like this method a little, because the VAZ 2112 roller has a flange so that the belt doesn’t jump off anywhere, and the price of this one roller is 2x from 2112. That’s actually what I wanted to convey to you. I am attaching one photo, this is a photo of the timing belt from my car. I had the 21126th engine. The tension roller remains the original 21126 (there are no problems with it), the bypass pulley 2112 (note that both rollers are installed on a pin!), and the timing belt from BRT.PS
A few words about the timing belt. Again, there is a huge selection of belts on the market, ranging from Finwhale to Bosch. Personally, I always give everyone a belt from Balakovo, also known as BRT. Previously, 3-4 years ago there were good Gates belts, but now this is outright China, and I decided to abandon them.
This spare part for VAZ (Lada) 2110/2111/2112 cars is made in different parts of the world. The site contains reviews of timing belt manufacturers from countries such as the USA, Russia, Germany. In December 2019, 6 manufacturers took part in the rating of timing belts for VAZ (Lada) 2110/2111/2112 on PartReview. It is built on the basis of 29 reviews and 89 votes.
Causes of belt breakage
One of the common problems with the model is the failure of the timing belt. The reasons for this may be different:
- Simple wear and tear caused by a long period of use of the vehicle;
- Regular increased loads under which the engine has to work intensively;
- Mechanical damage as a result of improper operation or received during the repair of other components;
- Manufacturing defect.
Regardless of the causes of the problem, it must be eliminated.
Over time, it stretches so much that the gear teeth jump by 1-2 links. This disrupts the valve timing and causes interruptions in engine operation. But this is the best-case scenario for such a situation. The worst is when the strap breaks and the valves bend.
What should be included
When the time comes to replace the timing belt in the Lada Priora, many owners invariably face problems related to the fact that they do not know which spare parts still need to be replaced. The presence of two camshafts in the timing drive mechanism has lengthened the toothed belt, so in addition to the tension roller, a support device is also installed. The bearings of the support and tension rollers are designed for a long period of operation, but experts recommend replacing them.
If the engine has a “solid” mileage, the camshaft and crankshaft gears will have wear, so they also need to be replaced. If they are not replaced, the teeth will be damaged. If engine oil gets into the working area of the timing mechanism drive, it is deadly, so oil seals on the shafts (distribution, crankshaft) that have lost their elasticity may need to be replaced.
What can cause a timing belt to break?
In a VAZ-2112 car with 16 valves, rupture of a belt part can occur due to:
- Strong or, on the contrary, weak tension. To make sure it is tensioned correctly, it is recommended to use a special device called a frequency meter. Measurements should only be taken from a cold engine, the indicator should not exceed 155 Hz +/- 3 Hz.
- A rupture will be inevitable if the part has been in use for a long time and the replacement was not made in a timely manner. Since there is a constant temperature difference during the working position, the belt element gradually collapses, cracks appear on it, which leads to rupture.
- Due to improper placement of the bearing, which can jam and tear the timing belt.
- Due to leakage of the oil seal, which coats the part with oil.
- Due to a low-quality timing belt, which was installed in the 16-valve VAZ-2112 engine by the manufacturer.
These are the most basic reasons that lead to the rupture of the HMS belt. If you carefully monitor the technical condition of the machine and repair it yourself at the slightest sign of breakdown, you can avoid very unpleasant situations that can happen at any time.
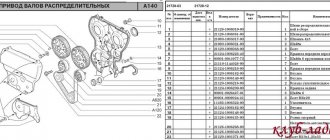
Article numbers of original parts
Lada Granta, Kalina with 8-valve engines (VAZ 11183):
- Belt - 21080100604010 (“BalakovoRezinoTekhnika” PJSC Balakovo)
- Tension roller assembly - 21080100612000 (“VPK” JSC Vologda)
- Tension roller assembly - 21080100612001 (TD EPK LLC, Moscow)
Timing kit 2108 - 21080100604086 (Gates CIS LLC, Moscow). The kit includes a belt and a roller. This is the GATES K015521 kit, only in LADA branded packaging.
Lada Granta, Kalina, Priora with 8-valve engines (VAZ 11186, 11189):
- Toothed belt assembly - 21116100604000 (Gates CIS LLC, Moscow)
- Toothed belt assembly - 21116100604082 (Gates CIS LLC, Moscow)
- Tension roller - 21116100623800 (Gates CIS LLC, Moscow)
- Tension roller - 21116100623882 (Gates CIS LLC, Moscow)
Timing kit - 21116100604086 (Gates CIS LLC, Moscow). The kit includes a belt and a roller. This is the GATES K015670XS kit, only in LADA branded packaging.
Lada Granta, Kalina, Priora, Largus Vesta, XRAY with 16-valve engines (VAZ 21126, 21127, 21129 and 21179):
- Reinforced toothed belt - 21126100604000 (Gates CIS LLC, Moscow)
- Reinforced toothed belt - 21126100604082 (Gates CIS LLC, Moscow)
- Toothed belt - 21126100604001 (ContiTech Antriebssysteme GmbH)
- Support roller - 21126100613500 (“Lada Holding” GMBH Vienna)
- Support roller assembly - 21126100613501 (Schaeffler Technologies GmbH & Co. KG)
- Automatic toothed belt tensioner - 21126100623800 (“Lada Holding” GMBH Vienna)
Timing kit 21126 - 21126100604086 (Gates CIS LLC, Moscow). The kit includes a belt and 2 rollers. This is the GATES K015631XS kit in LADA branded packaging, which is installed on the AvtoVAZ conveyor.
Belt replacement
Replacing the timing belt must be described separately, depending on how many valves your VAZ 2110 has - 8 or 16. Self-repair of the unit on an 8-valve engine is considered easier, although you should not have any serious problems with a 16-valve engine.
8 valve
The sequence of work will be as follows:
Disconnect the battery by removing the negative cable; Unscrew the bolts from the belt protective cover; Remove this protective cover; Remove the front wheel on the passenger side, while simultaneously removing the mudguards and engine compartment protection; Turn the generator pulley clockwise so that the marks on the cover and the pulley match; Remove the protective plug from the gearbox and check in the resulting hole to see how much the control marks match; Using a metal screwdriver or other object, you need to block the flywheel; After this, you can unscrew and remove the generator pulley; Make a few turns to loosen the nut that holds your belt tensioner pulley in place; Remove the old belt. You won’t need it anymore, so feel free to send it to the landfill; The space needs to be cleaned and degreased. White spirit is perfect for this; After rinsing, dry everything using a dry and clean cloth; Install a new roller, following the direction arrows
If they are missing, then take the inscription into account. It should be located from left to right, that is, you could read it without any problems; To tighten the belt, move the roller counterclockwise; Check that all marks and the degree of belt tension match correctly; The compression ratio should be checked on a cold engine and at an air temperature within 15-30 degrees Celsius; Turn on the motor and with the unit running, check whether you have installed everything correctly; If the sound is normal, then the installation was completed correctly; Reassemble the removed elements in reverse order.
Help in choosing a timing belt and rollers
The reliability, efficiency and operating life of the motor depend on the quality of the rollers and belts chosen for replacement.
Research shows that the cost of a belt is from 450 rubles, and rollers will cost you at least 600 rubles.
When buying spare parts, be guided by the opinions of VAZ 2110 car owners. There are many forums. Also consult with specialists at the service station. They will be able to give professional advice, or even order quality components for you.
Surveys among owners of AvtoVAZ’s creation, namely the VAZ 2110, showed that the most popular belts are products manufactured by the following companies:
- Gates;
- Bosch;
- Kraft;
- Power Grip;
- Dayco;
- Contitech.
As for videos, it’s better to pay attention to the following brands:
- Gates;
- Power Grip;
- VPZ;
- BRT;
- Dayco;
- Marel.
Of course, the choice is purely individual and depends on the financial capabilities and available assortment of a particular store. But if the necessary elements are not available in your city, you can always order them online. Nowadays this is not a problem.
How to check the condition of the VAZ 2110 timing belt
To check the condition of the timing belt you need to:
- remove the front timing belt protective cover plug,
- remove the alternator belt so that it does not interfere,
- unscrew 6 bolts and remove the front protective cover,
- Having gained access to the timing belt, we inspect it.
If during your next inspection you notice:
- cuts on the timing belt, bulges,
- delamination, appearance of broken threads,
- numerous cracks, folds, severe abrasions,
- oil leaks on the belt,
it must be replaced immediately.
As a rule, young drivers perform such repairs in specialized auto repair shops or car repair centers. But, if you decide to replace the old belt with a new one yourself, prepare the tools and materials: heads “10”, “17”, a special wrench used to tension the belt, a screwdriver, a new timing belt, detergent, clean rags.
Myths about fake belts
You can often hear information from experienced car owners that if there is a seam on the belt, it means it is defective. In fact, this is not true at all. Many drives have a similar seam, as it is provided for by the manufacturing technology. These products are produced by cutting a wide roll (the ends of which can be sewn) into blanks corresponding to the geometric parameters. The seam is made with strong threads and does not affect the operation of the belt in any way. But it’s worth assessing the quality of the seam and the data indicating its number.
Another common myth is that a Teflon-coated timing belt must be white. This is also a mistaken opinion. Teflon itself does not have any color, therefore, its application to the belt does not affect the final shade of the product. You can find out about the presence of Teflon coating by studying the documentation or asking the seller.
It is also a myth that the Teflon® coating must have the inscription “Teflon®” on it. This is completely false. Such information is specified separately. Most Teflon-coated belts are visually indistinguishable from others.