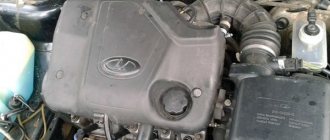
From time to time, Priora owners need to change valves - this is due to the technical features of 16 valve engines. Typically valves bend after the timing belt stretches or breaks. With such problems, the camshafts either stop working or lose synchronization with the crankshaft. As a result of such a defect, the pistons begin to hit the valves, which causes their deformation.
In some cases, damaged and/or deteriorated pistons add to the problem of bent valves.
To ensure that the Priora owner does not have such problems, it is worth carrying out maintenance work on the vehicle and engine from time to time.
If the valves are still bent, you will have to change them yourself, or with the hands of a specialist at a service center. This is not the most difficult job if the vehicle owner has basic skills and understands how to repair his car.
Main signs and causes of faulty valves
Replacement of all valves on a Priora with 16 valves can occur either when they are bent or when they burn out. They can burn out due to poor quality parts or poor quality of the mixture used.
If the vehicle engine overheats too quickly, then sooner or later the working surface of all valves begins to burn out (wear out). Another point is that the valves and their mechanisms have a return spring. If the return spring begins to wear out, the valve will begin to hit the piston during operation. In this case, the result will be the same as a damaged timing belt.
It is important for the vehicle owner to correctly diagnose problems with valves. The very first sign of an emerging problem is a decrease in the level of engine response, which manifests itself in a noticeable decrease in vehicle power. In some cases, tapping sounds are heard.
A common symptom of valve problems is black smoke coming out of the exhaust pipe. This problem is combined with increased engine oil consumption. The machine may also operate unstably when idling. It is difficult to diagnose this problem, since it is difficult to accurately determine the cause of the breakdown without disassembling the engine.
Engine specialists know a large number of examples in which a Priora arrives at a car service center with signs of broken valves, but in the end everything is fine with them. Therefore, in order to diagnose the car and remove the cylinder heads. Only then will it be possible to check the valves for sure.
Video showing cylinder head repair (1.5 l engine)
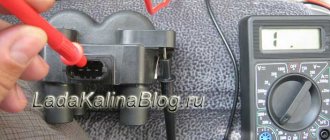
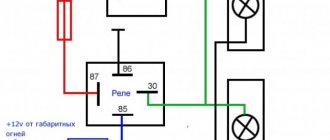
If, when starting the 16-valve Priora engine, you hear knocking noises in the engine compartment, which will disappear as the power plant warms up, then you should check the hydraulic compensators (HC). When every start of a cold engine is accompanied by a knocking sound, this is a clear sign of a worn hydraulic compensator. We will tell you how to replace expansion joints yourself. We will also look at a component such as the cylinder head check valve, which can also cause defects in the operation of compensators.
Hydraulic compensators are sensitive to the quality of lubricant. If mechanical impurities are present in the oil, the part may fail ahead of schedule. Faulty hydraulic compensators cannot be repaired. After installing new compensators, you may be upset by the knocking of the remaining main valves - this is normal, but not for a long time.
Required Tools
Repair work requires a set of certain tools - this can simplify and speed up the process.
To repair the engine and valves, you need the following tools:
- Set of keys.
- Screwdrivers.
- Valve spring extractor.
- Pullers for valve stem seals.
- Tweezers.
- New valves.
- Cylinder head gaskets.
An important point: valves can only be purchased as a set. There is no point in removing and installing only one valve, because soon the other valves will also break.
Factors on which the price of a part depends
A set of valves for a Lada Priora can cost differently. The price of the set may be influenced by the following factors:
- The number of products included and their purpose.
- Weight of the spare part.
- Material of manufacture and quality.
- Company manufacturer.
- Originality.
- State.
- Place of purchase.
- The need for delivery and its cost.
- Seller's pricing policy.
FOR-MASH valve set (light version)
Removing the block head
The cylinder head needs to be removed like this:
- fuel system pressure relief;
- removing the negative terminal of the battery;
- disconnecting wires from sensors;
- draining liquid;
- dismantling the rear engine mount;
- removing the valve cover;
- unscrewing the screws securing the mass harness;
- dismantling the wire going to the negative battery;
- removing the timing belt and dismantling the camshaft pulleys;
- removing the oil check guide tube;
- disconnecting the fuel supply tube to the ramp (you will need a 17 key);
- disconnecting all harnesses coming from the engine control unit;
- removing the 8 cylinder head mounting screws (you will need a 10mm hex wrench).
It is recommended to check the lower head mirror and its condition. In order to do this, you need to take a ruler and make sure there are no distortions.
Thermostat
Next you need to switch to the thermostat. "Priora" (16 valves), in which replacement of the thermostat itself is not required, remains still not running. The next step is to remove the temperature sensor from the element body. It is used to monitor the coolant temperature. Now you can loosen a few fixing bolts and freely remove the thermostat out. The sealing gasket is removed from the studs. After this, you need to remove all the candles. At the same time, the Priora (16 valves) will not require such action as replacing the pump. Below you will find detailed instructions for dismantling the spark plugs.
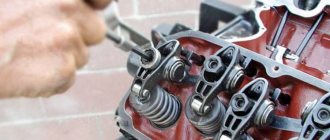
How to remove the valve
Before you begin removing the valves, you must place the head on the support. This simple step will prevent damage to the valves during operation. The valves are removed as follows:
- dismantling blocks with camshaft bearings with 20 screws (you will need an 8 socket wrench);
- removing the camshaft and oil seals;
- removing all plugs from the ends of the cylinder head;
- removing valve lifters.
After this, the valves need to be replaced. To do this, you need to remove the oil seal from the valve. You can use a puller or pliers.
After removing the valve, you need to inspect it. It is necessary to replace it with a new one only if there is visible damage to the rods, that is, if there are bends, cracks or chips. There should also be no other damage on the valves, such as scratches. It is important to make sure that the valve is not burnt out and inspect its seat. If there is even minor damage on it, it is worth sanding. If this is not done, even new valves will leak gas from the combustion chamber.
The assembly process must be done in reverse order. When assembling, you need to pay special attention to every little detail, since then you can avoid possible problems in the future. Eg:
- There should be a new gasket under the cylinder head. It would be better if it was a gasket with sealant.
- When installing the valve and screws, they must be lubricated with engine oil. The build quality depends on this.
- In order to finally tighten the screws, you can take a torque wrench.
The work involved in replacing the valves will not be difficult, but it is best to avoid it altogether. All that is required for this is just to check the condition of the timing belt from time to time. You also need to use high-quality fuel to avoid the formation of carbon deposits on the valves.
Twisting force
During further assembly, pay close attention to the force with which you tighten them back. For a car like the VAZ Priora, the torque is 30-40 Nm. If you don’t have a torque wrench, you can use the traditional method. To do this, twist the candle with one hand until it stops. These efforts are quite enough to screw the parts into the well. By the way, if you lightly clamp the spark plug, it can simply shoot out while the engine is running due to the high pressure in the combustion chamber of the engine.
What about the cost? A set of new parts can be purchased at a price from 500 to 2 thousand rubles, depending on the manufacturer. For injection engines, choose products marked “R”.
Replacing the front crankshaft oil seal on a VAZ 2170 2171 2172 Lada Priora[edit]
If you find traces of oil leakage through the crankshaft oil seals, first check to see if the crankcase ventilation system is clogged and if its hoses are pinched, and if necessary, repair the faults. If the oil leakage continues, replace the oil seals. A sign that the front crankshaft oil seal needs to be replaced is oil leakage through its lip. In this case, oil is sprayed out by the rotating crankshaft pulley, as a result of which the entire front part of the engine and the timing belt are oily.
1. Disconnect the wire from the negative terminal of the battery.
3. Remove the timing belt (see “Replacing the timing belt and tension roller on a VAZ 2170 2171 2172 Lada Priora”).
5. ...remove the crankshaft timing pulley.
7. Using a screwdriver, remove the oil seal from the oil pump cover.
9. Install all removed parts and components of the gas distribution mechanism in the reverse order of removal.
How to replace the timing belt on a Priora (VAZ 217030)
- Remove the top decorative engine cover;
- Remove the upper timing belt guard;
- Remove the front right wheel;
- We set the engine according to the marks;
- Remove the crankshaft pulley;
- Remove the lower protective cover of the timing mechanism;
- We make our marks on the belt and stars;
- Remove the belt and rollers;
- We transfer the marks from the old belt to the new one;
- We install a new timing kit;
- We put everything that was disassembled earlier into place.
Further, the photo report shows more detailed instructions on how to replace the belt and rollers of the gas distribution mechanism of a Lada Priora (VAZ 217030) 1.6 16 valves with your own hands.
1
Let's start replacing the timing belt on the VAZ Priora. First of all, we will remove the decorative engine cover.
2
But first, we disconnect the vacuum sensor from the cover. We lift the sensor up and remove it from the grooves on the engine cover.
3
And remove the decorative engine cover by pulling it up, pulling out the rubber seals from the guides on the engine.
4
Now let's start analyzing the timing mechanism. Remove the upper timing belt guard by unscrewing the five mounting bolts with a 5 mm hexagon.
5
We remove the upper casing and go down to the wheel to disassemble access to the timing belt from the bottom of the engine.
6
We jack up the car or lift it on a lift. Unscrew and remove the front right wheel.
7
Since there is no protection behind the wheel, we can immediately begin installing the timing marks on the engine. To do this, turn the engine by the central crankshaft bolt. It is convenient to use a ratchet with several extensions and a 17 mm socket.
8
The TDC mark on the timing belt guard should look at the gap between the first and second teeth, after the gap without teeth, at the crankshaft pulley.
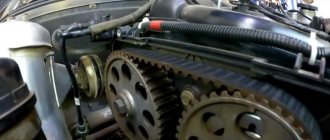
9
And the marks on the camshaft sprockets should be opposite the marks on the rear timing belt guard.
10
When the engine is aligned to the marks, we can safely unscrew the crankshaft pulley. The easiest way to unscrew a pulley is to use an air impact wrench. If there is no impact wrench, then you need to ask a partner for help. The partner must get into the car, press the brake pedal, and engage fifth gear. This will stop the engine and allow you to unscrew the pulley.
11
We removed the pulley and remove the spacer installed behind it.
12
Now you can check the timing marks again. The mark on the crankshaft is where the crankshaft pulley key matches the casting on the engine.
13
For more convenient installation of a new timing belt, we recommend using a corrector to set your marks on the sprockets and belt.
14
Having drawn the marks, unscrew the two bolts securing the lower timing case casing using a 5 mm hexagon. And remove the protective cover.
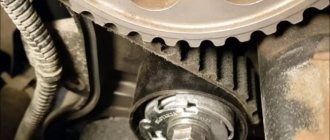
15
After removing the lower casing, we begin to disassemble the gas distribution mechanism. Using a 15 mm wrench, unscrew the bolts securing the timing rollers. Remove the rollers and belt. Inspect the condition of the water pump.
16
We compare the new timing kit with the removed rollers and belt.
17
We align the belts one to one and transfer our marks from the old belt to the new one. It is advisable to count the belt teeth and walk around in a circle to be sure that the belt is correct.
18
We install new rollers on the engine and install the belt according to their marks.
19
The belt must be tensioned using a tension roller. It shows an arrow in which direction to turn the roller. The correct belt tension will be at the moment when the slot on the roller and the tension bar of the roller are opposite each other.
20
After correct belt tension, you need to crank the engine several times and again check the timing marks and belt tension are correct. If everything is in order, then you can begin reassembling the engine.
21
Since we removed the crankshaft pulley together with the generator belt, without loosening the belt tension, we need to move the generator towards the engine. This is necessary so that you can easily put on the alternator belt. Use a 13 mm wrench to loosen the top bolt of the generator, and use a 10 mm wrench to unscrew the tension bolt of the generator.
22
We screw the crankshaft pulley into place and put on the generator belt. Screw the wheel into place.
23
Reinstall the timing belt guards.
24
We install the upper decorative engine cover in its place and finish the job.
Useful tips for choosing
In stores and on the market they offer a wide selection of valve kits for Lada Priora. Therefore, it is often difficult to decide on a model. The product must meet the following requirements:
- Sufficient hardness.
- High thermal conductivity.
- Strength.
- Low coefficient of thermal expansion.
If you just need to replace a worn-out spare part, then you should choose a standard kit. If you want to improve the dynamic performance of the car, then it is recommended to purchase and install lightweight titanium intake and exhaust valves. But you need to take into account that they are more expensive than usual.
Is it possible to tune the Priora 126 engine?
Tuning the 126 engine from Lada Priora is possible. But again, an increase in power will lead to a decrease in the life of the car. Before the car owner gets ready to do tuning, let him ask himself this question.
What do they do to increase the power of the 126 motor:
- install the receiver;
- change the injectors to type 440 cc;
- install lightweight valves;
- the throttle valve diameter is made equal to 54 mm;
- exhaust circuit 4 – 2 – 1.
Let's look at the video to see what other methods of tuning VAZ 126 and 124 engines are available.
Factory service life of the pump
The service life of a water pump depends on the supplier of the product or, in other words, on the build quality of the pump, the elements and materials used. A not quite high-quality pump can fail even after 10 thousand kilometers of the car. The service life of a good part can be 100 thousand kilometers without any signs of failure of the part.
Experts recommend installing an original water pump on the car from the manufacturer TZA (Tolyatti Automotive Unit Plant), which has good quality and a significant period of trouble-free operation.
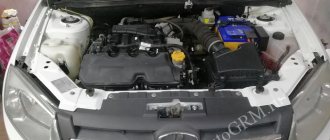
The purpose and general design of the pump in the Lada Priora car
An auto water pump (VP) or pump is structurally included in the liquid cooling system (LCS) of a modern car and is its key element. The main function of this part is to ensure intensive circulation of coolant (coolant) through the engine's fluid circulation system.
Thanks to this constant movement, the temperature of the liquid decreases and its ability to cool other parts and systems of the car is restored. As a rule, the water pump on a car engine is structurally located in front of the cylinder block. Its drive is carried out from the crankshaft through a special wedge-shaped belt or from the gas distribution mechanism (timing) using a toothed belt.
A special toothed belt ensures the functioning of the car's water pump.
General pump structure
The Lada-Priora pump is a fairly simple mechanical unit, which consists of several main parts.
The pump design consists of several elements, one of which is the obligatory gasket
The main components of an engine water pump are:
- product body;
- a shaft with an impeller and a special self-regulating oil seal, thanks to which the coolant is securely retained in the structure during operation;
- pump shaft bearing on which the pump shaft is mounted;
- drive pulley;
- radiator fan (this part can be attached to the pump drive or in a separate electric drive version, without any connection with the car’s water pump);
- gasket made of cardboard or special material.
Operating principle of the device
The operation of the coolant pump is as follows:
- with the engine running, the coolant that has cooled in the car radiator moves to the pump (in particular, to its impeller);
- the gaps between its blades are completely filled with coolant;
- due to the action of centrifugal force, the coolant is thrown by the impeller into different directions of the internal cavity of the HV;
- through the technological hole, the liquid goes into the channels of the cooling jacket of the motor elements;
- constant circulation of the cooling medium in the liquid cooling system is ensured.
Design Features
To prevent possible leakage, the pump body is installed on the engine cylinder block through a special gasket (for example, made of cardboard). The cooling fan, which is sometimes structurally located on the car pump pulley and driven simultaneously with it, is usually made of metal or durable plastic. To reduce operating noise, the blades of the structure are located at certain angles, in an X-shaped position, which corresponds to 110/70 degrees.
In order to reduce the power required to drive the fan, designers use a special electromagnetic clutch. This device can turn off the fan when the coolant temperature drops to a level of 78–85 degrees Celsius. In this way, the operation of the engine cooling system is optimized, and the noise level during operation of the unit is also reduced.