The clearance between the camshaft cam and the valve stem compensates for thermal expansion of the valve. Moreover, if the fuel gap is increased, the valve will not be able to fully open, and if the thermal gap is very small, the valve will not be able to fully close.
Today we will try to convince you that the process of adjusting thermal gaps on a VAZ 2109 car is completely simple and it takes no more than thirty minutes.
When is valve adjustment necessary?
It is necessary to resort to adjustment if the car engine becomes unstable. A characteristic knocking sound appeared while the engine was running. Experienced drivers determine the need for adjustment work based on the following symptoms:
- the fuel consumption level of the car has increased sharply;
- there was a knocking noise while the car was running;
- at idle the power unit is unstable;
The valves need to be adjusted every 25-30 thousand kilometers . This is the optimal period; during this time, structural gaps increase due to wear of some parts. Next I will tell you about the procedure for carrying out adjustment work.
What is needed for adjustment
As mentioned above, you can adjust the slots of the thermal valve on the vase with your own hands. To do this you will need a set of shims, several fixtures and tools. The stand can be made at home, but it is more profitable to buy a ready-made installation fork at the car market.
Heels for adjustment are needed in the range from 3.40 to 4.05 mm, if the guides in the cylinder head have not been changed. If everything was repaired in the same way or the car runs on gas, you should buy washers in the 2.50 mm range for the exhaust valves. Intake valves, as a rule, remain at the same sag; their seats are not recessed.
Accordingly, this article briefly discusses the sequence of valve adjustment on front-wheel drive VAZ vehicles. The consequences of untimely regulation were also discussed.
Preparing to adjust valves
Before you start adjusting the valves on the VAZ-2109, you should acquire all the tools that may be needed in the process of this work. Namely:
- screwdriver;
- set of wrenches;
- tweezers;
- adjusting washers;
- special kit for adjusting valves;
- valve cover gasket;
- sealant.
The car is set to the handbrake. One of the front wheels is suspended using a jack so that it can be rotated.
In this case, 5th gear should be engaged (if this is not possible - 4th).
Followed by:
- disconnect the pipes from the valve covers;
- remove the air purifier housing;
- Disconnect all damper wire cables from the carburetor;
- To make the crankshaft turn easier, you can unscrew the spark plugs;
- Unscrew the 2 nuts that secure the cover, and then remove it. Clean the upper part of the cylinder head from any remaining oil;
- Remove the front cover from the timing belt;
- Set the piston of the first cylinder to TDC on the compression stroke. To perform this action, turn the wheel so that the mark on the camshaft pulley aligns with the mark on the rear cover of the flat-toothed belt.
Adjusting valves on VAZ 2108, VAZ 2109, VAZ 21099
Welcome! There must be a valve clearance, but it must be minimal, otherwise, if there is no clearance, the valves will not be able to close reliably. In this case, depressurization will occur in the cylinders and the power will noticeably drop, and the exhaust valves will begin to burn out. On the other hand, the gap is increased - the valves will not be able to open completely while the engine is running, thereby the power will again drop, because the engine will not be able to supply the fuel-air mixture, because the valves do not open completely. Moreover, the valves can rattle when there is a large gap, and after adjusting them, when you start the engine, you will immediately feel how it will run quieter and in the future you will understand when it is time to adjust the valves on the car.
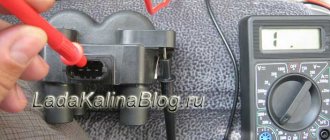
Note! You will need the following tools: tweezers, a screwdriver, a set of all kinds of wrenches (spanners, sockets, etc.), a set of probes (purchased at a car dealership or car market) and a micrometer.
Summary:
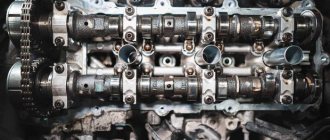
Valves location
You won’t be able to see them that easily, you’ll have to remove the cylinder head from the car, after removal the camshaft and its cams will appear in front of you, under the camshaft cams there are eight valves (or rather their shims, and under them there are pushers, and under the pushers the valves themselves ), which you need to adjust. The shaft cams and valve washers, through which the clearance is adjusted, are indicated by arrows. Under each arrow there is a number indicating the valve number; you will use these numbers to adjust them, so do not forget about this photo as you read the article.
When to adjust valves?
Their gap increases as you drive the car, for example, a hard driving style will require adjustment after 30 thousand, a quiet ride - after 40 thousand you will need to think about adjustment. It is imperative to make adjustments if you buy a used car (few people adjust the valves before selling), especially if you hear the loud sound of the engine running (the valves are knocking). In general, the easiest way to understand whether valves need to be adjusted is to check their clearance: just remove the cylinder head cover from the car engine and use a set of feeler gauges to check the clearance of all valves on the car.
Symptoms of a burnt valve
The main sign of a burnt-out valve is a distinct tripping of the engine in all operating modes. Power also drops noticeably and fuel consumption increases. Signs of failure are similar to other engine problems, and it is easy to confuse it with the following problems:
- Wear of piston rings and loss of compression in the cylinders.
- Breakage of high-voltage wires and spark plugs.
- Failure of injectors and malfunctions of the power system.
To accurately diagnose the malfunction, exclude all of the above options in the following order:
1. Checking the serviceability of the spark plugs is carried out with the engine running at idle speed by sequentially disconnecting the cap of each spark plug. When removing, carefully monitor the engine reaction and stability of its operation. If the engine starts to run worse, it means the valves in the cylinder are intact. If the nature of the operation has hardly changed, then most likely the problem cylinder has been detected.
We recommend: How to quickly and easily replace a generator bearing on a VAZ 2110?
2. On the faulty cylinder, replace the spark plug with a known working one, check the high-voltage wire and ignition coil. After starting the engine, it becomes clear whether there was a breakdown in the ignition system, or whether further diagnostics are required.
3. If, when replacing faulty parts of the ignition system, the engine continues to stall, the cause of the breakdown may be a burnt-out valve or a malfunction in the piston group in the form of sticking or wear of the rings. Both failures lead to low compression in the problem cylinder, but by measuring it it will not be possible to determine which of the two failures occurred. To do this, perform the following additional diagnostics:
- After measuring the compression, pour a few ml of engine oil into the problem cylinder through the spark plug hole and take another measurement. If the compression has increased, then the problem is with the rings, if not, then the valve has burned out;
- The spark plug on the problem cylinder is inspected. If the valve is burnt out, it will be completely dry and without any oil deposits. If the failure is related to the piston group, then the spark plug will be covered with oil, and when the engine is running, bluish smoke can be observed from the removed breather.
We adjust valves on VAZ 2108-VAZ 21099
Note! The adjustment is made on a warm car engine (+20 °C and above), in winter during cold weather, be sure to warm up the engine first and quickly, before it has completely cooled down, adjust the valves. There is a caveat, you will have to initially stock up on shims, because you don’t know what sizes of washers exactly are needed. The washers are first removed and looked at in size and new ones are selected. You will need a second car (for example, a taxi, a friend) to get to the auto shop and buy new washers. Accordingly, we do not recommend this method of adjustment; it is better to find a warm place, the car will stand, heat up, and at the same time the engine will become room temperature, acceptable for adjustment.
1) Remove the cylinder head cover from the car engine, first stock up on the cover gasket: the old one always shrinks and deteriorates (cracks, deforms) over time. For a detailed description of the process, read the article: “Replacing the cylinder head cover gasket on a car.”
2) Now remove two side bolts and 1 central bolt using wrenches or a socket wrench (shown in the photo below). Remove the plastic cover and set it aside. Align the two marks with each other, namely the camshaft pulley mark (indicated by a blue arrow) and the mark on the rear cover (indicated by a green arrow). There are many ways to connect tags, we recommend using the following:
- hang out the front wheel (any);
- engage fourth gear;
- Turn the wheel forward in the direction of travel of the car until the marks connect.
- engage 4th gear;
- Using your own efforts, slowly move the car until the marks align.
Third option: take a hefty wrench in your hands (a wrench with a large socket head is most convenient) and turn the crankshaft pulley mounting bolt clockwise. This bolt is located quite low and in the second photo after the bottom one it is indicated by a yellow arrow.
Note! It is possible to turn the crankshaft only by turning the crankshaft pulley (number 3) and the generator pulley (number 2). It is forbidden to turn the crankshaft by rotating the camshaft pulley (number 1). Turning out the four spark plugs will help make rotation easier; for more details, see the article: “Replacing spark plugs on a car”!
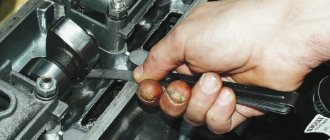
3) Then use a clean cloth to wipe the cylinder head, especially the location of the valve tappets, to remove any remaining oil. Now turn the crankshaft another 40-50° (not to be confused with the camshaft) - the same gap will appear at the camshaft cams and pushers. We check the gap at the first, second, third and fifth valves (diagram with numbers above), for exhaust valves it should be equal to (0.35+0.05) mm. Graduation - first, fourth, fifth and eighth, be sure to remember. For intake (0.2+0.05) mm - second, third, sixth and seventh. The gaps are checked using special probes. Insert one at a time of varying thicknesses between the camshaft lobe indicated by the red arrow and the shim indicated by the blue arrow). Rotate the crankshaft exactly 360° (full rotation) and check and, if necessary, adjust the clearances of the fourth, sixth, seventh and eighth valves in the same way.
Note! The bottom photo shows the adjustment washer. Take a closer look at the place indicated by the arrow and you will see an inscription with information about the thickness of this washer (3.82 on the presented example). The thickness is measured with a micrometer (the values are not always written correctly on the washers, and sometimes they are completely erased). Having measured, you got a value, for example, 3.90. Remember the valve clearance from which you removed this washer (0.50 for example) and add it to the thickness (3.9+0.5 = 4.4). From the obtained value we subtract the permissible gap, the standards were described above). Using the intake valve as an example: 4.4 – 0.2 = 4.2 (mm) – the value of the new washer.
When adjustment is necessary
Valve adjustment is required when problems occur with the engine or after passing a technical inspection. Experienced car owners can quite accurately determine the cause of a power unit malfunction; the main signs are the following:
- the appearance of a characteristic knocking sound when the engine is running;
- a sharp increase in fuel consumption;
- Unstable operation at idle.
Valve adjustment is also required after every 25-30 thousand kilometers . During this time, some parts wear out and structural gaps increase. Diagnostics can be done at a service center; this service is inexpensive.
Do-it-yourself valve adjustment for VAZ 2110 8 cl.
Despite its age, the good old eight-valve engine in all its variations not only does not leave the roads, but also continues to be produced in new incarnations by the Togliatti plant. But despite its unpretentiousness and sufficient resource, in some ways it has long been outdated - and to a large extent the gas distribution mechanism is outdated. No matter how simple and “indestructible” the “camshaft-pushrod-valve” system is, wear in it is inevitable, and hence the need for regular adjustment of thermal clearances.
Adjustment frequency
The need to adjust the valve clearances in the VAZ 2110 is remembered when the characteristic sound of rattling pushers is heard from under the hood. With this, the VAZ 8-valve engine was lucky: there are engines in which the valve clearances manage to decrease as they wear out, and here the burnout of the valves and the need to dismantle the head would already remind of itself.
However, there is still no need to postpone adjustment until the last minute. The noise of the gas distribution mechanism itself is a direct consequence of the increase in shock loads in it: the top of the cam does not roll onto the pusher, but hits it. Even when idling, each cam will experience more than 400 such impacts per minute - and how many of them will there be in one trip? And impacts mean an increase in wear and a risk of developing fatigue stresses, and on the most loaded part of the camshaft.
Factory regulations require the first valve adjustment at 3000 mileage (breaking in of parts), then at 45,000 and then every 45,000 mileage. When purchasing a VAZ 2110 secondhand, it is worth combining valve adjustment with replacing the timing belt in order to immediately have a guaranteed starting point for routine procedures. As the mileage increases, a valve grinding procedure may be necessary.
Why are thermal gaps needed?
The term thermal clearance adjustment is usually used among car enthusiasts, but it would be more correct to call this process this way: adjusting the thermal clearances between the camshaft cam and the valve stem. But usually such a slightly abstruse name is used in technical literature, and in colloquial speech the wording is valve adjustment.
There is a thermal gap between the camshaft cam and the valve stem, which is measured at the manufacturer.
The thermal gap on a VAZ 2109 car is measured using a special probe on a cold engine, that is, with a temperature of up to +20 ⁰C between the camshaft cam and the pusher adjusting washer.
If some metallic knocking occurs, the valves need to be adjusted.
Do not immediately contact a car service center, as you can carry out this fairly simple procedure yourself. This way you can save about a thousand rubles. Believe me, this procedure is not so complicated that you need to pay that kind of money for it, because for this you will only need to purchase a special set of tools.
Valve adjustment process
Adjusting valves VAZ 2109
On VAZ 2109 cars, the thermal gap is adjusted using specially adapted washers. adjustment of thermal clearances on a VAZ 2109 car is carried out with the engine idling.
So, the algorithm for adjusting the valves on a VAZ 2109 car:
- Remove the cylinder block cover. To perform this step, dismantle the air filter, disconnect the pipe attached to the valve cover, but before that, first loosen its clamp. After this, disconnect the throttle valve control mechanism from the valve cover and carefully remove the cylinder block cover;
- Unscrew the spark plugs;
- Remove the front plastic cover protecting the gas distribution system;
- Rotate the car engine crankshaft clockwise until the mark on the timing system pulley aligns with the mark on the rear cover. The crankshaft can only be turned using a wrench using the bolts securing the generator pulley. If you accidentally missed the mark, turn the car engine a few more revolutions;
- After the marks have come together, rotate the crankshaft a few more teeth of the gas distribution system;
- Measure the thermal clearance of the exhaust valve of the first cylinder and the intake valve of the third cylinder. For exhaust valves, according to the standard, it is approximately 0.2 millimeters, and for exhaust valves, 0.4 millimeters;
- If the thermal clearances do not match the standard, then you need to lower the cylinder piston to the lowest position and, using a special device, remove the installed washers;
- We measure the size of the required washer; to do this, subtract the value of the recommended gap from the size of the thermal gap, and then add the thickness of the washers used to the resulting value;
- Measure the thermal clearance value for each valve in turn, with each crankshaft turn half a turn;
- Install washers of suitable thickness and repeat the measurements again.
We recommend: How to install bi-xenon H4 with your own hands: diagrams and connection sequence
Step by step work
How valves work
Adjusting the 21099 carburetor valves begins with unscrewing the nut that secures the filter cover. Then the washer is removed and 4 clamps are disconnected. After removing the cover, the filter is dismantled.
The tightening of the clamps is loosened. The hoses are removed from the pipes and the nuts are unscrewed. Then the filter housing is removed from the studs. A holder made of durable plastic is detached from the hose. The nut is unscrewed and the bracket is removed. In this case, the last unit must hang on the appropriate cable. After unscrewing the 2 cap nuts, oil is removed from the top of the cylinder head.
A device designed for recessing pushers is installed on special studs. Nuts are used to secure it. The drive cover is removed after removing 3 bolts. Then the crankshaft rotates 40-50°. Using feeler gauges, the gaps of the 1st, 2nd, 3rd and 5th valves are measured. If this indicator differs from the nominal value, you will need to recess the pusher of this unit by pressing the handle of a certain device.
At the same time, a retainer is installed. Then the unit used is moved away from the pusher using an adjusting washer. It is recommended to write down its thickness on paper. This indicator is indicated on one side of the part. If it is not visible, then you will need to measure the washer using a micrometer. A new part of appropriate thickness is installed in the pusher. The washer is mounted with the inscription facing down. Then the pusher is recessed with a similar device, and the latch is removed.
The next step is to check the gap. If the indicator corresponds to the nominal value, then the crankshaft is turned 1 revolution and the clearances of the 4th, 6th, 7th and 8th valves are adjusted in the appropriate order. Upon completion of this procedure, oil is poured into the upper part of the cylinder head.
The final step involves installing the dismantled units. Next, the spark plugs are screwed in. The above work can be done with your own hands, taking into account the VAZ 21099 valve adjustment diagram. Otherwise, it is recommended to seek help from auto mechanics.
How to adjust valves on a VAZ 2109: instructions
On all VAZ models, the principle of valve adjustment is practically no different. You need to adjust the gaps in the order of operation of the cylinders: first 1 and 4, after 5 and 8. Set the piston of the first cylinder to TDC, then make sure that the marks on the pulley and the rear belt cover match. It should look like this:
Using the “17” key, we turn the camshaft by three teeth, this way we will ensure that the camshaft cams come out of the pushers. We take the dipstick and start checking the gaps. The probe should pass with little effort. If it moves freely or difficultly along the gap, adjustment is necessary.
Using a lever, fix the pusher in the desired position. Next, remove the old washer and set the gap we need. If necessary, install another washer after completing all the work. The procedure must be repeated for each engine cylinder.
Interaction of parts of the gas distribution mechanism of VAZ 2109, 2108
It is very important to preview the engine performance requirements. The values of its clearances and other indicators of the interaction of parts of the gas distribution mechanism of VAZ 2109, 2108.
On a cold engine, specific clearance values are set between the pusher and the camshaft. The indicator is 0.20 millimeters (a deviation of 0.05 millimeters in different directions is allowed), which is relevant for intake valves . For exhaust valves, the gap value is set within 0.35 millimeters with the same tolerance. Here you need a specific set of feeler gauges that can measure gaps within 0.30-0.40 millimeters.
If the maximum probe fits into the hole, it means that you will need to select an appropriate washer that is slightly thicker in size, and then replace it.
In the same case, when the gap value is smaller, the valve can easily close on a preheated engine. In fact, this is very dangerous, because such a value can lead to the valve and seats burning out. Consequently, there is a sharp loss of pressure, the occurrence of compression and a drop in power level.
Ultimately, this necessarily leads to the need to perform a complete cylinder head repair, which will be too expensive. This can be diagnosed without problems. Indeed, in the case when the gap is increased, a corresponding knock in the engine is noted.
As numerous masters say, this indicates that there is a situation with increased wear on the camshaft. It is exposed to unnecessary shock loads. This in itself is not a pleasant moment. It is in this case that it is important to promptly complete the process of adjusting the gaps at a strictly defined time.
Valve adjustment procedure
In order for the work to be carried out more efficiently, the camshaft pulley should also be marked with additional marks located in a circle, every 90 degrees. During a rotation of this number of degrees, the crankshaft must rotate 180. Thus, each subsequent piston will enter the top dead center of the compression stroke.
- We combine the marks on the rear panel of the timing belt housing with the pulley. Turn the camshaft clockwise approximately 2-3 teeth. This is done using a 17 wrench, which needs to be used to grab the pulley mounting nut. Thanks to this action, the camshaft cams will be able to completely move away from the pushers.
- We take the valve adjustment dipstick and measure the existing gap. It should move between the cams thanks to a slight pushing movement.
If the gaps are such that they do not meet the minimum dimensions, the following actions must be taken:
- A device is installed directly onto the camshaft bearing housing stud, with which the valves are adjusted.
- The pusher is rotated until the hole is directed towards the master. Thanks to the lever, you should install the pusher all the way, fixing this position.
- Take in your hands a long, strong and sharp object that can be used to pry the adjusting washer. The latter should be removed using tweezers. Its thickness will be displayed on it.
We recommend: What to do if the VAZ-2112 16-valve engine fails
In order to correctly select the thickness of the new washer, it is worth resorting to the following calculations: to the thickness of the removed washer, add the difference between the result shown by measuring the gap and what is indicated according to the instructions.
Basic indicators
The technician makes the adjustment
Before you start adjusting the VAZ 21099 injector or carburetor valve, you must take into account that the gap is measured only on a cold engine. Adjust the valves by selecting the thickness of special washers.
Every owner of a VAZ, including a nine carburetor, should know that the 1st, 4th, 5th and 8th valves located from the camshaft drive are considered exhaust, and the 2nd, 3rd, 6th and 7th th - inlet. Adjusting the valves of the nine carburetor begins with unscrewing the spark plugs. Adjust them and then turn the crankshaft.
For simple and quick dismantling of the adjusting washer, grooves are provided in the first unit. We adjust the valves only after calculating the thickness of the new product. This indicator can be calculated using the formula: H=BA-C, where
- A - gap;
- B is the thickness of the removed washer;
- C—nominal clearance;
- H is the thickness of the installed washer.
The permissible gap limit is +0.05 mm. The crankshaft is turned clockwise and adjustment is made on the nine using a set of keys, an appropriate washer and a special tool.
Replacing burnt out valves
The operation of replacing the valves of different engines is similar, and differs only in the size of the parts and their placement on the cylinder head. Before performing the operation, prepare lapping powder, new valve seals and a new head gasket. After dismantling the cylinder head, operations are performed in the following order:
1. Valve desiccation. To do this, the head is laid out on a flat surface and a rubber mat is placed under the valve. A tube with a diameter of 13 mm is placed on the valve so that the crackers are inside, and blows are applied with a hammer. The valve desiccates, and the crackers remain in the tube. The operation is also easily carried out using a special device that compresses the vein and allows you to pull out the crackers.
- The valve is pulled out, a new one is inserted, and the bushing guide is checked by shaking. If runout is up to 1 mm, the guide is not replaced.
3. If it is necessary to replace the guide, use a special mandrel. The old part is knocked out in the direction of the camshaft using a half-sledge hammer with a heavy blow so that the part does not crumble. Afterwards, a new bushing is driven into the head, having first put a retaining ring on it.
4. The new valve is secured with a retaining ring and the assembly is lubricated with oil.
5. Valve grinding. The seat is initially treated with a special cutter, after which lapping powder is applied to the edge of the valve, inserted into the head, the other end is clamped into the drill chuck, and by pulling it up and down, the valve is provided with a tight fit to the seat. It is advisable to carry out the operation for all valves.
6. Drying of the valve. To do this, press the spring firmly and insert crackers. The cylinder head is attached to the engine cylinder block.
The described method allows you to replace the burnt valves of all models of the VAZ: 2101, 2102, 2103, 2104, 2105, 2106, 2107, 2108, 2109, 21099, 2110, 2111, 2112, 2113, 2114, Niva, Lada Priora, viburnum, Grant, Grant, Grant. Vesta and most foreign cars.
Injector valve clearances on a VAZ 2109 with an 8-valve engine
Many myths and legends have developed around such a necessary procedure as adjusting the valves on the VAZ 2109, 2114 and 2108. At first, carburetor ones then became injection ones, but the design of the gas distribution mechanism did not change.
Until the 2011 release, even the thermal gaps remained the same. Only with the advent of the light ShPG did the gaps become a little larger. The seats are metal-ceramic, and the pistons are light. The frequency of valve adjustment remains the same at 30,000 km. On a new car, it is necessary to adjust the valves in the first 3,000 km, then at 15,000 and every 30,000 km. If you do not adhere to periodicity, the valves may burn out and the seats in the head may sag. In addition, traction is lost and fuel consumption increases. Thermal clearances on vases 2108, 21083, 2109, 21099, 2110, 21102, 2111, 21114, 2112, 2113, 2114, 2115, 1113, 11113, 2170, 2190, Priora, Granta (with engine 1118 3), should be like this:
- Graduation 0.35;
- Inlet 0.20 mm.
Thermal clearances on new modifications since 2011 for VAZ 8 valve Lada Granta, Kalina 2, Priora, with engine 21116
- Graduation 0.4 mm;
- Inlet 0.25 mm.
Checking the quality of work
After completing the repair, it is necessary to check the operation of the engine. First, we install all the dismantled elements in place and screw in the spark plugs. After starting the engine, there should be no knocking of valves or other extraneous noise. We recommend carrying out checks for 15-20 minutes - this will ensure that the cylinders are operating normally even after heating.
It is not difficult to adjust the valves on the VAZ-2109 model yourself. You can do this work yourself, the main thing is to have a special kit and a couple of hours of free time. Using step-by-step instructions and an adjustment diagram, you will do the job efficiently and save on a trip to the car service center.
Causes of misfires
Among the many reasons why the ignition does not work properly, the main ones are:
- Failure of elements of the ignition system - armored wire, spark plugs, coil or distributor-breaker (distributor in carburetor internal combustion engines). In addition, at low temperatures, condensation may form in the spark plug wells, which can cause “punching” into the block.
- Malfunctions in the fuel-air system can be associated with injection nozzles, air and fuel filters clogged with dirt and deposits. These ailments manifest themselves in the “triple” of the engine at idle, which disappears after warming up. An open circuit in an individual injector as a result of unstable power supply can also disrupt the fuel supply.
- Low compression in all cylinders or its uneven distribution indicates wear of the elements of the cylinder-piston group or problems with the gas distribution mechanism (GRM). In this case, the fuel-air mixture is compressed with less pressure, which is why ignition difficulties arise.
- Incorrectly adjusted valve clearance can lead to a violation of the tightness of the entire chamber during the compression stroke. Lack of optimal fit of the valve plate to the seat, as well as burnout of the valve, will cause misfires.
- Poor fuel quality, leakage or low supply pressure due to improper operation of the fuel pump can also cause misfires. To identify the problem, it is necessary to check the serviceability of the pressure regulator in the fuel rail. It is equally important to ensure that there are no air leaks or water entering the fuel tank.
- A malfunction of the electronic control unit results in the transmission of an incorrect signal from the sensors to turn off the injectors. Therefore, the engine begins to “trouble” and there is a misfire. In such cases, it is better to check the ECU firmware and sensors of the electronic engine management system.
Adjusting washer
I installed a tachograph with CIPF But in vain 1214, January 26, 2022 Print version
Then remove the steel bushing and adjusting washer, after which the trigger sector is carefully removed from the stop.
The outer end of the latter is clamped in the pocket of the adjusting washer 7, mounted on the fixed cover o. Concentric slots in the places where washer 7 is attached allow it to be rotated when adjusting the device. The reohord is included in the measuring circuit of an electronic bridge of the EMD type.
When installing the kingpin support bearing and adjusting washers, it is necessary to ensure an interference of 0 1 mm in the M 20 and Moskvich-400 cars, in the GAZ-5 car - with a gap of no more than 0 15 mm, in the ZIL-ISO car - 0 10 mm.
| Starter connection circuit for checking. |
The required amount of axial clearance is ensured by installing adjusting washers on the armature shaft journal on the drive side.
This gap should be equal to the thickness of the adjusting washer 2 plus the working stroke of the punch equal to 0 45 - 0 5 mm.
The axial clearance of the sector shaft is regulated by selecting an adjusting washer of a certain thickness.
Low pressure injection burners, which have an air adjusting washer, ignite with low gas pressure and a closed washer. During the ignition period, combustion occurs due to the secondary air available in the furnace of the unit. When torches appear at all burner fire holes, the gas pressure rises slightly and the air washer slowly opens. If the gas combustion is stable, the operator, observing the flame, alternately increases the gas pressure and opens the air washer until a mode is established that corresponds to the operating instructions.
Medium pressure injection burners, which have an air adjusting washer and ceramic combustion stabilizers, ignite with reduced gas pressure and a closed washer. Gas during this period also burns due to the air available in the firebox. If there is a stable flame at the burner mouth, the gas pressure rises slightly and the air washer slowly opens so that the stability of the flame is not disturbed. The transition to the design gas pressure mode and the supply of primary air in an amount that ensures complete combustion of the gas is allowed only after the ceramic stabilizer has been heated to a light red heat. With stable combustion stabilization using a ceramic slide or divider, the torch should come off the burner mouth and the gas should burn on the surface of the stabilizer. If a ceramic tunnel serves as a stabilizer, then the gas mainly burns in the tunnel and the flame should not be separated from it.
The air bubble is installed in the center of the scale using adjusting washers. Ball tilt indicators are installed on MKA series cranes. A steel ball is placed in a plastic case with a spherical bottom, hermetically sealed with a plexiglass lid and filled with oil. When the crane operates on an uneven site, the ball moves along the spherical bottom, indicating the slope of the crane. The pointer scale is backlit. Verify the pointer in the zero position of the ball using special screws, having first installed the tap on a strictly horizontal platform.
| Liquid tilt indicator. |
The air bubble is installed in the center of the scale using adjusting washers.
Disassembling the glass, selecting the total thickness of two adjusting washers, assembling the glass and checking the selection of washers are carried out in the same way as on a GAZ-51A car.
During the adjustment process, an additional weight in the form of an adjusting washer is placed under the balance screws for final balancing of the balance.
Correct tightening of the bearings is achieved by installing steel shims of different thicknesses or by grinding.
Preparatory work
From the adjustment tool you will need:
- set of wrenches;
- special device for adjustment;
- measuring probe;
- several adjusting washers;
- screwdriver;
- tweezers;
- valve cover gaskets.
Before starting the repair, set the car to the handbrake and engage any gear. One of the front wheels must be suspended so that the crankshaft can turn easily.
The procedure is as follows:
- Raise the hood.
- Disconnect all pipes from the cover.
- Remove the windshield wiper housing.
- We unscrew the spark plugs.
- Remove the front timing belt cover.
Tip: To monitor the current position of the piston, you need to use the viewing window.
Why are valves adjusted?
Too small a gap between the cams and the valve pusher does not allow it to completely close the cylinder cavity - this leads to a decrease in compression and can cause valve burnout. A gap larger than the nominal one makes it difficult to fill the cylinder cavity with the fuel mixture and remove exhaust gases, which leads to a loss of engine power.
To properly adjust the valves, measurements and adjustments should be made on a cooled engine (temperature below +20 degrees).
Gap calculation
In order to find out the size of the washers, there is an adjustment formula:
H – thickness of the new washer;
B – thickness of the washer that was removed;
A – existing gap;
C – nominal clearance (0.2 or 0.35)
We check the gaps with a feeler gauge. It is advisable to have several of them in increments of 0.02 - 0.03 mm.
Correct valve adjustment guarantees a long engine life.
Adjustment features
The engines of the first production of the Zhiguli 2109 used a camshaft chain drive. It was a more reliable design. However, increased noise and the need to constantly adjust the chain tension due to its wear led to the appearance of a camshaft belt drive. The noise during engine operation has decreased, and there is no need to adjust the tensioner.
The insufficient service life of flat-toothed drive belts on the Lada 2109 (40–50 thousand km) and failure to comply with maintenance schedules led to belt breakage.
This caused serious engine damage, sometimes complete destruction due to the opposing movement of pistons and valves.
The solution to the problem was to change the shape of the top of the piston using recesses for the valves. When repairing and adjusting the Lada 2109 engine, this design difference between old engines and more modern ones should be taken into account. When installing the cylinder head, it is especially important to carefully align the camshaft and crankshaft and prevent them from turning separately.
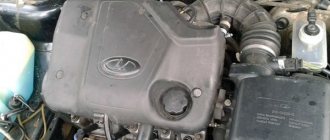
Features of the VAZ 2109 cylinder head.
Why do you need to adjust valves?
With mileage, the metal valve stem tends to stretch and contract. The seats in the cylinder head sag, which is why the thermal gap changes. And it is physically needed of a certain value due to the design features of the engine. The consequences of untimely adjustment are not reversible. A clamped valve during operation of an eight-valve engine loses its seal, and the avalanche flow after ignition burns its edges and the cylinder head seat, which is recessed into the body of the head. This type of repair is expensive and does not come with a warranty. It is better to regulate in time, especially since the cost of tuning an 8-valve engine at 600 - 800 rubles per 30,000 km is not so significant.
Setting the correct spark plug gap in a VAZ 2109
One of the most common problems with the appearance of black carbon deposits on the spark plugs of VAZ 2109 and VAZ 21099 cars is the incorrect gap between the SZ electrodes.
Today, many spark plug manufacturers claim that there is no need to adjust the gaps, but in fact, every car owner should know how to fix this problem and check and adjust the spark plugs themselves.
The main malfunctions arising from incorrectly adjusted spark plug gaps.
The main malfunctions that arise due to incorrectly adjusted spark plug gaps include the following:
- Increased fuel consumption
- Unstable engine starting
- Engine oil getting on spark plugs and much more.
Therefore, every driver must know how to independently adjust the gaps, but we will help you with this using the example of the VAZ 2109 car and its modifications.
Checking and installing spark plug gaps in VAZ 2109 – 21099
Almost all spark plugs produced today have a factory-set gap between the electrodes. It is different for each manufacturer. It is also different for spark plugs for carburetor engines with contact and non-contact ignition systems, and for spark plugs for injection engines.
For example, the gaps between the electrodes of spark plugs for VAZ 2109 carburetor engines vary between 0.5-0.7 mm for a contact ignition system, 0.7-0.9 mm for a non-contact ignition system.
Moreover, it is recommended to make the gap smaller by 1 mm in winter, and larger by 1 mm in summer. In this way, improved engine starting and stability of its operation at different atmospheric temperatures are achieved.
It is believed that prolonged cranking of the engine with the starter at low ambient temperatures can discharge even a new battery so much that its voltage is not enough to form a spark if the gap between the electrodes is too large or normal. At the same time, increasing the gap creates additional load on the ignition coil.
For VAZ 2109 injection engines, the gap is in the range of 0.9-1.1 mm. There are no recommendations for changing the gap size for different seasons.
Checking the gap between the spark plug electrodes
When installing new spark plugs on an engine or checking old ones, it is necessary to measure the gap between their electrodes. Old spark plugs should be cleaned of carbon deposits. The check is carried out with a round probe of the required diameter.
When checking and replacing spark plugs, be careful - if the engine is hot, you can get burned.
Measuring with a flat probe will be inaccurate, since there is almost always a small indentation on the side electrode of the spark plug due to metal transfer to the central electrode. This is especially true for candles that have already worked for some time.
Lada 2114 1.6 8V washer Logbook Adjusting the valves of the VAZ 2114
I’ll say one thing right away, guys, I advise you to adjust the valves yourself, if you change the oil in the internal combustion engine yourself, then you can handle it too. Personally, I went to the service center for adjustment twice, in one, as soon as I arrived, they started to remove the cap and adjust, in the other, without bothering in what position the shaft cams were adjusted. and besides, the money they charge is not trivial, sometimes 500 rubles, sometimes 1200 rubles. I'm tired of it, and from now on I always do it myself. This is the second time, with my own hands)))
A few more words, patience, we’ll soon get to practice))) I’ll say right away, I allocated 2 days for this matter. One day, when I arrived from work, I took off the valve cover and left the engine to cool overnight. In the morning of the second day, I started adjusting.
and so, what do we need from material and tools: 1) a device for adjusting valves (rod, flag, handle for recessing the pusher) 215 rubles. 2) feeler gauges for checking clearances 75 rubles. 3) syringe (for pumping oil out of the valve groove) 4) pliers (medical or manicure ones will do) 5) adjusting washers (buy after calculating the gaps) 6) valve gasket. covers. 120р7) pen, piece of paper8) wrench 10 and 89) screwdriver
a few more words about the gasket, probably everyone who has taken off the valve cover is familiar with the situation of oil snot coming out from under it, well, I had the same thing, I bought ordinary black gaskets, but then I came across information that there is a miracle gasket from the Balakovo company (BRT, RTI) red, silicone, I found it, bought it and it’s true, I’ve been driving it for two days now and there’s not a hint of smudges. I advise you, here is a photo of her.
1) remove the valve cover. 2) bring together the marks of the camshaft pulley and the rear timing cover 3) the sequence of checking the gaps is as follows, I will write the valve number as the first digit, the second is the number of teeth that will need to be moved relative to the marks of the camshaft and rear cover clockwise (photo example checking the clearance of valves 1 and 3):
Valve clearance adjuster
A more effective and efficient way to adjust the valve mechanisms of the power unit is to adjust them using a device, which is a special rail with an indicator attached to it. This adjustment is much more accurate manually, since when using the device, it detects and takes into account all defects on the surface of the adjustable parts.
For mechanical adjustment, in addition to dismantling the cylinder head cover, you will additionally have to remove the accelerator drive, the protective shield on the ignition distributor, the exhaust hose from the crankcase, and for carburetor cars, the carburetor “pan”.
Using a special wrench, you need to rotate the crankshaft until the marks on the camshaft sprocket align (this is described above). To make this process easier, you can use a bright marker to mark the camshaft sprocket every 90 degrees. After that, we install the device rail on the valve being tested and fix it in a stationary state. We put an indicator on it and place its foot on the edge of the adjustable valve. To correctly perform this procedure, you will need a special grip, with which you need to clamp the cam and pull it up (a simple wrench will do). As a result, the indicator readings should deviate by 52 divisions. If they are slightly too low or too high, the valve needs to be adjusted. And then everything is extremely simple:
- using a 17mm wrench, loosen the locknut on the adjusting screw;
- the gap is adjusted with a key of 13, and all readings are clearly reflected on the indicator scale;
- the adjustment is checked and the locknut is tightened;
- At the end of the stage, it is again necessary to check the correct settings of the valve mechanism.
As you can see, this adjustment is much more accurate and simpler. But we should not forget that a highly qualified specialist will perform it at a high level and using a standard set of probes. In conclusion, it is worth emphasizing that most sets of feeler gauges contain an adjustment diagram that contains data on the angles of rotation of the camshaft and crankshaft, indicating the numbers of cylinders and valves.
How to properly adjust valves
To compensate for thermal expansion of the engine valves, a design gap of 20 hundredths of a millimeter is provided for the intake valves, and 35 hundredths of a mm for the exhaust valves, with an error of 5 hundredths of mm.
As a rule, the VAZ 2109 valves are adjusted after a major overhaul of the engine or when a characteristic knocking or “clattering” sound appears. Also, the frequency of valve adjustment can be determined by mileage - it is performed every 30,000 km traveled by the car. It can be carried out by contacting specialists, although it is quite possible to do it without a service station.