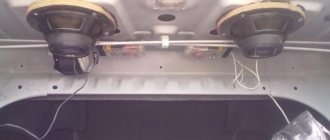
Installing speakers in the rear doors of a Lada Granta will require disassembling the door card. The further process will not cause difficulties if the diameter of the acoustics is standard 13 cm and you have a set of tools at hand. To install 16 cm speakers, you will have to build additional stands due to the non-standard diameter, but such installation is also quite possible to do yourself.
A short checklist for installation in the front doors of Lada Granta
To install speakers in the front or rear doors of the Grant sedan, you should study the step-by-step algorithm of actions. Basic moments:
- Dismantling the door structure.
- Removing cladding material and sound insulation.
- Removing the stock speaker.
- Installation of a musical element. If the size of the acoustics is 13 cm, then there is no need to make a cut in the door contour.
- Electrical wiring connection.
- Door card assembly.
During these manipulations, the driver has the opportunity to replace or improve the sound, heat and vibration insulation of the body part.
Soundproofing Lada
It is most convenient to use a self-adhesive foil sound absorber, at least 1-1.5 cm thick.
To install the insulator, it is necessary to remove the casing
Please note that each front door has screws not only in the handle area, but also on the bottom. And on the driver's side there is also a self-tapping screw in the very middle (hidden under the plug) and in the recess of the latch
After removing the door decorative panel, it is necessary to pre-treat the internal metal surfaces. They are cleaned of the anti-corrosion compound with aviation gasoline, and then additionally degreased with alcohol or another substance with similar properties.
Next, the insulating material is cut into strips 10 or 15 cm wide. They are rolled into a roll, pushed inside the door one by one and pressed tightly with a hard rubber roller, removing the protective film. Upon completion of the procedure, all technological holes are also closed with the selected self-adhesive material.
Now all that remains is to finish the trim. Sound insulation is also applied to its inner surface. Then the speakers are installed and the panel is returned to its place.
What you need for installation
The equipment should be installed in a well-lit room with a comfortable temperature. The following equipment and consumables are prepared for work:
- flat and Phillips screwdriver;
- jigsaw;
- knife;
- metal files;
- spacers (wood or plywood - 2 pieces);
- chalk or construction pencil;
- speakers.
Experts recommend purchasing this equipment from the same company as the radio in the vehicle.
How to process a cylindrical hole?
The above manipulations lead to the formation of a cylindrical hole inside the door panel of the Lada Granta, into the cavity of which further installation of the loudspeaker is implied. Before the immediate installation procedure, the contour of the internal cavity of the formed hole must be glued using Vizomat 10 (similar to gluing the outer side of the ring).
The purpose of pasting manipulation is to achieve two properties:
creating a trumpet-like effect; ensuring protection of the speaker contact group from moisture when the side window is fully lowered.
The installation procedure on LADA Granta requires preliminary preparation. “Vizomat 10” needs to be cut into thick strips and when pasting, it is necessary to ensure that the lowered glass does not touch the outer surface of the created cylindrical hole.
The density of the structure plays an important role. To achieve a sufficient level, it is recommended to glue the outer circumference of the wooden ring
Bitoplast is suitable for this purpose. This action will ensure that the installed speaker is pressed tightly against the ring.
After installing the loudspeakers, we also cover their circumferences with Bitoplast. This measure will ensure sound intensity, because air will not be able to penetrate behind the door trim.
Subtleties of the procedure
Installing speakers is a standard procedure if the car has standard equipment. Main subtleties of the process:
- It is necessary to make holes in the cladding for the acoustic system. To do this, it is removed. A hole is cut in the material itself, as well as in the body element. If the diameter of the speakers is 16 cm, then the standard recess in the doors will not fit. You will have to create additional wooden parts.
- The hole is made with a jigsaw. To saw off a circle, special steel files are used.
- After the speaker is in place, the trim is attached. When dismantling it, some fasteners may be damaged because they are made of plastic and break easily. A set of clamps should be purchased in advance.
Level two. Replacing standard speakers
This is where you need to be very careful. This is a field with a rake; you can’t run with your eyes closed. This upgrade option is not always applicable. If you replace only the speakers and leave everything else, then it is far from a fact that the system will “sing.” Moreover, in some cases the result may be completely negative. Although the standard audio system itself is not of a high class, everything in it is matched to each other and balanced.
It is clear that the audio system is far from a priority element when designing a car, but sometimes the methods for installing standard speakers are simply surprising. The photo shows a standard BMW speaker, which was simply attached to the inside of the upholstery and covered with a light casing
One of the tricks that automakers resort to is reduced acoustic impedance. In general, the most common acoustics in car audio are 4-ohm ones, but in “standard” speakers they often use 2-ohm ones. All in order to boost the dead standard amplifier and slightly increase the volume headroom. Replace these speakers with more conventional 4-ohm ones and you get a quiet system, and any attempts to increase the volume will be accompanied by an increase in distortion.
But that’s okay, there are plenty of aftermarket acoustics with 2-ohm ones. Don't step on another rake - a corrected signal. This, by the way, is one of the “tricks” of many branded standard systems - it’s not the components that are better, but correction that compensates for the features of cheap speakers and the shortcomings of their acoustic design. Replace the dynamics in such a system, and such a correction will no longer be appropriate.
But there is no need to be scared and completely discard this option. Today you can find many acoustic kits that are tailored specifically for certain brands and models of cars. Mainly for European ones, in this part of the world such an upgrade is most in demand.
The video demonstrates the ease of upgrading a standard audio system by simply replacing the OEM speakers with a set specially designed for a specific car brand:
The main differences between coaxial and component acoustics
Speakers have different designs. The sound of the speakers and the internal structure directly depend on this. The coaxial system implies that the axis contains both low-frequency and high-frequency waves. They can be arranged in one, two or three stripes. The sound quality depends on their quantity. A component system consists of a chain of speakers that are at different frequencies. You will need a lot of speakers. They are located around the entire perimeter of the car interior.
Coaxial elements with a mesh are mounted on the back row of seats for better sound, and component ones on the front doors or in the side panel.
Level three. Upgrade without replacing the standard head unit
If all these “flowers” with speakers seem frivolous to you, it’s time to move on to the “berries” - touching on the amplification part of the system. The main problem that has to be solved in this case is where to get the original uncorrected linear signal from which to start building a new audio system.
In fact, you won't find it anywhere just like that. And there is simply no single recipe for all cars; in any case, you will have to turn to professionals who specialize in “voicing” cars. By and large, it all comes down to four options.
The first option is to “pull out” the linear signal from the electronic bowels of the head unit. For many models, this process, by the way, is well established, and for a relatively small amount your standard head unit will acquire a tail with RCA connectors on the rear side.
In many head units it is not difficult to get a line signal. Sometimes, however, its level is low, and in order not to pick up interference on the way to the amplifier, you have to add a small output buffer. But for an experienced master this does not cause any particular difficulties.
The second option has to be used when it is not possible to display “linear lines”. In this case, we leave the standard amplifier in the system, decisively disconnect the standard speakers from it and connect its outputs to the inputs of the new amplifier. The only requirement for the latter is the presence of so-called high-level inputs.
High-level inputs are a feature exclusively of car audio equipment; at home, it would hardly occur to anyone to connect one amplifier after another. In a car this is a necessary measure, and although technically it is not very elegant, it still makes sense. After all, it is no longer low-impedance speakers that will be connected to the standard amplifier. Its output stages will operate in a completely different mode, with lower currents, so the signal quality will be somewhat different. In any case, you will get better sound than in the state.
But this option is also not always applicable. A little higher, I already said that many systems introduce intentional signal correction. In this case, there is no point in simply passing the “crooked” signal from the standard amplifier to a new one. And if the standard system has channel-by-channel amplification, then you won’t even find a curved signal - only frequency “cuts”.
For such cases, there is a third option, using a digital processor like Audison bit One, Audison bit Ten, Helix DSP, etc. The trick of these devices is that they can combine the original audio signal from these separate frequency pieces, remove the correction (or rather , adjust the signal “in the opposite direction”) and send such a restored signal to a new amplifier. In the right hands, by the way, it’s quite an effective thing.
Typically, automotive processors are configured from a laptop or tablet
Well, the fourth option is applicable in cars in which the standard system is built using the MOST bus (Media Oriented Systems Transport). By the way, there are quite a few of them these days. The peculiarity of the MOST structure is that all devices (source, amplifiers, monitors, changers, etc.) are united by a single digital bus through which data circulates around the ring. It is impossible to take and remove anything from such a system; the data transfer is interrupted and everything simply stops working.
Despite the apparent complexity at first glance, this option is actually one of the most convenient for installing a new system. All you need is a MOST adapter. It is included in the MOST ring as another device, pulls the digital audio signal out of the bus and gives it to us “on a silver platter” - in the form of the usual SPDIF.
If the standard audio system uses a MOST bus, then using an adapter allows you to get SPDIF without surgical intervention in the head unit or wiring
And then we can do whatever our heart desires with it - from an economical “processor + amplifier in one package” solution (MD.Lab AM-60.6DSP, Audison Prima AP8.9 bit, Helix P SIX DSP, etc.) and to extravagant systems with an external DAC and other audiophile tricks.
Sequence of actions when installing rear speakers in a Lada Granta liftback
Granta has factory openings in the rear door fragments, only the shape is cut out oval, so if round speakers are purchased, then a problem arises. Using the standard set of equipment described above, you can get to work:
- The inside of the door is disassembled: handle, trim, power window control unit.
- A hole is cut in the facing sheet. Using a jigsaw, the elongated metal pancake is dismantled. A round niche is created for the column.
- If a set of size 13 speakers is selected, then there is no need to dismantle the metal structure. Using a knife, only the top part of the panel is cut off.
- A stand is cut out of wood. It is lined from the inside and fastened with screws or self-tapping screws to the speaker.
- Cable laying and electrical wiring are being connected. It is recommended to install the ISO connector immediately.
Level four. Complete replacement of the standard system
There are situations when you are not satisfied not only with the sound of the standard system, but also with the functionality of the head unit itself. In this case, thoughts about replacing it become especially annoying. But this cannot always be done with small forces.
Initially, this Honda was equipped with a standard head unit integrated into the dashboard. Using a non-standard panel, it was possible to install a new head unit of standard DIN sizes
First of all, take a close look at what the standard head unit is. If it has its own display, and all audio system controls are not connected to other car systems (climate control, on-board computer, etc.), then it can most likely be safely removed, while all other systems will remain unaffected.
Don't let the original shape and size of the standard GI confuse you. Firstly, there are now many alternative head units that are produced for specific car brands and fit into the panel using the pin-to-pin principle - the seats and connectors are completely the same. Or you can use an adapter frame to install a standard 1DIN or 2DIN size device and an adapter from a standard connector to a standard ISO. They are produced by many manufacturers, so choosing the right set is usually not difficult. As a last resort, no one has canceled the custom solution either.
If the standard head unit has many standard functions, then replacing it is a very difficult task; there are not simple solutions for every car. Pictured is an Alpine kit designed specifically for Mercedes
But if the standard “head” is combined with other car systems, then it’s more complicated. It is far from a fact that there is an alternative head unit for your car. In this case, the approach will be individual, and most likely costly.
This McIntosh became the head of the new audio system, and a mounting frame was made especially for it. All that remains of the standard system is the head unit, which now serves as the second most important source
But there is another option. It looks quite extravagant, but sometimes the only way to organize a truly high-quality audio source in a car is to leave the standard head unit unchanged and install a second one. In this case, it becomes the main one in the system, and the audio system is built from it. The standard one is shifted from the role of the main one in the system and becomes additional - its outputs are connected to the AUX inputs of the new head unit.
HOW TO IMPROVE THE SOUND OF YOUR HI-FI SYSTEM WITHOUT SPENDING ALMOST NOTHING BUT TIME
A. J. van den Hul is known primarily for his cables, but in fact his range of professional interests is much wider. He designs and assembles the most expensive phono cartridges himself, and is well versed in amplification technology and acoustics. He has repeatedly carried out orders for recording studios, so he knows the whole “kitchen” from the inside. Has several academic degrees. Today we begin to publish the advice of Professor van den Hoole, which he kindly provided to our magazine.
1. An inexpensive but most effective way to improve the sound of your speakers is to replace the internal wiring with better quality. Try our CS-12 cable, or better yet, SCS-12. The next step forward is replacing electrolytic capacitors in filters with film ones. For example, from metallized polycarbonate*.
2. Solder all connections, avoid crimp contacts. The inner wire must also be soldered to the input terminal. No petals or nuts.
3. Duplicate all the tracks on the crossover PCB with a thicker conductor, the same one you used for the internal wiring. Clean it thoroughly before soldering, otherwise you won’t be able to get rid of the dirt and the sound.
4. Reinforce the column body with internal struts, and apply a layer of bitumen to the walls. This will reduce the coloration of the sound.
5. Compared to traditional bi-wiring, it has a number of advantages. Separate the LF and HF/MF sections of the crossover by cutting the tracks on the PCB. Install an additional pair of terminals to supply a signal to the midrange and tweeter.
6. Remove speakers from corners of the room. Any angle accentuates low frequencies and introduces a “horn” coloration. Each speaker should stand freely, away from the walls. Of course, this depends on the size of your listening room. Getting rid of unnecessary furniture is useful in any case, and the improvement in sound will certainly please you.
7. If you can, place the speakers so that the line connecting their front panels is 15 degrees. from one of the walls. This really helps eliminate room resonances if the bass is too punchy. This way, both speakers will be placed asymmetrically in the listening room. In a symmetrical installation, both speakers produce the same mode. Each speaker excites its own resonant frequency (i.e. mode) in the room, depending on the distance to the nearest wall. The distance between the speakers and the ceiling gives the second frequency dominant. With an absolutely symmetrical arrangement of speakers in the room, the resonance effects are doubled, which leads to breaks in the frequency response at frequencies higher than the dominant ones. To break this structure, I advise you to place the speakers as shown in the figure. The problem with sound coloration will be solved by 99%. If that doesn't help, try 20 degrees. The method also gives excellent results at Hi-Fi Shows in hotels, where not too smart demonstrators like to arrange everything symmetrically. That's exactly what you shouldn't do.
8. If there is an excessive abundance of high frequencies, place a nice rug, a gift from your mother-in-law, in the center of the room. It will absorb reflections from the floor, and there will be less ringing.
9. If you can bring paving slabs measuring 30 x 30 cm or more from the street, slip them under the column. The second one can be taken in front of the neighbor's house and placed on top. Between them it is worth placing a sheet of flexible and adhesive material. Thus, one day four tiles will disappear from the street. Oh times, oh morals!
10. Do your speakers have soft grills? Please take them off. But not if you love children and cats. Otherwise, the losses will upset you more than the sound with protective nets.
11. If your bass reflex speakers still produce too much bass, stuff a T-shirt or old socks into the port. It is so easy to change the quality factor of the system in the range of 30 - 50 Hz by increasing the air flow resistance. It also helps to reduce port noise.
12. It is very useful to purchase a second, exactly the same amplifier. Use one channel of each for the bass section, the other for the mid/high frequencies**. The result is bi-amping, which reduces the load on the amplifier's power supply. The left and right channel inputs are shorted to the pre-section output. Use special adapter cords for this.
13. Minimize the distance between the power amplifier and the speakers. It will be even better if you place the amplifier directly on the speaker (more precisely, on the tile). The speaker cable should be as short as possible. At the same time, of course, the interconnects are lengthened, but this is exactly how it should be. The sound improvement will amaze you.
14. New speakers need warming up. It is best to put them “face to face” and turn them out of phase with respect to each other, changing the polarity of one of the cables. Give them pink noise from a generator or a music signal from an FM receiver. Turn it up loud. Close the door and visit your mother-in-law, whom you have not seen for at least two years. Smile, no matter what she says - after all, the speakers will either warm up or burn out by the time you return.
15. Warming up at low frequencies will help increase the mechanical quality factor of the system at the main resonance frequency. A sine generator tuned between 10 and 20 Hz will work fine. Remember that if the speaker plays very loudly, this means only one thing - the speaker is no longer there. It's a shame if this happens.
* In our specifications, polycarbonate capacitors are designated K-77. They are not scarce and inexpensive.
** It’s more logical to use one amplifier for bass, and the second for everything else. Moreover, they can (and even should) be of different power.
Just recently I talked about the design of the UMZCH power indicator. Today I want to return again to the topic of the reanimated Solntsev amplifier. The resuscitation process itself was troublesome, but painless. However, when listening to phonograms, gradually but surely the impression of constriction of one channel began to take shape. There was a feeling that one channel was missing something to breathe “fully.” The lows were somehow sluggish and smeared, the mids were a failure, the highs seemed to be seeping through the felt.
Initially, suspicion fell on the amplifier itself, since during the reincarnation it had to be practically remade. I started checking the pre-amplifier, tone block, UMZCH, and made sure that there was no drop in the supply voltage when the power increased. I swapped channels, replaced feed-through ceramic capacitors with film capacitors, fed a signal from an audio frequency generator, and looked at the output signal with an oscilloscope. Everything turned out to be in order, but the study gradually suggested that the acoustic system was not working correctly. The amplifier, like 20 years ago in its first life, is loaded with Yugoslavian speakers from Ei model HZK 12031 with a power of 120/100 watts and a resistance of 4 ohms.
The global network is stubbornly silent about their characteristics, and documentation on them has not been preserved. We only managed to find out that the volume is 55 liters, and the sensitivity is 91 dB/W/m2. However, the nameplate on the front decorative panel indicates that this is not just that, but Hi-Fi.
It should be noted that the woofer has a rubber surround, and speakers with such a surround have always been valued above speakers with a foam surround because of their durability. I decided to perform an autopsy.
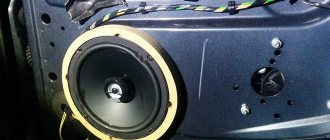
We install size 16 speakers on the Priora
If your Priora has speakers, most likely their size is no more than 13 cm. Will such acoustics be able to satisfy a true music lover? Do they provide high-quality and good sound? It is not surprising that the owner of this particular car, after purchasing the Priora, first of all decided to replace the speakers in it and install 16-centimeter speakers instead of the standard ones.
It turned out to be much easier to buy them than to install them; there were some nuances here. And although there is nothing complicated in such a modification, let's see how this can be done practically. The first difficulty is that the doors of the VAZ model are designed for size 13 acoustics. So we will have to refine them.
Many car enthusiasts solve this problem simply by using additional podiums that are placed on the doors and into which the acoustics are then mounted. But not everyone likes this method; podiums create additional noise, knocking and vibration. Our owner of the Priora decided not to go down this path; he didn’t need unnecessary and extraneous sounds, so he decided to increase the existing places for acoustics.
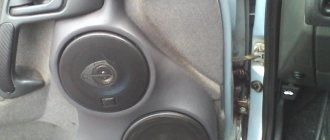
The first step is to remove the door trim
We will not focus on this process, since almost every car enthusiast can handle this. The upholstery was removed, we have a standard hole in front of us (see photo)
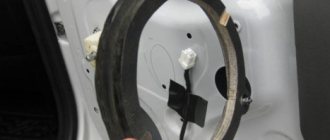
What to do next? You can use a jigsaw. If this tool is not at hand, use a regular drill. We take a compass or ruler, use them to mark points for the 15th diameter, then in these places we drill small holes along the contour. Then, using drills of a larger diameter, we drill out the holes already obtained. Make sure that the edges of the holes are smooth; you can use a file to do this.
photo). What to do next? You can use a jigsaw. If this tool is not at hand, use a regular drill. We take a compass or ruler, use them to mark points for the 15th diameter, then in these places we drill small holes along the contour. Then, using drills of a larger diameter, we drill out the holes already obtained. Make sure that the edges of the holes are smooth; you can use a file to do this.
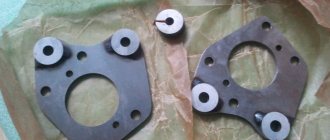
When the hole for the new acoustics has been made, we move on to the next stage. We need to make sure that the door plane and the sound device are in good contact with each other. To do this, you can make special spacers from plywood, for example, or wood. If you don’t want to tinker, go to a specialized store and buy ready-made spacers. We fasten them with self-tapping screws or “seat” them with sealant. But remember that this must be done carefully and thoroughly, otherwise the speakers will soon begin to rattle.
Now we need to install acoustics directly in the Priora doors. Before doing this, glue some elastic material onto the spacer. For example, it could be splen. The speakers themselves can be attached with self-tapping screws. Now the final stage of our refinement, we need to thoroughly refine the plastic trim on the Priora doors.
Why is this necessary? So that the sound is of high quality and nothing interferes with it. To do this, remove part of the plastic door pocket using a sharp utility knife as a tool. You can also cut a round opening, and then attach a mesh for the speaker in it.
Now all that remains is to connect the acoustics. I will not dwell on this in detail either, since this is a topic for a separate conversation, although there is nothing complicated about this either.
What will we get as a result? More powerful and solid acoustics fit organically into the doors of the Priora. The sound has become much better quality. We didn’t have to install podiums that spoil the appearance of the interior and can rattle.
Find out what the Priora doors will look like after installation and how such speakers sound in this video.
If this is your first time on our Forum:
Master Receiver went to the monastery
On the left side. There are several ways. In particular, the wiring under the hood comes from the left. You can carefully route your wires there. You will need a plastic cable holder. And Granta has many similarities with Kalina. If desired, you can make a cable entry in the switchboard.
Thank you! That means I’ll disassemble the driver’s side and look for where it can be pulled under the hood into the interior!
If it’s an automatic, then through the plug where the clutch pedal should go into the engine compartment. I have 2 x 25 square meters stretched this way. But there is enough space for 2 to 50.
No, I have the norm. There should still be plugs.
To be honest, I don’t remember anymore about the plugs. I've been pulling and making noise for a long time, but my memory is bad. At the grant club the topic was about pulling wires. Look. Well, listen to Papa Carlo’s advice. It also seems like people turned it on through the headlight range control somewhere, but I could be wrong.
Left for PPL Head of Personnel
Before disassembling, you can look under the hood for the direction of the harness that goes into the interior. The simplest and most effective method in this matter.,
Pull through the front fender (on the driver’s side) it’s very convenient, you will need to remove the locker (and the wheel accordingly) there is a factory power wiring in one corrugation (right under the wing), you can hook the power wire to it with clamps, the output is in the lower left corner from the clutch pedal (you need to remove the plastic threshold + unscrew the plug (above the pedals) and bend the floor backing. You may have to modify the hole in the rubber plug (depending on the thickness of the cable). I pulled it this way myself in Kalina (consider the twin grants) KG 50 and + and - in principle, it will fit in. Well, don’t forget to protect your power cable with corrugation or a snake.
Left for PPL Head of Personnel
It’s detailed, and it turns out without any problems. I don’t remember this lately - I look at everything for a specific car, damn, but they’re all different today.,
It's no secret that acoustics in a car are very necessary and perform various functions. Installing it is a bit of a concern for novice motorists: they find it difficult to choose the right speakers, they do not have enough money for high-quality installation, etc. This article was written solely to help everyone in this matter and we will find out how to install acoustics in a Lada Granta with our own hands. The Lada Granta and the acoustics, installed correctly in its interior, taken together, will create a completely different car, which even the owners of some foreign cars will look at with envy.
Acoustics Lada Granta
As a rule, installing acoustics in a car has three main stages of development:
- Car radio installation.
- Installation of front speakers.
- Installation of rear speakers.
Let's look at everything in more detail.
Sound emission angle
If the speaker is placed too high, it will affect the clarity of the music. High frequencies will be transmitted worse. Experience shows that tilt angles greater than 60 degrees distort the transmission of the audio signal. For this reason, when creating an external screen, this value should be accurately calculated.
When making the outer structure, you first need to securely fasten the inner screen. Then the outer box is either initially made with the desired slope to the vertical, or screwed obliquely with self-tapping screws. The voids are filled with putty. The entire structure is processed with fiberglass and covered with appropriate fabric.
Review of prices of audio products manufacturers
| Name / characteristics / article number | Price, rub.) |
| Comprehensive budget solution | |
| Radio tape recorder PIONEER MVH-150UBG | from 1500 – 1700 |
| Speakers Pioneer TS-1339 (13cm) | from 2000 |
| Speaker trim | from 450 – 500 |
| Additional noise/vibration insulation of doors | from 1200 |
| Consumables, bolts, screws for vinyl (wood) spacers | from 100 – 150 |
| Car radios | |
| Pioneer SPX-HUD01 | from 10000 |
| Pioneer DVH-345UB | from 12000 |
| Sony XAV-65 | From 15000 |
| Pioneer SPH-DA230DAB | —/— |
| Pioneer SPH-DA120 | from 12000 |
| Pioneer MVH-X585BT | —/— |
| Pioneer MVH-X580BT | —/— |
| Pioneer MVH-S300BT | —/— |
| Auto acoustics coaxial | |
| Two-way coaxial acoustics URAL AK-M | from 7000 |
| URAL AK-74 | —/— |
| Coaxial acoustics URAL AS-C6947 | from 5200 |
| URAL AS-C1647 | —/— |
| URAL AS-C1347 | —/— |
| Four-way acoustics German Maestro AC6511 | from 7500 |
| Focal Performance PC 130 | —/— |
| Dragster DCB 5 | —/—7 |
| Dragster DCA 943 | from 6800 |
| Dragster DC 572.2 | —/— |
| Dragster DC 502.2 | —/— |
| Auto acoustics component | |
| 2-component acoustics Dragster DSB 5 | from 4000 |
| URAL AS-C1627K | —/— |
| URAL AS-C1327k | —/— |
| URAL AK-74.C | —/— |
| URAL AK-47.C | —/— |
| Avatar CBR-6.21L | from 5000 |
| German Maestro MB 4.2 FR | —/— |
| German Maestro 2S 6512 | —/— |
| Dragster DSC 592.2 | —/— |
| Dragster DSA 582 | —/— |
| Dragster DS 532.3 | —/— |
| Alphard Machete MC-6.2A | —/— |
| Amplifiers single / multi-channel | |
| Machete MFC-650.1D | from 10000 |
| Taramps DSP 3000 | —/— |
| Taramps TS2000x4 | —/— |
| Taramps TL500 | —/— |
| Taramps TL1800 | —/— |
| Taramps TL1500 | —/— |
| Taramps DS800x4 | —/— |
| Taramps DS800x2 | —/— |
| Taramps DS440x4 | —/— |
*prices are as of September 20, 2018.