Installing rear speakers in Lada Granta
Acoustic systems in Lada Granta
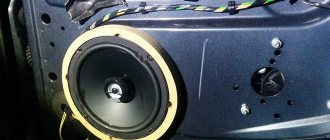
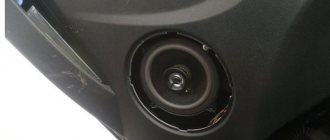
As a rule, without rear acoustics there can be no talk of any high-quality sound. Of course, the main thing is the front speakers, but the sound coming from the rear is an undeniable addition to the overall sound stage created in the cabin of any car. Speakers from Morel Tempo Coax are ideal for the rear doors of the Lada Granta. This is a two-way speaker with a power of 6 dB. Rear speakers in the car door:
- We remove the door trim.
- We try on the speakers for the doors.
- To ensure that the speakers are firmly fixed and the sound quality is not lost, you need to cut off the protruding edges of the metal, and screw the cut pieces of plywood into this place. Material with a thickness of 10-15 mm is quite suitable for this.
Rear speakers in Lada Granta
- We also install crossovers from the inside so that they are not visible and do not interfere with the trim.
- We are modifying the rear door trim so that the peculiar pancakes for the speakers do not protrude. It is recommended to install aluminum mesh. They will need to be cut according to the pattern, and then secured to the rear doors using hot glue.
The main differences between coaxial and component acoustics
Speakers have different designs. The sound of the speakers and the internal structure directly depend on this. The coaxial system implies that the axis contains both low-frequency and high-frequency waves. They can be arranged in one, two or three stripes. The sound quality depends on their quantity. A component system consists of a chain of speakers that are at different frequencies. You will need a lot of speakers. They are located around the entire perimeter of the car interior.
Coaxial elements with mesh are mounted on the rear
a row of seats for better sound, and components on the front doors or in the side panel.
Professional rear acoustics in Lada Granta
Acoustic shelf in Lada Granta
If the owner of a Lada Granta is a true connoisseur of sound, then the above methods for installing an audio system will not be enough for him. Therefore, we will present another method that involves installing professional acoustics in this car. To begin, prepare the necessary materials and equipment:
- Coaxial acoustics, preferably 6x9 from Pioneer. As for the rated power, 120 W will be enough.
- An acoustic shelf that you can make yourself, or you can buy ready-made.
- Kit for connecting a 4-channel amplifier, preferably from Supra.
- One roll of Splen.
As an amplifier, it is advisable to choose, again from Pioneer, a 2-channel option. As for the 4-channel option, this will be superfluous. The 2-channel amplifier exactly matches the selected acoustics.
Note. The kit for connecting a 2-channel amplifier can be used as for a 4-channel amplifier. The wires in this case are of higher quality and better.
The actual installation process itself:
- We dismantle the old shelf. We press out holes in the new one using hydraulics and cover it with two sheets of vibrating mat, and on top with a roll of Splen.
- We make podiums for the shelf to match the size of the speakers.
- We install everything in place.
This concludes the process of installing acoustics in the Lada Granta. The instructions will help you do everything correctly and will prevent you from making mistakes if you also use photo and video materials in the process. The price in this case will be very low if you do everything yourself.
What speakers are best to put in the car?
The main thing when choosing car acoustics is to decide on its type.
The type is determined, in general terms, by a combination of price, quality and dimensions. There are 3 of them. It cannot be said that there is definitely the best and definitely the worst; rather, they have different use cases.
- Component
- Coaxial
- Broadband
Component speakers for the car
Component car speakers offer the best sound quality, but also a fairly high price. Component speaker sets usually consist of several speakers. Or, to paraphrase, several stripes.
Component speaker logic: separate speakers for different frequency ranges. That is, one emitter is responsible for the low frequency, a second for the midrange, and a third for the high frequency. But most often you can find two-way systems on the market.
The most common type - it is also the minimum for building a component system - is a speaker (usually a midrange or midbass, however, these concepts are often synonymous) and a tweeter (“tweeter”). In addition to them, the kit must include a crossover that allows you to adjust the frequency separation.
Component speakers, which is logical, take up quite a lot of space in a car. After all, you need to place several speakers. But it is precisely such a system that, when properly installed and configured, will give the best sound. Ideally, these are not only the front doors and tweeters, but also the rear and subwoofer.
Coaxial car speakers
Coaxial speakers in a car are coaxial emitters installed in one housing. That is, there is a bass (most often mid-bass) speaker, and mid-range or high-frequency emitters are installed directly on it, instead of a cap.
This arrangement of drivers is a great space saver. But the sound quality, with other comparable parameters, will be worse in comparison with component acoustics. The main difference is that coaxial speakers will not give such a natural scene.
All of the above does not mean that coaxial speakers are a bad choice. There are very worthy models that provide excellent sound for the money. For most car audio lovers (those for whom it is not enough to simply listen to the radio from a standard system, but for whom audiophile delights are also alien), this type can be considered the first to be considered.
Broadband speakers in cars
From the name it is clear that in broadband speakers in cars, 1 speaker is responsible for all frequencies. A good broadbander is not easy to find. In any case, given the complex geometry of the car interior, noise, etc., wideband car speakers are a compromise.
Installing front speakers
Acoustics for Lada Granta
Before moving on to the actual algorithm for installing the front speakers (see How to choose speakers for a car radio on your own), let us remind you that this car has already been equipped with standard seats and there is no need to do anything new. But a serious problem arises when installing two-component acoustics. And yet, modernization will have to be carried out, since the diameter of the standard seats is quite limited, however, as on other car models.
Note. If, for example, we want to install high-quality 16 cm acoustics on a Lada Granta, then another intractable problem will arise. The front windows may not open all the way and will hit the speaker. You will have to make special spacers from plywood or chipboard.
Making podiums
The first thing to do is to make podiums.
DIY acoustic podium
Cut out a paper stencil to fit the diameter of the speaker. Don't forget to cut out the inner circle too.
Note. For 16 cm acoustics, you should get a ring with the same diameter and a 15 cm circle cut inside it.
- We glue together 2 pieces of plywood, cut according to a stencil. We use PVA glue and self-tapping screws.
- We should get rings 11 mm thick. This is quite enough for most speakers, although the thickness can be increased, if necessary, later by adding additional rings.
- Now we need to install these same acoustic podiums in the door of the Lada Grant. Without removing the trim, we make markings by attaching a homemade ring to the door.
- We remove the casing.
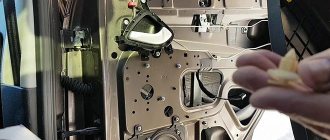
- We take a drill and start drilling holes in the metal of the door.
- We put up podiums and fasten them well.
Note. During this work, it is recommended to at the same time make high-quality sound insulation of the door. It will make the sound from the speakers much fuller, and music lovers will be satisfied.
- We lay wiring in the door.
- We put the trim back in place.
- We install the decorative speaker grille. You can attach it in various ways.
The work is done. As for the tweeters and subwoofer, they are installed in the cabin, on the advice of professionals who should themselves feel the direction of the sound. The homemade podiums are very good and nothing will rattle, because the speakers will not be attached to the door.
Do-it-yourself installation
Next, we will look in detail at how to correctly install the radio on the Lada Granta manually
If you are not a fan of the standard audio preparation of the Lada Grant, pay attention to this algorithm
As stated earlier, the power wires are initially wired, and all that remains is to understand how to properly connect them to the radio.
After removing the cover that covers the radio, two connectors will be visible in front of you. One connector is intended for connecting speakers in the doors, the second is for power supply.
The black and pink wires indicate ground and plus, and at the same time they are the main ones for power supply. If the connection is incorrect, the audio system will at least not work; in the worst case scenario, you will short-circuit the “–” and “+” terminals, which will result in the fuse blowing.
When connecting directly, be sure to insulate all wires, not just those used, to avoid a short circuit.
After connecting the necessary wires, we secure the speaker with self-tapping screws or screws and close the mesh.
It is recommended to install 5-inch speakers (12.5 cm) on the front doors of Lada Granta cars, but if desired, you can insert 16 cm, as a result of which the sound quality will only increase. Choose speakers so that the glove compartment can open completely. This problem often exists when owners choose larger speakers.
Some craftsmen cut out the trim on the rear doors and install pancakes (6x9), which sound even better. With this option, a teardrop-shaped mesh is purchased in the standard factory place for speakers, and speakers measuring 13 cm are installed.
After doing all this grant-audio preparation, all that remains is to turn on the speaker and wait for the radio to turn on.
Soundproofing Lada
It is most convenient to use a self-adhesive foil sound absorber, at least 1-1.5 cm thick.
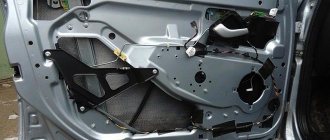
To install the insulator, it is necessary to remove the casing
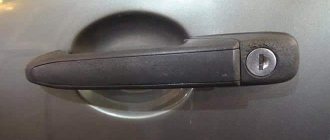
Please note that each front door has screws not only in the handle area, but also on the bottom. And on the driver's side there is also a self-tapping screw in the very middle (hidden under the plug) and in the recess of the latch
After removing the door decorative panel, it is necessary to pre-treat the internal metal surfaces. They are cleaned of the anti-corrosion compound with aviation gasoline, and then additionally degreased with alcohol or another substance with similar properties.
Next, the insulating material is cut into strips 10 or 15 cm wide. They are rolled into a roll, pushed inside the door one by one and pressed tightly with a hard rubber roller, removing the protective film. Upon completion of the procedure, all technological holes are also closed with the selected self-adhesive material.
Now all that remains is to finish the trim. Sound insulation is also applied to its inner surface. Then the speakers are installed and the panel is returned to its place.
Machining a cylindrical hole
As a result of these actions, a cylindrical hole is formed suitable for installing speakers. Before installation is carried out, it is worth noting the need to paste the resulting cylindrical hole with Vizomat 10, as was the case at the stage of pasting the outer side of the wooden ring.
An aspect of gluing a cylindrical hole is the pursuit of two goals, among which are:
• protection of the column and its contacts from water (it can get on the column when the glass is completely lowered);
• creating a trumpet effect.
To achieve these results, Vizomat 10 is cut into thick strips, resulting in the Vizomat being several mm shorter than the cylindrical hole and not touching the completely lowered glass.
The density of the entire structure plays an important role. To achieve the optimal density, you can cover the circumference of a wooden ring with Bitoplast, as a result of which the mounted column will be pressed as much as possible against the homemade ring.
We install 16 cm speakers in the Lada Granta, and also cover their circumference with Bitoplast. This pasting is carried out in order to maintain the intensity of the sound, since air will not escape under the door trim.
At this point, the installation of speakers in the front doors of Granta is completed, and all that remains is to assemble the door. After such installation, the weight of the doors increases slightly and, accordingly, the protrusion from the installed column increases slightly.
Preparatory work before installing speakers in the front doors Grants
Before the installation of 16 speakers in Grantu begins, it is worth noting the need to enhance the wave dispersion effect. Thus, it is necessary to glue an additional layer of Bitoplast 10 on top of Vizomat MP-2. This kind of action is not mandatory, but will reduce the reflection of sound directly from the door itself.
It is also worth noting the use of Bitoplast 10, and not foam rubber. The fundamental difference between these materials is the different degrees of water absorption. Foam rubber absorbs water like a sponge, resulting in corrosion inside the door.
As for the additional materials that were mentioned at the very beginning, it is at this stage that it is necessary to install the spacer on the door. You can buy it at any car audio store. As for the possibility of making spacers (rings) yourself?
In order to ensure proper placement of the column and sufficient functioning of the window regulators, plastic spacers must be placed under the wooden ring. Smaller spacers are placed under the upper fastening points, and larger spacers are placed under the lower ones.
The manufactured wooden ring can be fixed into the standard holes of the Lada Granta door, while placing the spacers mentioned above.
How to process a cylindrical hole?
The above manipulations lead to the formation of a cylindrical hole inside the door panel of the Lada Granta, into the cavity of which further installation of the loudspeaker is implied. Before the immediate installation procedure, the contour of the internal cavity of the formed hole must be glued using Vizomat 10 (similar to gluing the outer side of the ring).
The purpose of pasting manipulation is to achieve two properties:
creating a trumpet-like effect; ensuring protection of the speaker contact group from moisture when the side window is fully lowered.
The installation procedure on LADA Granta requires preliminary preparation. “Vizomat 10” needs to be cut into thick strips and when pasting, it is necessary to ensure that the lowered glass does not touch the outer surface of the created cylindrical hole.
The density of the structure plays an important role. To achieve a sufficient level, it is recommended to glue the outer circumference of the wooden ring
Bitoplast is suitable for this purpose. This action will ensure that the installed speaker is pressed tightly against the ring.
After installing the loudspeakers, we also cover their circumferences with Bitoplast. This measure will ensure sound intensity, because air will not be able to penetrate behind the door trim.
Tightness is the key to high-quality sound
In order to achieve the maximum effect from the installation, almost every stage of the installation of 16-centimeter speakers requires additional sealing. After the installation of the ring is completed, and the use of plastic spacers has led to the formation of gaps between the door and the ring, it is necessary to glue the ring with Visomat 10 on the outside.
The outer side no longer has holes and cracks, and a void has formed between the ring and the door, which can be filled with polyurethane foam. Without waiting for the foam to dry completely, we remove its protrusions, which will certainly interfere with the installation of the column itself.
Installation algorithm
The algorithm will be approximately the same as for installing speakers in the front door.
Rear door trim
Let's allow a couple of deviations to this. You may need to make custom spacers to replace the stock mounts. We can’t give exact advice here, everything is individual.
What should those who have the “Standard” equipment do?
The standard configuration does not include audio preparation and decorative plugs in the rear door trim. You will have to pull the wires yourself from the radio, and buy plugs and install them in the upholstery yourself. There will also be no standard fasteners.
Cladding article number.
- 2190-6202095 — speaker trim, left rear door trim
- 2190-6202094 — speaker trim, right rear door trim
Article number of standard fastening.
- 2190-7901033 — standard rear speaker mount left
- 2190-7901032 — standard rear speaker mount, right
I blinded you from what was. The main thing is the result!
We prepare the tools: a stationery knife, a marker, straight arms.
We fix it, if possible, use hot glue to prevent it from rattling.
Finished product.
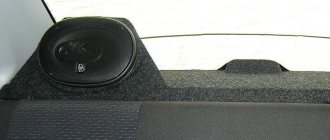
Installing speakers in the rear shelf of Lada Granta liftback
The installation process is somewhat complicated by the need to pre-prepare the shelf, cut holes, and install podiums.
- Open the back door of the Lada Granta Liftback, remove the shelf;
- We apply the speakers one by one, projecting their oval silhouette onto the shelf from the back side;
- We cut out holes with a jigsaw and clean them around the perimeter with sandpaper;
- We buy in advance and cut out the podiums for the speakers ourselves. We apply and assemble the structure.
The most crucial moment comes - laying the cable. Some masters practice feeding from side doors, which is fundamentally wrong. As the load on the circuit increases, the speakers will begin to sag. It is best to connect to the ISO connector on the back of the tape recorder.
- We dismantle the plastic linings - thresholds between the front and rear rows of seats.
- We lay the wires from the rear speakers and bring them out to the inside of the dashboard.
- We route the ISO connector and connect it to the free sockets.
- We reassemble the pads.
Provided you follow the recommendations and follow the algorithm, the performance of the speakers is guaranteed. During the warranty period, the buyer has the right to present to the seller any demands provided for by law.
General information about music in Grant
In this section, we will consider general non-professional points about music in the Lada Granta.
Installing music
If you have a VAZ 2190 in the basic configuration (or Norma) with audio preparation, then installing music will entail the following steps:
- Removing the radio cover - on the back side there are ISO connectors for power and speaker wires. You will have to run the wires to the rear speakers yourself if you plan to install an acoustic shelf, since from the factory the wires are routed only to the doors;
- Installation of a 1-DIN radio (for 2-DIN you will have to farm, cutting out a jumper in the panel and looking for a suitable frame);
- Finding and connecting the plug of the pre-installed antenna - often the antenna wire on the roof is lost under the ceiling trim and it turns out to be easier to install the antenna separately than to find the factory cable;
- Pulling wires into the trunk to connect an amplifier, subwoofer and speakers installed in an acoustic shelf.
- To install the amplifier, you will also need a separate power cable from the engine compartment directly from the battery terminal through a fuse.
Removing the jumper in the panel trim is mandatory when installing a 2-DIN GU. Installing an acoustic shelf entails dismantling it behind the back of the rear seat.
The non-standard shelf will cover the ISOFIX mounts! If your car does not have audio preparation, you will have to separate the power wires for the radio and the speaker wires in the door.
What kind of acoustics to put in Granta
Common budget music option:
- radio tape recorder within 5000 rubles with the ability to adjust the equalizer;
- 16 cm component speakers with tweeters at the front;
- acoustic shelf with speakers 6*9;
- amplifier with subwoofer in trunk.
Let's look at an example of such a configuration with a price tag in the table (the calculation is for ordinary people, not audiophiles) based on Pioneer devices:
| Example of a Pioneer device | Average price tag in rubles | |
| Head unit (radio) | DEH-S101UB | 4000 |
| Front 16cm acoustics | TS-G1733i | 2000 |
| Acoustic shelf | 1500 | |
| 6*9 “pancakes” | TS-R6951S | 2200 |
| Amplifier 2-channel | GM-A3702 | 4300 |
| Passive subwoofer in a box | TS-WX305B | 5200 |
| Subwoofer installation kit | 1500 |
As a result, we get budget sound in the region of 20 thousand. If we consider professional head units, premium-segment speakers, installation of custom podiums and other delights, the price tag can easily jump over a hundred thousand, amounting to a third of the cost of the car itself.
The choice of podium depends on the type of windows, budget and number of speakers.
Podiums in the front doors
We will not describe the technology for making podiums with our own hands. Next is a selection from various resources for ready-made podiums and manuals for self-production.
Please note that most of the podiums in the front right doors interfere with the opening of the glove compartment.
- Here is a link to a store with ready-made options and prices. It's not advertising that's a source of inspiration.
- Here is a photo report on self-production with comments.
- This link is just a photo report without comments.
Professional acoustics
For car audio fans who are ready to invest large amounts of money in Granta, we have selected a couple of bright videos. Look what you can build on the Lada base and look decent in the area and at local car audio competitions. Enjoy.
Crib
Instead of a conclusion, let's summarize:
- You can plug in budget sound into the Grant for an amount of 20,000 rubles or more.
- Podiums in the front doors = impossible to open the glove compartment.
- 16 cm speakers in the front doors - cut the metal of the door or prepare spacers with the factory facing of the speakers.
- The acoustic shelf covers the ISOFIX mounts.
- Audio preparation pulls wires only in the doors.
- Article numbers for ordering speaker covers and mounts are in the “Installing speakers in rear doors” section.
Did you like the article? Write a comment or see what we have about the selection of budget cars for 200 thousand.
And so, I considered the standard speakers to be a drawback, so I decided to replace them. I decided to replace it with speakers of the same size 13 cm, since to install larger speakers it is necessary to cut the door, and I don’t want to do this, and since even in the long term there is no installation of an amplifier, so installing 16 cm is not logical, because of this I decided to install 13 cm speakers and just get better sound. I purchased the well-known Pioneer TS-1339R speakers for the front doors for 2,000 rubles. The kit comes with long wires, which is useful for those who do not have audio training.
Type - coaxial speaker; Number of speakers included - 2 pcs; The shape of the speakers is round; Number of stripes - 3; Rated power - 40 W; Maximum power - 200 W; Minimum frequency - 40 Hz; Maximum frequency - 30000 Hz; Sensitivity - 91 dB; Impedance - 4 Ohms; Diameter - 13 cm; Planting depth - 55.3 mm.
To install in the front doors, remove the trim; to do this, unscrew the bolts in the indicated places and unscrew the door lock release button, remove the trim that is held on by clips.
Tools:
- Small flat screwdriver
- Medium Phillips screwdriver
- Jigsaw with metal files
- Stationery knife
Parts and consumables:
- Speakers
- Wooden spacers - 2 pcs.
- Fastening pins (if necessary)
- Chalk
Notes:
In addition to the radio, for its normal operation, it will also be necessary to install speakers (acoustics) in the car door.
1. To cut holes in the door trim, remove it from the vehicle.
Note:
The door trim and metal frame of the front doors provide a size for 16 cm speakers.
2. Use a utility knife to cut holes in the front door trim.
3. If you decide to install 16 cm speakers, you may have to modify the door frame, since the speaker basket may not exactly fit into the standard hole in the door iron. Use a jigsaw to cut a hole of the required diameter and try on the speaker.
4. Connect the speaker and install it in place using spacers.
5. Install the speaker grille onto the speaker.
6. Reinstall the front door trim, replacing the damaged trim clips if necessary.
Note:
With the described installation method, the speaker grille does not protrude significantly above the door trim, and therefore will not interfere with the full opening of the glove compartment.
The article is missing:
- Photo of the instrument
- Photos of parts and consumables
The standard audio equipment of a Lada Granta liftback car includes: a 2-DIMM radio, two speakers in the front door measuring 13 cm, blocks with wires in the rear door.
Obviously, such an audio system is not complete and of low quality. The stock speakers are too small, weak when using mid and high frequencies. It's enough to listen to the radio. Is it worth changing the standard speakers? The answer is yes.
Video - Installing 16 cm Speakers in Lada Granta through spacers
Installing speakers in the front doors on Granta
Music in the car is an indisputable attribute of any car enthusiast. Many Lada Granta buyers who did not order additional. option in the form of acoustics, the dealer is wondering how to install a music system with their own hands. Today we will talk about installing speakers in the front doors of a Grant.
How to install speakers in front doors
There are several ways to install speakers in the doors of a Lada Granta.
The first and easiest installation of 13 cm speakers in standard places in the door. For this we do not need any additional spacers. All we need is a set of speakers, preferably with facings. All we need to do is remove the trim from the door, fix the speaker in the standard holes in the metal of the door, cut a hole opposite it for the speaker trim and put everything in place. But this type of installation has several negative sides. Firstly, the 13 cm speaker is small enough to produce acceptable sound quality and volume.
Secondly, the stamping on the door trim is designed for a size of 16 cm, which is why it is impossible to match the speaker grille and the trim.
Let us remind you that in the previous news we looked at an article about adjusting the handbrake on a Lada Granta with your own hands. You simply cannot debug the adjustment, because this is for your safety.
Read
Installation of 16 cm Speakers in Lada Granta through spacers
Video about installing 16 cm speakers
into the front doors of the Lada
Granta
through spacers without cutting metal from.
Lada Granta - installing speakers in the rear doors.
Text version of the review: granta
.ru/ustanovka-dinamikov-v-zadnie-dveri-na-lada-
granta
/ Ordered here: .
We screw the spacer to the door, as shown in the photo above, put the trim in place and insert the speaker through the cut hole in the trim itself and screw it directly through the plastic of the trim to the spacer in the door. We put the speaker grill on top. Such an installation in the same way is not particularly difficult, but it solves several disadvantages: the sound will become richer, and the stamping on the door will align with the speaker grid.
However, another drawback will appear: the glove compartment will stop or will open with the speaker grid contact.
Let's consider the third method of installing speakers in the Lada Granta. It is one of the most difficult, however, in my opinion, it gives the best result. To implement it, you will need to slightly file the metal in the door, make or buy a 10 mm spacer for a 16 cm speaker, and purchase a factory set of speaker covers.
It is necessary to trim the metal in the door as marked in this photo with a red line. In your case, you may need a more precise adjustment, because... Speakers may vary. In my case it is Helix Xmax 216.
Read
Next, we place the prepared 10 mm spacer on the door body and screw the speaker together with it to the door, this is clearly demonstrated in the next photo.
In the door trim itself, you will need to cut a hole for the fasteners of the standard speaker trim.
After completing all the work, all that remains is to assemble the door and enjoy the result. Personally, I tried the second and third installation methods on myself and I can say that the latter is truly the best and has many advantages: good sounding of the speaker system, reliable installation, no contact of the glove compartment with the speaker trim. But it has one significant and no less important disadvantage - the complexity of installation.
Video. Installing speakers in the front doors of a Lada Granta
Installation of speakers in the front door has been successfully completed. Have a nice trip!
Mounting options
It is advisable to take care of creating an additional noise-insulating barrier before performing the work described. We'll tell you how to do this a little later. Otherwise, installing speakers in the front doors of the Lada Grant is not at all difficult.
The simplest way is to install the minimum size (130 mm) elements in places specially designed for them. There is no need to be clever or adjust anything here.
First of all, buy a set of speakers with grilles. Next you need:
- dismantle the decorative trim of the front doors;
- install the speakers in the Grant holes stamped at the factory;
- connect them to cables;
- cut holes in the cladding;
- return it to its place;
- screw the grates.
There are some disadvantages to this setup. First of all, the speakers of this size are quite weak. At the same time, the holes with which each front door is equipped with a diameter of 160 mm will cause a number of certain difficulties with joining the upholstery.
Thus, it is still better to mount 16 cm speakers on the Granta. For installation, you will have to additionally buy so-called spacers measuring 2 cm. They are sold by almost all stores specializing in car acoustics.
Here you should proceed differently:
- the casing is removed;
- the spacer is fixed with screws on the door body;
- the front decorative panel returns to its place;
- a hole is cut in it where the speaker is placed;
- it is screwed through the upholstery to the spacer and closed on top with a grille.
Despite all the obvious advantages, this method has one drawback - it will be difficult to open the glove compartment. Its lid will either begin to cling to the grille or simply become blocked.
The third option for installing speakers in a Lada Granta car is relatively complex, but also the most profitable from all points of view. Pre-purchase:
- 16mm acoustic devices and grilles for them;
- 10mm spacers.
Next, the standard hole located in the front door of the Lada needs to be filed a little (about 1 cm) on the side that is closer to the hinges - this is important. You will find out how much the hole will have to be widened when you attach the selected speaker. It should fit as tightly as possible. A spacer and an element of the acoustic system are placed in the hole. They are screwed to the front door together using self-tapping screws.
Next, carefully cut a hole in the plastic lining - a circle has already been pressed out there. Step back from its borders towards the center by 0.5 centimeters. The decor is returned to its place, and the hole in it is covered with a speaker grille. After assembling the front doors, you will be able to enjoy a really strong sound and avoid the glove box cover coming into contact with the acoustic device.
Subtleties of the procedure
Installing speakers is a standard procedure if the car has standard equipment. Main subtleties of the process:
- It is necessary to make holes in the cladding for the acoustic system. To do this, it is removed. A hole is cut in the material itself, as well as in the body element. If the diameter of the speakers is 16 cm, then the standard recess in the doors will not fit. You will have to create additional wooden parts.
- The hole is made with a jigsaw. To saw off a circle, special steel files are used.
- After the speaker is in place, the trim is attached. When dismantling it, some fasteners may be damaged because they are made of plastic and break easily. A set of clamps should be purchased in advance.
We install size 16 speakers on the Priora
If your Priora has speakers, most likely their size is no more than 13 cm. Will such acoustics be able to satisfy a true music lover? Do they provide high-quality and good sound? It is not surprising that the owner of this particular car, after purchasing the Priora, first of all decided to replace the speakers in it and install 16-centimeter speakers instead of the standard ones.
It turned out to be much easier to buy them than to install them; there were some nuances here. And although there is nothing complicated in such a modification, let's see how this can be done practically. The first difficulty is that the doors of the VAZ model are designed for size 13 acoustics. So we will have to refine them.
Many car enthusiasts solve this problem simply by using additional podiums that are placed on the doors and into which the acoustics are then mounted. But not everyone likes this method; podiums create additional noise, knocking and vibration. Our owner of the Priora decided not to go down this path; he didn’t need unnecessary and extraneous sounds, so he decided to increase the existing places for acoustics.
The first step is to remove the door trim
We will not focus on this process, since almost every car enthusiast can handle this. The upholstery was removed, we have a standard hole in front of us (see photo)
What to do next? You can use a jigsaw. If this tool is not at hand, use a regular drill. We take a compass or ruler, use them to mark points for the 15th diameter, then in these places we drill small holes along the contour. Then, using drills of a larger diameter, we drill out the holes already obtained. Make sure that the edges of the holes are smooth; you can use a file to do this.
photo). What to do next? You can use a jigsaw. If this tool is not at hand, use a regular drill. We take a compass or ruler, use them to mark points for the 15th diameter, then in these places we drill small holes along the contour. Then, using drills of a larger diameter, we drill out the holes already obtained. Make sure that the edges of the holes are smooth; you can use a file to do this.
When the hole for the new acoustics has been made, we move on to the next stage. We need to make sure that the door plane and the sound device are in good contact with each other. To do this, you can make special spacers from plywood, for example, or wood. If you don’t want to tinker, go to a specialized store and buy ready-made spacers. We fasten them with self-tapping screws or “seat” them with sealant. But remember that this must be done carefully and thoroughly, otherwise the speakers will soon begin to rattle.
Now we need to install acoustics directly in the Priora doors. Before doing this, glue some elastic material onto the spacer. For example, it could be splen. The speakers themselves can be attached with self-tapping screws. Now the final stage of our refinement, we need to thoroughly refine the plastic trim on the Priora doors.
Why is this necessary? So that the sound is of high quality and nothing interferes with it. To do this, remove part of the plastic door pocket using a sharp utility knife as a tool. You can also cut a round opening, and then attach a mesh for the speaker in it.
Now all that remains is to connect the acoustics. I will not dwell on this in detail either, since this is a topic for a separate conversation, although there is nothing complicated about this either.
What will we get as a result? More powerful and solid acoustics fit organically into the doors of the Priora. The sound has become much better quality. We didn’t have to install podiums that spoil the appearance of the interior and can rattle.
Find out what the Priora doors will look like after installation and how such speakers sound in this video.
Installation of Kalina 2 speakers with your own hands: we buy grilles, cut the casing, screw on the speakers
Cars of the Kalina-2 family, produced in the Standard configuration, are not standardly equipped with speakers and a radio. But these cars have already been equipped with audio preparation, unlike, for example, the Granta Sedan Standard. The doors in different configurations of the “second Kalina” do not differ, but their trim is different. More precisely, in the “standard” version she is deaf.
But, using a jigsaw, you can cut through the plastic and prepare holes for the standard VAZ trim, which is placed above the speaker.
What exactly will you need to buy?
Having opened the catalog of parts and assembly units of the Kalina-2, we find that the speakers are screwed to the rear doors through spacers. There is a spacer for the left door and for the right one, their catalog numbers: 7901032/33.
If you want to use standard facing panels (grids), then know that they are usually sold complete with spacers.
Catalog numbers of facing panels: 6102096 (“circle” in the front door), 6102094/95 (overlay for the right and left rear doors).
Speaker Installation Kit
It seems that the car has audio preparation, and it will be enough to just screw on the speakers and connect them.
In theory, you can buy door trim designed for more expensive trim levels. This option is the simplest and most expensive. We are not considering it.
Cutting plastic with a jigsaw
See how part 6102094/95 works. There are clips along its perimeter. After removing the trim from the rear door, we place this part on a plane, face up. Then, you need to mark the attachment points. And then, even if not with micron precision, you need to cut a hole of a suitable shape in the part. Here you will need a jigsaw.
Installation of speaker trim, plastic door trim
The front door trim is finished in a similar way. Here you will need to cut round holes, but note that you cannot use a ballerina. Working with plastic requires a certain skill, and cutting a sheet with a jigsaw is quite simple.
Choosing the Right Speakers
Let's say we want to install 4 loudspeakers, which will not differ in size from the standard ones. It is known that some owners decide to install a subwoofer, as well as a separate amplifier, etc. But the manufacturer prepares the car to connect 4 speakers, which are located in the doors. This is true for all trim levels.
We also note that the front speakers installed forward are no different in size from the rear speakers. The standard size of the speakers is 5 inches, that is, 12.5 cm. Almost all budget sets are suitable.
Speaker installation process
Installing the rear speaker, oddly enough, is even easier than the front speaker. We take the spacer and screw it to the back door, after which all that remains is to secure the speaker and connect it. With the front door, everything looks more complicated - there you need to glue threaded washers under the holes for the bolts. And normally these washers are held in place by brackets, which are not included in the “standard” configuration.
Rear and front door without trim
Each speaker is screwed onto 4 threaded screws, but it is better to connect the connectors first. One pair of speaker wires goes into each door, and they come from the main connector intended for the radio. Before making the connection, it is better to test the wires for breaks.
We have discussed in full how to install speakers in Kalina 2. We will not consider the method of installing and connecting the radio, but note that it is not at all necessary to dismantle the center console for this.
The subtleties of installing speakers on a Granta liftback that everyone should know
- To avoid additional manipulations with cutouts and extensions of standard holes in the doorway, install audio speakers with a diameter of 13.0 cm.
- If you want to improve the sound quality, increase the volume, frequency, install speakers in the front doors at 16.0 cm. Be prepared to widen the hole in the door structure. You can do this at a service center or yourself, armed with a metal jigsaw. From a ring with a radius of 6.5 cm, make 8.0 cm.
- When installing speakers of larger diameter, there is a high probability of glass coming into contact with the back of the speaker. As a result, vibrations are possible when lowering the glass to its lowest position.
Lada Granta Standard
The audio preparation of the Lada Granta Standard is arranged as follows: the car has power wiring harnesses connected to the head unit. Such wires are present only in the radio; there are no visible outputs of wires for the speaker on the doors.
Therefore, on the basic configuration of the car, the wires do not reach the audio system speakers. Under the panel on the driver's seat side there are wire outlets for the radio.
In order to connect them into one system, you need to find the corresponding audio system wire outputs on the Lada doors. After finding all the necessary outputs, the wires located on the panel are connected to the wires that are built into the doors.
On a car of this configuration, you will need to run the wires to the dashboard alone.
A few words about this configuration. The “Lux” assembly has a factory pre-installed radio with speakers. The radio has at its disposal such additional functions as a 5-inch touch screen, which also has a line input, a Bluetooth headset, and the ability to read flash media.
Conclusions and recommendations
Conducting standard audio preparation in cars such as, for example, the Lada Granta has now become much easier, because there is no need to conduct the wires themselves and the owners only have to make their proper connection.
Thus, the corresponding wires are connected to the power connector of the radio, as well as the connector for the speakers. Do not forget about the insulation of wires that are supplied directly.
Remember that independently connecting an audio system to existing factory outputs is in no way considered an excuse for refusing warranty service.
The subtleties of installing speakers on a Granta liftback that everyone should know
- To avoid additional manipulations with cutouts and extensions of standard holes in the doorway, install audio speakers with a diameter of 13.0 cm.
- If you want to improve the sound quality, increase the volume, frequency, install speakers in the front doors at 16.0 cm. Be prepared to widen the hole in the door structure. You can do this at a service center or yourself, armed with a metal jigsaw. From a ring with a radius of 6.5 cm, make 8.0 cm.
- When installing speakers of larger diameter, there is a high probability of glass coming into contact with the back of the speaker. As a result, vibrations are possible when lowering the glass to its lowest position.
What speakers to put in car doors
There are many speakers of different prices and quality in the car audio markets, but among them there are models that occupy leading positions in the ranking. To install speakers in the front doors, you will need high-quality dynamic heads that, despite the noise in the cabin, provide high-quality sound reproduction. These speakers include the following models:
- Fokal 165 AC
- Hertz MPX165.3
- Morel Tempo Coax 6
These are coaxial two-channel speaker systems. The dynamic heads of these manufacturers are characterized by a smooth amplitude-frequency response, high sensitivity and good output power. The high-frequency head is mounted on a rotating hinge, which allows you to adjust the reproduction of high frequencies.
Let's sum it up
Now you know how to install 16 cm speakers directly into the rear doors. When installing speakers, remember the need to screw the parts tightly in order to avoid rattling and ensure decent sound.
When the installation of speakers is completed on the LADA Granta car in both doors, we begin to check the sound. If there is no sound, then we check the correctness of all connections, and if rattling occurs, the “disturbing” element will need to be re-disassembled and then securely fixed.
Installing speakers in the rear door can cause a number of difficulties that may arise as a result of incorrectly selected size (depth) of the speaker and the lack of standard decorative fastening and spacers.