If the owner of a Lada Granta sets out to achieve high-quality sound in the interior of his “iron horse,” then he will need to install 16 cm speakers in the front doors. For these purposes, you will need to purchase products with a diameter of 160 mm. They will provide an increase in sound quality and volume compared to the existing 13-centimeter loudspeakers.
Self-installation of 16 cm speakers directly into the front doors is quite simple and does not require the owner of a Lada Grant to have particularly secret skills or a large number of additional materials.
Acoustics for the front doors of Lada Granta
Installing speakers in Granta doors allows you to be independent of the body type - speakers in the doors do not require an acoustic shelf. This means that you can install speakers in a sedan and a hatchback according to the same principle.
Preparatory work
Before we begin the installation itself, let's figure out how to prepare the car. For this:
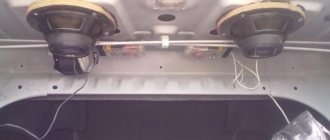
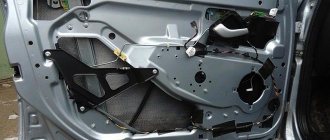
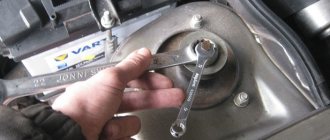
- We disassemble the door : dismantle the handle (pry up and remove the trim, unscrew 2 screws), the tip of the limit switch, two screws from the bottom of the door, overcoming the resistance of the retaining pins, pull the door card toward you and remove it from the door;
- We soundproof the door: in the warm season or in a heated garage, we cover all accessible parts of the door with vibroplast. Vibroplast StP M2 is suitable; when applying it to the door, be sure to heat it with a construction hairdryer and roll it with a pressure roller;
- If you have Spleen thermal insulation material, we cover the inside of the door card with it. This will further hide noise from the door when assembled;
- We are preparing spacers , if any are required for installing 16 cm speakers - more about them later in the text;
- We replace the factory terminals on the speaker wire in the door with normal ones (usually good terminals are included with the speakers) - to do this, we simply cut off the unnecessary connectors and attach the terminals we need to the wiring. A high-quality twist with heat shrink is enough;
- If the door panels do not have holes for speakers , we prepare them. It would be optimal to supply factory acoustic grids, which are installed on luxury versions of Granta and Datsun OnDo.
Installing speakers in Granta front doors
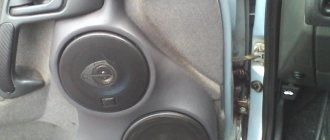
The standard acoustics in Grant are 13 cm speakers. They do not produce good sound, but they are easily installed in the factory holes for the speakers without unnecessary manipulation. The procedure for dealing with them is simple:
- connect the speaker cables, observing the polarity;
- fix with screws in regular places in the metal of the door or directly on the door card;
- install grids (in common parlance - grills).
An important disadvantage is that the center of the mounting hole and the place under the grill do not coincide. This means that when installed with complete grills, they will look asymmetrical and clumsy.
Standard acoustics most often do not produce a rich sound and, when installed with their own grids, look poor.
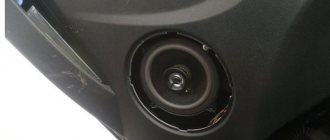
How to install 16cm speakers with spacers
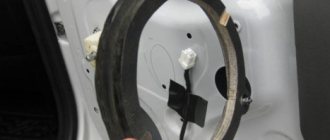
In pursuit of sound, it is logical to install 16 cm speakers. This is where all the disadvantages of the AvtoVAZ design appear - the speakers either are not centered, or do not allow the window to roll down, or interfere with the glove compartment lid.
Why are spacers needed ? In order not to cut the door, if you do not put the acoustics in the spacer rings, you will have to attach it to the metal of the door. This may result in the need to cut the door itself in order for the speaker to fit in, and is dangerous for the glass.
How to machine a cylindrical hole
16 cm speakers will require enlarging the hole in the metal structure. This diameter is preferable because it creates more sonorous acoustics. For cutting you will need a metal jigsaw and steel files. Chalk outlines the place of the cut, which is measured in advance. When the niche is ready, it should be cleaned with sandpaper, and also make sure that the speaker fits tightly into the hole. If it dangles, it will create extraneous noise in the cabin.
A wooden podium is additionally prepared from wood, which is attached to the inside of the speakers.
Installing speakers in Granta rear doors
The procedure for working with the rear doors is identical to the front ones. Important difference : homemade spacers are not required here. The plant produces a set of special mounts for installing 13 cm speakers in the rear doors.
Articles for ordering online:
| Speaker Mount - Rear Left | 21907901033 |
| Speaker Mount - Rear Right | 21907901032 |
| Rear left column trim | 21906202095 |
| Rear right column trim | 21906202094 |
| Trim for front left door | 21906102097 |
| Trim for front right door | 21906102096 |
Installation sequence:
- Disassemble the door;
- Cut a hole in the door card for the lining;
- Install the speaker mount on the door;
- Replace the standard audio terminals with normal ones;
- Connect the wires to the column, secure it;
- Install the trim and assemble the door.
You can replace the fastening with improvised materials, but factory production takes into account all bends.
Preparatory work
First, it is determined what diameter of the speakers will be installed on the Lada Granta liftback or other type of hatchback. Then a set of equipment and fasteners is prepared. Installation will require the following tools:
- screwdrivers;
- jigsaw;
- sharp knife;
- rags;
- metal files;
- wooden spacer;
- chalk to mark the diameter of the stand.
Speaker size 13 is the norm. The internal design of the door allows you to install such a column without additional manipulations. In this case, installation and cutting of the metal base is not required.
General information about music in Grant
In this section, we will consider general non-professional points about music in the Lada Granta.
Installing music
If you have a VAZ 2190 in the basic configuration (or Norma) with audio preparation, then installing music will entail the following steps:
- Removing the radio cover - on the back side there are ISO connectors for power and speaker wires. You will have to run the wires to the rear speakers yourself if you plan to install an acoustic shelf, since from the factory the wires are routed only to the doors;
- Installation of a 1- DIN radio (for 2-DIN you will have to farm, cutting out a jumper in the panel and looking for a suitable frame);
- Finding and connecting the plug of the pre-installed antenna - often the antenna wire on the roof is lost under the ceiling trim and it turns out to be easier to install the antenna separately than to find the factory cable;
- Pulling wires into the trunk to connect an amplifier, subwoofer and speakers installed in an acoustic shelf.
- To install the amplifier, you will also need a separate power cable from the engine compartment directly from the battery terminal through a fuse.
Removing the jumper in the panel cladding is mandatory when installing a 2-DIN GU.
If your car does not have audio preparation , you will have to separate the power wires for the radio and the speaker wires in the door.
What kind of acoustics to put in Granta
Common budget music option :
- radio tape recorder within 5000 rubles with the ability to adjust the equalizer;
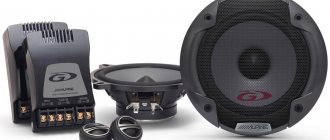
- 16 cm component speakers with tweeters at the front;
- acoustic shelf with speakers 6*9;
- amplifier with subwoofer in trunk.
How to install 16 cm speakers with spacers
You can install 16-cm speakers without enlarging the hole, but then, due to the spacer, the speaker will stick out from the door. It is more advisable to carry out a standard cutting. Instructions:
- After the handle and facing panel are removed, the wires are disconnected. Sound insulation is removed. Use a jigsaw to enlarge the standard hole in the door.
- A pre-created podium is attached to the back and securely fixed with self-tapping screws.
- The cable is removed, the electronics are connected, and the structure is assembled in the reverse order.
Crib
Instead of a conclusion, let's summarize:
- You can plug in budget sound into the Grant for an amount of 20,000 rubles or more.
- Podiums in the front doors = impossible to open the glove compartment.
- 16 cm speakers in the front doors - cut the metal of the door or prepare spacers with the factory facing of the speakers.
- The acoustic shelf covers the ISOFIX mounts.
- Audio preparation pulls wires only in the doors.
- Article numbers for ordering speaker covers and mounts are in the “Installing speakers in rear doors” section.
Did you like the article? Write a comment or see what we have about the selection of budget cars for 200 thousand.
- 690 rub.
- Description
- Reviews (11)
- Question answer
Specially designed spacers for standard installation of 16 cm speakers in the front doors of Lada Granta and Lada Kalina2 without cutting metal.
1. Easy installation - the back side completely follows the curvature of the door metal. The front completely follows the curvature of the door trim.
2. The spacers fit evenly and tightly between the metal of the door and the door trim.
3. The speakers are installed on the door trim. The grids that come with the columns are used. The sound goes into the interior and not under the upholstery.
Self-tapping screws for installation are not supplied.
Installation:
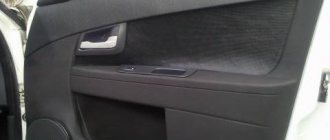
Installing speakers in the front doors on Granta
Music in the car is an indisputable attribute of any car enthusiast. Many Lada Granta who did not order additional. option in the form of acoustics, the dealer is wondering how to install a music system with their own hands. Today we will talk about installing speakers in the front doors of a Grant.
How to install speakers in front doors
There are several ways to install speakers in the doors of a Lada Granta.
The first and easiest installation of 13 cm speakers in standard places in the door. For this we do not need any additional spacers. All we need is a set of speakers, preferably with facings. All we need to do is remove the trim from the door, fix the speaker in the standard holes in the metal of the door, cut a hole opposite it for the speaker trim and put everything in place. But this type of installation has several negative sides. Firstly, the 13 cm speaker is small enough to produce acceptable sound quality and volume.
Algorithm of actions
- First you need to remove the door trim (details in this article).
- We take measurements and estimate certain dimensions. The most convenient way is to pre-make a layout from cardboard.
- Based on the layout, we figure it out on the spot and see if the column fits into the door niche. We are trying to understand whether the glove compartment can open with this column, since the column may interfere with it.
- We cut out spacers, if necessary; below we will consider options for columns for which it is not necessary to make spacers.
- We cut out a decorative plug for the column on the door trim.
For convenience, you can first drill holes around the perimeter of the cut
We cut the trim with a utility knife.
Install and secure the spacer
Attach the column to the spacer
Reviews and recommendations
People often ask on forums which set of acoustics to take in order to get high-quality and loudest sound. The advice boils down to the fact that higher-quality acoustics need to be installed in the front, and something simpler is suitable for the rear.
It is desirable that the sensitivity of the “front” and “rear” be the same. The sensitivity of car audio is the number of decibels per 2.83 Volts. Typical values: 89 or 92 dB/2.83 V.
It is impossible to squeeze “real bass” out of five inches. But still, you can notice the following pattern: the higher the sensitivity of the speaker, the less ideally it reproduces bass. So, choose: quiet, but high-quality bass, or loud sound, but without low frequencies. This limitation can only be removed by moving to the “6.5-inch” category. True, then you will need an angle grinder, and some owners also use it when installing a radio.
Level one. Noise insulation
Yes, yes, this is the very first point for any upgrade of a standard audio system. If you want to listen to music, first of all get rid of unnecessary sounds. By the way, we are talking not so much about outside noise as about body noise. Look at the home speaker. Durable body, devoid of overtones. Sound emits only what should emit sound, and what should not be held monolithically. Now take a look at where and how any car speaker is installed and what the housing is for it. Most often it is mounted on some kind of metal panel, and in the worst case, even on plastic upholstery. And the body of such a “column” is a door or some kind of body niche. Tough, and that's all. By the way, in the literal sense of the word.
The easiest way to improve the acoustic operating conditions of speakers and get rid of unnecessary resonances and other metallic sounds is to use vibration-damping materials. They are usually made from bitumen or rubber, often with some additives. Their main feature is high internal viscosity. Basically, these are just sheet materials that are cut right on site and carefully rolled onto the metal. But sometimes such materials come in the form of mastics.
Treatment with vibration-damping materials eliminates metallic sounds and improves the operating conditions of installed speakers
Vibration-damping materials are heavier and more rigid, more effective, but they are also harder to work with, so not all craftsmen like them. Thinner and lighter ones are easier to work with, but their effect is not so high. The optimum is usually somewhere in the middle.
Various kinds of lightweight foam and fibrous materials can be considered only optionally; they work somewhat differently and do not have much effect on the absorption of metal vibrations.
How to make spacer rings for speakers
You will need : plywood, drill, jigsaw, sealant, varnish.
The thickness, width and other dimensions of spacers for columns are calculated individually in each case, so there are no universal sizes of spacers. The diagrams presented above can act as a template, which will be modified locally.
The total thickness of the spacer is determined individually. Approximately, for a speaker mounting depth of 52 cm, spacer rings 16 mm thick should be suitable.
Procedure:
- Determine the outer and inner diameter of the rings (using a sample or speaker).
- Cut out the spacer slides with a jigsaw, having previously drilled holes for installing the jigsaw blade.
- Fasten all parts of the spacer (if they are composite) using glue or self-tapping screws.
- Try on the door spacers and modify them if necessary. Make sure that the spacers fit tightly to the surface, nothing interferes with the correct positioning of the speaker, and the door trim is installed without problems (modify locally).
- Coat the rings with several layers of varnish.
When installing spacers, make sure that it and the speaker are secured as tightly as possible (stick vibration isolator strips under the ring), this will eliminate the occurrence of vibrations and rattling. Seal all cracks using caulk. It is recommended to combine the installation of spacers with sound insulation of doors.
Let us remind you that new speakers are not the only popular accessory for Lada Priora.