Dismantling
All the speakers are located in the doors, and therefore, to get to them, you will have to remove the upholstery.
To work, you will need a special plastic spatula (it can be replaced with a knife or a thin screwdriver, and the metal must be covered with a cloth) and a TORX T20 bit. In addition, it would be a good idea to buy at least a few pistons, since the standard ones may break during disassembly. First we disassemble the front door. First of all, you need to remove the triangular plastic trim that covers the mirrors on the interior side. It is held on by latches - you need to snap them off.
Next, using a knife or screwdriver, pry up and remove the door handle trim. Underneath there are screws that need to be unscrewed.
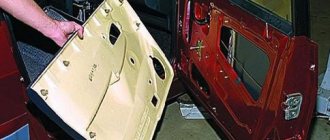
When this is done, all that remains is to remove the upholstery - you need to pull it towards you, gradually snapping off the clips. It is recommended to start working from the bottom and gradually work your way up.
Finally, you just need to disconnect the wiring plug.
In the case of the rear door, everything is a little more complicated, since you have to remove the window handle (in the absence of full power accessories, of course). To do this, you need to insert a plastic spatula under the washer and remove the bracket, after which the handle can be easily removed.
The process of dismantling the handle is clearly demonstrated using the example of the rear door of a Lada Vesta.
Then you need to unscrew the screws securing the casing itself. There are three of them:
- In the door handle;
- Top at the end;
- In the door handle.
Next, you just need to unclip the pistons, similar to the front door, and remove the upholstery by disconnecting the wiring plug.
When all the door cards are removed, it will be possible to get to the speakers of the X-Ray Lada.
Acoustics for the front doors of Lada Granta
Installing speakers in Granta doors allows you to be independent of the body type - speakers in the doors do not require an acoustic shelf. This means that you can install speakers in a sedan and a hatchback according to the same principle.
Preparatory work
Before we begin the installation itself, let's figure out how to prepare the car. For this:
- We disassemble the door : dismantle the handle (pry up and remove the trim, unscrew 2 screws), the tip of the limit switch, two screws from the bottom of the door, overcoming the resistance of the retaining pins, pull the door card toward you and remove it from the door;
- We soundproof the door: in the warm season or in a heated garage, we cover all accessible parts of the door with vibroplast. Vibroplast StP M2 is suitable; when applying it to the door, be sure to heat it with a construction hairdryer and roll it with a pressure roller;
- If you have Spleen thermal insulation material, we cover the inside of the door card with it. This will further hide noise from the door when assembled;
- We are preparing spacers , if any are required for installing 16 cm speakers - more about them later in the text;
- We replace the factory terminals on the speaker wire in the door with normal ones (usually good terminals are included with the speakers) - to do this, we simply cut off the unnecessary connectors and attach the terminals we need to the wiring. A high-quality twist with heat shrink is enough;
- If the door panels do not have holes for speakers , we prepare them. It would be optimal to supply factory acoustic grids, which are installed on luxury versions of Granta and Datsun OnDo.
Rear speakers Kalina
If the requirements for music are not high, then you can get by with a standard shelf. If you are a music lover, you will have to buy or make an acoustic shelf.
Installing rear speakers on a Kalina Station Wagon: the wiring for the rear speakers is taped under the upholstery. There are no special features of the process, everything is simple and clear. Example, Kalina station wagon, rear speakers in standard shelves measuring 13cm: Installing rear speakers on Kalina Hatchback. There is also nothing complicated in the process. Holes are cut in the rear shelf to suit the size of the speakers and secured with self-tapping screws.
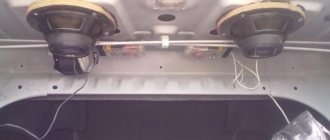
Installing rear speakers on Kalina Sedan. Remove the rear shelf, which is held on by clips. If the speakers are larger than the standard size, for example, 21cm, then we cut out pieces of metal and fix the speakers with self-tapping screws. The shelf is installed using new clips (Author of the photo).
New Lada: Replacing front struts, springs, supports and bearings - Lada Kalina Blog
Now all that remains is to install the radio.
Is the warranty lost if you installed the speakers in Kalina yourself? AvtoVAZ’s answer says that if the wiring is not broken during the installation of audio equipment, then the car is not removed from the warranty.
Speakers for viburnum, which ones to choose?
First, let's determine what size the standard speakers are in Kalina .
- The speakers in the front doors measure 13cm.
- The rear speakers on the Kalina sedan are 18cm, but you can manage to attach 17cm, or 9x6 pancakes.
- Rear speakers for Kalina station wagon 16″, you can attach other sizes, starting from 13cm.
- The rear speakers on the Kalina hatchback are installed in a shelf; the size for the “pancake” speakers is cut out as desired.
When choosing speakers for Kalina, keep in mind that the front speakers should be the main ones, and the rear ones should be secondary. Therefore, it is recommended to install 16cm instead of the standard front 13cm speakers. Learn more about which speakers to choose. Next, installing speakers in Kalina:
Front speakers Kalina
There is audio preparation in the front doors, but on new Kalinas, in the standard configuration, there is no wiring in the front doors.
Set 13cm. Speakers in the front doors of Kalina can be installed in various ways. 1) Quick and easy installation, no need to remove door trim. Just attach the ring from the speaker to the door trim and circle it with a marker. Use a sharp knife to cut a hole in the upholstery. It is worth considering that the standard audio wires are short, so it is best to install the speakers in the viburnum door with the connectors facing down, otherwise the wiring may break when the glass is released. 2) Installation of speakers through spacers. This method, together with noise insulation, gives better sound quality. You will need to remove the door trim and attach the spacer rings from the kit (or make them from plywood) in the car door.
If you choose the second method, then it is recommended to consider 16cm. speakers. Depending on the model of speakers of this size, they can be installed without spacers and no modifications will be required, or you will have to cut the door iron or install spacers.
Speakers for rear doors Kalina 1
A long time ago we purchased a set of speakers Ural AS-C1347.
It was decided to put them in the back doors. Unfortunately, those who have a Kalina know very well that there is a very huge recess in the rear door cards. It was decided to purchase podiums for the rear doors on the Alamar website.
Everything came quickly. But the installation took a while. For almost six months, all this stuff lay there, waiting in the wings. And finally it came. A day off, warm but not hot weather, no hassle at home and we go to the garage and install. I’ll say straight away that you can do everything alone, but at the very end, when you screw the podiums to the door panel, then at that moment it’s virtually impossible to do it alone. Otherwise, everything is quite simple. We remove the Door Card, unscrew the threshold plate of the front and rear doors and remove the plastic of the pillar (where the seat belts are hidden). We lay the wires to the front speakers (we do everything according to Feng Shui, through the corrugations and so that they are not visible
Kalina cars are available in several trim levels. Most of them do not have speakers in the doors, and for many this is very important, because installing additional audio parts can significantly improve the sound quality. In general, it’s not uncommon to replace the speakers that are installed on the rear shelf, because the sound quality they produce leaves much to be desired. In this publication, we will look at how to choose speakers for Lada Kalina and how to install them on the rear shelf and in the doors.
Lada Kalina dismantling the door and changing the speakers | Base-ex
To choose the right audio speakers for your LADA Kalina car, you should focus on the highest quality models, as well as the standard sizes provided by the manufacturer:
The size of the speakers in the front doors is 13 cm.2. The rear speakers in a Lada Kalina in a car should have a size of 18 cm, in a station wagon – 16 cm, but in a hatchback there are no standard speakers, so you can cut holes in the shelf for any speakers.
Another fundamental point when choosing speakers for Lada Kalina is the fact that the main speakers should be front ones, and the speakers installed in the rear parcel shelf should be additional ones. Let us recall that in the previous article we looked at why the window regulator on Kalina does not work and how to repair it yourself.
Installation of front speakers on LADA Kalina
There are two main methods for installing front speakers in the Lada Kalina door apron:
The first method can be called the “fast method”. To implement it, you must perform the following steps: – apply the speakers to the door trim and trace them with a marker; – put the speakers aside and use a sharp knife to cut out the trim along the drawn outline; – install the speakers in the door so that the connectors are at the bottom, since otherwise If the windows are lowered, they can break the wires.
The second method can be called the “quality method”, since after its implementation the result is a more pleasant sound. The essence of the method is to install the speakers under the door trim on special spacers. It is important to note that using the second method, you can afford to install larger speakers, up to 16 centimeters.
READ Ford Focus low beam bulb replacement
How to install speakers in the rear shelf of Kalina
The installation of speakers in the rear parcel shelf of a LADA Kalina car is somewhat different, depending on the body in which the car is made.
Installation of rear speakers in Lada Kalina station wagon. There are no special features for installing audio speakers in this body; everything is simple and intuitive.
Installation of rear audio speakers in Lada Kalina hatchback. In this case, you need to cut holes for the audio speakers and secure them with self-tapping screws, otherwise everything is “standard”.
Installation of rear audio speakers in Lada Kalina sedan. In this case, you should dismantle the rear shelf by removing it from the mounting clips. Next, we cut the metal to the size we need, fasten the speakers with self-tapping screws and mount the shelf in place using new clips.
If your car has recently been purchased and you are wondering whether the warranty will remain after installing the speakers on Kalina yourself? The official website contains the following information: “if the car’s wiring was not damaged during installation of the speakers, then the car will not be removed from warranty,” but from personal experience I advise you to consult an AvtoVAZ service station.
As a result, we get budget sound in the region of 20 thousand. If we consider professional head units, premium-segment speakers, installation of custom podiums and other delights, the price tag can easily jump over a hundred thousand, amounting to a third of the cost of the car itself.
The choice of podium depends on the type of windows, budget and number of speakers.
Selecting a speaker system
Having assessed the audio preparation of the car, you can begin selecting equipment. Depending on personal preferences and financial capabilities, a minimum set is determined - in fact, a radio tape recorder (or, as it is called, a head unit) and a set of speakers. A true car audio connoisseur will select equipment with increased power, as well as taking into account the possibility of installing additional devices: a subwoofer. amplifier Typically such a complete audio system requires the purchase of an auxiliary battery. When choosing acoustics, beginners should consider the following main characteristics of the equipment.
For the head unit - available media formats (CD, MP3) and output sound power. It is worth focusing on the average value of 25 W for a standard four-channel device.
- dimensions of standard sockets and the possibility of changing them;
- power (take into account comparability with GI);
- frequency range during playback;
- sensitivity.
Front speakers
These are 6-inch speakers (16 cm) from the Renault-Nissan Alliance model 4ohm MAX 40w. You can find them by article number 28156-3SG0A. These components are installed on spacers from Logan and Sandero models.
It is noteworthy that AvtoVAZ used rivets rather than simple screws as fastenings. On the one hand, this guarantees the quality of fixation. But on the other hand, dismantling these Lada X-Ray speakers is much more tedious and time-consuming, because you have to drill out the rivets and then rivet them again.
Moreover, after 2-3 operations, the holes are usually so broken that new ones have to be drilled.
Speaker power
Beginners who decide to select a speaker system must remember that purchasing high-power speakers does not mean that the output can be high-quality sound. The main thing is that the power of the speakers matches the power of the radio. The total acoustic sound power should not be less than the declared power of the car radio. It is worth paying attention to the fact that at peak or maximum power the speakers produce very large distortions. A clean signal is obtained at rated power.
Connection
Standard tweeter connection diagrams for Lada XRAY (configurations: basic and luxury):
It is necessary to connect to the 12-pin connector of the radio (see radio pinout):
- left tweeter to pins 2 and 7
- right tweeter to pins 3 and 8
That is, “minus” to “minus”, and “plus” to “plus” through a capacitor.
Also, the tweeters can be connected parallel to the front speakers (just like on the Lada Vesta).
After installing high-frequency speakers, the sound in the Lada XRAY cabin will be more voluminous.
New Lada: Theft statistics - Ugona.net
Let us remind you that we talked about the audio preparation of the Lada XRAY earlier. Will you install tweeters in your car? By the way, do you know how to activate the function of changing the radio volume depending on the speed on a domestic crossover?
About standard speakers (speakers) lada xray
01 December 2022 Lada.Online 59 803
One of the advantages of the Lada XRAY over its competitors and other LADA models is that even in the simplest configuration, the plant equips the crossover with a 2DIN audio system (FM/AM with RDS, CD, USB, AUX, Bluetooth, Hands free) and four speakers. Let's take a closer look at what speakers are installed in the doors of this car.
To get to the standard speakers in the doors, you need to remove the trim.
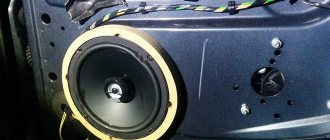
About the front speakers. They have the article number 28156-3SG0A. These are Renault-Nissan 4ohm MAX 40w speakers measuring 6 inches (16 cm). They are installed on special spacers (from Logan/Sandero), instead of screws there are rivets (they are drilled out).
About the high-frequency speakers in the wind window pillars (articles: 281489095R and 281489095R), 15 W:
About the rear speakers. They are smaller than the front ones and measure 5 inches (13 cm).
About the connector for connecting speakers. Like the Lada Vesta sedan, the Lada XRAY uses a non-standard connector, which was inherited from Renault and Nissan models. To avoid cutting off the block when replacing speakers, it is recommended to use an adapter (ZRS-AG-22 or CT55-17).
About spacers for speakers. They are also borrowed from Renault. Diagram of special spacers for installing speakers:
Are you satisfied with the sound of the standard acoustics in the Lada XRAY? Will you be changing speakers over time? By the way, did you know that you can update navigation maps, watch videos or TV on the XRAY radio?
Keywords: front speakers lada xray | rear speakers lada xray | cassette player lada xray
Share on social networks:
Found an error? Select it and press Ctrl Enter..
Reviews and recommendations
People often ask on forums which set of acoustics to take in order to get high-quality and loudest sound. The advice boils down to the fact that higher-quality acoustics need to be installed in the front, and something simpler is suitable for the rear.
It is desirable that the sensitivity of the “front” and “rear” be the same. The sensitivity of car audio is the number of decibels per 2.83 Volts. Typical values: 89 or 92 dB/2.83 V.
It is impossible to squeeze “real bass” out of five inches. But still, you can notice the following pattern: the higher the sensitivity of the speaker, the less ideally it reproduces bass. So, choose: quiet, but high-quality bass, or loud sound, but without low frequencies. This limitation can only be removed by moving to the “6.5-inch” category. True, then you will need an angle grinder, and some owners also use it when installing a radio.
I've been wanting to install another speakers for a long time. I immediately refused the option of installing it in the rear parcel shelf, because... you often have to remove it to transport something, and it would not be very convenient, so there is only one option left, these are the rear doors, especially since many car manufacturers install them there from the factory, including our Lada Kalina 2 and Lada Granta.
Parts from them were taken as a basis, namely: Speaker trim for rear door trim, left 2190-6202095 Speaker trim for rear door trim, right 2190-6202094
Left rear speaker spacer 2190-7901033 Right rear speaker spacer 2190-7901032
Below is a short report on the installation, I hope it will be useful.
It was not easy to find them in our city, and to be even more precise, I didn’t find them))) And I had already forgotten, but then a relative went on a business trip to Samara, from where he brought these parts.
If the installation of the dynamics did not raise any questions, then there were a few questions regarding the installation of the grids, namely, how they would fit into places that were not native to it.
In principle, the installation is the same as on Kalina 2 and Grant; there is a lot of information on the Drive.
I look at the mesh, understand how it is installed, and cut out a template from cardboard
then I placed the template on the door card, chose the optimal location and circled it with a marker
And again the question is, how to cut with improvised means so that everything is neat? I took a screwdriver with a thin drill, and drilled holes along the contour, and then cut them with an ordinary knife, it turned out quite neatly and accurately
Self-installation of speakers in Grant is required when you have a car without acoustics (standard / norm with audio preparation), or you need to replace the factory speakers. Let's look at the step-by-step process.
Installing front speakers – Lada Kalina blog
In most of the configurations that AvtoVAZ now produces, even in the basic configuration there is audio preparation. In a specially designated area of the instrument panel under the radio there are plugs for connecting an audio system, and in the front doors there are wires for connecting speakers. Accordingly, connecting everything yourself will not be difficult. I will try in more detail below.
New Lada: Check engine light on Lada Kalina 8 valves: reasons, how to fix
First you need to cut round holes in the front door trim. To avoid making a mistake with the size, I did the following. We attach the edging of the column that secures it to the casing and use a pen or pencil to trace the outline inside, after which we cut out a hole using a stationery knife according to our marks. The photo below shows the result of this action.
After that, we apply this edging again, and with a pen or marker we mark the places of fastening for the screws. Then we make holes and insert metal clamp plates onto each of them, which serve for more reliable fixation.
So half the work has already been done, I would say that almost everything is ready. Now we take out the wires for the speaker from the door and connect them. The photo below shows how I secured them with a small piece of vibration isolation.
After this, we attach the column to the door so that the fastenings coincide and immediately apply the edging, which will fix the entire structure, and tighten the 4 bolts with a Phillips screwdriver.
The last step in this work will be the installation of the mesh, which is attached very simply. Slightly bending the protruding antennae along the edges, we insert it from above into the slots of the speaker body.
That's the whole procedure for this small repair, if you can call it that. Personally, all this took me about an hour of time, even a little more. The main difficulty was cutting out the holes with a stationery knife. I know that many people attach everything not to the trim, but to the door body itself, but I didn’t bother with it, now everything is fine, there are no vibrations at all.
What is audio preparation
This is equipping the car with wiring, with the help of which in the future the owner of the car will independently install the audio system chosen according to his taste and budget. The car owner installs a radio, speakers, and a subwoofer. An acoustic shelf is mounted as an alternative to standard preparation for speakers.
Such audio preparation is important for those who value high-quality sound and who care about how music sounds in the interior of their car. For those who do not want to waste money on a cheap standard audio system, but want to install high-quality musical equipment.
Preparing the door for installing the column
Audio preparation is carried out by those who prefer everything exclusive and individual. Real car audio requires a special professional approach and attention to detail. Needless to say, such high qualities cannot be achieved at a factory due to conveyor production.
Installing a high-quality audio system yourself does not always lead to excellent sound. This is all due to the fact that the interior of a car is not considered ideal for acoustics. Sound waves from the speakers are distortedly reflected from the windows and other surfaces of the car. And speakers are often installed in the wrong place, since during factory audio preparation, holes are drilled in standard, inconvenient places.
Sound reproduction is also affected by factors such as electrical interference, engine and external noise, and constant vibrations. Fortunately, now all interference can be easily eliminated and the system can be modified, you just need to know how to do it. If your own knowledge is not sufficient to install and modify the audio system, experienced car audio specialists will come to the rescue. The main requirements, after high-quality sound, remain reliability and ease of control of the system.
The ideal sound for a car enthusiast and for a music listener at home has significant differences.
The basis of a car audio system is a player, which must have certain characteristics.
- Supported media format. Ordinary audio cassettes have long since sunk into oblivion, and CDs are already outliving their last years and becoming less and less popular.
- Player output power. It varies from weak (25 watts) to strong, more than 55 watts. Moreover, the price of the system directly depends on the power.
But even the best player will not play music perfectly if it is paired with low-quality speakers. The best sound can be achieved from speakers that are optimally combined with the head unit, that is, the equipment must have the same power.
Plug
As in the case of Vesta, the plug for the Lada X-Ray speakers was taken from the Renault/Nissan Alliance. It is non-standard, and therefore there are only 2 options when installing new speakers:
- Cut it off;
- Install an adapter - it can be found under article number CT55-17 or ZRS-AG-22.
As for the spacers, they were also taken from the Renault/Nissan Alliance models.
As you can see, the design of the domestic crossover uses conventional speakers, supplemented with specific plugs and spacers, and there is also a unique mounting method.
