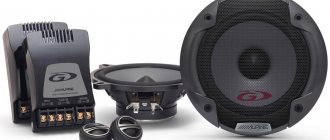
High-quality sound in a car is ensured by installing and connecting several speakers to the media system. The larger the tweeter, the louder the sound will be.
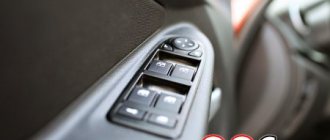
And the more speakers, the more voluminous the sound from the radio in the cabin. This is why many owners decide to install podiums on the front doors of the Priora to increase the playback volume. The speakers can be placed either at the top or at the bottom of the door.
New podiums on the Priora in the front doors: differences and features of the products
Before choosing a podium for Priora tweeters, the buyer needs to determine their appropriate size. This applies not only to the purchased speakers, but also to the free space left for a comfortable stay in the cabin. It is unacceptable to install an element that is too bulky, since it will not allow either the driver or the passenger to sit properly in the cabin.
In addition, the podiums should be conveniently attached to the side pads. The newly acquired elements must lie exactly on the surface of the door, without blocking the pocket. And special podiums for Priora, installed in the upper part of the sidewall near the pillar, will allow you to add new notes to the sound. And also achieve surround sound transmission.
The external design of the podiums also plays an important role. For example, in a car with a classic black and gray finish, you can buy podiums on a Priora in regular black or dark gray. But silver linings will look no less attractive, giving the interior a more modern look.
A car with a brown or beige finish should be complemented with podiums in a coffee or pleasant brown shade.
Small additions should not only be of high quality and convenient. The elements must look stylish in the car where they are installed. That is why only stylish podiums on Priora with tweeters can complement the interior and create really good sound from the media system. And during operation they will not cause any discomfort or noise.
Connection features
A tweeter is an element of a stereo system whose task is to reproduce sound with a frequency from 3000 to 20,000 hertz. The radio tape recorder produces a full spectrum of frequencies, ranging from five hertz to 25,000 hertz.
The tweeter can only reproduce high-quality car audio with a frequency of at least two thousand hertz. If a lower-frequency signal is applied to it, it will not be reproduced, and if the power for which the mid- and low-frequency speakers are designed is high enough, the tweeter may fail. At the same time, there can be no question of any quality of playback. For long-lasting and reliable operation of the tweeter, you should get rid of the low-frequency components that are present in the general spectrum. That is, make sure that only the recommended range of operating frequencies falls on it.
The first and simplest way to cut off the low-frequency component is to install a capacitor in series. It passes well the high-frequency frequency band, starting from two thousand hertz and more. And does not pass frequencies below 2000 Hz. In fact, this is a simple filter, the capabilities of which are limited.
As a rule, the capacitor is already present in the speaker system, so there is no need for additional purchase. You should think about buying it if the owner decided to acquire a used radio and did not find a capacitor in the tweeter kit. It may look like this:
- A special box to which a signal is sent and then transmitted directly to the tweeters.
- The capacitor is mounted on the wire.
- The capacitor is built directly into the tweeter itself.
What are tweeters and why are they needed?
To achieve the best effect, tweeter acoustics are installed together with a subwoofer, i.e. amplifier that reproduces low frequencies. It is not advisable to use such speakers separately from others. They are part of the acoustics system. Thus, horns are needed not as the main source of sound, but as auxiliary elements necessary to improve the quality of reproduction.
Modern podiums
Acoustic podiums yourself
Sound organization is a set of measures that includes not only sound insulation or installation of a subwoofer, but also installation in the front doors of the podiums. You don’t have to buy them, although you can find almost any option in stores today. You can make podiums with your own hands if you know the basic nuances of the operation presented in our instructions below. Modern acoustic podiums are not too different from those that came before. Although, this is at first glance, but if you take a closer look, you will see the following:
- Modern podiums are made of high-quality material, which significantly increases their service life. If earlier they were made of plastic, which soon became covered with cracks and delaminated, today podiums are made of more durable material;
Modern acoustic podium
- Acoustically, modern podiums have an excellent and comfortable matte surface that does not leave dirty marks. High-quality plastic or plywood, from which modern podiums are made, is quite difficult to accidentally damage;
- The current podiums are made in such a way that they provide the opportunity to conveniently lay hidden electrical wiring to the speakers;
- Modern podiums are distinguished by a slightly modified configuration, which allows the installation of not one, but several speakers that reproduce different frequencies.
Acoustic podiums for yourself
How to connect correctly
First, prepare the place where the horns will be installed. If necessary, a podium for tweeters is fixed. It is necessary to prepare cables and adapters. When installing horns, the connection is made using interconnect wires, and then cables for power supply are required.
Connection to the radio can be done in many ways. It is easier to connect horns through a capacitor. It ensures that only sounds of a given frequency are transmitted through it. The installation method in this case does not differ from connecting standard speakers. The plus is connected to the capacitor and to the positive contact, and the minus is connected to the negative.
Tweeters can be connected through an amplifier. This device is equipped with a number of connectors. Connecting horns to it is done in the same way as standard speakers. Each amplifier has its own connection features to the radio, which the manufacturer indicates in the technical documentation.
Alternatively, you can connect it directly to the main speaker or to the radio, but this method is considered less effective. It is convenient to use crossovers for tweeters during installation. This device is equipped with a number of clamps. It acts as a connecting link between the radio power source and the horns. In some cases, it is not possible to do without crossovers.
DIY acoustic podium VAZ 2107
Installation of 16 Speakers in the Front Doors of Prioras
Contents of the article: 1. Installation of front speakers 16 cm in diameter 2. Installation of 16 speakers in Priora without cutting
Installation of front speakers 16 cm in diameter
Finally I got a radio. Cheap radio cassette player SoundMAX SM-CCR3037.
I bought Mystery speakers.
As a friend recommended, I took 16, their sound should be better. But the question is how to install it in the door, because the size is standard for 13 speakers.
Now I decided to install it without the help of others.
Below is a photo report of the process of installing the front speakers.
To remove the trim you will need: a screwdriver and an asterisk wrench. Thanks to AvtoVAZ I will have to take a set of asterisk keys. There are probably many more such pitfalls.
Looking ahead, the plastic, as well as the clips on the Priora doors, are good, a comparison with the former two-piece.
There is a standard place for speakers for 13. There is audio preparation - it’s true that two wires for the speakers are brought out.
This piece of paper was already included with the speakers, all I had to do was draw a circle in a comfortable place.
For the future, you shouldn’t move the hole as in this picture. The last clip on the trim will touch the speaker. I made a hole on the second door without moving it higher to the side. It was awkward to strengthen, but the sheathing sat perfectly.
For good fastening of the speaker to the door
, took 9mm as a substrate. plywood
So as not to touch the fastening of the clip on the casing, I ground down the edge of the speaker.
Speaker on spacer
Speaker on plywood spacer
There was no suitable material for sound insulation, but there was one at hand - foil insulation.
It’s not a masterful thing to say, I agree. But isolon is better than nothing at all.
Everything is ready, you can put on the trim.
Installation of 16 columns in Priora without cutting
The process itself is not easy, I chose the music painstakingly, but not cheaply, I think this option will suit many.
Diary Lada Priora 2. Entry 44. 16 cm speakers in the front doors.
Subscribe to the channel Dismantling BC https://www.youtube.com/
Installation of 16 cm speakers in the front doors of a Lada Priora without podiums
process 16
.5 cm columns in
front doors
VAZ
priors
station wagon (car/hatchback). Possible difficulties...
For the base there was a Pioneer head, which I got from my father when I was still driving a 99. A nice thing with AUX and Bluetooth. I don’t remember the name, and it’s not so important, because at the moment most of the radios play “at the level”, that’s enough for me.
The most important incident for me was the purchase of speakers
, walked a lot, listened, chose. I braked on an Alpine SXE-1750s in front and an SXE-69c2 in the rear. Excellent mids, not crunchy lows + tweeters included (albeit without crossovers, but not a failure, they pull). I read an unlimited number of blogs about installing 16″ speakers in front doors. The vast majority of them in the text seemed to hint that the doors would have to be cut and spacers made. I decided to buy spacers at the car market so as not to suffer and make a mistake. Not a failure, I thought, and armed with patience, equipment and a jigsaw, I went to the dacha.
In analysis, under the noise already, the bottom layer
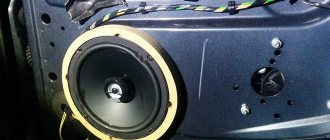
Having disassembled the car ( doors
, thresholds, back seat), began to make noise on the doors. For one door, a sheet of foil isolon was enough (forgive me if I called this material something wrong, the dealer sold it to me under that name). Then, having tried on the column itself in the standard 13″ position, I was pleasantly surprised that the core is almost completely hidden in the door and, together with the spacer, reassures us that there are no hard metalwork sculptures with Zhiguli metal.
Shelf, nothing exciting, cut with a jigsaw without any problems, glued together perfectly
Having thought about it with my dad, we decided to transform the little guy’s spacer, and specifically, we sawed it down to fit the curve of the door and “oh, magic.”, the column fit “like a glove,” the only thing was that we had to make a small cut on the plastic of the door from the inside, because touched slightly and could create unpleasant rustling noises when moving.
Plastic, the main thing is not to overdo it and not touch the skin
There was no tool, the plastic was scratched a little, not terrible
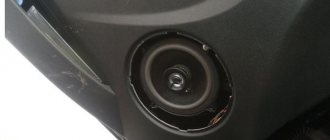
Almost into the original mounting holes
The place for tweeters was chosen only based on aesthetics, because... They don’t give any special highs, and I didn’t want to turn them up on the racks.
The door ends up
The rear speakers installed without any problems after a little customization (I just like that word) of the shelf. To support low frequencies, the usual Korean active subwoofer Fusion FBS-AW12 was chosen. There were also no hassles with its installation, I’ll just say that it’s more convenient to throw the power cable not to the battery, but to the fuse block, and this option looks more successful and many times more convenient, and after some manipulations with the block itself, it generally looks like a standard one the wire.
Just drilled 2 holes and that's it
Installation of 16 speakers in a door without podiums
On the 10, these speakers stood on podiums on top of the casing, which made it possible not to cut the casing or cut out the metal of the door.
But on the Prior, under all the podiums you have to cut the trim and the podiums that I saw take up a lot of usable space, and some do not allow the glove compartment to open completely.
I decided not to cut the trim, but to cut the doors into the metal (it’s more reliable, and it sounds better at 16 than at 13)
I traced the outline of the new hole using a template.
Cut it out with a jigsaw and a metal file
I attached the speaker, marked it and drilled the mounting holes.
Since the landing plane is not level, I glued it in 2 layers in the depressions, and later glued it on top. The plane is now level
The landing plane is level
The bezel is a centimeter from the speaker. Just in case, you need to cut it off.
Final map view
It’s difficult to compare the sound (since I didn’t glue the door in 10), but it sounds decent.
https://www.drive2.ru/l/288230376152566849/, https://www.drive2.ru/l/4035257/, https://www.drive2.ru/l/211248/
Reinforced spacers for front acoustics in Lada Priora
The story will be about the front doors. From time to time and from the constant sound of listening to music, they began to publish
Installation rules
When installing additional or new speakers, you must follow a number of rules that will help improve sound quality and eliminate the possibility of short circuits:
- It is necessary to select the correct wires. The sound quality depends on the cables. It is recommended to install copper wires, which are excellent conductors and provide high signal quality.
- If necessary, it is recommended to carry out additional sound insulation of vehicle components. This will ensure better sound not only from the horns, but also from any installed speakers.
- It is recommended to lay the wires parallel to the standard speakers. This allows for easy access to them and maximum protection of the wiring from short circuits.
- It is recommended to connect the horns through an amplifier. This will allow the speakers to deliver the required frequencies, improving sound quality.
- Contact of wires with the car body is not allowed.
- When laying the cable, it is necessary to use insulating materials (corrugation) and insulate the connection points of the wires.
By following the rules described above, you can achieve the highest sound quality and protect the wiring from short circuits.
Bottom line: you can install horns in your car yourself. But if you have doubts about your own abilities or do not have the special knowledge required for installation, it is recommended to contact specialized auto repair shops so that the car owner is completely confident that the installation is correct and the sound meets all expectations.
I would like to share my experience of installing audio equipment in a Priora station wagon (VAZ-21713) of the luxury configuration (03-018).
This package comes without a built-in radio and acoustics, but with audio preparation (with wires laid to the speakers). Most radio tape recorders sold in stores can be connected to standard ISO connectors. A box plug is installed in place of the radio.
I want to say right away that initially I wanted to purchase a head unit (radio tape recorder) without disks, but with mandatory support for USB and SD media. The age of CD/DVD has already passed, and I didn’t want to overpay for additional stuffing that wouldn’t really work. Searches on the Internet showed that most manufacturers persistently continue to produce disk devices, albeit with support for cards and USB. Among diskless ones, the offerings of mainly Chinese manufacturers dominate and there are very few of them. After comparing several devices, I chose the budget Hyundai H-CCR8086. The standard mounting positions are designed for 13 cm speakers. There was no time to modify the installation locations for a larger diameter, and there were no big musical requests either - the choice fell on Pioneer TS-1339R three-cavity coaxial speakers, which were purchased in the amount of 2 pairs. The package was completed with the purchase of the Hyundai H-CA3200 internal antenna and spare pistons for the door trim.
I prepared the tools in advance: a flat screwdriver wrapped in electrical tape for removing the trim, a PH2 Phillips screwdriver, a TORX T15 head, a knife, duckbills and side cutters.
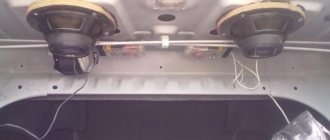
First I decided to install the speakers - the rear ones, then the front ones. The places for the rear speakers are covered with decorative mesh covers.
Under the plug there were wires for connecting the speaker.
To maintain connection polarity, the connectors are made of different widths and correspond to the size of the contacts on the column. The speaker comes with special mounting hardware.
I put the metal eyes on the shelf in accordance with the location of the mounting holes and attach them immediately with self-tapping screws so that when installing the speaker in its seat, they do not stick to the magnet. The wires need to be connected to the speaker.
I insert the column into its seat, bending the screws to the sides, then screw it on.
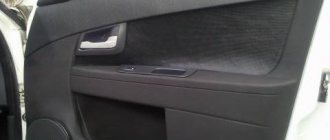
You can put on the decorative cover after checking the functionality of the entire system. Work on installing the column on the opposite side is carried out in a similar way. I'm starting to dismantle the door trim.
Using a Phillips screwdriver, I unscrew the self-tapping screw in the niche of the door opening handle.
I take out the rubber mat in the niche of the closing handle.
I unscrew two screws with a torx head.
The power window control panel is removed after releasing the latches. Then I disconnect the connector with the wires.
I unscrew the cap of the locking pin. I push the pin down. It is also better to remove the decorative plastic rim - this is easy to do by prying it with a screwdriver through the internal hole.
The “luxury” package is equipped with lampshades at the bottom of the door, which also need to be removed by unlatching the latch on the side of the door hinges and folding the lampshade down.
I disconnect the power connector for the lamp.
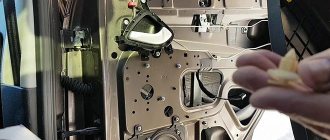
I move on to the most interesting part - removing the casing. After the operations performed, it is held on by plastic clips. You need to apply some force to snap them off. At this point, a flat-head screwdriver wrapped in electrical tape will come in handy so as not to scratch the paintwork. It's better to start from the bottom corners, then move up. At the end, I move the door opening handle and slightly push the trim up to overcome the locking pin. In the above photo you can see the locations of the pistons - this is where you need to apply force with a screwdriver in order to remove the casing without damage.
I found wires for connecting the speaker in the area of the installation location.
Fitting the column into its seat showed that the hole in the door is slightly smaller than the diameter of the column. I didn’t have any bushings of the appropriate size to secure the speaker at a short distance (about 3-5 mm) from the door. Well, I'll mount the column as best I can. Gradual alternate tightening of the screws made it possible to fix the column quite evenly and firmly in the installation location. The mounting ears of the column are slightly deformed - a consequence of the decision made.
I put the trim back in place. I almost forgot to pass the power supply wire for the lampshade into its hole. I tap the locations of the pistons with my fist. I am installing the power window control panel and dome light. I screw all the screws into place. Similar actions are carried out with the passenger door.
The speakers are installed - it's time to move on to the radio. I take out the decorative dummy box. It is held in place by four latches - you can release them with a flat-head screwdriver or simply pull the box towards you with force.
Factory ISO standard connectors are plugged into the box at the back. I pull them out, the box to the side.
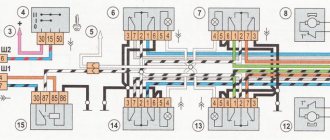
If you connect the head unit (radio tape recorder) right now, everything should work. I restrain myself from such an impulse - I deal with the gray connector. There are power wires there. Power is supplied to the radio continuously, even when the ignition is turned off. This doesn’t suit me - I don’t want the radio to drain the battery while parked. In the passport for the radio, I find out that it has two power wires - power from the battery (always on) and power after turning on the ignition. After the second one is supplied, the radio can be turned on and begins to consume standby current. In a standard connector, both contacts are connected together - the radio will always consume current, albeit small, on the order of several tens of milliamps, but still unpleasant. In addition, the contact for supplying power to external devices is not used - an active antenna in our case. The power connector needs modification.
Constant power should be in the 4th pin, interrupted power should be in the 7th pin.
I pull the wire from there and connect it to pin 7. I check the circuits and carefully insulate the connections.
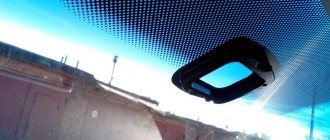
It's time to install the antenna. I remove the right pillar trim - it is attached to the latching caps.
There is enough space between the dashboard and the pillar to pass the wire going to the antenna.
I extend the antenna cable under the glove compartment into the radio compartment. I connect the antenna power to pin 5 of the power connector.
I assemble the antenna - everything is ready for testing.
I connect the radio and make sure that everything works.
I attach the antenna according to the instructions. It is important to maintain the distance from the rack required for installing the sheathing. I attach the grounding wire under the self-tapping screw of the sun visor, passing it under the headliner.
The antenna is installed. The rack trim is in place.
All that remains is to install the mounting casing in the radio compartment.
I insert the casing and bend the fastening tabs. I connect all the connectors to the radio.
I insert the radio into the casing and push it until it clicks. Work is done.
A short review about the Hyundai H-CCR8086 radio and Pioneer TS-1339R speakers.
Below is a picture of the pinouts of these connectors.
Unfortunately, the sub output is not implemented, nor is its control implemented.
But this is not a global problem, since the existing outputs can be used for these purposes.
It should be noted that the first version of the head unit of the Priora car was much more modest in functionality, characteristics and design. Photo below:
For those who are looking for connector specifications, the following photo:
to the article: Is it possible to connect an amplifier to the standard Priora radio?
Yes you can, I installed a buffer and amplifier on mine
I tried to connect AUX in different ways, but it didn’t work. Maybe someone was able to connect, write? And one more question, if you managed to connect, how can I switch the radio to playback with AUX?
But what about the radio of the first version, which does not have a memory card? Is it possible to implement such an input? (Inserting connectors or soldering in certain places) On some forums they write that the third connector is not soldered to the board, so it will not be possible to connect.
Pavel P 03.08.2012 15:24 I quote DEN: What about the radio of the first version, where there is no memory card? Is it possible to implement such an input? (Inserting connectors or soldering in certain places) On some forums they write that the third connector is not soldered to the board, so it will not be possible to connect.
Can you tell me where to insert the REM wire into the radio?
Only some manufacturer made this output with a smooth increase in voltage from 0 to 12 volts, when you turn on the amplifier, this causes an incomprehensible noise in the acoustics, how to get rid of it?
I connected it as you wrote, everything works great. Thank you. And the electricians at the official dealer said that without a splitter it wouldn’t work, and they asked for 3000 rubles. for connection
Guys, tell me how to get rid of the growing parasitic whistle in the speakers after connecting to an amplifier
Please tell me. What does it mean to connect wire braids to ground? How to do it? All four linemen?
Thanks for the advice ! And what will the schematic look like? As far as I understand, connecting a 4-channel amplifier will not work!
Thank you very much for your answer !
Hi people. Connecting an amp with a subwoofer to a standard Priora head is much easier than you think. you don’t need to buy any plugs and have to worry about getting your head out, I made it much simpler, I bought a linear output converter (issue price is 360 rubles) it has 4 connectors for wires from the rear speakers! Personally, I just made an insert into these wires and brought them out to the converter! All linear lines ready!! together with the power cables, everything cost me 1000 rubles. It works very well. If anyone is interested, I bought the converter at the auto audio center on Bolshakova Ekaterinburg!! Good luck to everyone)))
Comment submission panel Cancel comment
Log in using your social media account Login to leave a comment.
Lada Priora comes off the assembly line in various configurations, but even the “norm” version is offered with primary audio preparation, which involves running wiring for the radio and speakers in the front doors and on the rear parcel shelf. When purchasing such a variation, the question of installing acoustics immediately arises, and even in the luxury version, not everyone is happy with the original acoustics supplied with the car. Let's analyze in detail the choice of acoustics and, as a result, figure out how to install podiums on the Priora.
How to install podiums with your own hands in Priora?
You can carry out installation without disturbing the overall appearance of the interior of the cabin using simple instructions. It is necessary to prepare screws in advance and remove the door trim. Buy a speaker and the cover itself. Next, the performer will only have to take the Priora podium and perform the installation according to the following scheme:
1. Mark the speaker installation location on the trim.
2. Cut a hole in the casing for the speaker, glue the mount with tape and pull the wires through it.
3. Return the trim to the door.
4. Screw the speaker mount to the door itself, and then screw the podium to the door.
5. Connect the tweeter.
Any motorist can install podiums on the Priora with his own hands. At the same time, do not forget about tightly screwing all elements. If any component of the structure is not secured correctly, rattling noise will follow when driving.
The resulting sound will not be loud or full enough. And the performer will subsequently have to redo the work again.
High-quality acoustic podiums on the Priora look like an indispensable element of the interior. At the same time, it blends perfectly with the side door and is a kind of continuation of it. And due to proper installation, it will not interfere with the driver or front passenger. In addition, it will allow you to “ennoble” the car and make it more respectable.
Considering the low cost of the products, making podiums for the front doors of the Priora with your own hands simply does not make sense. The time spent will not correspond to the money saved. But not everyone can make a really beautiful and even element. Therefore, the optimal solution would be to purchase factory podiums for certain speakers and with a certain design style.
How to connect correctly
First, prepare the place where the horns will be installed. If necessary, a podium for tweeters is fixed. It is necessary to prepare cables and adapters. When installing horns, the connection is made using interconnect wires, and then cables for power supply are required.
Tweeters can be connected through an amplifier. This device is equipped with a number of connectors. Connecting horns to it is done in the same way as standard speakers. Each amplifier has its own connection features to the radio, which the manufacturer indicates in the technical documentation.
Alternatively, you can connect it directly to the main speaker or to the radio, but this method is considered less effective. It is convenient to use crossovers for tweeters during installation. This device is equipped with a number of clamps. It acts as a connecting link between the radio power source and the horns. In some cases, it is not possible to do without crossovers.
A high-quality sound reproduction system that allows you to create the effect of presence - horn acoustics. Such systems are installed both as home acoustics and in cars, allowing you to create the atmosphere of a large concert hall in a limited space and convey the emotions of the performer to the listeners. How to properly connect a speaker to a car?
Horn acoustics
Product delivery options
Note! Below are the shipping methods available specifically for this product. Payment options may vary depending on the shipping method. Detailed information can be found on the “Delivery and Payment” page.
Parcel by Russian Post
Available payment methods:
- Cash on delivery (payment upon receipt)
- Using cards Sberbank, VTB, Post Bank, Tinkoff
- Yandex money
- QIWI
- ROBOKASSA
Shipping throughout Russia. Delivery time is from 5 to 12 days.
Parcel by Russian Post 1st class
Available payment methods:
- Cash on delivery (payment upon receipt)
- Using cards Sberbank, VTB, Post Bank, Tinkoff
- Yandex money
- QIWI
- ROBOKASSA
Shipping throughout Russia. Delivery time – from 2 to 5 days. More expensive than regular delivery by Russian Post, approximately 50%. Parcel weight up to 2.5 kg
Express Parcel EMS
Available payment methods:
- Cash on delivery (payment upon receipt)
- Using cards Sberbank, VTB, Post Bank, Tinkoff
- Yandex money
- QIWI
- ROBOKASSA
Shipping throughout Russia. Delivery time – from 3 to 7 days. More expensive than regular delivery by Russian Post, approximately 100%.
Transport companies
Available payment methods:
- Using cards Sberbank, VTB, Post Bank, Tinkoff
- Yandex money
- QIWI
- ROBOKASSA
Delivery is possible to any locality where there is a representative office of the transport company. Delivery time – from 2 to 10 days. Sending large parcels is approximately 50% more profitable than by Russian Post.
Courier delivery in Togliatti
Available payment methods:
- Cash upon receipt
- Using cards Sberbank, VTB, Post Bank, Tinkoff
- Yandex money
- QIWI
- ROBOKASSA
Delivery time from 1 to 12 hours.
Pickup from our warehouse
Available payment methods:
- Cash upon receipt
- Credit, installments
- Using cards Sberbank, VTB, Post Bank, Tinkoff
- Yandex money
- QIWI
- ROBOKASSA
Pickup times must coincide with store opening hours.
Expensive cars with good audio systems have many different speakers. The number of such sound sources can be up to 30 pieces. Due to this quantity, surround sound is achieved. Of course, sound insulation of the car interior also matters.
By installing good acoustics on a Lada car, achieving good sound insulation of the interior will, of course, be problematic, but adding speakers to your Lada Priora is quite possible.
The only problem that you may encounter if you decide to add more speakers to the interior of the Lada Priora is the availability of places to place them. Let's try to figure out where to place the acoustic speakers in the Lada Priora. Standard places immediately come to mind - two columns in the rear parcel shelf, four columns in the door panels. Of course, more speakers can be placed in these places, but this will already truncate the space. But you can also use places that are not used at all.
Which ones are better to choose?
There are a number of parameters that you should pay attention to when choosing a device. These include:
- availability of necessary exits;
- power;
- nature of the coating.
The sound quality depends on the type of material from which the horn is made. Silk horn tweeters are considered the best. Many brands use silk because... It is soft, so the sound is not fully transmitted. In addition, this material has a high degree of viscosity, which creates pronounced internal friction.
Moreover, in most models of such speakers, silk is treated with special substances that not only improve sound quality, but also increase the moisture and dust resistance of the device. Some companies produce good horns made from artificial materials that sound no worse than instruments made from natural silk.
It is advisable that the speaker be equipped with rear and front channels.
There must be a connector for connecting a subwoofer. The power of the device must be at least 50W. This will be enough to ensure volume. It is better to purchase devices with high sensitivity.
Purpose
In most cases, horn acoustics are designed to reproduce mid and high frequencies, allowing you to improve existing acoustics. The best effect is achieved when used with a subwoofer (amplifier) that reproduces low frequencies.
By adding and changing audio system components, you can achieve the desired sound in your car, and horns are excellent equipment to improve the quality of music in your car.
Horn
One popular place to connect horns is at the front of the car. The horns are installed frontally on the housing wall. A waveguide is formed inside with a hole facing outwards.
To properly connect the horn to the radio, you need to use a capacitor. It is also recommended to carry out sound adjustments to properly distribute the sound and achieve maximum immersion.
Capacitor
News RusAutoNet » Installation of 16th speakers on Priora
The speakers that the manufacturer installs on the Priora have a rather modest (No. 13) size. It is unlikely that such speakers will be to the taste of a true music lover. The motorist who purchased this car will soon change the factory speakers. In place of those, he will buy speakers with size No. 16.
But buying is one thing, but installing is a completely different matter! We should not forget the fact that the Priora doors are made for only size 13 speakers, and you will need to modernize them. A lot of drivers do this: they additionally purchase podiums, on which they build new speakers. The inconvenience is that these stands “podiums” become sources of various knocks and noises. And there are quite a few of them in domestic cars. There is no need to add unnecessary extraneous sounds to your cabin. The owner of Priora decides to make more typical places. And we will watch how he achieves what he wants.
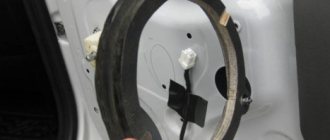
First he removes the upholstery. It's quite simple. Every car enthusiast can cope with this task, and we will not pay special attention to this. So, we removed the upholstery and gained access to the speaker holes. We need to increase their size. What's the best way to do this? To do this, it is recommended to use an electric jigsaw. And if you don’t have this tool, you can use a regular drill. Using a compass or ruler, you need to mark the points with which we will determine the size of diameter No. 16. Then we drill small holes along the contour. Next, after the small drill, we use a larger one. It is necessary to ensure that the edge of the hole is smooth and that there are no sharp edges on it. For this we need a file.
Next according to plan we have another stage. For this we need excellent contact between the speakers and the surface of the doors. To ensure that the speakers are in perfect contact with the doors, you can make special inserts from plywood or wood. If you don’t want to make them yourself, you can go to a special store and buy ready-made ones. You can also easily purchase various car accessories at wholesale prices there. To attach them, use self-tapping screws or adhesive sealant. Do the job efficiently, otherwise the speakers will soon begin to rattle.
The final touch of our work with you is the installation of speakers with a diameter of 16 centimeters on the Priora doors. First, we attach (glue) some elastic material, for example, SPLEN, to the surface of the spacer. As for attaching the speaker, we do it using self-tapping screws.
Finally, we have reached the final stage of improving the Priora. It is imperative to make a good plastic trim on the car door. In order for the sound in the car to be high-quality and clean, you should remove a piece of the plastic door pocket. To do this, use a utility knife. You can also make a round opening to attach the speaker grid into it. We won’t talk about connecting these speakers because this is a topic of a different order. But there is absolutely nothing complicated about it.
Without using an additional podium, which would spoil the car's interior appearance and become a source of various extraneous noises, we increased the standard speaker openings.
Reinforced "Hedgehog" pistons for interior door trims of VAZ 2108-21099, 2110-2112, 2113-2115
with 19% discount
Stands for tweeters (aimed at the glass) for VAZ 2110, 2111, 2112
with 9% discount
Side rubber floor mats for Lada Priora, VAZ 2110, 2111, 2112
with 12% discount
Door handle mats for Lada Priora
with 19% discount
Adapter frame for installing a 1din radio on Lada Priora 2
with 10% discount
Acoustic podiums allow you to install larger speakers than in standard locations. Also, when installing speakers in podiums, the sound quality significantly improves, since the speakers are fixed tightly and do not resonate with the metal of the door, and the wood softens sound vibrations, which allows for the correct implementation of mid and high frequencies. The shape of the podiums is designed in such a way that the original pocket remains.
Acoustic podiums allow you to install larger speakers than in standard locations. Made of plywood with foam filler and covered with leatherette. Applicability: Lada Priora.
Acoustic podiums allow you to install larger speakers than in standard locations. Also, when installing speakers in podiums, the sound quality significantly improves, since the speakers are fixed tightly and do not resonate with the metal of the door, and the wood softens sound vibrations, which allows for the correct implementation of mid and high frequencies. Plus, the podiums have quite spacious pockets that will allow you to keep the necessary things at hand.
Pay for goods by credit card, using QIWI, Yandex.Money or WebMoney and save on your purchase from 4%, avoiding postal and bank commissions
( 1 rating, average 4 out of 5 )
Where can I buy?
If you live in a large city and are not very well versed in such issues, the easiest way is to go to a large car acoustics store and choose tweeters for Vesta there. It would also be a good idea to consult with the seller, who can recommend the best option.
However, many either do not have the opportunity to go to a large store, or initially know what they need. In this case, the smartest thing to do would be to order the product online. Some people use Aliexpress because they can find acoustics cheaper there, but not everyone is satisfied with long delivery times, and therefore sometimes it is much easier to pay a little more and buy everything in a Russian online store.
Choosing an audio system
First you need to determine the dimensions of the speakers that will be installed in the standard holes prepared for them when assembling the car. All speaker systems that are offered to customers have several standard sizes. Speakers installed in cars by manufacturing companies sometimes have overall dimensions that occupy a middle position between the proposed standards. But it's not scary. In order to switch to selected speakers with a certain standard of overall dimensions, it is necessary to prepare podiums for them, replacing the former standard plastic ones with those chosen by the car owner.
Installation
How to install and connect a horn without an amplifier directly to the radio? The first step is to make or purchase a podium for the speakers.
Speaker podiums
In most cases, the podium is supplied with the column, but in some cases you need to make it yourself. This does not require special knowledge, and it is enough to simply measure the dimensions of the speaker and cut a podium to fit these dimensions. When you lack knowledge or tools, it is recommended to contact a specialist.
Horns are installed in two ways:
- Diagonally - the right speaker is directed to the left seat, and the left, respectively, to the right.
- Direct – the speakers are sent directly to the listener.
The options are equivalent to each other and when choosing, you need to rely only on the layout of the car’s interior and audio system. It is recommended to try two variations, and only after that make a final choice.
The installation location depends on the location of the audio system, and in most cases, it is selected individually for each speaker.