Correct and precise operation of the clutch on VAZ 2105, 2107 vehicles is ensured by certain adjustments to its drive. There are two of them: adjusting the gap between the pusher and the piston of the clutch master cylinder and adjusting the free play of the clutch pedal.
The gap between the pusher and the clutch master cylinder piston is 0.1 - 0.5 mm. It is regulated by rotating the clutch pedal free travel limiter. In this case, a certain free play of 0.4 - 2.0 mm is formed at the clutch pedal, which the driver selects when starting to press the pedal.
the gap between the pusher and the piston, free play of the clutch pedal of VAZ 2105, 2107 cars
It is measured with a ruler or tape measure, which is installed from the floor to the middle of the lower part of the pedal platform. We move the platform with our hand relative to the ruler scale by pressing the pedal. If there is a gap, at first the pedal moves very easily, and then with difficulty. If there is no gap, turn the pedal travel limiter out a little. We ensure that the free movement along the ruler fits within the required two millimeters.
This gap is necessary for the clutch to disengage completely. If it is missing, then the piston will not be able to fully return to the rear position when the pedal is released and in the working cavity of the master cylinder, and excess pressure will remain in the entire drive. As a result, the clutch will not disengage completely, since the release bearing will press on the leafs of the pressure spring, and the discs will slip (not be fully pressed against the flywheel). Increasing this gap will lead to the fact that the clutch will not disengage completely and will “drive” (the discs do not fully move away from the flywheel).
Adjusting the clutch pedal free play (the gap between the release bearing and the plane of the pressure flange of the clutch “basket” pressure spring)
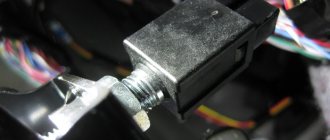
It is adjusted by a nut on the clutch slave cylinder pusher. With proper adjustment, the free play of the clutch release fork is 4–5 mm (checked by hand: the fork is pulled away from the stop against the adjusting nut on the pusher), and the free play of the clutch pedal is 25–35 mm. It is necessary to unscrew the lock nut on the pusher and rotate the adjusting nut to set the required free play of the fork. The pedal free play of 25 - 35 mm (until the clutch is disengaged) can be checked using a ruler. It is this value that means there is a gap between the release bearing and the plane of the pressure flange of the clutch “basket” pressure spring.
free movement of the clutch slave cylinder pusher for VAZ 2105, 2107 cars
In the absence of this gap, the release bearing presses on the pressure spring of the “basket” - the clutch “slips”. With an increased gap, it “leads.”
The clutch pedal free play of 0.4 – 2.0 mm is included in the pedal free play of 25 – 35 mm. That is, 25 - 35 mm is the total required size.
Notes and additions
— The clutch on VAZ 2105, 2107 cars is of a constantly closed type, that is, constantly on: when the pedal is released, the driven disk is pressed by the drive disk to the flywheel and rotates with it, as well as the release bearing and the input shaft of the gearbox. There is a gap of 1.5 - 2.0 mm between the release bearing and the lining of the thrust flange of the clutch basket pressure leaf spring. This gap is selected when the driver begins to press the pedal.
— The full travel of the clutch pedal on VAZ 2105, 2107 cars is 140 mm.
— After adjusting the clutch drive, check for smooth gear shifting. Particular attention to reverse gear. The smoothness of its activation is an indicator of successful adjustment.
More articles on VAZ 2105, 2107 cars
The main purpose of the clutch mechanism is to combine the crankshaft with the gearbox and transmit torque from the engine to the wheels of the car. This device is used on the car when switching to a lower or higher gear, as well as when turning on neutral. In order for gear shifting to be carried out easily and smoothly, you will need to properly adjust the VAZ 2107 clutch, which every owner of the 7 should be able to do.
Clutch VAZ 2107
The vehicle's handling largely depends on the serviceability of the VAZ 2107 clutch mechanism. How often this mechanism will have to be repaired is influenced by the quality of the roads and the driver’s experience. For beginners, as a rule, the clutch fails quite quickly, and repairing and replacing the unit is quite labor-intensive.
Purpose of the clutch
The main task of the clutch is to transmit torque from the engine to the drive wheels of the car.
The clutch serves to transmit torque from the engine to the main gear and protect the transmission from dynamic loads
Initially, it was intended for short-term separation of the engine and the main gear during smooth starting and gear shifting. The VAZ 2107 clutch has the following characteristic properties:
- has the smallest permissible moment of inertia of the driven disk;
- removes heat from rubbing surfaces;
- protects the transmission from dynamic overloads;
- does not require a lot of pressure on the pedal when controlling the clutch;
- It is compact, maintainable, quiet, easy to maintain and maintain.
The design and principle of operation of the VAZ 2107 clutch
Clutch VAZ 2107:
- mechanical (driven by mechanical forces);
- frictional and dry (torque is transmitted due to dry friction);
- single-disk (one slave disk is used);
- closed type (the clutch is constantly on).
When you press the pedal, the force is transmitted hydraulically to the pressure bearing, which releases the driven disc.
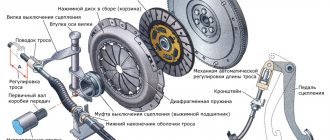
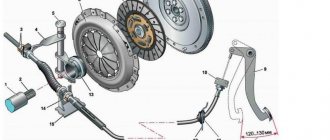
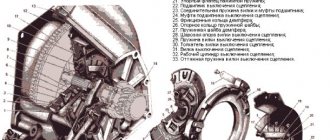
Cohesion can be roughly represented in the form of four components:
- driving or active part (crankshaft flywheel 6, basket with casing 8 and steel pressure disk 7);
- driven or passive part (slave or passive disk 1);
- inclusion elements (springs 3);
- shutdown elements (levers 9, fork 10 and pressure bearing 4).
The basket casing 8 is bolted to the flywheel, connected by damper plates 2 to the pressure disk 7. This creates conditions for transmitting constant torque from the flywheel through the casing to the pressure disk, and also ensures that the latter moves along the axis when the clutch is turned on and off. The driving part rotates constantly when the engine is running. The passive disk moves freely along the splines of the input shaft 12 of the gearbox. The hub is connected to the driven disk through damper springs 3 and due to this has the possibility of a certain elastic rotation. This connection dampens torsional vibrations that occur in the transmission due to engine operation at different speeds and corresponding dynamic loads.
When the pedal 5 is depressed, the passive disk 1, with the help of springs 3, is clamped between the flywheel 6 and the pressure disk 7. The clutch is engaged and rotates together with the crankshaft as a single unit. The rotational force is transmitted from the active to the passive part due to the friction that occurs on the surface of the friction linings of the driven disc, flywheel and pressure plate.
When pedal 5 is pressed, the hydraulic fork moves the clutch with the pressure bearing towards the crankshaft. Levers 9 are pressed inward and pull pressure plate 7 away from driven disk 1. Springs 3 are compressed. The active rotating part is disconnected from the passive one, no torque is transmitted, and the clutch is disengaged.
When the clutch is engaged, the driven disc slips relative to the smooth surfaces of the flywheel and pressure plate, so the torque increases gradually. This allows the car to move away smoothly and protects transmission components during overloads.
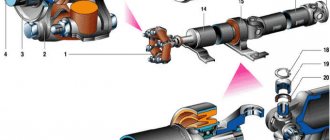
Clutch hydraulic drive device
The transmission of torque from the engine to the drive wheels is carried out using a hydraulic drive.
The clutch hydraulic drive transmits force from the pedal to the clutch fork.
The hydraulic drive plays an important role when starting the vehicle and changing gears. It includes:
- pedal;
- master and slave cylinders;
- pipeline and hose;
- pusher;
- clutch engagement and release fork.
The hydraulic drive allows you to smoothly engage and disengage the clutch without exerting much effort when pressing the pedal.
Clutch master cylinder
The clutch master cylinder (MCC) increases the pressure of the working fluid when you press the pedal. Due to this pressure, the clutch fork rod moves.
The clutch master cylinder converts the force from pressing the pedal into working fluid pressure, which moves the clutch on/off fork rod
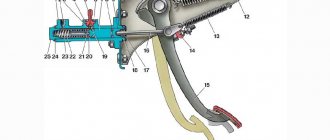
The pusher piston 3 and the master cylinder piston 5 are located in the main cylinder body. The use of an additional pusher piston reduces the radial force on the main cylinder piston when the pedal is pressed. In this case, the sealing ring 4 is pressed against the walls of the cylinder mirror and improves the sealing of the pistons. To ensure tightness inside the cylinder, there is an o-ring 12 located in the groove of the piston 5.
For additional sealing of the piston, an axial hole is drilled in its guide part 9, connected to the ring groove by 12 radial channels. As the pressure in the working space of the GCS increases, it reaches the inner part of the ring 12 and expands it. Due to this, the tightness of the master cylinder piston increases. At the same time, ring 12 acts as a bypass valve, through which the working part of the cylinder is connected to the reservoir with the working fluid. When the pistons reach their extreme position at the plug 11, the sealing ring 12 opens the compensation hole.
Through this hole, when the clutch is engaged (when the RCS piston creates excess back pressure), part of the fluid passes into the reservoir. The pistons are returned to their original position by a spring 10, which at one end presses on the plug 11, and with the other on the guide 9 of the piston 5. All internal parts of the GCS are fixed with a retaining ring 2. On the mounting side, a protective cover is put on the GCS, protecting the working part of the cylinder from dirt. .
Most often, the o-rings on the master cylinder wear out. They can always be replaced from the repair kit. In case of more serious malfunctions, the GCS changes entirely.
If the compensation hole becomes clogged, excess pressure will be created inside the drive system, which will not allow the clutch to fully engage. She will slip.
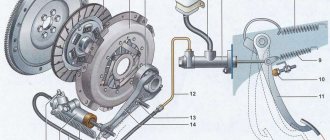
Clutch slave cylinder
The clutch slave cylinder (CLC) is attached with two bolts to the gearbox housing in the area of the clutch housing. This arrangement of the RCS leads to the fact that dirt, water, and stones often get on it from the road. As a result, the protective cap is destroyed and wear of the O-rings is accelerated.
The slave cylinder is secured with two bolts to the gearbox
When you press the pedal, pressure is created in the clutch hydraulic drive, which is transmitted to piston 6. The piston, moving inside the cylinder, moves the pusher 12, which, in turn, turns the clutch engagement and release fork on a ball joint.
It is very important to observe the dimensions of the internal mirror of the main and working cylinders. When factory assembled, they are equal to each other - 19.05+0.025–0.015 mm. Therefore, the sealing rings on the pistons of both cylinders are completely interchangeable. If you need to make the clutch pedal softer, you need to buy a foreign analogue of the working cylinder with a smaller diameter of the working cavity. If the diameter is larger, then the pressure on it will be less. Therefore, in order to overcome the elastic force of the basket friction springs, greater force must be applied. Therefore the pedal will be tighter.
Composition of the VAZ 2107 clutch kit
The VAZ 2107 clutch kit consists of:
- baskets;
- driven disk;
- pressure bearing.
According to VAZ regulations, these elements are not repaired, but are immediately replaced with new ones.
Read how to bleed the clutch on a VAZ 2106: https://bumper.guru/klassicheskie-modeli-vaz/stseplenie/kak-prokachat-stseplenie-na-vaz-2106.html
Basket
The basket has the most complex device in the clutch kit. It consists of many parts that require correct and precise assembly. The basket is assembled only in factory conditions and is not repaired even in specialized car repair shops. If wear or serious defects are detected, the basket is replaced with a new one. Main cart malfunctions:
- loss of elasticity due to sagging springs;
- mechanical damage and fracture of damper plates;
- the appearance of wear marks on the surface of the pressure plate;
- kinks and cracks in the basket casing;
- other.
Usually the entire clutch is replaced, so the replacement kit includes a driven disc, pressure plate and pressure bearing
The service life of the clutch is determined by the life of the basket, driven disk or pressure bearing. Therefore, to avoid the cost of repeated repairs, the coupling is always replaced as a set.
Driven disk
The driven disk is designed to transmit torque from the engine flywheel to the transmission input shaft and can briefly disconnect the gearbox from the engine. The technology for manufacturing such disks is quite complex and requires the use of special equipment. Therefore, it is impossible to repair the disk yourself. It is replaced with a new one when:
- wear of friction linings;
- wear of the internal splines of the hub;
- detecting defects in damper springs;
- loosening the sockets under the springs.
Pressure bearing
The pressure bearing is designed to retract the pressure plate from the driven one and is activated when the clutch pedal is pressed. Its malfunctions are usually accompanied by whistling, knocking and other sounds. When the rollers jam, the supporting working surface or the seat in the cup wears out, the pressure bearing assembly is replaced.
Removal and repair
Regardless of whether the owner decided to restore the GVC or preferred to buy a new one, the first step is to dismantle the old one. To work you will need:
- set of spanners;
- medium sized screwdriver;
- pliers;
- brake fluid for topping up;
- repair kit for clutch cylinder VAZ-2107 (in case of repair);
- small container for draining brake fluid.
The sequence for removing the clutch master cylinder is as follows:
First of all, the cylinder must be inspected. This will help you decide on repair or replacement. It makes sense to restore the cylinder only if the rubber seals are worn out. The work is carried out in the following sequence:
Assembly and installation of the VAZ-2107 clutch cylinder is carried out in the reverse order. After installing the reservoir, it must be filled with brake fluid. True, the clutch will not work yet. Air must be removed from the system.
Clutch faults VAZ 2107
The main signs of a faulty VAZ 2107 clutch are:
- it is difficult to change gears;
- the driven disk slips;
- vibration appears;
- The pressure bearing whistles;
- the clutch is hard to disengage;
- The pedal does not return from the lower position.
Destruction of the pressure plate and basket casing can lead to very serious consequences
Almost any malfunction is accompanied by extraneous sounds - noise, knocking, whistling, etc.
Find out why a car can jerk when starting from a stop: https://bumper.guru/klassicheskie-modeli-vaz/hodovaya-chast/pri-troganii-s-mesta-mashina-dergaetsya.html
Gears won't shift
If the gears are difficult to shift, an experienced driver will immediately tell that the clutch is moving. In other words, the clutch does not disengage completely. As a result, when starting from a stop, it is difficult to engage first gear, and when the pedal is pressed, the car moves slowly. The reasons for this situation may be:
- Increased distance between the thrust bearing support surface and the heel of the basket. It must be set within 4–5 mm, changing the length of the working cylinder rod.
- The spring sectors of the driven disk are warped. The disk needs to be replaced with a new one.
- The thickness of the driven disk has increased due to the stretching of the rivets securing the friction linings. The disk needs to be replaced with a new one.
- Jamming of the driven disk on the splines of the gearbox drive shaft. Both parts are defective and, if necessary, replaced with new ones.
- Lack of brake fluid in the master cylinder reservoir or accumulation of air bubbles in the hydraulic drive system. The working fluid is added to the required level, and the clutch hydraulics are pumped.
The clutch is slipping
The clutch may start to slip for the following reasons:
- there is no gap between the pressure bearing and the fifth basket;
- the clutch drive is not adjusted;
- oil got on the rubbing surfaces;
Oil getting on the driven disc can cause the clutch to slip and operate jerkily. - the bypass channel in the main cylinder body is clogged;
- The clutch pedal does not return to its original position.
Such malfunctions are eliminated by adjusting the drive, replacing oil seals, cleaning the channel with wire, and identifying and correcting the causes of pedal sticking.
Clutch is jerky
If the clutch starts to jerk, it may be caused by the following:
- the driven disk is jammed on the splines of the gearbox drive shaft;
- oily areas have formed on the friction linings;
- the clutch hydraulic drive is not adjusted;
- the steel disk of the basket is warped, some friction springs have lost their elasticity;
- The driven disk is faulty.
In such situations, a complete clutch replacement is most often required.
Noise when engaging clutch
The appearance of grinding and rattling noises when releasing the clutch pedal may be due to the following:
- the pressure bearing is jammed due to lack of lubrication;
- The gearbox drive shaft bearing is jammed in the flywheel.
In both cases, the problem is solved by replacing the bearing.
Noise when disengaging the clutch
When you press the clutch pedal, you hear a knocking, clanging, rattling sound, and you can feel vibration on the gear lever. The reasons may be the following:
- the damper part of the driven disk (springs, sockets) is faulty;
If the driven disk has worn splines, broken or loose damper springs, it must be replaced - The splined connection of the driven disk and the gearbox drive shaft is badly worn;
- the return spring of the clutch fork has become detached, lost its elasticity or broken.
In all cases, worn elements should be replaced with new ones.
The pedal returns but the clutch does not work
Sometimes it happens that the clutch does not work, but the pedal returns to its original position. This may be due to the following situations:
- air entering the hydraulic drive system;
- wear of the sealing rings of the main and working cylinders;
- lack of working fluid in the tank.
In these cases, you should bleed the hydraulic drive, replace the rubber rings with new ones and add working fluid to the reservoir.
Find out when you need to change tires to summer ones: https://bumper.guru/klassicheskie-modeli-vaz/poleznoe/kogda-menyat-rezinu-na-letnyuyu-2019.html
Tight grip
The softness of the clutch is determined by the force of pressure on the heel of the basket to retract the pressure plate. The magnitude of the force depends on the elasticity of the damper springs. Baskets from many manufacturers, including foreign ones, are suitable for the VAZ 2107 clutch. A tight pedal signals to the driver that the basket's life is coming to an end.
The pedal disengages the clutch at the beginning/end of its stroke
When you press the pedal, the clutch may disengage at the very beginning or, conversely, at the very end. In such situations, adjustment of the free and working travel of the pedal will be required. The free stroke is regulated by changing the length of the pedal limit screw, and the working stroke is regulated by changing the length of the working cylinder rod. In addition, increased free play may be a consequence of wear on the driven disk linings.
Video: main clutch problems and their solution
Examination
To make sure that everything is done correctly, simple checks should be carried out upon completion of the work.
- Set the gearbox to neutral. Start the engine and warm up the car to operating temperature. Reduce the gas to such an extent that the crankshaft speed becomes minimal. Depress the clutch pedal and shift to reverse gear. In this case, there should be no extraneous sounds: tapping, creaking, etc. If, nevertheless, some extraneous noise occurs, it means that the work was carried out incorrectly.
- When the car is moving at a speed of 40-45 km, depress the clutch pedal and change gears. There should also be no third-party sounds.
- At the acceleration stage of the VAZ-2106, you need to observe the correspondence between the increase in speed and the increase in crankshaft rotation speed. Proportionality and the absence of slipping indicate that the adjustment was made correctly.
The check must be done to make sure that the car is in good technical condition, which is important in terms of the safety of the driver and his passengers. At the end of the work, it is recommended to bleed the system by filling it with brake fluid to remove any trapped air. This procedure is also easy to carry out yourself using a set of inexpensive and accessible tools and materials.
Clutch selection
The manufacturer installed carburetor (2103 with a volume of 1.5 l) and injection (2106 with a volume of 1.6 l) engines on different VAZ 2107 models. Despite the external similarity, the clutch of these models has certain differences. The diameter of the basket pressure plate in both cases is 200 mm. But for the basket for 2103 the width of the pressure plate is 29 mm, and for 2106 it is 35 mm. Accordingly, the diameter of the driven disk for 2103 is 140 mm, and for 2106 - 130 mm.
Some car owners install a VAZ 2121 clutch on their VAZ 2107, which is noticeably stiffer and more reliable than the original one.
Clutches for the VAZ 2107 are produced by both domestic and foreign manufacturers
All VAZ models with rear wheel drive are suitable for clutch kits from classic cars of famous brands.
Table: clutch manufacturers for VAZ 2107
| A country | Manufacturer's brand | Advantages and disadvantages of clutch | Weight, kg | Price, rub |
| Germany | SACHS | Reinforced, so a little tough. Reviews are excellent | 4,982 | 2600 |
| France | VALEO | Great reviews, very popular | 4,322 | 2710 |
| Russia, Tolyatti | VAZInterService | Installed on the assembly line, good reviews | 4,200 | 1940 |
| Germany | LUK | There are dampers on the pressure and driven disks. Reviews are good | 5,503 | 2180 |
| Netherlands | HOLA | Noisy, short-lived, many negative reviews | 4,810 | 2060 |
| Germany | KRAFT | Soft, reliable. Reviews are good (many fakes) | 4, 684 | 1740 |
| Russia | TRIAL | Excessively hard. Reviews 50/50 | 4,790 | 1670 |
| Belarus | FENOX | Difficult, bad reviews | 6, 376 | 1910 |
| Türkiye | MAPA | Medium hardness, reviews 60/40 | 5,370 | 1640 |
| China | AUTOTECHNIK | Difficult, reviews are not very good | 7,196 | 2060 |
Clutch adjustment
Clutch adjustment is necessary after its repair or replacement, as well as after bleeding the hydraulic drive. To do this you will need:
- open-end wrenches for 8, 10, 13 and 17;
- ruler with divisions;
- pliers.
Adjusting the pedal free play
The pedal free play should be 0.5–2.0 mm. Its value is measured inside the car with a ruler and, if necessary, adjusted by changing the length of the pedal travel limiting screw.
Adjusting the working cylinder rod
The working cylinder rod is adjusted from the inspection hole or on a platform. In this case, it is necessary to achieve a clutch play value (the distance between the end of the pressure bearing and the fifth basket) within 4–5 mm. Adjustment is carried out by changing the length of the working cylinder rod.
After both adjustments have been made, the clutch operation is checked. To do this, on a warm engine with the pedal depressed, try to engage all gears, including reverse gear. There should be no noise, the speed lever should move easily, without jamming. Starting off should be smooth.
What's the best way to change?
It is best to replace the device by placing the car on a lift, overpass or inspection groove. If this is not possible, then you can raise the car using a jack to get to the unit from below. For safety, you need to fix the wheels so that the car does not roll or put on the hand brake.
Tools
To carry out repairs, you need to prepare the appropriate tools:
- set of keys;
- screwdrivers;
- pliers;
- clean rags;
- jack;
- new consumables.
When choosing a new replacement kit, you need to buy original parts, preferably assembled.
Stages
The replacement procedure consists of the following steps:
- Having opened the hood, first of all you need to turn off the power to the car. To do this, you need to remove the negative terminal from the battery.
Engine compartment of VAZ 2107
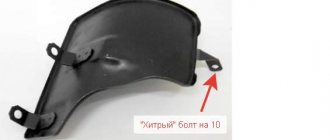
- Then you need to dismantle the air filter housing and unscrew the starter mounting nuts.
- Next in the cabin, you should remove the covers from the gearshift knob, floor mats and sound insulation. Then the gearshift lever must be disconnected from the gearbox. To do this, you need to press on it and use a screwdriver to pull out the white plastic sleeve.
- To perform further repairs, you need to move under the car.
- When removing parts, you should carefully inspect them for wear and defects. Change them if necessary.
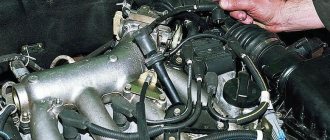
- At the next stage, we disconnect the exhaust pipe, the working cylinder, the universal joint, from which the wires should be disconnected.
- Then we dismantle the starter, which we unscrewed, and remove the gearbox. The gearbox could simply be moved to the side, but it is better to remove it to check the condition of the oil seal. If necessary, the oil seal should be replaced. It is better to remove the gearbox with an assistant, as this is a labor-intensive process. It is advisable to wash the gearbox after removal.
- Next, you can remove the basket and clutch disc. In this case, you need to remember how the disk was installed in order to install it correctly when reassembling.
Removing disks from a node
- Now you can evaluate the state of the components of the node. The anthers and driven disk are subject to the most wear. The master cylinder and clutch fork should be replaced.
- You can only change worn parts, or you can change the entire assembly. It is advisable to replace the clutch assembly, since, having replaced the old parts, there is no guarantee that after a short period of time you will not have to reassemble and disassemble to replace broken parts.
Installing a new drive
- Further assembly is carried out in the same order as disassembly.
After the repair is completed, the vehicle system should be checked for functionality.