You can leave your wife, your job, your homeland, but don’t you dare leave the clutch!
The clutch system is a fairly simple mechanism that not only serves as a transmission link between the engine and gearbox, but also removes excess load from both of these units. Of course, such work is not in vain for the clutch system itself, but that’s why it contains consumables, so that you can spend money on replacing them, and not on a global car repair.
The clutch system's job is to mechanically connect the engine to the manual transmission when needed, and disconnect them when it is necessary to change gears. In essence, the task of the clutch does not change, whether it is a clutch on a VAZ 2107 or a Lexus, only the technical details differ.
The design and principle of operation of the VAZ 2107 clutch
At its core, a clutch is a transmission link between the engine crankshaft and the input shaft of the gearbox. In this case, a simple press of the pedal separates these two units: the engine continues to operate without changing the optimal mode, and the driver can change gear to up, down or neutral.
What would happen if the crankshaft and gearbox were connected directly? At a minimum, when stopping the car, you would have to turn off the engine and then start it again. Nowadays there are cars on the roads with a “Start-Stop” system, when instead of idling the engine simply turns off, but on the VAZ 2107 neither the battery, nor the starter, nor the engine itself are designed for such “extreme”. Changing gears while driving is also not the best option; the load on the gearbox will be too strong. And such jerks do not add “health” to the engine itself.
So, using the clutch you can:
- Transmit torque from the engine crankshaft to the transmission;
- Disconnect the engine and transmission, interrupting the transmission of rotation.
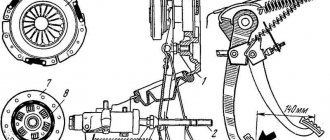
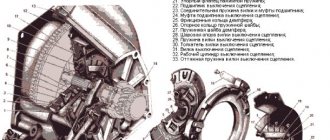
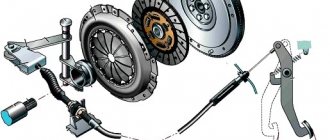
The clutch device on the VAZ 2107 is a classic clutch design, the simplest and most understandable:
- The engine crankshaft is rigidly connected to the flywheel, which rotates with it. The flywheel performs two functions: it maintains the moment of inertia so that the engine pistons do not freeze at a “dead point”, and serves as one of the elements of the clutch system;
- The driven (friction) disc is a transmission link between the flywheel and the pressure plate. It is installed on the input shaft of the gearbox and connects the clutch elements due to friction;
- The pressure (drive) disk is rigidly connected to the clutch basket. Its task is to tightly press the driven disk to the flywheel, then the torque will be transmitted to the driven disk and from it to the gearbox;
- The clutch basket consists of a casing and a system of leaf springs, which, when pressed, move the release plate back and separate it from the driven disk. When there is no pressure on the springs, they push the drive disc forward so that it presses the driven disc against the flywheel. The basket casing is rigidly connected to the flywheel and rotates with it;
- The release bearing is an essential element of the clutch system. When you press it, the leaf spring of the basket is pressed;
- The driver controls the clutch by pressing the pedal, from which the force is transmitted to the bearing through a system of rods and a hydraulic system.
As can be seen from the description, this is a “dry” (not in an oil bath) single-plate clutch, with a mechanical release bearing and a permanent connection (closed-loop system). Hydraulics are used to transmit the force that the driver applies to the pedal.
Clutch hydraulic drive device
Separately, it is necessary to say about the hydraulic drive. Thanks to it, it is possible to use the incompressibility of the liquid (maintaining a constant volume even under high pressure) and transmit force along a complex trajectory. There is no need to install complex rods and levers; hydraulics do their job perfectly.
Drive diagram VAZ 2107
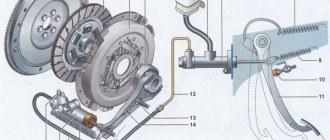
The hydraulic drive system includes several elements:
- Clutch pedal;
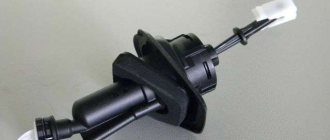
- Master cylinder with expansion tank;
- Working cylinder with pusher;
- Pipeline and hose;
- Release fork.
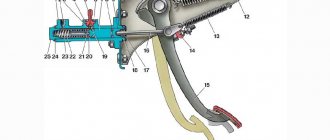
Principle of operation:
- The force is transmitted from the pedal through the pusher to the master cylinder rod;
- The cylinder piston moves forward and pushes a portion of liquid into the pipeline leading to the working cylinder;
- The fluid presses on the piston of the working cylinder, combined with a pusher. The pusher comes forward and presses on the release fork;
- The fork moves the release bearing away from the clutch leaf spring.
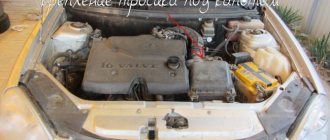
Preparation for repair
First of all, put the car on the lift and disconnect the battery. Please note that you need to disconnect the battery. When replacing a VAZ-2107 clutch, the gearbox, starter, and on the last one, a large-section power wire are removed. And if it shorts to ground, then a fire cannot be avoided. And don’t forget that the car is rear-wheel drive (in the good sense of the word, of course). This means that its two rear wheels are driving - torque is transmitted to them from the engine through the box and driveshaft with gearbox.
What does this mean? About the need to install wheel chocks under the rear wheels. At least put some bricks on it so the car doesn't drive away. In a broken state, it is capable of terrifying not only capitalist countries, but even normal and adequate people. And it doesn’t matter whether you are going to completely change the assembly, or you are only planning to replace the VAZ-2107 clutch disc, you need to remove the box in any case. Therefore, all the requirements described below must be met.
Basic faults
It should be noted right away that the driven disk and release bearing are consumables, the long service of which should not be counted on. The integrity of the flywheel is much more important; its price is much higher and replacement is more difficult.
The main clutch malfunctions on a VAZ:
- Difficulty changing gears;
- Clutch slips;
- Jerks during operation;
- Vibration during operation;
- Creaking and other extraneous sounds during operation;
- The clutch doesn't work.
Difficult gear shifting means that the clutch does not disengage completely, that is, the driven disc continues to turn when the pedal is pressed. There may be several reasons for this situation:
- There is a problem with the driven disk: it began to jam on the splines of the input shaft, or the fixing rivets began to come out of their seats and cling to the flywheel and pressure plate, or the damping springs failed;
- Problem with the release bearing: it is too far from the clutch basket, as a result it does not press it with enough force;
- Hydraulic problem: low fluid or air lock.
Once the cause has been found, you can solve the problem: replace the driven disk, troubleshoot the input shaft, install the release bearing at the required distance from the clutch basket, add hydraulic fluid and bleed the system.
Clutch slipping is the asynchronous movement of the flywheel and driven disk when the clutch is fully engaged (when the pedal is not pressed). Causes:
- Oil has got onto the working surface of the driven disk;
- The problem is with the release bearing: it fits against the clutch basket and presses on the spring;
- The clutch drive requires adjustment;
- The bypass channel in the master cylinder is clogged;
- The clutch pedal does not move back.
Depending on the problem, the solution will be appropriate: checking and replacing oil seals from which oil may leak, adjusting the clutch, repairing and cleaning the master cylinder.
Jerking and vibration when the clutch operates is a rather unpleasant sign. Possible causes of jerking when moving:
- The disc is jammed on the gearbox shaft splines. In this case, it cannot move freely along them, which means there will be no “soft docking” with the flywheel;
- Problem with the basket and drive disk. With prolonged use, the springs wear out and the drive disk becomes deformed;
- The driven disk is worn;
- The drive requires adjustment.
With such a problem, diagnostics is needed. In the best case, everything can be done by replacing the driven disk; in the worst case, the entire clutch will have to be changed.
If, when engaging or disengaging the clutch, you hear grinding, rattling, knocking and other sounds that should not be there, this may be a manifestation of the following problems:
- The bearings are jammed - pressure or drive shaft. This may be due to wear and tear over time or lack of lubrication. In this case, the sound appears when the clutch is engaged;
- There is a problem with the driven disk - the springs or splines connecting to the gearbox shaft are worn out. Knocking and rattling noises appear when you press the pedal;
- The clutch fork return spring does not work.
After diagnosis, broken parts must be replaced with new ones. If the problem is in the spline connection of the driven disk, it is necessary to check the condition of the gearbox shaft.
And finally, if you release the pedal and the clutch does not engage, the reason must be sought in the hydraulics:
- Airlock;
- Insufficient hydraulic fluid;
- The clutch cylinder seals are worn out.
The easiest way is to add fluid to the reservoir and bleed the clutch system. If the problem is not solved, it is necessary to dismantle the master and slave cylinders and replace the repair kits.
How to replace?
If you have no idea what a VPS is or what a clutch disc looks like, then entrust bearing repair work to professionals. If you think that you can cope with this, then we suggest that you familiarize yourself with our car repair manual.
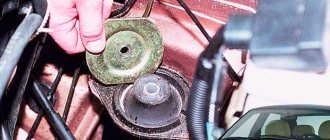
Which to choose?
Selecting an IPS is the first point that must be completed if you decide to replace an element.
There is nothing difficult in choosing an element. Classic VAZ models (2010 - 2107) are equipped with a release bearing of the same type. Just buy the appropriate part at a car store or market, indicating the model of your vehicle. To make it more clear to you what the UPS looks like, you can look at it in the photo below.
Replacing the clutch basket
Replacing the basket is done less frequently than replacing the driven disk. The basket needs to be changed if the drive disk overheats (then colored spots appear on it), breakage or wear of the diaphragm blades and springs. To access the clutch, you need to remove the gearbox.
Procedure:
- In the engine compartment, remove the “-” terminal from the battery and unscrew the starter bolts; Removing the terminals from the battery
- In the cabin, remove the gearshift knob; Removing the gear knob
- Remove the exhaust pipe from the hole; Removing the exhaust pipe from the exhaust manifold
- Unscrew the propeller shaft from the main gear, mark the connection points on the flanges; Unscrew the driveshaft
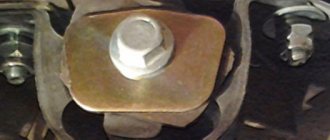
- Unscrew the cross member of the rear gearbox support; Unscrew the gearbox cross member
- Unscrew the gearbox mounting bolts (4 pieces);
- Disconnect the wire from the reverse gear sensor;
- Unscrew the speedometer cable; Unscrew the speedometer cable
- Unscrew the clutch slave cylinder;
- Pull the gearbox out until the shaft is completely out of the clutch and remove it. Removing the gearbox
When dismantling the clutch itself, you need to unscrew the basket bolts from the flywheel. To distribute the load evenly, the bolts are unscrewed 1-2 turns in turn. After removal, the basket must be inspected for wear of the disk, integrity of the springs, and diaphragm.
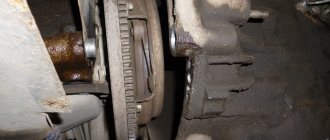
Stage two - from below the machine
Now make yourself comfortable under the car and carry out the following manipulations:
- Disconnect the cardan drive from the flange on the gearbox side. Only mark the position of the splines, otherwise after assembly the cardan will make a terrible noise.
- Unscrew the nuts securing the outboard bearing. And don’t lose them, it’s better to tighten all the nuts right away.
- Lightly tap the driveshaft out. You throw it to the side so that it doesn’t get in the way under your feet.
- You tear off the nuts on the box cushions. Don't twist it all the way yet.
- Remove the clutch slave cylinder and secure it so as not to accidentally damage the hose.
- Unscrew the speedometer cable and disconnect the reverse sensor.
That's all, now place a support under the box and use a crowbar to move the gearbox away from the engine block. A little pain and the box comes off.
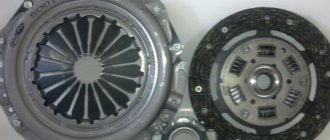
Replacing the clutch disc
The driven disc is a consumable that must be worn out for the rest of the clutch to work properly. Problems with the driven disk are wear of the friction linings, damper springs, and splined connection to the gearbox shaft. When inspecting, you need to pay attention to the condition of the rivets (they should not protrude above the surface of the friction circle), the presence of cracks, rust in the center, and traces of oil. And an important sign of a problem will be a burning smell - the friction material is burning due to clutch slippage.
Experts recommend choosing the clutch basket and driven disc from the same manufacturer. It often happens that the friction material and, for example, the power of the basket springs are specially selected according to parameters to give the optimal effect. This is where many fans of a sporty driving style make a mistake when they install a three-leaf driven disc without replacing the remaining clutch elements.
Simultaneously with replacing the clutch, it is necessary to check the crankshaft oil seal. Servicemen often recommend changing it at the same time as the clutch disc, “so as not to have to get up twice.”
When installing the clutch on the flywheel, the driven disk is centered using a special mandrel, which is inserted into the flywheel bearing. After this, the basket is installed on the guide pins so that the mounting holes on it and the flywheel match. As with dismantling, the bolts are tightened one at a time, each one needing to be tightened 1-2 turns at a time. After this, the mandrel for centering the driven disk can be removed.
Lubricate the gearbox shaft before installation, then install the gearbox. Next, the sequence of actions is the reverse of removal.
What should you pay attention to to clarify the diagnosis of clutch failure?
When accelerating or braking the car to change gears in the gearbox, the crankshaft is constantly disconnected and connected to the power transmission. This operation is performed very often and intensively, so over time the signs of a clutch malfunction become more and more obvious. All clutch malfunctions are divided into two general types: incomplete engagement of the clutch (driving) and incomplete disengagement of the clutch (slips).
Any experienced car owner knows how to check the clutch for complete disengagement. To do this, start the engine at low speeds, fully depress the clutch pedal and engage first gear. If it engages easily, then the clutch has completely disengaged the drive - everything is in order.
When you hear the smell of burning while driving, on a steep climb the car suddenly loses speed, and in general, it accelerates poorly - “slipping” of the clutch is obvious. That is, the clutch does not disengage completely - both discs do not close tightly enough.
A very simple and at the same time very reliable way to independently diagnose clutch problems:
First, warm up the engine so that the cold, thick oil does not create additional resistance. Next, the car is put on the handbrake. This should be done on a flat surface, without steep slopes. After this, the engine is accelerated to 1500-1700 rpm, the clutch pedal is depressed, first gear is engaged, and then the pedal is smoothly released.
As a result, the engine should stall. The engine does not stall, or the engine stalls after some time - the clutch definitely requires repair or replacement.
Replacing the master and slave cylinders
The master cylinder creates pressure in the hydraulic system, transmitting force from the pedal pusher to the working cylinder rod. It lasts a long time, and the repair kit often requires replacement, rather than the cylinder itself. The slave cylinder serves to transmit force to the clutch fork pusher. Hydraulic fluid from the master cylinder presses against the piston in the slave cylinder and operates the fork.
Their malfunctions are manifested by dips or tight movement of the clutch pedal, difficult operation of the gearbox (gears are switched with a crunching sound, vibration). Visually, a problem with the main or working cylinder can be seen by fluid leaks.
The clutch cylinder is replaced if the “mirror” of the cylinder or its other elements are damaged, which happens quite rarely. Replacement parts wear out much more often, and then you can simply install a new repair kit.
Replacing the master cylinder, video
The master cylinder is located next to the brake booster, below the brake reservoir. Its dismantling is done in the following order:
- Pump out the liquid from the cylinder expansion tank (with a rubber bulb or a syringe with a hose);
- When there is no liquid left in the expansion tank, remove it from the cylinder (disconnect the rubber fasteners);
- Unscrew the nut that secures the pipeline to the cylinder, hose pipeline to the side;
- Loosen the clamp that secures the hose to the cylinder and remove the hose;
- Unscrew the nuts that secure the cylinder, remove it, and pour out the remaining liquid.
After dismantling, you need to inspect the cylinder for wear of metal parts and rubber gaskets. If necessary, replace the repair kit or install a new cylinder. Installation is done in reverse order.
Replacing the working cylinder, video.
The slave cylinder is located next to the gearbox, on the clutch housing. It can be accessed both from below and from the engine compartment. Dismantling procedure:
- Loosen the nut that secures the hose to the cylinder. Do not remove the nut completely, do not disconnect the hose;
- Use pliers to remove the tension spring;
- Using pliers, straighten and remove the restrictive cotter pin from the pusher;
- Remove the bolts that secure the cylinder to the clutch housing;
- Remove the bracket that was attached to the cylinder with these bolts and to which the tension spring was attached;
- Remove the cylinder by sliding the pusher out of the hole in the clutch fork;
- Now you can completely unscrew the nut and remove the hose from the cylinder. As with the master cylinder, installation is done in the reverse order.
Often, problems with the drive are caused by low-quality hydraulic fluid. When working, pay attention to its color and consistency. Often wear products accumulate in the liquid and they begin to act as an abrasive.