The clutch in a car serves as the connector between the engine and transmission. This unit takes on all the load that occurs when changing gears. Accordingly, the part can rightfully be considered a consumable item, because car owners regularly face the need to replace it or schedule maintenance.
It is almost impossible to influence the degree of wear of this unit. Therefore, after the clutch has exhausted its service life, it must be replaced partially or completely (in case of serious malfunctions).
Which clutch bearing should I install?
The original clutch bearing number is 2108 1601182.
- Pilenga PC-P 2108 — 360 rub.
- Luk 500 0439 20 — 1156 rub.
- Fenox TP2116C3 — 345 rub.
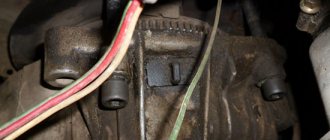
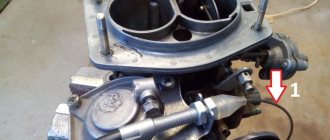
We remove the “negative” terminal from the battery “4”, remove the connector from the mass air flow sensor (MAF) “2”, loosen the clamp securing the corrugation to the MAF “3”, remove the air filter housing “1” from the car.
Remove the clutch cable from the clutch fork. Loosen the two nuts securing the cable to the bracket on the gearbox.
Remove the clutch protective cover. Disconnect the ground wire and the top dead center sensor from the clutch housing. Disconnect the wires from the reverse light switch. Drain the oil.
Unscrew the 3 bolts securing the bracket to the body. Unscrew the nut securing the arm extension.
We jack up the car. We remove two bolts “1” and disconnect the ball joint of the suspension arm from the steering knuckle. Unscrew the nut “2” securing the brace to the suspension arm, and remove the longitudinal brace together with the lever.
We remove the wheel, unscrew the hub nut and unscrew the fastening of the ball joint to the steering knuckle, then remove the CV joint from the bearing hole.
Having rested the pry bar against the gearbox housing, we press the internal drive joint from the side gear, to do this we sharply hit the body of the internal joint with a hammer. We knock out the hinge from the side gear.
Mounting a ball joint without front wheel drive.
Loosen the clamp and disconnect the gear shift rod from the gear selection hinge. It is also necessary to support the engine, otherwise it may drop too low and tear off the interior heater hoses.
Having unscrewed the bolts securing the rear suspension support of the power unit, remove the suspension bracket from the eyes of the body spar.
Using a 17mm wrench, unscrew the nut and remove the bolt of the left engine mount. Unscrew the three starter mounting nuts and remove the starter.
Using a 19mm wrench, unscrew the three bolts and one nut securing the clutch housing to the cylinder block, remove the gearbox from the engine and remove it.
Using an 8-mm spanner, unscrew the six bolts securing the clutch housing to the flywheel. To loosen the bolts easily, tap their heads with a copper hammer. You can also use a 8mm socket to loosen the bolts.
Remove the driven and driven clutch discs. We check the degree of wear of the friction linings. If the rivet heads are recessed less than 0.2 mm, the surface of the friction linings is oily or the rivet joints are loose, the disc must be replaced. Cracks or mechanical damage to parts of the driven disk are not allowed.
If a visual inspection reveals loosening of the rivet connections of the clutch basket and drive disc parts, the clutch drive disc assembly should be replaced.
Lubricate the release bearing seat on the shaft, as well as the clutch guide forks, then install the bearing.
When installing the clutch, we orient the driven disk with its protruding part towards the drive disk and insert the centering mandrel.
We insert the mandrel into the hole in the crankshaft and secure the clutch drive disc in this position, tightening the bolts evenly (one turn per pass). We tighten the bolts no more than one turn each, so as not to deform the flange of the clutch drive disc. We assemble everything in reverse order.
At the request of my friend Misha (smalk), I am posting brief instructions on how to replace the clutch on a VAZ 2108,09,099,13,14,15. The work was carried out on my car by me from 9.30 to 13.00.
And so let's start: Disconnect the battery. (On injection machines, remove the air filter housing) Remove the left engine mudguard. Unlock and unscrew the hub nuts on both sides. Jack up and unscrew the left wheel. Unscrew the two ball mounting bolts. We remove the drive from the hub.
How to get to the desired node?
Now about how to replace the clutch correctly. If you want to get to this unit, you will have to remove the gearbox and several additional parts. To do this, you definitely need a jack, inspection hole or overpass. If necessary, you can make a homemade overpass. You cannot do without such devices, since in order to replace the clutch on a VAZ, you will have to lie under your car for almost a day.
Once you can work normally under the car, you will have to remove the transmission piece by piece. It looks like this:
- Disconnect the starter assembly - disconnect all contacts, then unscrew the three screws and remove the device.
- Next you should tackle the gear change drive. Loosen the clamp and pull out the device.
- Disconnect the cable from the speedometer and reverse wires.
- Next you will see stretch marks to the suspension arms. It is necessary to loosen their fastenings, and then move them in different directions.
- Remove the ball joints from the swing arms.
- Pull out the CV joint tip and immediately plug it with some kind of plug, otherwise oil will flow out.
- The lower part of the clutch housing protection is dismantled; there are only 3 bolts.
- To prevent the engine and gearbox from falling, supports are placed under them.
- Then unscrew the remaining supports, after which you can carefully pull out the gearbox assembly.
Clutch repair on VAZ 2108, VAZ 2109, VAZ 21099 cars
1. Remove the gearbox from the VAZ 2108, VAZ 2109, VAZ 21099 (see “Removing and installing the gearbox”).
1:709 2. Install the mandrel into the pressure plate hole. NOTE You can remove the clutch without a mandrel, but at the same time hold the clutch driven disc - the driven disc may fall out of the clutch housing.
USEFUL ADVICE
A mandrel for centering the driven disk can be made according to the dimensions of the input shaft, or you can use the old gearbox input shaft instead of the mandrel.
2:1911 3. Unscrew the six bolts securing the clutch housing
leniya. Remove the clutch housing assembly with the pressure plate and driven disc installed inside the clutch housing. Hold the clutch driven disc while doing this, otherwise the driven disc may fall out.
NOTE When removing the clutch housing bolts, block the flywheel using a screwdriver.
3:1061 To stop the screwdriver, install one bolt securing the clutch housing (for clarity, the operation is shown with the engine removed).
4:1801 4. Cracks on the driven disk parts are not allowed. Check the wear of the friction linings 1. If the heads are behind
moldings 2 are deepened to a distance of less than 0.2 mm, the surface of the friction linings is oily or the rivet joints are loose, then the clutch driven disc must be replaced. Check the reliability of the damper springs 3 in the sockets of the driven disc hub; if the damper springs are broken, the clutch driven disc must be replaced.
5:1130 5. Check the runout of the driven disk if warping of the driven disk is detected during visual inspection. If the driven disc runout exceeds 0.5 mm, replace the clutch driven disc.
6:1965 6. Inspect the working
e friction surfaces of the flywheel and clutch pressure plate, paying attention to the absence of deep marks, scuffs, nicks, obvious signs of wear and overheating. Replace defective components
7:839 7. If the rivet connections 1 of the housing parts and the clutch pressure plate are loosened, replace the housing with the pressure plate assembly. Using an external inspection, evaluate the condition of the diaphragm spring 2 of the clutch pressure plate. Cracks on the diaphragm spring are not allowed. The contact points between the spring petals and the clutch release bearing must be in the same plane and have no obvious signs of wear (the amount of wear should not exceed 0.8 mm). Otherwise, replace the clutch pressure plate assembly.
8:2321
8. Using an external inspection, evaluate the condition of the support rings of the pressure spring. The pressure spring rings should not have cracks or signs of wear. Otherwise, replace the housing and pressure plate assembly.
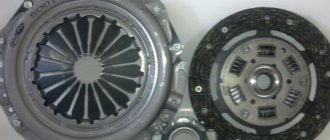
9:861Rice. 5.4. Checking the condition of the clutch drive disc:
A, B, C - controlled dimensions; 1 - pressure spring; 2 - casing; 3 — pressure disk; 4 - intermediate ring
9. To check the clutch drive part, secure the pressure disk 3 (Fig. 5.4) assembled with the pressure spring 1 and casing 2 to a device with an intermediate ring 4 with a thickness of B = (8.3 ± 0.04) mm. This device replaces the flywheel with the clutch driven disc. Disengage the clutch three times with a release stroke of 8-9 mm, applying a load to the petals of pressure spring 1 at a diameter of C = 34 mm. In this case, check that: - the shutdown stroke (8.0+0.1) mm corresponds to the pressure plate stroke of at least 1.4 mm; — the difference in the deviation values of pressure plate 3 was no more than 0.25 mm; — size A was in the range of 29-31 mm; — the load on the petals of pressure spring 1 at diameter C with a stroke of (8.0+0.1) mm was no more than 1100 N, the peak shutdown load was no more than 1300 N. 10. Before installing the clutch on a VAZ 2108, VAZ 2109, VAZ 21099 check the ease of movement of the driven disk along the splines of the gearbox input shaft. If necessary, eliminate the causes of jamming or replace defective parts.
10:3378
11
Please note that when installing the clutch driven plate into the clutch pressure plate housing, the more protruding part of the hub is directed towards the pressure spring
11:834 12. Insert the centering mandrel into the splines of the driven disk from the pressure spring side.
12:1498 13. Install the clutch on the flywheel along the three centering pins (shown by arrows) and tighten the six bolts securing the clutch to the flywheel evenly diagonally, holding the flywheel from turning. After this, remove the centering mandrel and install the box in front
h.
next article:
Clutch selection
When choosing a clutch kit, you should focus not only on your available budget.
By saving or buying a fake, you risk getting even more problems in the future. Valeo kit
Today there are several main manufacturers whose clutches should be purchased for the VAZ 2109.
| Manufacturer | Peculiarities |
| VIS | This is a stock clutch that the VAZ 2109 is equipped with from the factory. If there are laser markings on the discs, this is definitely not a fake. Plus, the company allows you to send an SMS indicating an identification code. If it is a fake, you will be notified accordingly. Good quality, but nothing special to say about them |
| Valeo | A French manufacturer, which is actively counterfeited on the domestic market. To catch fraud, pay attention to the cost and quality of components. Although the brand is from France, Valeo couplings can be produced in Italy, Spain, and South Korea. Good quality components ensuring smooth, easy operation. Perfect for female drivers. If you use the clutch correctly, it will last for about 150 thousand kilometers. The flywheel is almost eternal, and the disks are not afraid of overheating within acceptable limits |
| Luk | A German company that has proven itself well in its homeland and has also earned a lot of praise among Russian motorists. They dampen vibrations perfectly, and real Luk clutches always have an element for damping vibrations of the pressure and driven disks. |
| Kraft | You can only find negative reviews about Kraft couplings from competitors. An impressive part of the sets under the Kraft brand, presented in Russia, were produced in Turkey, but under a German license. The kit includes a soft release bearing that performs well even under heavy use. The flywheel is very durable. On average, the clutch can withstand 150 thousand kilometers. But if you don’t spare the clutch, the life will be significantly reduced. |
Kraft kit
Regardless of the quality of the selected kit, if it is installed incorrectly or due to rough operation of the vehicle, the life of the clutch will not reach those declared by the manufacturer. Therefore, drive your car accordingly.
How to independently replace the clutch on a VAZ 2109?
In what cases is replacement necessary?
So, when does a clutch basket need repair?
It is necessary to change the node if the following symptoms occur:
- If, while driving, your vehicle suddenly begins to slip and the unit does not turn on completely. In particular, the engine will gain power, but the car cannot accelerate; as a rule, this problem is especially acute when driving uphill. In addition, you may hear an unpleasant odor in the cabin, and gasoline consumption will also increase significantly.
- If the clutch system (hereinafter referred to as SS) is driven, that is, it does not turn off completely. In particular, changing gears will become more difficult, and when the reverse gear is engaged, a sound appears, while the gearbox operates in normal mode.
- When the car starts moving, jerking will occur.
- In general, the SS is noisy, it rattles and makes some sounds when you press the accelerator.
- Another symptom indicating that the CC needs to be changed is the appearance of a knocking sound when the pedal is released.
Sorry, there are no surveys available at this time.
Replacement instructions
So, let's move directly to the process of repairing and replacing the CC. A video of this procedure will also be presented in this article. If you don’t know which clutch is better to install, then everything is simple in this matter - buy the original from the VAZ company or read reviews on our resource about other brands. Which one to install is entirely up to you, but it will be better if the SS costs a little more, but it will be of high quality.
List of tools
What you should have with you before you begin repairing and replacing the basket:
- spanners;
- socket wrenches;
- jack;
- chisel.
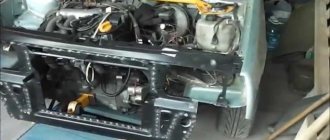
To begin, drive your VAZ 2109 into the pit and apply the parking brake. Open the hood and disconnect the negative terminal from the battery. Then, using the appropriate wrench, the engine splash guard must be removed from the left side. After this, take a chisel, you will need to unpress and unscrew the hub nuts from the two front wheels. Now you will need a jack. Place it under the left wheel, then jack up the vehicle, remove the wheel screws and remove it. After these steps, you should unscrew the two screws that secure the ball joint. Then you need to remove the drive from the hub. Next, the two upper screws that secure the gearbox are unscrewed, and the cylinder head securing screws are screwed in their place. Next you need to dismantle the starter. It is attached to three nuts that need to be unscrewed with wrenches
Remove the device very carefully so as not to damage it, otherwise problems with the operation of the car will arise later. The next step will be to unscrew the side motor support, for which you need to place a jack under the latter as a support. Using the key, the gear shift lever is unscrewed along with the rear support of the power unit. Having done this, you can easily remove the clutch protective cover. Then you should unscrew the front screw that secures the gearbox, and also unscrew the rear nut securing the transmission system. After this, the gearbox is carried out, ask a friend to help you, since it will be difficult yourself
Having done this, the box end will lie on the lever extension. This way you can remove the clutch. The guide sleeve is lubricated, after which the release bearing is installed. Then the driving and driven pulleys are installed. The gearbox is installed in place, the lower screws are tightened. Having done this, you need to turn the crankshaft while tightening the CC basket evenly. The remaining elements are assembled in the reverse order.
Cost of replacing a clutch with a "nine"
The issue of the cost of this procedure worries VAZ 2109 owners no less than the repair process
After all, you will need to spend at least 4 hours on repairs, and it is important to have at least some idea of what you will be doing. If you perform the wrong actions, this can generally affect the functioning of the car, so if you have never encountered this before, it is better to seek help from a service station
So, as for the cost. Depending on the country and region of residence, the cost may vary. The average price for a SS kit is $50. It will cost from $20 to replace an element at a service station, it all depends on the technician. We repeat - prices may vary depending on where you live.
You can learn how to change the clutch on a VAZ 2109 from this video.
Tools required for repairs
To replace the VAZ 2109 clutch basket you need to prepare the following tools:
- standard set of keys;
- jack.
Do-it-yourself repairs are quite advisable, since the price for replacing a VAZ 2109 clutch as of March 3, 2022, on average in car services is 3.2 thousand rubles.
But self-repair is quite accessible even without an assistant, and without completely removing the gearbox. The principle of repair and the sequence of work are identical for models 2108-2115, so we suggest you see how such dismantling is performed on a VAZ 2114:
Do-it-yourself clutch replacement (front-wheel drive)
Unlike VAZ classics, on front-wheel drive 2108-2115 it takes a little longer to change the clutch, and the work of removing the gearbox is more labor-intensive. But with experience, professionals perform the operation of removing the gearbox quickly, and besides, there is a method in which it is not necessary to completely dismantle the gearbox; it is enough to just hang it up.
We do the replacement ourselves without completely removing the gearbox as follows:
- we hang the car on a car lift; if the work is being done in a pit, we place tripods under both front sides of the underbody;
- remove the battery terminal (minus);
- unscrew the front wheel bolts and remove the front wheels;
- unscrew the clutch cable mounting bracket from the box and move the cable itself to the side;
- dismantle the speedometer cable (if you do not remove it, when you move the gearbox, it may become overtightened and as a result burst);
- unscrew the ball joint nuts on each side (left and right bearing);
- unscrew the starter and move it to the side;
- unscrew the nuts of the front wheel hubs;
- unscrew the three fastenings of the lower gearbox casing and remove the casing;
- if there is protection under the engine, it must also be removed;
- dismantle the left mudguard;
- remove the three bolts of the left “crab” (bracket), which is attached to the front left, next to the front bumper;
- unscrew the fastening of the left lever (in the area of the wheel);
- loosen the other lever fastening (in the area of the box), move the levers down so as not to interfere;
- remove the left gearbox cushion;
- unscrew the bolts securing the gear shift rod, disconnect the rod;
- unscrew the rear gearbox cushion;
- unscrew the top two bolts securing the gearbox to the engine, screw in the long bolts of the cylinder head instead;
- unscrew all other transmission fasteners - now the box on the top bolts “moves away” from the engine;
- twist the six bolts securing the basket; we install the new parts in place, tightening all the bolts, move the box towards the engine, tighten the bolts to the end through the hole in the starter (turning the crankshaft). With this method, the centering roller will not fit here, so the clutch can only be secured in this way;
- We put all the removed parts back in place.
With this method, there is no need to drain the oil from the gearbox, since the wheel drives (CV joints) are not removed from the gearbox housing. The distance between the engine and gearbox is not too large, but there is enough space to attach the bolts of the basket.
Important points
When replacing the clutch, it is necessary to pay close attention not only to the condition of the discs, but also to the condition of the release bearing, which was mentioned above. After removing it, you need to turn it several times by hand.
If rotation is difficult or a creaking or crackling sound is heard during scrolling, then the bearing needs to be replaced. If this is not done, all the work on replacing the clutch discs will be useless, since they will again become unusable. The gearbox shaft and adjacent parts should be cleaned of dirt very carefully; it is best to wash everything with kerosene and wipe dry with a clean rag. The above is a method for replacing the clutch with complete removal of the gearbox. But sometimes car enthusiasts do without removal. To do this, the bolts that secure the box to the engine are carefully unscrewed (one at a time). In their place, studs are installed, which are slightly thinner and at least three times longer than the mounting bolts. These pins serve as guides along which the box can be moved slightly to the side. This creates a gap between the engine and the gearbox, through which the clutch discs are removed. This method is less labor-intensive, but it has its drawbacks: it will be impossible to get to the release bearing and it will not be possible to thoroughly clean the gearbox shaft from dirt.
As you can see from this article, replacing a clutch is a very labor-intensive operation. Therefore, it is necessary to follow the proposed instructions exactly. You should also not forget about safety precautions, especially when it comes to removing the gearbox. This is a very heavy unit and you should be extremely careful when handling it.
Sequence of operations
You need to start by placing the car on a level place so that it won’t roll anywhere when you jack it up and unscrew the wheels. Before jacking up, we need to break off the bolts - we need to remove the left front wheel. We also unscrew the nuts on the wheel drives, those on the hub, from both front wheels.
I am of the opinion that the fewer movements during repairs, the better. Therefore, I prefer to remove the box together with the drives, so as not to drain the oil and then fill it again, because if you remove the drive from the box, the oil will definitely flow, but as a rule, it is not possible to drain all the oil and it constantly drips. Therefore, we remove the entire transmission assembly. It is also not necessary to completely remove the box - just move it a little a few centimeters to get the necessary space. This will not affect the convenience, and unnecessary fuss can be eliminated, although everyone does things differently here. So, the front wheel has been torn off, the nuts have been unscrewed from the wheel bearings, you can lift the car, we only need to lift one side - from the side of the box. We remove the wheel. The stand along with the steering knuckle and hub prevents us from leaving the box. We remove the strut assembly with the hub; you can read how to do this in the article about replacing struts. Now we need to disconnect everything from the gearbox. We remove the starter, speedometer drive, clutch cable and gear shift mechanism. To free up some space under the hood and de-energize the starter, remove the battery. The starter is located in the front and is easy to reach; unscrew the bolts and move it to the side. The speedometer drive is located behind the box when viewed from the front of the car, but it is quite easy to reach with your hand. We unscrew it, if it doesn’t work by hand, you can tighten it with some pliers. The gear shift mechanism is screwed on with a bolt, unscrew it and pull it out. The box is ready to be removed.
Malfunctions
Replacing the clutch on a VAZ 2109 is not the easiest task, so you should correctly determine the moment when it is worth completely dismantling something, and when it is enough to repair several parts.
In the “nine” there are 4 common problems that precede the replacement or repair of clutch elements:
- Incomplete gear shift, clutch is moving.
- Incomplete activation of the system, towing occurs in the system.
- Jerks with vibration when trying to change gear and disengage the clutch.
- Noise coming from under the car when changing gears.
Which clutch bearing should I install?
The original clutch bearing number is 2108 1601182.
- Pilenga PC-P 2108 — 360 rub.
- Luk 500 0439 20 — 1156 rub.
- Fenox TP2116C3 — 345 rub.
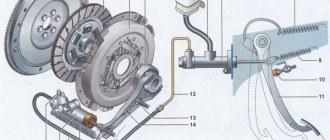
We remove the “negative” terminal from the battery “4”, remove the connector from the mass air flow sensor (MAF) “2”, loosen the clamp securing the corrugation to the MAF “3”, remove the air filter housing “1” from the car.
Remove the clutch cable from the clutch fork. Loosen the two nuts securing the cable to the bracket on the gearbox.
Remove the clutch protective cover. Disconnect the ground wire and the top dead center sensor from the clutch housing. Disconnect the wires from the reverse light switch. Drain the oil.
Unscrew the 3 bolts securing the bracket to the body. Unscrew the nut securing the arm extension.
We jack up the car. We remove two bolts “1” and disconnect the ball joint of the suspension arm from the steering knuckle. Unscrew the nut “2” securing the brace to the suspension arm, and remove the longitudinal brace together with the lever.
We remove the wheel, unscrew the hub nut and unscrew the fastening of the ball joint to the steering knuckle, then remove the CV joint from the bearing hole.
Having rested the pry bar against the gearbox housing, we press the internal drive joint from the side gear, to do this we sharply hit the body of the internal joint with a hammer. We knock out the hinge from the side gear.
Mounting a ball joint without front wheel drive.
Loosen the clamp and disconnect the gear shift rod from the gear selection hinge. It is also necessary to support the engine, otherwise it may drop too low and tear off the interior heater hoses.
Having unscrewed the bolts securing the rear suspension support of the power unit, remove the suspension bracket from the eyes of the body spar.
Using a 17mm wrench, unscrew the nut and remove the bolt of the left engine mount. Unscrew the three starter mounting nuts and remove the starter.
Using a 19mm wrench, unscrew the three bolts and one nut securing the clutch housing to the cylinder block, remove the gearbox from the engine and remove it.
Using an 8-mm spanner, unscrew the six bolts securing the clutch housing to the flywheel. To loosen the bolts easily, tap their heads with a copper hammer. You can also use a 8mm socket to loosen the bolts.
Remove the driven and driven clutch discs. We check the degree of wear of the friction linings. If the rivet heads are recessed less than 0.2 mm, the surface of the friction linings is oily or the rivet joints are loose, the disc must be replaced. Cracks or mechanical damage to parts of the driven disk are not allowed.
If a visual inspection reveals loosening of the rivet connections of the clutch basket and drive disc parts, the clutch drive disc assembly should be replaced.
Lubricate the release bearing seat on the shaft, as well as the clutch guide forks, then install the bearing.
When installing the clutch, we orient the driven disk with its protruding part towards the drive disk and insert the centering mandrel.
We insert the mandrel into the hole in the crankshaft and secure the clutch drive disc in this position, tightening the bolts evenly (one turn per pass). We tighten the bolts no more than one turn each, so as not to deform the flange of the clutch drive disc. We assemble everything in reverse order.
When to replace the clutch disc
Unfortunately, not a single manufacturer indicates exact figures for replacing or repairing the clutch, and this is not surprising, since the serviceability and service life of this unit will largely depend on the driver. It should be noted that the service life and the risk of current malfunctions directly depend on the quality of clutch operation. According to statistics, the driven or driven clutch disc often breaks. The following defects may be observed:
- any mechanical deformations;
- damage to damper springs;
- malfunction of the hub splines;
- wear of friction linings.
All these troubles indicate an urgent change of the clutch disc.
Note! Since the manufacturer does not set deadlines for changing parts, you need to remember experience and national automotive advice. Almost all technicians advise diagnosing the element once every 80 thousand km. Of course, if during this period there are no signs of a unit malfunction.
Symptoms of a problem
- clutch slip;
- shutdown is not performed;
- vibration is felt when turned on;
- the pedal does not return to the reverse position.
Note! Before deciding to replace the clutch disc, it is necessary to accurately diagnose its condition.
The corresponding check can be done either at a service center or on your own in a garage using detailed instructions. If the second replacement method is implied, the actions will need to be performed carefully and efficiently.
Reasons for replacement
Practice shows that there are several main situations that force you to change the clutch cable.
| Situation | Peculiarities |
| The clutch does not work properly | It becomes difficult for the driver to depress the clutch pedal, which causes problems when trying to move away or start the car, the clutch slips |
| Gearbox is acting up | It begins to switch with certain problems, and during operation it also makes strange, incomprehensible sounds |
| The pedal has failed | If, after pressing the clutch pedal, it does not want to return to its original position when you remove your foot, this may indicate a problem with the cable |
Such symptoms can only suggest that the problem lies in the cable. To make sure of this, you should conduct a full check of the node's condition.
All the symptoms mentioned may indicate a broken cable or a broken fork. In the case of a cable, you will have to replace it. If the fork falls off, it will need to be returned to its place and clamped in order to prevent possible repeated falls.
Between a broken cable and a broken fork, it is better to face the first situation. Buying a new cable will cost 200 rubles, and a fork costs about 2000 rubles.
How to install a clutch disc: step-by-step instructions
The clutch performs the most important function - it ensures smooth gear shifting, so that the car starts smoothly, the transmission and engine function correctly and do not fail ahead of time.
Due to the fact that the clutch experiences increased loads, it has to be changed quite often, every 100,000 kilometers. How do you know when it's time to install a new clutch disc?
The following signs indicate that this element has become unusable: slippage appears, the clutch does not disengage completely, gears are difficult to shift, the clutch pedal becomes too tight or falls, and the car loses traction.
Removing the box
To remove the box, we need to unscrew it from the engine, it is held on by four bolts, and on the other side we unscrew the cushions that secure it to the body. There are two pillows - one in a straight line, the second on the side, right under the driver's seat. Once we unscrew it all, we can remove it. It may not work the first time, you may have to pry it off with a pry bar, the main thing is to be more forceful with it and it will move away from the engine. Next, remove it or simply move it to the side. We have open access to the clutch. The clutch basket is bolted to the flywheel, the clutch disc is sandwiched between the basket and the flywheel, and the release bearing is located on the input shaft of the box and pressed by the fork.
Removing the disc basket
To replace the disc basket, unscrew the bolts in a circle. The motor may turn over at this time, so you need to stop it. We insert a bolt into one of the holes in the engine to which the box is attached, use a pry bar to rest against this bolt and against the flywheel ring gear. This way you can stop the engine to unscrew the basket. After unscrewing all the bolts, remove the clutch. Remember which side the disc was on so you don’t have to worry about how to place it later. The release bearing is much easier to remove - you just need to pull it along the shaft, the fork will tilt to the side, and it will come out. It also doesn’t hurt to lubricate the fork with grease to make it easier to turn. We put on the new release valve in exactly the same way. It is better to change all the parts at once, because they have approximately the same resource.
How to check disk thickness
- Using a measuring gauge, you can accurately determine the thickness of the disc. There is no need to remove the clutch to complete the process. You can't do without a lift with a gauge and instructions for use. This gauge is connected to the active clutch cylinder.
- It is not recommended to abuse traditional methods, since their use can increase wear on the clutch disc. You need to start the engine with 4th-5th gear active, press the gas with the clutch. If the engine does not stall, this indicates wear on the driven disk.
Replacement sequence
Remove the clutch cover
Remove the gearbox. Insert a mandrel or some old shaft into the hole in the pressure plate)
You must act very carefully so that the driven disk does not fall out of the casing. Using a screwdriver, block the flywheel and remove the housing fastenings (6 bolts). Remove the casing together with the driven disk. Inspect the driven disk.
Inspecting the driven disk
Carefully inspect the driven disk and all its elements. The most important thing is that there are no cracks on them. Check the wear of the friction linings. The driven disk must be replaced in cases where:
- very weak rivet connection;
- oil was found on the surface of the friction linings;
- rivet head depth less than 0.2 mm;
- Disc damper springs are broken.
Finally, you need to inspect the pressure plate and flywheel. They must be free of nicks, burrs, deep scratches, serious signs of overheating and wear.
The rivet connections of the pressure plate must not be loose. If you suspect one of these defects, then you need to change the flywheel or pressure plate accordingly.
Checking all clutch parts is carried out only for the purpose if there is an intention to change a specific part. In most cases, the entire set is replaced.
In reverse order, the clutch is assembled and put into place.
Let's summarize
If the check shows that the free play is normal, but you doubt your competence in adjusting the unit, contact a service station. Incorrect settings can cause rapid clutch failure. If you want to complete the work yourself, you can find the necessary information on the vehicle manufacturer’s website or in its service book. It is important to complete the work in a timely manner so as not to get into an unpleasant situation on the road. Monitor the service life of clutch parts; for example, the service life of the driven disc is 100 thousand kilometers. But, if a motorist has an aggressive driving style, it can decrease by 2-3 times. How to replace a VAZ 21099 clutch, watch this video:
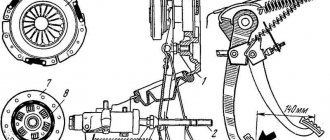
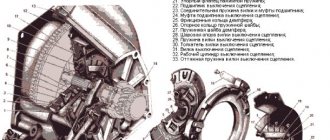
Design
The clutch is located between the gearbox and the engine and is bolted to the flywheel. To remove it, you need to disconnect the box from the engine. There is nothing complicated, but the box is quite heavy, so it is better to remove the box together. For convenience, you can use a lift, a hole in the garage, or an overpass, but you can make repairs simply on the ground; you only need a jack to remove the wheels.
The picture shows:
- Clutch cable bracket
- Oil level dipstick
- Box casing for mounting to the engine
- Rod and fork for pressing the release bearing
- Primary shaft
- Release bearing
- The wheel drive shaft oil seal, behind it there is a differential with which the drive is connected.
- Gear shift mechanism with protective cover
- Side cushion
- Speedometer drive
And to remove the box, you need to disconnect it all. Moreover, this can be done in several ways. For example, the box can not be completely removed, but only moved away from the engine to provide enough space to access the clutch. The wheel drives can be disconnected from the box, or you can remove the box along with the drives by unscrewing them from the wheels. In this case, there will be no need to drain the oil from the box, since the drives will close their mounting holes.
When is it necessary to change the unit?
The mechanism requires servicing in the following situations:
- The clutch "drives". Motor power drops.
- The unit slips or incomplete activation occurs.
- Clicking noises are heard when changing gears.
- The clutch disengages automatically.
- Vibration is noticed when the clutch pedal is pressed.
In each of the above cases, it is recommended to carry out partial maintenance or replace the unit in question.
Replacing the VAZ 2109 Clutch Without Removing the Box
Replacing the VAZ-2109 clutch without removing the box
Even if you follow all the instructions given in the car's owner's manual, replacing the clutch is not easy at all. A necessary condition for this is that not every car owner has a pit, an overpass and, to put it mildly, an elevator.
If you go up to 100, the clutch will change in almost an hour, but the price won't lift your spirits and most likely a whole day, if not two, will be useful for this task. It all depends on your knowledge and speed. Most of the time is spent on disassembly and assembly, and the installation of the parts themselves takes 20-30 minutes. How to do without a pit and an elevator?
Beginning
The first thing that a car enthusiast is usually interested in when replacing a clutch is: is it possible to make the replacement without removing the gearbox? No matter where you find the answer, look at the video or photo, there is no single answer. After all, it is possible that you will come across someone's review that says that the procedure is quite possible. In addition, they can even give examples for you. Then you will understand everything. It's time to get down to business and change the part yourself.
READ Timing Belt Replacement Lifan Solano 1.6
First you need to find a couple of huge stumps, about 40 cm high, and several bars. To ensure safety and prevent the vehicle from falling during repairs, it is necessary to install two regular wheels under the bottom of the vehicle.
Even while under the car, you may hesitate to remove the transmission because if the transmission falls to the ground, it will be very difficult to pick it up since it is almost impossible to crawl through the bottom of the car. First, you need to completely disconnect the battery by turning off the entire system. Then the whole process begins. The next step is removing all the unnecessary details, namely:
Clutch replacement
VAZ output bearing
2114 (
VAZ
2108,
2109
)
without removing the box
, discs (grenades) and sewerage.
YOU 2110 OPEN THE COVER WITHOUT removing the box and drain the oil, repair it yourself!
Receive benefits for repairs, maintenance and repair of VAZ
2110 (Lada 2110).
- wheels. After removal, they should be rolled up and turned over so that nothing interferes;
- empty the shelves. To do this, remove the steering tips;
- unscrew the ball bearing mounting bolts;
- then the motor protection must be removed using a cable;
- drain all the oil from the box;
- on the wings, loosen the nut and then remove it;
- unscrew all the nuts on both pillows;
- The jack or other support should now be placed under the engine;
- disable the reverse sensor;
- the starter must be carefully disconnected, unscrewed and removed;
- unscrew the flywheel nuts and plugs;
- Next is a very important point. It is necessary to remove the CV joint, but only on the right side, no need to touch the left;
- unscrew to the gearbox.
- last step. get rid of the nut above the right suture joint.
READ Rav 4 Headlight Washer How to Enable
Nuances of the work
Following all the recommendations from the automaker's manual does not guarantee that everything is done simply and quickly. Not every car owner has the opportunity to drive the car onto a pit or overpass. A lift is perfect for carrying out work, but not everyone has one either.
When you contact any service, the replacement will be made within a couple of hours, but for such a service you will need to pay a considerable amount. It may take a whole day to do the work yourself. Maybe more if you don't have experience in car repairs.
Most of the time is spent on disassembly and assembly. The operation to replace the node will take you no more than half an hour. Later in the article we will look at the process of replacing a clutch without a pit/lift.