Many domestic cars with carburetor engines have a traction drive of the carburetor throttle valve. It is not clear why this design was made, but certainly not for the convenience of the driver.
- the mechanism does not allow precise dosing of the force on the pedals, therefore the addition of gas does not occur smoothly, but in jerks;
- the rods have play in the brackets, which does not add comfort when operating the engine;
- Additional noise and vibration penetrate into the cabin through the metal of the drive.
The only advantage of the traction mechanism is high reliability. Perhaps this was the reason for the development of such an archaic unit, but the numerous disadvantages of such a solution outweigh its only advantage. It is no wonder that many owners of such cars try to replace the traction with a cable.
What is a throttle cable
By throttle cable, car enthusiasts understand the throttle cable, which plays an important role in the proper operation of the vehicle. The throttle valve is a structural part of the fuel intake system into an internal combustion engine. Its main function is to regulate the amount of air supplied to the engine for the air-fuel mixture. This damper is located between the air filter and the intake manifold. If the throttle valve opens, the pressure in the intake system is compared to atmospheric pressure. If it is in the closed position, then the pressure drops to vacuum. This action of the throttle valve is necessary to enhance the operation of the vehicle’s braking system and to ventilate the adsorber in the gasoline vapor recovery system.
A special cable is used to open and close the throttle valve. This is where the main point of wear occurs during operation of the damper.
How to adjust a cable pedal?
If the carburetor cable is set correctly, but there is still play, the problem is in the pedal itself. To return the damper to its original state, a spring is installed on the pedal. It can be spiral or regular, tensile. Over time, elasticity is lost and the spring must be replaced.
In addition, play in the rotation axis is possible. After adjustment, the pedal should not move horizontally, otherwise it can get caught on the side wall of the central tunnel and the unit will jam.
When the throttle cable needs to be replaced
How to determine the moment when the VAZ-2110 throttle cable requires replacement? Experts recommend paying attention to the following points in the operation of this vehicle part:
- it is not possible to regulate the throttle valve drive;
- when pressing the accelerator pedal, the damper cannot open and close fully;
- the metal part of the cable began to “shag” (this can be seen visually when checking the internal parts of the car);
- When the throttle valve is operating, the gas cable constantly gets stuck.
If you find one of these problems in the operation of your vehicle, then you need to immediately buy a new throttle cable and replace it.
To understand the process, consider the principle of operation of the mechanism
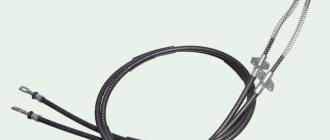
The photo shows a cable drive.
- Actually, the cable is in a protective sheath, the second side is connected to the pedal;
- Rotary sector-pulley connected to the damper axis.
When you press the gas pedal, the cable turns the sector-pulley to the desired angle. The movement is smooth, linear dependence. This allows you to accurately control the opening of the damper. The design of the pedal may differ from the “old-fashioned” floor pedal. It is suspended from the front panel, and moves in a similar way to the brake and clutch.
There are cable and even electronic throttle designs with a floor pedal, but these are more a tribute to tradition than a functional solution.
The only drawback of the cable is that it wears out and can break. True, replacing it is a fairly simple procedure.
Removal
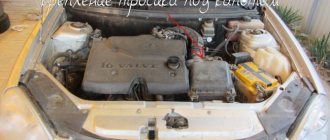
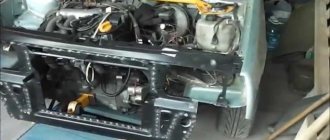
1. We prepare the car for work (see paragraph 2a “Preparing the car for maintenance and repair”).
2. Remove the air supply hose to the throttle valve.
Note. The air supply hose to the throttle valve will interfere, especially when installing a new cable.
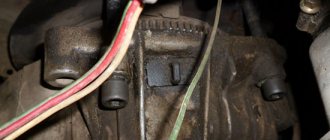
3. Use a slotted screwdriver to pry up the locking spring and remove it from the sector.
4. Turning the sector counterclockwise until it stops, remove the end of the throttle cable from the sector slot.
5. On the VAZ 21124 (l.6i) injection engine:
remove the locking plate of the throttle cable casing and pull the cable casing out of the rubber holder. We remove the throttle valve drive cable together with the rubber holder from the bracket for fastening the cable sheath (the bracket is integral with the intake module).
On the injection engine VAZ 2112 (l.5i):
remove the plastic cable end (3) and unscrew the nut (2). Remove the throttle valve cable from the bracket.
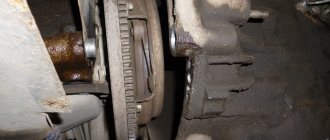
6. We pull the cable with the sheath through a plastic clamp or cut the clamp with wire cutters (a new clamp will be required during installation).
7. Under the instrument panel, prying it with a screwdriver, disconnect the cable end from the gas pedal lever.
8. Pull the end of the cable out of the passenger compartment through the hole in the engine compartment partition and remove the cable along with the rubber holder.
Bowden cables
Since they are properly called couplings or gas lines, they consist of a steel cable running in a metal armor protected on the outside by a layer of plastic. In older motorcycles, the cable usually slides in a metal frame. In newer ones, an additional plastic layer reduces friction and protects the cable from damage and makes handling easier. Typical damage to cables includes a broken ferrule - where it attaches to the handle or roller gas - and shielded armor, which causes water ingress and rusting of the element.
Lubricating the cables is very easy, especially if you have what we have in our hands - a special device thanks to which the operation takes place instantly, since the cables do not need to be disconnected from the motorcycle. When you visit the websites of Larsson, Polo, Hein Gericke or search for “cable lubricator”, you will find a simple but effective solution - the device is inexpensive, so it will not empty your pocket. In addition, the device is universal and fits the diameters of all cables that are on your motorcycle.
Rear Derailleur Settings
It is convenient to lubricate, adjust and repair chain drive units with the rear wheel raised. To do this, you can tilt the bike, leaning on the side stand, hang the bike on hooks or an ironing board, or ask a friend for help. A stand for the rear wheel will come in handy in this situation.
1. Preparation:
- clean the gear selector and sprocket cassette thoroughly;
- Place the chain on the middle sprocket at the front and the smallest sprocket at the rear.
To properly adjust the rear transfer switch, it needs to be cleaned. Namely: clean the tensioner rollers from dirty lubricant, remove blades of grass and sticks from the sprocket cassette, wash and lubricate the chain. Even after this simple work, the switch begins to work noticeably better.
2. Releasing the cable:
- screw in the tension screws on the rear shifter and the shifter until they stop;
- Pull the cable out of the mounting clamp screw.
It is not necessary to completely remove the cable from the bicycle, but it will not hurt to inspect it for damage and lubricate it.
3. Setting the travel limit to the smallest sprocket: sitting behind the bike and turning the adjusting screw H, set the derailleur to a position in which its rollers and the smallest sprocket in the cassette are in the same straight line.
There is one trick here: if the thrower is no longer new, and it is wobbly, then you can adjust it more or less accurately only by placing the frame not in a straight line, but moving it literally a hair's breadth to the right, away from the wheel.
If the setting is done correctly, then when the wheel rotates, the chain does not try to jump to the side and works silently.
4. Adjusting the cable tension:
- fix the cable with a fastening bolt, pulling the cable not with pliers, but with your hand;
- we tighten the cable by rotating the hollow screw with the drum, so that the transfer mechanism easily moves from one sprocket to another and back with one click and pressing the shifter.
It is enough to adjust the transition only between two adjacent sprockets, and the shifting will be adjusted on all sprockets of the cassette. This is the advantage of the index gear shift system.
If there is a groove in the clamp for the cable, then make sure that it fits exactly into it and is not squeezed if it is not secured correctly.
5. Setting the travel limit to the largest sprocket:
- loosen the adjusting screw L so that it does not interfere with the movement of the transfer device;
- turning the pedals, we throw the chain onto the largest sprocket at the rear;
- By turning the adjusting screw L, we align the transfer mechanism in a position where its rollers and the largest cassette sprocket are exactly on the same line.
Again, if your bike has a rickety derailleur, then it is advisable to move its frame a little when adjusting from a straight line, but towards the wheel. Sometimes this is exactly what a loose derailleur needs to transfer the chain to the largest sprocket at the rear.
6. Chain tensioner adjustment:
- move the chain to the smallest sprocket in front and the largest in the back;
- If, when the chain rotates, the upper tensioner roller touches the sprocket in the cassette, then tighten the chain tension screw. It is necessary to establish a gap between them approximately equal to 5 mm;
- We move the chain to the largest sprocket at the front and the smallest at the back and check the chain tension in this position.
Replacing the VAZ 2109/2110/2112 clutch cable with your own hands
Starting with model 2108, VAZ cars began to use a cable as a drive for the clutch mechanism, and not, as in classic models, a hydraulic drive.
This greatly simplified the design. The cable really turned out to be more convenient, so they used it on other modifications - 2109, 2110, 2112, etc.
Malfunctions and reasons for their occurrence
But this type of drive is also not eternal and problems with it will only be a matter of time.
Over time, the cable threads corrode and break, which is why at one point when you press the clutch pedal, it remains in the depressed position and does not return to its original position.
For the same reason, it happens that pressing the pedal and returning it is difficult, and a grinding noise can be heard. This is a consequence of the “fluffing” of the cable - rotted metal threads rest against the braid, significantly complicating movement.
All these malfunctions occur for one simple reason - moisture gets inside the braid, which leads to corrosion.
And although manufacturers are trying to combat this problem by applying a polyethylene protective layer over the cable, such measures can only extend the service life.
And here, too, everything is simple - while moving, the cable rubs against the braid and over time the protective layer wears off. Lubricating the cable also provides only temporary protection.
Corrosion is not necessarily the cause of the burst. Very sharp squeezing of the pedal, for example, during a difficult traffic situation when the driver kicks it with all his might, can also lead to destruction of the cable.
In any case, if problems arise with the drive, the cable must be replaced, since it cannot be repaired.
Note that the cause of the failure of the clutch pedal can be not only the cable, therefore, if such a malfunction occurs, first of all you need to make sure that the drive has broken.
The fact is that there are cases when the clutch release bearing control mechanism breaks, which is a much worse problem than the destruction of the cable. After all, in case of such a malfunction, you will have to remove the gearbox from the car in order to repair the mechanism.
But a cable break is a malfunction that can be very easily eliminated if you have a spare element.
And since such a problem on a VAZ can appear at any time, it is recommended to always carry a new cable with you in the trunk.
What will you need?
Another positive quality of the cable drive is the ease of replacement. The whole operation takes about 20 minutes, even for a novice VAZ car owner. Moreover, everything can be done even in the field, with a small number of tools at hand.