As a rule, the main and slave cylinders are fairly reliable parts that very rarely fail. In most cases, they cannot be repaired. The good news is that these units are inexpensive and easy to replace yourself. For minor faults, it is recommended to carry out repairs, which is not a difficult undertaking. Below we will look at how to replace both clutch cylinders.
Installing the clutch master cylinder repair kit
It is not difficult to determine when it is necessary to repair the master cylinder; the main signs of its malfunction are:
- Insufficient clutch release (clutch drives)
- Any type of leakage, whether from under the nuts securing the hose and tubes, or from the end from under the rubber seals
- Master cylinder stuck in pressed position
In my situation, the main leak was due to a worn out sealing ring, in other words, fluid flowed down the clutch pedal into the passenger compartment.
I started the repair by dismantling the reservoir hose, unscrewed the clamp on the main cylinder and quickly removed it from the main cylinder, turned it up and pinched it behind the reservoir cap so that the liquid did not flow out of the reservoir. Next, I unscrewed the tube that goes to the working cylinder, I did this with a special key, it’s a pity there is no photo, but you can buy one without any problems at any auto store. All that remains is to unscrew the main one itself, it is secured with two 13 nuts and remove it from under the hood.
The boot was removed and it was noticeable that fluid was flowing from here.
Having picked up the boot with a screwdriver, I saw exactly where the liquid was flowing from; the assumption was absolutely correct.
Next, you need to wipe the cylinder, remove dirt and rust.
Attention. Do not use gasoline or similar liquids for washing, as they will very quickly ruin the new rubber bands. To flush the clutch and brake elements, use clean brake fluid.
After cleaning the dirt, you can begin disassembling. To do this you will need an awl or similar object.
Next, you need to carefully remove the insides, keeping in mind that the piston is under the action of a spring.
This is what it looks like
Next, you need to clean the master cylinder body, you cannot scrape the parts with a screwdriver, sandpaper, etc., this is just in case, I use a rag with brake fluid. In repair manuals, I often came across such expressions that if rips, scratches, etc. appeared on the parts, then it is unusable. But despite all this, practice shows that despite all the risks, provided that a high-quality repair kit is installed, the master cylinder works without problems. I used this kit:
Repair kit for clutch master cylinder VAZ
We remove the old rings, clean all the grooves and holes. There should be no dust or debris there.
The ring is removed, clean the piston, install a new one
Thanks for subscribing!
And by the way, here is the reason for the clutch cylinder leaking:
The ring is not worn evenly
After cleaning and replacing the rings, you can assemble the cylinder, below is a photo of what should be there and how:
Here is a photo not cleaned, I added it here to show the correct assembly
Having assembled the cylinder, install the corkscrew ring
Bleeding the clutch on a VAZ 2106
After the repair has been made, it is necessary to bleed the clutch. In all repair manuals you can find standard instructions for bleeding the clutch, but it may not always help.
- The first bleeding option is standard; it consists of filling the tank with liquid, unscrewing the bleeding fitting, putting a hose on the fitting, and lowering the other end into a container with clean liquid. Then, by pressing the pedal, we monitor when the air stops being released, and also do not forget to control the level in the tank.
- The second method is to use an assistant - one person presses the pedal 4-6 times and keeps it pressed to the floor. The second unscrews the bleeder fitting; air bubbles should come out of the fitting; as soon as they stop coming out, you need to screw the fitting in and then release the pedal. And so on until normal operation of the pedal is restored and air bubbles stop coming out.
- There is also the simplest method of pumping, but which does not always work - to implement it you just need to pour liquid into the reservoir and unscrew the fitting on the working cylinder. The liquid will flow by gravity through the entire system and when it begins to flow steadily out of the fitting, it can be closed and the pumping can be considered complete.
Clutch replacement
Often when replacing a clutch, the release bearing is also replaced. This procedure is quite simple to do. On an already removed gearbox, the bearing is located on an element of the gearbox input shaft. To remove the release bearing (on 1.5 and 1.6), use a screwdriver to remove the retaining ring, then remove the old bearing and, after cleaning the seat, install a new one. We also install the new retaining ring from the kit. On cars with engines 1.8, 2.0 and 2.4, a hydraulic bearing is installed and the process of removing it is somewhat different, but in general it is practically no different from that indicated above.
The process of replacing the clutch disc itself is extremely simple - unscrew the bolts securing the clutch basket from the flywheel, then, holding the clutch disc, carefully pull it together with the basket.
We check the clutch basket petals for rigidity, inspect the petals for cracks and chips.
Then we apply lubricant to the clutch disc splines, after which we install a new clutch disc on the flywheel. Now the disk must be adjusted using a special mandrel to center the driven disk.
Now we install the basket back, remove the centering mandrel and tighten the bolts securing it to the flywheel. Tightening the bolts should be done carefully, tightening each bolt with a slight force of half a turn in a circle. Adjustment and tightening of the bolts with a torque wrench is carried out with a force of 15-20 Nm.
After replacing the clutch parts, install the gearbox and all other parts in the reverse order and pour new oil into the gearbox.
Product location
The master cylinder on a VAZ 2107 is located under the hood, directly on the wall separating the interior from the hood, near the driver’s feet. Directly above it is the expansion tank, and next to it are the vacuum booster and the brake master cylinder. Usually, simply looking at the product is enough to determine the problem. The presence of a leak indicates that the part is faulty and requires repair or replacement.
Purpose of the device
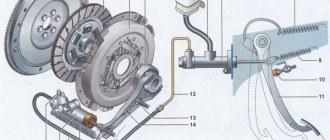
Cars are equipped with clutch master and slave cylinders, without which the operation of the mechanism is impossible. The VAZ 2107 clutch master cylinder is designed to push out brake fluid. Below is a diagram from which you can visually find out the operating features of the unit.
When you press the clutch pedal, the piston moves in the device in question, thereby pushing out the brake fluid. This liquid enters the working cylinder through a tube, where the reverse process is observed (the liquid pushes out the piston). Brake fluid drives a piston, which is connected by a fork to the clutch disc. As a result, the clutch disc and flywheel are separated, allowing you to change gear. The GCS is also called the main one, since it is with its help that force is supplied from the pedal when it is pressed.
The need to replace the device: when required
Like all parts of any car, the GVC tends to wear out, resulting in the need for repair or replacement. The simplest breakdown of a product is wear of the boot, which can be determined by the characteristic signs of a fluid leak.
To identify a cylinder malfunction, an initial visual inspection is required. It is possible to repair a failed main circulation system on a VAZ 2107; for this you can look for repair kits, but this is not always rational due to the quality of modern spare parts, so it is easier and faster to replace it entirely. The malfunction can also be determined by the characteristic loss of pressure in the system, which is determined by pressing the pedal. Let’s take a closer look at how to change a faulty VAZ 2107 mechanism.
We change it ourselves
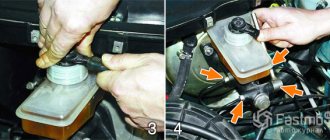
Replacing the VAZ 2107 clutch master cylinder begins with the need to pump out the brake fluid from the hydraulic reservoir. This can be done using a syringe or a rubber bulb. Together with this socket or a 10mm wrench, unscrew the bracket securing the expansion tank and move it to the side to gain access to the cylinder.
The next step involves removing the clutch expansion tank hose. To do this, you need to loosen the hose clamp, then disconnect the hose and position it so that it does not interfere with further work. If you want to remove the tank completely, this is done very simply.
Further actions are performed in the following sequence:
- Using a “10” wrench, you need to unscrew the pipeline securing nut to the device. Once the nut is unscrewed, the tube can be moved to the side.
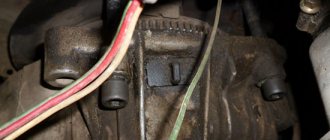
- There is a hose nearby near the steel pipeline, which also needs to be disconnected from the main device. This can be done by loosening the fixing clamp.
- The GCS is fixed to the body using two fastening nuts. To unscrew them, you will need to use a wrench with an extension and a “13” socket. After unscrewing the two nuts, you can remove the product and drain the remaining brake fluid from it. If it is not possible to dismantle the unit, you can press the clutch pedal, as a result of which it will move.
- But repairs are usually not rational, so after removing the old one, a new unit is installed in its place. Installation is carried out in the reverse order of removal. After installation, it is necessary to carry out the process of pumping the hydraulic drive, first pouring fuel fluid into the tank. You can find out how the system is pumped from the relevant material on the website.
What's the best way to change?
It is best to replace the device by placing the car on a lift, overpass or inspection groove. If this is not possible, then you can raise the car using a jack to get to the unit from below. For safety, you need to fix the wheels so that the car does not roll or put on the hand brake.
Tools
To carry out repairs, you need to prepare the appropriate tools:
- set of keys;
- screwdrivers;
- pliers;
- clean rags;
- jack;
- new consumables.
When choosing a new replacement kit, you need to buy original parts, preferably assembled.
Stages
The replacement procedure consists of the following steps:
- Having opened the hood, first of all you need to turn off the power to the car. To do this, you need to remove the negative terminal from the battery.
Engine compartment of VAZ 2107
Removing disks from a node
Installing a new drive
After the repair is completed, the vehicle system should be checked for functionality.
VAZ cars: repair, maintenance, tuning
Failures in the clutch operation of the classic VAZ 2107 - VAZ 2101 must be eliminated immediately. The clutch hydraulic drive system is not too complicated, maintenance work does not take much time, so removing, disassembling and repairing the VAZ clutch master cylinder will not be difficult even for novice drivers. Let’s find out how to deal with problems in the VAZ clutch right now.
When is it necessary to change?
The clutch system allows the car to move off smoothly, removing the load from the engine, which reduces wear on its parts and extends its service life. Overloads are caused by an inertial moment formed during the rotation of parts of the power unit if the crankshaft speed has sharply decreased.
VAZ 2107 assembly diagram
There is no specific time frame for replacing the unit, since the service life of this device mainly depends on operating conditions and the driver’s driving style. It is recommended to diagnose the device after 80 thousand km.
Clutch drive device VAZ 2107
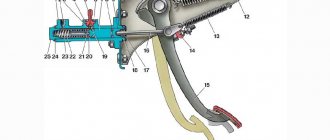
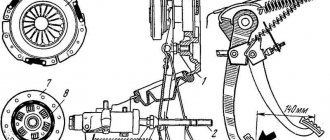
We dealt with the clutch mechanism of the classic VAZ 2101-2107 not so long ago. There is nothing complicated there either and you can refresh your knowledge here. In all rear-wheel drive VAZ cars, the clutch release drive is hydraulic. The clutch master cylinder is installed in the engine compartment on the shield, the cylinder is located coaxially with the clutch pedal rod. A pusher is attached to the pedal itself through a hinge, which presses directly on the master cylinder piston. The VAZ clutch drive diagram is presented below.
Clutch drive diagram VAZ 2101-2107
Thus, the rod, through the pusher piston, acts on the incompressible brake fluid in the master cylinder, which transmits force to the piston of the working cylinder, already installed on the gearbox housing through the hydraulic hoses.
Hydraulic drive installation
Replacing a mechanism involves purchasing it in a retail network or via the Internet. Installation work is performed in the following sequence:
- The clutch master cylinder of the VAZ 2107 is put on the studs and pushed all the way to the base.
- The nuts are screwed onto the fasteners and tightened with a wrench to “13”.
- The union nut of the pipeline laid to the working hydraulic drive is screwed into the main cylinder.
- The rubber tube is connected to a plastic connecting element and secured with a clamp.
- The expansion tank is filled with brake fluid, which enters the main and slave cylinders of the clutch through tubes. Replacing the fluid in the system is mandatory due to wear products.
Upon completion of installation of parts, it is necessary to inspect and check the tightness of the nuts. Replacing the main or working clutch drive of a VAZ 2107 car ends with bleeding the system.
Source
Malfunctions of the VAZ 2107 clutch master cylinder
Like any mechanism, the master cylinder is subject to wear, which reduces the efficiency of the system as a whole. The main malfunctions of the cylinder are fluid leaks or loss of nominal dimensions of the cylinder mirror, piston, wear of cuffs and seals. This is expressed in incomplete disengagement of the clutch, the pedal may fall through or be too tight. At the first suspicion of the clutch drive, we perform an initial diagnosis of the system:
- Check the fluid level in the clutch reservoir. A level that is too low indicates a brake fluid leak.
- Inspect the master cylinder for leaks. It should be taken into account that it can leak both in the area of the hydraulic drive fitting, the plug gasket, and in the area of the protective cap, which faces towards the pedal. In this case, the liquid will penetrate into the interior under the carpet and the leak may not be noticed immediately.
In this case, the leak was caused by wear of the piston cuff; fluid flowed into the passenger compartment. - If the clutch starts to engage only after a few presses of the pedal, then most likely air has entered the drive system. In this case, it is necessary to find out the cause of airing (loss of tightness, leak of the main or working cylinder), and only then perform bleeding and removal of air from the hydraulic system.
Lancer X clutch
One of the main parts in a car is the clutch, thanks to which torque is transmitted from the crankshaft and flywheel to the elements of the input shaft, and then through the gearbox to the drives.
In Mitsubishi Lancer X cars, there are two types of gearbox: manual and automatic. If the clutch “disappears” (slips, etc.), the clutch disc must be replaced.
We continue the series of articles dedicated to Mitsubishi Lancer 10th (generation) cars. Today we will talk in detail about how to select clutch elements (the required kit) and replace them yourself.
How to check the VAZ clutch cylinder, free play adjustment
In order not to do unnecessary work, it is better to spend half an hour and conduct independent diagnostics of the clutch drive. To do this, it is enough to place the car on a flat surface, it is advisable to have access to the gearbox housing from below (pit, overpass). Next, we check the operation of the system in this order:
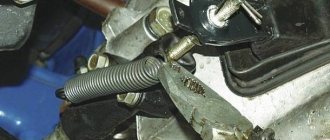
- From inside, we check the free play of the clutch pedal. The nominal free play is from 0.4 to 2 mm. If adjustment is necessary, take a 10mm open-end wrench and loosen the lock nut of the limiter A in the photo below, setting the free play.
- We go down under the car and check the free play of the working cylinder pusher. Before doing this, it is advisable to apply WD-40 penetrating lubricant to it. To do this, press the pusher fork back with your fingers; the free play should be within 5 mm.
- To adjust the free stroke of the rod, use keys 13 and 17 to loosen the locknut.
- Using a 8mm wrench we hold the rod, and using a 17mm nut we achieve such a rod length that the free play is within 5mm.
- We tighten the locknut, go into the salon and check the free play of the pedal until the clutch disengages , which should be within 30 mm. If necessary, add brake fluid to the reservoir.
Symptoms of a problem
The need to repair the clutch assembly is determined by the following criteria:
- extraneous noise occurs when changing speeds;
- the device slips, especially under load;
- the clutch does not disengage completely;
- rattling;
- jerking when starting to move;
- The clutch pedal falls out.
If the described signs appear, it is better not to delay repairs in order to avoid unpleasant surprises along the way.
This video shows the process of replacing a unit on a VAZ classic.
How to remove the clutch master cylinder VAZ 2107 - 2101
During operation, rubber parts and the piston most often wear out, and after 200 thousand mileage it is necessary to carefully check the cylinder mirror.
VAZ master cylinder mirror with signs of wear
In order to remove the VAZ clutch master cylinder, you must first drain the brake fluid from the system. To do this, first of all, we put the hose on fitting 9 of the working cylinder (photo below), and lower the second end of the hose into a clean vessel.
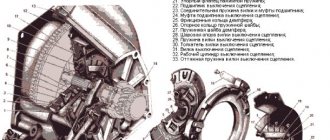
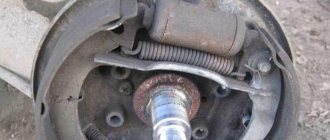
Slave cylinder and clutch release fork: 1-clutch release bearing; 2-ball joint; 3-clutch release fork; 4-pusher; 5-adjusting nut; 6-lock nut; 7-tension spring; 8-body plug; 9-fitting for bleeding; 10-cylinder body; 11-o-ring; 12-wire cap; 13-piston; 14-seal; 15-plate; 16-spring; 17-support washer; 18 circlip
After this, unscrew fitting 9 half a turn and press the clutch pedal until all the liquid goes into the container. Screw in the fitting and remove the tube. If you need to remove the working cylinder (obvious leak, damage to the boot), remove spring 7, the cotter pin from the end of the pushers and unscrew the two mounting screws. To remove the master cylinder, simply disconnect it from the expansion tank and unscrew the two fastening nuts, as shown in the photo below. Remove the cylinder by unscrewing the hydraulic drive fitting.
Algorithm for removing the gearbox
To remove the gearbox, you need to remove the engine protective cover, disconnect the terminals from the battery and remove it, after which you should remove the air filter.
Then you need to remove the intake manifold; to do this, remove all the terminals from the sensors located on the manifold, intake tract and throttle assembly. We also remove the fuel rail, crankcase ventilation and air conditioning hoses.
Then unscrew the intake manifold mounting bolts in the following order.
Now we remove the decorative panel of the bumper, unscrew the ground from the gearbox housing, remove the ECU mount and move the unit to the side.
Then we lift the car on a lift or use a pit. We unscrew the fastenings of the crankcase protection and mudguards, and also drain the oil from the box. The next step is to remove the starter from the car.
We also disable the chip on the speed sensor at the gearbox. Then we remove the control rods and cables from the gearbox, they are easy to remove, just pry them off with a flat screwdriver and apply force. After that, all that remains is to unscrew the connecting bolts of the gearbox, as well as the rest of the attachments from the engine compartment.
Then the wheel is removed and the CV joint is removed from the gearbox. We have already talked in detail about how to replace the boot yourself, and the algorithm for removing the CV joint from the car is also described there.
To remove the internal CV joint grenade from the gearbox housing, we use a crowbar. From the bottom of the flywheel, unscrew the 4 bolts securing the small “pallet”. Unscrew the remaining gearbox mounting bolts. There is nothing complicated here, with the exception of one complex bolt located next to the engine mount.
To do this, use an open-end wrench to unscrew the mounting bolt next to the cushion, jack up the gearbox as high as possible and remove the last mounting bolt. At this point, the main thing is to securely fix the gearbox on a jack or a special rack.
Then, using rocking movements, carefully disconnect the gearbox and pull it out.
Repair of clutch master cylinder VAZ 2107
After dismantling the master cylinder, carefully wipe it from any remaining liquid and dirt and clamp it in a vice for disassembly.
First, let's estimate from the diagram which parts of the cylinder will need to be replaced.
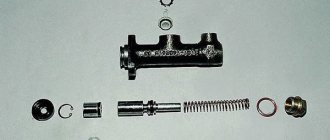
Master cylinder parts: 1-body; 2-lock washer; 3-fitting; 4-gasket; 5-cap; 6-stop ring; 7-piston pusher; 8-o-ring; 9-piston of the main cylinder; 10-spring
First of all, after disassembly, we check the condition of the cylinder mirror. If the internal diameter is larger than the nominal 19.05 mm, there are obvious deep scratches and stepped wear on the mirror, repair does not make sense. You'll have to buy a new cylinder. If everything is fine with the mirror, we proceed to inspect the piston return spring. If it has lost its elasticity, we only change it. Next, using a standard repair kit, we replace all seals 8 and boot 5.
Complete repair kit for clutch master cylinder VAZ 2107
After replacing worn parts, we thoroughly rinse the entire cylinder and each part with fresh brake fluid, only then reassemble it according to the diagram.
Parts and their compatibility
Clutch parts on Mitsubishi Lancer X differ from each other. Depending on the engine model, the clutch baskets also differ. So, for cars with 1.5 engines, their own clutch elements are provided, for an engine with a displacement of 1.6 parts - completely different clutch elements. But clutch parts for cars with 1.8 and 2.0 engines are unified with each other, and accordingly, some parts are compatible with each other. Some parts of the gearbox parts for 2.4 cars are also compatible with versions 1.8 and 2.0.
For more precise specifications, we provide the numbers (codes) of these parts for each engine version. After reading this list, owners of Lancer 10 cars will be able to understand which clutch to install specifically for their version of the car. The price of these items will vary depending on the supplier and brand of the part.
Clutch parts for internal combustion engines with a displacement of 1.5:
- clutch disc, original - 2301A054, analogue - Exedy (MBD107);
- clutch basket, original - 2304A029, analogue - Exedy (MBC642);
- release bearing, original - 2960A042, analogue - SACHS (3189000027);
- mounting bolts - MN 168910, 2960A031 and guide pin - 2960A031.
Clutch parts for internal combustion engines with a volume of 1.6:
- clutch disc, original - 2301A088;
- clutch basket, original - 2304A038, analogue - Exedy (MBC649);
- release bearing, original - MD722744, MD749998.
Clutch parts for internal combustion engines with a volume of 1.8:
- clutch disc, original - MN132331, analogue - Exedy (MBD104) (also compatible with ICE 2.0);
- clutch basket, original - MN132330, analogue - Exedy (MBC640) (also compatible with internal combustion engines 2.0 and 2.4);
- release bearing, original - 2324A080.
Clutch parts for internal combustion engines with a displacement of 2.0:
- clutch disc, original - MN132331, analogue - Exedy (MBD104) (also compatible with ICE 1.8);
- clutch basket, original - MN132330, analogue - Exedy (MBC640) (also compatible with ICE 1.8 and 2.4);
- release bearing, original - 2324A080.
Which clutch master cylinder is better to install on a VAZ 2107, articles and prices
To completely replace the VAZ 2107 - VAZ 2101 clutch master cylinder, analogues from other cars are not suitable. Fortunately, there are more than enough original cylinders and analogues on sale. As a rule, the public tries to choose a branded VAZ cylinder with catalog number 2101-1602610 . Other manufacturers also use this article, but when purchasing, it is better to start not so much from the price of the cylinder, but from the level of trust in the brand. A branded master cylinder will cost us 8-9 dollars and this is one of the most expensive options.
Next, you can choose from what is on the counter:
- The DK cylinder is half the price of the branded one, but often leaks due to poor-quality plug gaskets. As a temporary option, it will do.
- BAZALT , price about 200 hryvnia (about 7 dollars), Basalt and Phenox are highly not recommended due to the disgusting quality of mirror polishing.
- Excellent German Metelli , price approximately equal to the original one, factory article number 55-0014G .
- German ATE, HORT do not cause any complaints, the price is around 10 dollars.
- There are a lot of Chinese cylinders, like AT 2610-001H , the price is about 6 dollars, the quality is unstable.
Instability in China
Upon completion of the master cylinder repair work, fill in DOT4 brake fluid from any manufacturer and bleed the clutch drive in the same way as bleeding air from the brake system.
Clutch replacement tool kit
Replacing a clutch is a very responsible task that requires a lot of knowledge and tools. You can carry out this operation yourself only if you have all the necessary tools and knowledge of how to work with a car. To complete this work you will need:
- set of socket wrenches and heads;
- set of screwdrivers (phillips and slotted);
- lift or pit;
- hammer;
- gearbox oil;
- jack - 2 pcs;
- crowbar;
- special support to support the gearbox during removal.
The step-by-step guide and photo report are aimed at advanced car owners with experience in car maintenance. So, since the Mitsubishi Lancer X has front-wheel drive, removing the gearbox from the car will require partial disassembly of the engine compartment and removal of one of the wheels. Only after removing the gearbox can you gain access to the clutch parts.
When is clutch bleeding required?
Bleeding the clutch hydraulic drive may be necessary in the following cases:
- Scheduled replacement of old fluid with new one.
Any liquid loses its properties over time and requires replacement. For brake fluid, which is also used in the clutch hydraulic system, the shelf life (from the date of manufacture), even when unopened, can be 1 year in plastic containers and 2 years in metal ones. That is, the working fluid can still lose its properties regardless of whether it was used or not. The recommendations should be followed when it comes to replacing the working fluid in the clutch. - Clutch system repair.
Like any mechanism, the clutch is subject to breakdowns and wear during operation, as a result of which it may require repairs (replacement of cuffs, seals, repair or replacement of the cylinder, elimination of leaks in the line, etc.). And as a result of repairs, the hydraulic system depressurizes with the leakage of working fluid or the entry of air into it. - Air entering the working fluid.
Air entering the line with the clutch fluid can occur both during clutch repair and fluid replacement, and due to air leaks through micro-holes in the hoses, through loose connections, worn rubber seals and cuffs in the master and working cylinders.
How quickly air gets back into the fluid will depend on the severity of the problem.
How to change the Lada slave cylinder yourself?
To work you will need the following set of tools:
- Pliers.
- Open-end wrench “17”.
- Head "13".
It is more comfortable to carry out the repair process on an inspection pit or overpass. If this is not possible, the front part of the machine must be jacked up and placed on supports, having previously secured the rear wheels with shoes. Further work is carried out on the following transitions:
- Loosen the nut of the hose tip in the RC plug using a 17-mm open-end wrench.
- Using pliers, disconnect the tension spring.
- Unbend and remove the cotter pin at the end of the pusher using pliers.
- Using a 13mm socket, unscrew the two bolts securing the cylinder to the gearbox housing.
- Disconnect the bracket that was secured with bolts.
- Having removed the pusher from the fork, take the RC in your hand and, using a 17mm wrench, completely unscrew the tip nut and remove the hose.
- Replace the clutch slave cylinder on a VAZ 2107, and immediately tighten the hose tip to avoid loss of brake fluid.
- Attach the new part in reverse order.
A certain part of car enthusiasts prefer to drain the old brake fluid before surgery, believing that this will allow them to get rid of dirt in the system. Be that as it may, you will have to bleed and adjust the clutch in any case.
How to bleed the clutch control system?
For the quality of transmission operation, the absence of air in the system is important, which is why bleeding is done. The procedure is similar to bleeding the brakes. An assistant is needed to complete the work:
- Fill the reservoir on the master cylinder with brake fluid.
- Place a rubber hose of the appropriate diameter onto the fitting. Place the other end of the hose in a container with some liquid.
- Ask an assistant to press the pedal 5-6 times and hold it in the pressed position.
- Using a “10” wrench, unscrew the fitting half a turn and release air bubbles, then tighten the fitting and repeat the procedure until the air in the liquid completely disappears.
During work, it is important to monitor the fluid level in the tank and replenish it in a timely manner.
Procedure for bleeding the clutch
To bleed the clutch hydraulic drive you will need:
A rubber or plastic hose (tube) with a diameter suitable for tightly fitting the hose onto the drain fitting. Wrench (usually 8 by 10). A transparent vessel or reservoir for 200 ml of fresh liquid, for placing the second end of the hose into it. Fresh fluid to add to the clutch expansion tank. Important! Old contaminated fluid drained from the clutch hydraulic system cannot be poured back into the system. On some car brands, the drain fitting is located at the bottom, so you may need an inspection hole to get to it. To find out exactly where and how the clutch slave cylinder drain fitting is located in your car, study the “Operator's Manual”, in the “Clutch” section. It is advisable to wear rubber gloves, since brake fluid is considered toxic.. Important! In this case, it is necessary that the heavy object used not only prevents the pedal from returning back, but also exerts constant pressure on it, since when the fitting is unscrewed, the pedal will be pushed through and fall through.
Important! The pumping procedure is as follows:
Important! In this case, it is necessary that the heavy object used not only prevents the pedal from returning back, but also exerts constant pressure on it, since when the fitting is unscrewed, the pedal will be pushed through and fall through.
Important! The pumping procedure is as follows:
The first step is to check the fluid level in the clutch expansion tank. The tank must be filled completely, up to the neck. When inspecting the tank and adding fluid (if necessary), maintain cleanliness and prevent debris from entering the tank. Release the head of the working cylinder drain fitting from the protective cap and place a hose (tube) on it. The opposite end of the hose should be lowered into a container with fresh brake fluid
When air comes out of the hose into the liquid, air bubbles will be clearly visible. Important! During pumping, you cannot remove the second end of the hose from the liquid. Pump up pressure in the system using the clutch pedal. An assistant in the cabin must press the clutch pedal sharply and all the way 3-4 times
In this case, it is necessary that the pedal not only goes down to the stop, but also returns back to the stop. If the pedal “falls to the floor” and does not return to its original position on its own, you will have to return it with your hand or toe. The key here is to build up the pressure using maximum pedal travel. The interval between pressing the pedal should be approximately 2 seconds. Having pressed the pedal for the last time (the third or fourth), it must be left and held in the pressed position until it stops. While your partner holds the pedal all the way down, another person should unscrew the drain fitting of the working cylinder with the hose attached to it, about half a turn. After opening the drain fitting, old fluid from the working cylinder will begin to flow into the container with new brake fluid through the hose. With the old liquid leaving the cylinder, air will also come out, the presence of which can be judged by the air bubbles in the container with the new liquid. As the old contaminated fluid exits the clutch hydraulic system, the pedal pressed all the way by the second partner will begin to be pressed and lowered. You need to wait until the pedal is pressed all the way to the floor, and then immediately screw in (close) the drain fitting. The pedal cannot be released until the drain fitting is closed. Repeat the procedure of squeezing the pedal and opening/closing the fitting several more times until clean liquid without air begins to come out of the hose. If aired fluid continues to come out of the hose even after the system has been completely pumped and the fluid has been completely changed (approximately 1 liter), then you need to look for the reason why air is penetrating into the clutch hydraulic system. Important! During the pumping process, it is necessary to carefully monitor the liquid level in the expansion tank and not allow it to fall more than 35 mm from the edge of the neck. During the pumping process, the old fluid will drain into a container and leave the hydraulic system. Accordingly, the level in the tank will decrease, and if during the pumping process the liquid completely leaves the tank, then air will again enter the hydraulic system. Then you will not only have to start all over again, but also additionally waste new liquid, since the new liquid that has already been poured will merge into the container and mix there with the old one, and it will no longer be possible to pour it back. After pumping and obtaining the desired result, the fitting must be screwed in well, remove the hose and put a protective cap on the head of the fitting.
Which part to choose
Car manufacturer Ford installs Luk's GVC using the Ford logo. The original Luk clutch cylinder for Focus 2 has catalog number 511017610 and will cost about 8,000 rubles.
An absolutely identical analogue, but without the Ford logo, costs almost half as much, that is, up to 5,000 rubles, is of good quality and can be safely installed instead of the original. You can also find analogues and cheaper ones. So, BSG 30425012 will cost about 3,700 rubles, but there are no real reviews about the quality of this cylinder.
Sources
- https://carfrance.ru/zamena-glavnogo-cilindra-scepleniya-ford-focus-2/
- https://help2drivers.ru/zamena-glavnogo-tsilindra-stsepleniya-ford-fokus-2/
- https://razborov.net/ford/kak-snyat-glavnyy-cilindr-scepleniya-na-ford-fokus-2.html
- https://mlngame.ru/focus/ford-focus-ii-zamena-glavnogo-tormoznogo-cilindra-remont-svoimi-rukami-rashodniki.html
- https://focusufa.ru/info/articles/ford_focus_2_04_11/2_6_mekhanicheskaya_korobka_peredach_ib5_1_4_1_6_1_8/zamena_glavnogo_tsilindra_stsepleniya_ford_focus_2/
How to inspect the clutch basket?
How can you tell if the basket is worn out? It’s very simple: the first sign of wear on this part is slippage, which occurs if the disk is not pressed tightly against the flywheel.
Here are step-by-step instructions for checking the basket for wear:
Put the car on the handbrake. Start the engine and engage gear 3 or higher. Lower the right pedal and press the gas. Pay attention to the car's reaction to such actions.
What do these or other options indicate?
It is considered normal if the car stalls as a result of such impacts. This means that the clutch and gearbox are fine.
Important If the engine continues to run, this should be a cause for concern. The basket is faulty because it does not allow the entire clutch to disengage completely.
It is necessary to replace not only the basket, but also the disk.
The following steps should be performed to determine a particular problem:
- Idle the engine.
- Press the right pedal all the way.
- Switch to first gear and move backwards.
If it is difficult to shift gears and strange sounds occur, it is concluded that the disk and flywheel are faulty.
The best time to repair and replace the clutch is the moment when the car is undergoing major repairs. If the power unit has already been removed, then repairing and changing the clutch will be much easier. If you follow the following plan of action, everyone will successfully cope with this job. Note that the described actions can be performed even in the garage.
So, the sequence is as follows:
- Remove the gearbox (gearbox). If there is no need to repair or replace it, you can safely disconnect the drive, battery and mass air flow sensor (mass air flow sensor). There is no need to drain the oil first.
- Unscrew the cable providing the transmission.
- Disconnect the starter.
- Loosen the fasteners on top of the box.
- Unscrew the elements of the speed sensor, as well as the electrical wiring harnesses.
- Slightly loosen the drive nut on the right, but unscrew it completely on the left.
- Unscrew the ball joint.
- Disconnect the engine protection.
- The torque rod must be unscrewed, and then the lower crankcase cover must be removed.
- Remove the linkage, first loosening the nut of the clamp, which helps control the gearbox.
- Unscrew the fasteners and bolts of the gearbox.
- Using a jack, lift the engine.
- Unscrew the box from the pillow and then remove it.
After the box is removed, the motorist can see the problem area and is able to perform some actions with it.
To replace the basket, you must first remove the retaining fasteners.
You need to pay attention to the petals: the basket should be replaced completely if it is significantly worn out
Before installing the new basket, you need to adjust the position of the gearbox input shaft so that the box can be easily put on in the future. Then a disc is installed in the flywheel.
After the position of the basket is corrected, it is necessary to tighten the bolts. This is done gradually: first 3-4 turns, and only then should it be fixed.
At the very end of the procedure, all that remains is to install the release bearing and shaft, which must be generously lubricated before installation.
All previously removed parts are installed back in the reverse order.