02/04/2022 19,668 VAZ 2114
Author: Ivan Baranov
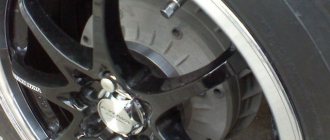
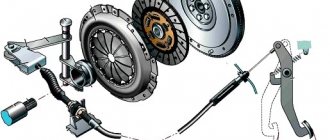
The release bearing of the VAZ 2114 car is the most important clutch element, acting as a thrust mechanism that transmits the pressing force that comes from the clutch to the drive disc hub and the basket spider. Thanks to the release bearing, the disc disengages from the clutch with the basket, and it also ensures that the clutch is turned off and on. If problems arise with the clutch, then it is often necessary to replace the release bearing of the VAZ 2114. The article examines the main symptoms of its malfunctions and provides step-by-step instructions for replacement.
[Hide]
Signs of malfunction and diagnostics of the release bearing of the VAZ 2114 (how the bearing makes noise and hums)
Direct diagnosis consists of checking the functionality and presence of the following signs of failure.
Signs of a malfunction of the VAZ 2114 clutch release bearing, if detected, will require its replacement:
- When you press the clutch pedal, you hear a noise, hum or knocking (rolling, internal vibrations occur due to damage to the tracks with rolling elements, deformation of the cage or the clutch itself).
- A whistle when the clutch is engaged makes it clear that the quantity or quality of lubricant is not enough;
- The speed does not change or the pedal moves hard (occurs when the clutch has fallen apart, as well as if the ear of the release bearing is broken).
- Watch a video example of how the release bearing of a VAZ 2114 makes noise and hums, as well as how the check is carried out. You can also hear the noise of the bearing after disassembling the transmission after removing the VP.
Video: “How to check a release bearing”
Video: “How a faulty release bearing makes noise”
Attention:
In cold weather, a VAZ 2114 car that is not warmed up sometimes experiences noise from the release bearing. This is due to the fact that, unlike ball bearing rings, the coupling is made of a different steel, and also has low hardening, so the thermal expansion of the elements does not occur evenly.
How to change the release bearing on a VAZ 2114 with your own hands - step-by-step instructions with a disassembly diagram
It was previously noted that the process of replacing the VP is difficult precisely when removing the gear shift unit, so first study the device to understand the intricacies of dismantling.
List of necessary tools for replacement:
- Two jacks and supports;
- Set of spanners with ratchet;
- Mount;
- Minus screwdriver;
- Torque wrench;
- Container for draining oil.
Replacing a broken clutch on a car
You can replace the mechanism yourself, without resorting to the services of a car service. Without changing the oil and dismantling the right CV joint, this is quite easy to do.
All work must be carried out with the vehicle raised, so you should first disable and remove all components and parts that may interfere.
Required Tools
To replace, you will need the following tools:
- set of wrenches;
- balloon wrench.
- removable key for removing the ball joint;
- jack;
- rope;
- screwdriver;
- beam for hanging the engine;
- small crowbar or pry bar;
- mandrel for centering the disk.
Procedure
- The negative terminal is disconnected from the battery.
- The air purification system and its sensor are dismantled.
- The clutch cable is disconnected.
If necessary, replace the clutch cable with a new one
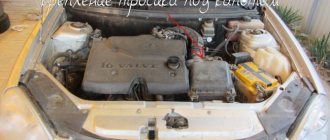
To facilitate access to the clutch, the engine protection is removed
Removing the clutch basket from a raised vehicle
During the replacement process, you should evaluate the performance of the removed components and parts of the car, and, if necessary, replace them with new ones.
We change the release bearing on a VAZ 2114 with our own hands - dismantling the gearbox
Advice:
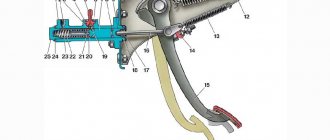
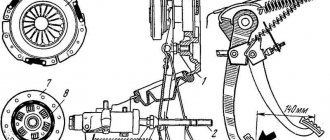
Please note that it is recommended to perform operations on a pit or a lift. The instructions provide an example of car repair on an overpass, but if there is none, then watch the video at the end of the article, where the replacement is carried out in a garage without a pit. To properly dismantle the gearbox, refer to the figures presented above.
Provide sufficient lighting above the hood of the car, put the car in first gear, and release the handbrake. If possible, ask a partner for help. Below is a detailed dismantling technology, according to the diagrams presented above.
- Open the hood, unscrew the air filter mounts, disconnect the wire and remove the assembly (see photo). After this, disconnect the battery terminals, and to be safe, remove the battery.
- Now we get access to the upper gearbox mounting bolts. Unscrew the long bolt at the back, the short one at the front.
- Let's move on to the starter. We unscrew the two upper studs, then remove the terminals. Now we look for the clutch cable that comes out of the gearbox, twist the nut to loosen the tension.
- We go down to the wheels, tighten the bolts, and remove the chassis. We tear off the nuts of the VAZ wheel bearings to remove the drive axle shaft on both sides. Use the pipe to extend the key.
- We remove the anthers (mud flaps) with a 8mm wrench, then unscrew the engine crankcase protection bolts.
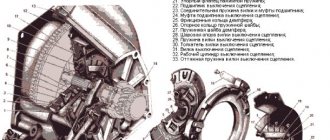
- We find the suspension arm extension bracket (3.4 in the diagram), unscrew the rear nut with the lower bolts.
- Now unscrew the anti-roll bar bolt (8) on the right side, then the ball joint bolts on both sides (key 17). Then remove the lever (7) together with the stretcher (4).
- The gearbox is half disconnected, now we unscrew the plug to drain the oil.
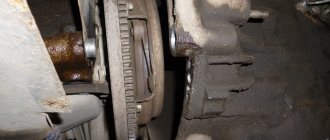
- After draining the oil, remove the wheel drives. First, we remove the CV joint “grenades” from the hubs with the bearing, then we take the splined side of the shaft out of the box using a pry bar.
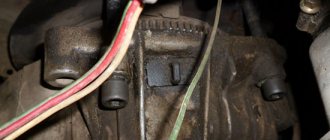
- On the side of the box we disconnect the reverse terminal. We find three bolts securing the gearbox to the engine and twist them.
- To remove the starter, unscrew the two bolts from the bottom.
- Now we disconnect the gear shift rod (10) and dismantle the rocker. The speed sensor terminal is located nearby; disconnect it (see photo).
- We unscrew the locknut to disconnect the gearbox from the side support (cushion), then use a long wrench to unscrew the two fasteners of the rear cushion (9).
- All that remains is to unscrew the two gearbox bracket bolts (2) and disconnect the unit from the engine.
- We dismantle the assembly, hold the body with one hand, and move it with the other using a mount. After removing the assembly, we proceed to replacing the release bearing.
It is important to know:
Be sure to watch the video “How to replace the clutch release bearing on a VAZ 2114”, since the disassembly process in the video is shown in full, with additional comments from a specialist. The first video shows the replacement process without removing the gearbox.
How to change the clutch without removing the gearbox
Detailed replacement process on video
Installation
When installing the clutch basket and disc, it is necessary to use a simulator of the input shaft. This is necessary so that the parts fit straight. Such an alignment can be bought in a store for 100 rubles. It will also work for a penny.
When installing the box, it is important to get the pin that is on it into the engine hole. It is located in the right drive area. When we installed the gearbox, we didn’t take this fact into account and spent a long time trying to turn the gearbox.
When the box is engaged with the engine, tighten the mounting bolts, but not completely. They need to be stretched when the box sits on the pillows to prevent displacement.
There should be no problems in further stages of assembly.
Don't forget to tighten the hub nut, adjust the clutch pedal and rocker.
I hope this material will help someone when replacing a gearbox. There is practically no difference in repairing VAZ 2110 or 2114 cars. They are all fine)). Frankly, I thought it would be more difficult to change the clutch, but the main thing is to get started, and there’s nowhere to go). If possible, try to repair your car yourself. This is both saving money and gaining experience. Good luck to all.
We independently change the release bearing on a VAZ 2114
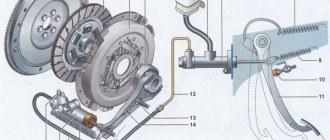
After removing the gearbox, it is important to inspect the discs, clutch basket, and also evaluate the condition of the gearbox housing from the inside. Remove dirt and excess used oil, make sure that the ear of the release bearing has not broken, then proceed to replacing the clutch. Below is a diagram of the clutch layout.
The principle of operation of the part is as follows: when you press the clutch pedal, the applied force is transmitted to the fork (4) through a cable (3), which moves the release lever along the guide sleeve of the input shaft (1), then the ball bearing housing transmits the force to the pressure plate (basket) (6), After this, the driven disk is disconnected, then the unit is disconnected from the engine to change speed.
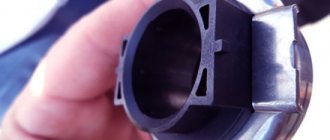
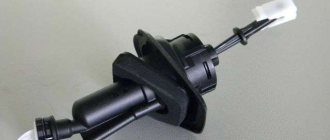
- The guide sleeve, which is shown in the photo, fixes and guides the coupling during its operation. To dismantle the old part, find the edges of the clutch spring, lift them with a screwdriver, remove the clutch VP from the VAZ 2114, the replacement of which is required.
- Using CV joint grease, apply it to the bushing splines, and also lubricate the new bearing and seating surfaces.
- We put the new VP on the guide shaft, then fasten the part with a spring. Check the clutch travel by moving the fork. Unscrew the element with your hands and make sure that there are no rolls or problems with ease of rotation.
- At this point, the replacement of the VP clutch is completed; we install the gearbox in place in the reverse order.
Notes, recommendations and repair tips
- The average service life before product replacement is 800,000 off-on cycles.
- Recommendations for extending the life of the release bearing:
- Avoid holding the pedal for a long time;
- It is advisable to release the pedal slowly and press quickly, without stopping between extreme positions;
- Prevent moisture and dirt from entering the transmission;
- Carefully lubricate the part during the replacement process (see video below).
- After replacement, when performing reassembly, treat the threads of bolt connections with graphite lubricant.
- Purchase auto parts from previously verified retail outlets, check dealer documents and product quality certificates.
- The video shows an example of performing repairs without an inspection hole, as well as without removing the gearbox.
Save it for yourself, it will come in handy!