Hi all! The other day the starter unexpectedly died, the symptoms were similar to IMMO failure. Before that, everything was normal, I turned it on for half a minute, then I just left the bank and stopped altogether, my friends drove up and tried to light a cigarette, but it didn’t work! We decided to close the terminals with a screwdriver, silence... In general, we hooked it to the cable and started it from the tow, drove home and decided to remove the starter this morning.
The procedure does not require any special skills, remove the air filter housing and everything is clear: 1. disconnect the battery so as not to short-circuit anything 2. disconnect the wires to the retractor 3. unscrew the two starter mounting bolts (at 13) 4. remove the starter
Let's drag it home and quickly sort everything out:
I had Bosch 0001108203 from AUDI Made in HUNGARY
An autopsy shows that the brushes are stuck, since the brushes are attached to the brush holder and it is likely that dirt and moisture have entered in the form of condensation. Wear 30%. But the retractor relay also comes into question, because there are also dimes and permanent magnets and also the retractor link itself with an eye.
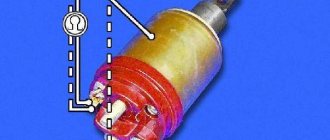
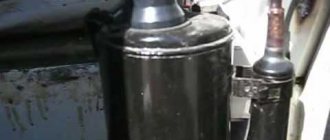
The photo clearly shows that the rotor commutator drum is in good condition, with minimal wear.
The reason is most likely the abrasive that got into them from the mixed dirt of condensate and graphite shavings as a binder. Which led to a short circuit, and as a result, the starter relay did not even make an audible click in order to prevent a fire. And now we see that the permanent magnets have oxidized due to moisture, the cause of which was the banal penetration of moisture into the housing, which caused severe corrosion and the formation of an abrasive. Everything began to actively corrode, which led to the appearance of debris which caused excessive friction and severe wear; there were a lot of metal shavings inside the case.
From the appearance of the starter, you can clearly see how much moisture there was inside and outside the housing, after all, the car is 10 years old and the Hungarian starter, accordingly, is also 10 YEARS OLD! and no one went there.
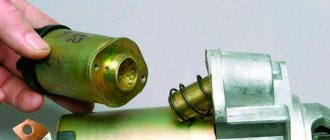
But I couldn’t remove the retractor as easily as it should be. The bolts stuck and I had to drill them out and buy studs from the Zhiguli carburetor))
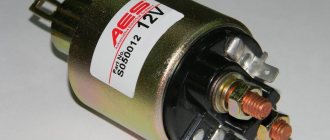
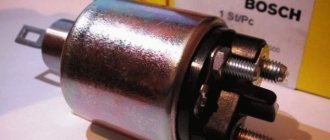
After completely disassembling the starter, everything turned out to be intact, even the brushes. I started cleaning the sink. But the retractor no longer inspired confidence, since moisture and dirt could also accumulate in it, and I really didn’t want to flare the retractor relay housing! And it was decided to look for an analogue of the retractor on the autodock - KRAUF SSB3586 - 650 rubles. I took the cheapest but popular one and of good quality (better than what they sell for our vases available in local stores)
Then I started the repairs
To eliminate the consequences I needed: 1. Lubricant with molybdenum disulfide XADO Price: 170 rub. 2. Acetone 0.5 and napkins 55 rub. 3. Sandpaper 100-600 pp 30 + 30 rub. and you can also use Kazan white sealant for 45 rubles. 4. Spare parts are those that need replacement. In this case, I ordered a retractor relay KRAUF SSB3586 - 650 rubles.
To begin with, I took the body - went through it from the inside with sandpaper, and lubricated it with a thin layer of lubricant
Having briefly understood the theory, let’s get down to practice. More precisely, we take grease and fill our gearbox a little (so that it doesn’t get on the magnets and rotor)
Next, we clean the starter rotor commutator, the place of contact with the brushes
We take abrasive sandpaper, grit P600, and graphite lubricant with MOLYBDENUM DISULPHIDE suitable for bearings and gears. The sliding bearing (bushing) did not play or make noise; an opening showed that there was almost no lubrication; I filled all the bushings to capacity. I cleaned everything, the brushes were still alive despite everything, restored their mobility and reassembled them.
What is the operating principle of the starter?
By turning the key in the lock of the Lada Kalina ignition unit, power is supplied to the terminals of the electromagnetic relay. This element, by means of a lever, moves the overrunning clutch to a position where the starter shaft gear meshes directly with the flywheel. In addition, voltage is supplied to the electric motor, the shaft of which begins to rotate, driving the engine. When the motor starts, the plunger moves back, bringing the assembly to its original position. Starter power is currently being cut off.
What if he doesn't come back
In fact, Bendix ensures long and trouble-free operation of the entire assembly. And if it weren’t for him, then at the moment when you turn off the starter (that is, the car starts), it does not disengage with the engine, which is called “does not return,” then the rotating engine shaft will simply break the starter itself. Which, by the way, sometimes happens when the Bendix malfunctions in the opposite way - that is, the accelerating clutch does not slip, but, on the contrary, sticks and continues to rotate the shaft together with the electric motor. That is, the bendix does not disengage.
And now we are talking about a malfunction when the bendix slips, slips, and it turns out that it works, but its clutch power with the engine is not enough to turn it over and start it. The thing is that heavy loads wear out the teeth of the ratchet gear over time, and the part fails.
It has already been said that this part - the accelerating clutch, popularly called Bendix - functions on the principle of a ratchet mechanism. And the cause of the malfunction, when the gear teeth do not grab and slip when rotating along their axis without achieving engagement, is in the vast majority of cases the banal wear of these very teeth. Indeed, in fact, at the time of operation, these same teeth experience a serious load, since they have to overcome the force of rotation of the heavy crankshaft of the engine, compression of its cylinders, and the like.
Over time, due to such loads, either:
- ratchet gear teeth;
- or (if it is not designed with gears, but with two rings with balls, a locking mechanism that works exclusively in one direction and return springs) the rings, balls wear out, or the spring breaks.
And such a malfunction leads to the fact that when the electric motor rotates, a characteristic malfunction occurs: lack of engagement of the starter with the engine.
When is a starter check required?
During operation, the device may malfunction, and therefore the engine will be unable to start. The Lada Kalina car unit is characterized by the following signs of malfunction, suggesting the need for removal and diagnostics for the purpose of further repair or replacement:
- turning on the starter is accompanied by the shutdown of other devices operating at that time;
- when the device starts, reduced crankshaft speeds are observed, which is not enough to fully start the engine;
- turning the ignition key does not activate the starter;
- the unit shows signs of “viability”, but the motor flywheel does not rotate.
Next we will tell you how to remove and replace.
The battery is low
The vehicle's power supply system largely depends on the health of the battery. To keep it in working order, you must comply with a number of requirements and instructions. If, for some reason, the battery was not taken care of, then sooner or later such negligent attitude will come back to haunt the owner.
The most pronounced symptoms of a faulty battery are:
- low brightness of running lights;
- sound signal attenuation;
- presence of a red/white indicator on the battery cover;
- deflection of the on-board ammeter needle towards the charge when the starter circuit is closed;
- presence of sulfation at the battery terminals.
All these signs, one way or another, indicate that the battery needs diagnostics. First, you should check the level and density of the electrolyte. After this, the battery must be charged using a charger. If the battery is old, charging should be done at extremely low charging current values.
During this procedure, the battery can caps must be removed. During the entire charging time, you must ensure that the battery does not self-discharge. It happens that during charging one or more cans begin to “boil” before the rest. This phenomenon indicates that the battery, due to improper care, has exhausted its resource.
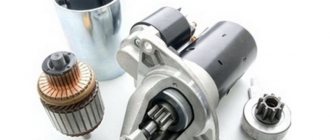
Replacing the starter on an 8-valve Kalina
Having found out where the required unit is located, we proceed to replacement. To perform the work (removal, repair and installation), you will need the following tools and accessories:
- keys with dimensions of “8”, “10” and “13”;
- wrench with nozzles 13 and 15 mm;
- screwdrivers, both flat and cross-shaped;
- hammer, vice and pliers;
- drift (made of wood or soft metal);
- ohmmeter;
- a little lubricant of the “CV joint-4” type;
- two metal plates, a block of wood and a fine-grained sandpaper sheet.
After the preparatory work, we’ll figure out how to remove the device.
To make the replacement convenient, we place the LADA Kalina above the inspection ditch.
- We de-energize the on-board network (remove the terminals from the battery terminals).
- We dismantle the air filter housing along with the element.
- Using a wrench (socket) set to “13”, unscrew the nut holding the wire tip to the positive terminal of the battery. Remove the tip.
- Using a key set to “15” we unscrew the nuts securing the starter to the engine block. We remove the node.
How to check it yourself
Without removing the starter from the car, you can only reliably check for poor contact and the fact that the retractor relay control circuit is faulty. If the starter does not respond to turning the key to the Start position, directly jumper the power terminals of the solenoid relay with a screwdriver. Triggering of the starter will indicate a malfunction in the control circuit or the traction relay itself.
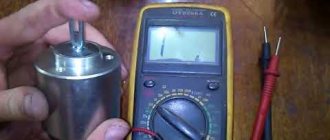
If you know how to use a multimeter, in DC mode, check whether voltage comes to the control terminal after turning the ignition key to the Start position. If voltage is supplied, but the retractor does not operate (there is no characteristic click), the traction relay needs to be repaired or replaced.
Typical breakdowns
- Abrasion of brushes that wear out due to tight pressing against the rotating armature. The degree of wear can be assessed visually or using a caliper. It is enough to compare the thickness of new brushes with worn elements.
- Wear of collector plates. Brushes wear out much faster than armature contact plates, but even after several hundred thousand kilometers they can become unusable. The degree of wear is determined by the depth of the groove, which is formed from friction with the brushes. If the brushes do not fit tightly at the moment of rotation of the armature, a spark discharge may occur, causing burnout and further detachment of parts of the lamellas. Among other defects that arise due to runout and axial play of the armature shaft are ovality and displacement of the friction zone of the brushes.
- Violation of the insulation of the commutator contacts, leading to breakdown of the armature housing to ground; interturn closure.
- Wear of the bushings securing the armature shaft. Critical depletion of bronze or copper-graphite bushings leads to runout of the armature shaft, as a result of which copper-graphite brushes fail much faster, and uneven wear of the commutator is observed. Also, wear of the bushings can cause displacement of the armature plates, which leads to an interturn short circuit.
- Wear or incorrect selection of spacer washers that prevent axial play of the armature shaft.
- Burning of the contact plate of the solenoid relay. Winding burnout, turn-to-turn short circuit of the solenoid coil.
- Worn armature shaft gear.
- Peeling off the magnets from the starter housing.
- Breaking the terminal of the positive wire coming from the power terminal retracting to the brush. Sometimes the terminals become severely corroded due to their location in an aggressive environment.
Repair or replace
Operations that in most cases are limited to manual repair of the starter:
- replacing the brush assembly. We have already looked at how to replace starter brushes with your own hands, so we will not dwell on this;
- cleaning the working area of the collector with fine-grained sandpaper;
- lubrication of the planetary gearbox, armature shaft in the place where the retractor relay fork moves;
- complete cleaning of all parts from wear products of graphite brushes and commutator, dirt.
Many manufacturers do not provide for repair and maintenance of the solenoid relay, so to disassemble it, flare it. This can be done only for the purpose of cleaning the contact areas of the terminal bolts and plates with sandpaper or a file. If an inter-turn short circuit or a breakdown in the housing is detected, we recommend replacing it instead of doing it yourself. We also find the idea of repairing the commutator lamellas and rewinding the starter armature very dubious. For widespread starter models, such repairs are simply unprofitable, since it is often easier to find a working used part at a disassembly site or buy a new starter altogether.
Starter repair in a Lada Kalina car
In most situations, disassembling a unit in the Lada Kalina model for the purpose of repair is carried out to replace such elements as:
- brush holder in combination with brushes;
- traction relay;
- drive components.
Naturally, repair procedures are carried out on a removed device. How to remove it correctly?
Let's sort it out.
- We take the spike at “13” and unscrew the nut that secures the lower contact bolt of the traction relay, after which we remove the wire tip.
- Using a screwdriver (Phillips), we “defeat” a pair of screws holding the retractor relay block. We remove the element.
- We remove the spring along with the armature from the front cover of the relay.
- Disconnect the housing from the front cover. Here you will need to unscrew a couple of tightening bolts (key set to “8”).
- From the released housing we remove the armature together with the brush holder and the end cover.
- This cover is removed by unscrewing two screws with a screwdriver. The bearing seat contains a wavy spring washer.
- The brush holder itself must also be dismantled, after which the brushes are removed.
- We move on to the planetary gearbox, from which we remove the cover.
- Now we remove the three satellites and the rubber plug.
- We press the end of the drive shaft with our finger, and then remove the drive assembly located in the front cover.
- We arm ourselves with two screwdrivers, with which we open the eyelet present on the support, and then remove the drive lever.
- We use a wooden block against which we rest the end of the ring gear.
- We apply the grips of the open-end wrench (size - “13”) to the ring that limits the travel of the drive gear. We hit it with a hammer, forcing the ring to compress in this way.
- The locking ring must also be removed. We use a flat screwdriver.
- Next, we dismantle the gear travel limit washer.
- We remove the overrunning clutch assembly with the drive gear.
- Using a screwdriver, remove the retaining ring from the corresponding groove on the shaft.
- We also remove the washer.
- We pay attention to the ring gear in the planetary gearbox, which we pull off the drive shaft.
- We proceed to dismantling the bearing. To do this, we use the previously designated metal plates. We insert them between the bearing itself and the armature commutator, and then rest it on a vice. Use a hammer to carefully impact the end of the shaft (a drift will be required) until the bearing is completely pressed.
This completes the disassembly procedure.
Next, we inspect the commutator and armature winding. There should be no charring here. If it is present, then use fine sandpaper to “correct the situation.” When the burning is intense, there is no alternative to changing the anchor.
If we find scratches or material coating on the shaft journal, we also use “all-conquering” sandpaper, after which we polish the treated areas.
We arm ourselves with an ohmmeter to check the short circuit between the core and the windings. We pay attention to the ends of the windings - their soldering to the lamellas must not be damaged. Blackening of the winding or separation of varnish insulation from its surface is not allowed.
If the brushes are worn out, then replace the holder assembly.
The assembly of the starter assembly is carried out according to the reverse algorithm of actions.
Possible faults
Possible starter malfunctions arise, as a rule, due to violation of its operating conditions.
Signs of breakdowns and diagnostics
Symptoms of the most common starter problems:
- suspicious noise or crackling noise when turning the ignition key;
- the engine stalls without the electric motor operating;
- inability to start the internal combustion engine;
- “sneeze” of the starter mechanism without engaging the flywheel.
Most often, the starting device breaks down due to an open electrical circuit, so you should check:
- battery charge level;
- wiring for damage;
- fastening terminals;
- ignition keyhole.
If there are no problems with the above, then the next step is to check the traction relay. This element can be diagnosed without removing the starter, since the operation of the electric motor depends on it. If, when you close the contacts on the relay with a flat-head screwdriver, the electric motor starts, then the cause of the breakdown lies precisely in this part.
Types of faults
There are two types of starter malfunctions - mechanical and electrical.
Electrical problems requiring qualified assistance:
- periodic closure of the armature winding;
- breakage of the solenoid relay and stator;
- breakage of brushes and contact plates;
- core wear and lack of contact in the electric motor.
Starter mechanical faults:
- locking the switching drive on the flywheel crown;
- deformation of gear teeth;
- damage to bearings and bendix;
- burnt surface of "nickels".
Causes of problems
The most common causes of malfunctions:
- If the starter begins to “buzz” characteristically and idles, it means that the overrunning clutch is not connected, and the mechanism operates without the gear engaging the shaft. The problem can be resolved by washing the Bendix in a special cleaning solution or gasoline. It is recommended to place the part in a container with liquid, let it sit for an hour and a half, and then move the drive a couple of times to clean the mechanism.
- If the car does not start, the reason may lie in the lack of power supply. If the circuit is working properly and there is current, it is necessary to check the relay, perhaps the reason lies there. You should thoroughly clean the element from dust, carefully examine the contacts again, assemble and replace the components. If the problem persists, most likely the winding is shorted, and only replacing the part will help.
The video (author - Alexander Anikin) shows in detail why you need to clean the starter and the main stages of this process.
What is an engine starter
Any gasoline internal combustion engine is equipped with a part called a “starter”. This unit, that is, the starter, is a conventional electric motor. The voltage “+12 Volts” is supplied to it via one electrical cord. The body acts as the second wire.
A relay is mounted inside the starter, the contacts of which conduct the supply current. When you need to start the internal combustion engine, the contacts close. Let us immediately note: the voltage on the power wire always remains as long as the battery is charged. Therefore, before dismantling, be sure to remove the negative terminal from the battery.
If the battery is charged, but the starter does not turn, then first you need to check whether there is voltage at the contacts of the Ka-3 relay. This element is fixed in a single mounting block, and it is called: “Additional starter relay.”
Originals, analogues, articles and prices
The first modifications of the Lada Kalina were equipped with a starting device with the catalog number “21120-3708010-00” (KZATE). It was fixed to the block wall with three nuts.
After the release of the Lada Kalina with a cable-controlled gearbox, the method of fixing the PU changed to a screw one.
Original indexes:
- 21120-3708010-00;
- 21901-3708023-00;
- 21120-3708045-00 (KATEK, KZATE, ZiT);
- 21901-3708051-00 (VALEO) (8 valves);
- 21902-3708056-00 (VALEO) (16 valves).
For automatic transmission type: Jatco – 21902-3708135-00.
The cost of PU varies depending on the modification. Base price from 3100 rubles. On models with a new type of fixation from 3400 – 3500 rubles.
Foreign analogues are no better in quality than domestic ones. The cost is 10 - 15% more expensive. Manufacturers: Blue Print, Bremi, Febi, Bilstein, Fenox, Glaser (see photo).
Where is the starter installed in a Lada Kalina car?
Many car enthusiasts wonder where the starter is located. As in many other brands, the PU is installed in the engine compartment, fixed at the end of the block on the flywheel side.
Originals, analogues, articles and prices
The first modifications of the Lada Kalina were equipped with a starting device with the catalog number “21120-3708010-00” (KZATE). It was fixed to the block wall with three nuts.
After the release of the Lada Kalina with a cable-controlled gearbox, the method of fixing the PU changed to a screw one.
For automatic transmission type: Jatco – 21902-3708135-00.
The cost of PU varies depending on the modification. Base price from 3100 rubles. On models with a new type of fixation from 3400 – 3500 rubles.
Foreign analogues are no better in quality than domestic ones. The cost is 10 - 15% more expensive. Manufacturers: Blue Print, Bremi, Febi, Bilstein, Fenox, Glaser (see photo).
Solenoid relay design
To understand how to identify a malfunction, you first need to understand the design and operating principle of the retractor relay, as well as the starter relay, since they are located in the same housing.
So, there is a housing, inside of which two coils are installed - retracting and holding.
On the one hand, the body is covered with an ebonite or plastic cover. Three terminals for connecting wiring are installed on the outside of this cover.
One of the terminals is intended for connecting the “positive” wire from the battery, the second is for supplying electricity to the starter motor, and the third is for connecting the relay to the ignition switch.
On the inside of the cover there are two contact plates of the “positive” terminals.
Schematic diagram.
Electrical
Problems in the electrical power system are one of the most common breakdowns. We are talking about the section of the line from the battery to the starting device directly.
- Slow rotation of the rotor;
- Lack of response when current is supplied to the starting device (hereinafter referred to as PU);
- The control unit clicks, but does not turn: interturn short circuit, broken wiring, short circuit of the solenoid relay;
- Washing brushes;
- Anchor wear.
To exclude a number of other related breakdowns, you need to check:
- presence of charge in the battery;
- fixing the terminals on the battery contacts;
- integrity of electrical wiring in the area from the battery to the control unit;
- proper operation of the ignition switch core.
Starting system
Lada Kalina is equipped with a starter type 2111.3708010-01. It is a DC electric motor with a two-winding traction relay.
Pretty good starters if you look after them properly. They have a reliable steel body made from the most popular and weather-resistant steel grades, good build quality, and acceptable weight. Such spare parts can withstand severe frost and high heat, in addition to heavy operating loads. They also overheat less during prolonged operation. The permissible time for continuous operation of the viburnum starter is 10s, after which overheating occurs.
Starter price and repair
Undoubtedly, the cost of repair depends on the type of damage. If, for example, you literally broke the starter in half, burning the control unit, and also snagging some more important modules of the car, then rest assured that the repair will be very expensive. In most cases, it is possible to deal with the breakdown yourself, especially if you only need to replace the faulty part. For example, a power supply or part of a traction relay. The Lada Kalina is designed quite simply, so breakdowns extremely rarely bring with them huge repair costs and problems. On average, the price of a new starter varies within $100, and its repair costs approximately $15-20 and more.
You can carry out repairs yourself. To begin with, you should pay attention to the nature of the breakdown: what exactly does not work, at what stage the signal breaks, whether all parts and terminals of the starter are installed correctly, find out where the break is located in the event of a wiring fault.
The cause of a breakdown of the starter of a Lada car can be a blown fuse, and in cold weather even frozen lubricant in the gearbox. Mechanical damage is also possible. For example, a crack or violation of the shaft geometry, a weakened reverse clutch, incorrect displacement of the armature or traction relay. In this case, most likely the starter needs to be replaced. This often happens due to the fact that the driver, in order to start the car, tries to pull it with the starter. Banal oxidation of the terminal contacts is also possible. This may be caused by temperature changes, exposure to various lubricants and oxidizing agents, or simply a rainy climate.