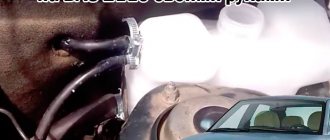
Such a seemingly simple and unremarkable part of a car, like the expansion tank of a VAZ 2114, can actually cause quite a lot of trouble for the motorist if it breaks down. Today we will talk about the most common tank malfunctions, as well as how to fix them on your own.
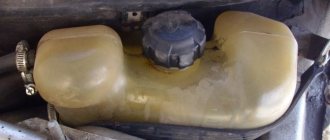
Expansion tank VAZ 2114
Major failures of the expansion tank
The most common failures of the coolant reservoir are:
- cracks (appear over time as a result of depolymerization of the plastic from which the case is made);
- rubbing (occurs due to poor fixation of the tank, leading to its periodic contact with the body of the machine and abrasion of the plastic wall);
- destruction of the thread on the neck (can occur either from old age, as a result of depolymerization, or from careless handling);
- failure of the tank plug or its jamming (most often occurs on tanks that have been in use for a long time).
Thus, almost all breakdowns are in one way or another related to the destruction of plastic and the violation of the integrity of the tank or its plug.
Every motorist should remember that the most important element of the tank is its plug, which is responsible for regulating and relieving excess coolant pressure. As soon as it is noticed that it is faulty, you should immediately replace it, since traveling with a faulty cap can lead to swelling, deformation and even explosion of the tank.
Typical problems and their diagnosis
- Violation of the tightness of the tank: the tank begins to leak due to mechanical damage;
- Rupture of the container due to impact or technological defect.
- Problems with the reservoir cap.
Tank cap malfunctions need to be disassembled separately, as this is the most diverse and common group of breakdowns. A clogged cover valve most often causes inconvenience to owners of “fourteeners”. The valve “clogs” due to dirt and stops releasing hot air. This leads to multiple excesses of operating pressure and overheating of the motor.
Repair or replace the tank?
Some drivers, having noticed that the expansion tank 2114 is leaking, try to repair the crack with glue or epoxy resin.
It should be noted right away that doing this is absolutely not worth it. After all, such repairs, as a rule, are short-lived, and with active use, even the most reliable adhesive seam can leak.
In addition, as already mentioned, the appearance of cracks in the tank is a sign of aging of the plastic caused by depolymerization - the volatilization of a number of fractions from the material that give it plasticity.
Thus, a plastic container that has already cracked can always crack again. That is why replacing the expansion tank of a VAZ 2114 is the most preferable option rather than repairing it.
As for the cover, it is also not repairable, and in case of malfunction it should be replaced with a similar one. At the same time, it is highly advisable to purchase the “native” cover for the 2114, and not its various analogues, the quality (and functionality) of which may be much worse.
If you could not find a cover for the 14th model, then instead you can purchase and install a cover for 2199, since they are completely interchangeable.
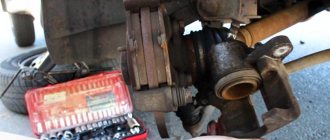
The process of replacing the expansion tank
Having talked about the main malfunctions, we will now figure out how to replace the coolant reservoir of the VAZ 2114.
The first thing you will need for this is to select the appropriate set of tools, namely:
- a set of keys;
- pliers;
- screwdriver;
- sandpaper.
In addition, you should immediately prepare new clamps.
Before you start replacing, you should take sandpaper and thoroughly sand all the inlet holes of the new tank. This is necessary for better contact with the pipes. If you don’t do this, but leave everything “as is” (that is, rough), then the expansion tank pipe 2114 may not fit tightly.
The replacement of the tank itself should be performed in the following order:
- If the car was running, you should turn it off and wait for the coolant in the system to cool.
- After the liquid has cooled, you should unscrew the nuts securing the adsorber (for this procedure you will need a 10mm wrench).
- Remove the adsorber.
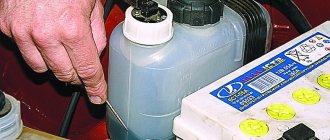
- Pump out the antifreeze from the expansion tank (the most convenient way to do this is with a syringe (rubber bulb), making sure that all the liquid is removed).
- Place a small basin under the tank (in case of possible leakage).
- Unscrew the top tube from the old tank and screw it to the new one (it is responsible for draining excess coolant from the radiator).
- Remove the old tank.
- Unscrew the lower pipe from the old tank and connect it to the new one (at the same time, during the installation process it is advisable not to change the position of the pipe and not lower it down).
- Place the new tank in place and secure it.
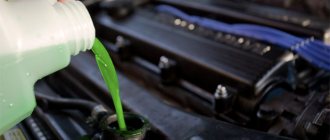
- Fill the conservator with coolant up to the Max mark, but not higher.
- Check the connections for tightness.
- If there are leaks, tighten the fastening clamps.
As you can see, replacing the expansion tank is very simple and does not require much time or effort. After it is completed, you should check the serviceability of the new cover. To do this, start the car and wait for the coolant to heat up. As soon as it boils, the fan on the radiator will start working. At this moment, you should carefully monitor the lid - it should rise and relieve excess pressure. If this happens, then everything is fine.
Finally, it is worth noting one important point. It often happens that after replacement the tank only lasts a couple of months and begins to leak. This is caused by its abrasion against the metal body of the machine, leading to thinning of the plastic and the formation of cracks. In order to avoid this, it is enough to install a piece of rubber or other soft but elastic material between the tank and the body.
Signs and possible consequences of a part malfunction
Most often, the consequence of a malfunction of the cap is boiling of the coolant, sometimes accompanied by the ejection of the coolant from the expansion tank - a common occurrence for VAZ cars. If this happens at engine operating temperatures, then most likely the plug does not hold the required pressure.
Car coolant boiling
Another reason for the same phenomenon is that due to a malfunction of the vacuum valve, air entered the ODS and formed a plug, which disrupts normal circulation, and therefore the cooling of the coolant. In winter, due to an air lock, the stove may not work well. Unpleasant consequences: loss of coolant, which has to be topped up regularly. This happens when, due to increased pressure in the SOD, liquid is “expelled” through the joints between the fittings and pipes put on them, through clamps.
- rupture of low-quality pipes or those that have not been changed for a long time (a picture familiar not only to VAZ owners);
- the appearance of a leak in the main or heating radiator;
- tears the thermostat housing (for Nexia it’s a common thing - into 2 parts);
- burst expansion tank.
Expansion tank VAZ 2114: main breakdowns
It would seem, what kind of damage can happen in a piece of plastic? But yes, they exist:
- Cracks appear on the body, from which liquid leaks.
- Violation of the integrity of the plug that regulates the pressure in the system.
- Destruction of the thread on the neck and other damage.
As for the plug, everything is banal - the valves are clogged and excessive pressure is not released. Associated symptoms - the tank swells and becomes like a ball.
The worst thing that can happen is the fluid bubbling in the tank. This is a clear sign that there is a breakdown in the cylinder head gasket. But this is a separate story, which will be discussed in one of the following articles. Sometimes air pockets appear in the system. In this case, the stove does not work well, therefore, heat exchange does not occur correctly. It’s easy to get rid of air pockets - install the cap on the tank and warm up the engine to operating temperature. To be sure, crimp the long pipes with your hands.
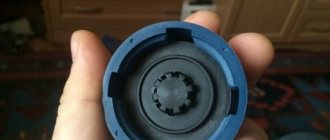
Finalization of the new cover
Unfortunately, the quality of spare parts for domestic cars leaves much to be desired, and it is better to check the new cover on a stand. If the pressure does not hold or excess pressure is not released, you can trim the springs. To do this, the part is disassembled, the sealing rubber is pryed off and removed with a screwdriver. Then use a screwdriver to carefully remove the inner cover and remove the springs.
The large spring is trimmed by one turn, and the small spring by two turns. As a result, the exhaust valve will begin to open at a pressure of 1 atmosphere, and not 1.7 atmospheres. When checking, the inlet valve should bleed freely.
Shortening the plug spring
Replacing the expansion tank
If there are obvious signs of damage or coolant leaks on the expansion tank of the VAZ 2114, it needs to be replaced. You will need a new tank, plug and possibly pipes that fit into it - this depends on the condition of those installed on the car. Also the following tools and materials:
- Sandpaper or file.
- Wrenches for "7" and "10".
- Screwdrivers and pliers.
First you need to do the preparatory work - using a file, remove all the burrs from the new tank. Unfortunately, they are cast very poorly and they look like they are unfinished. Make sure the surface is as smooth and even as possible. Pay special attention to the connections to the pipes.
Using a “10” wrench, unscrew the nuts securing the adsorber and move it aside. Now you can work on the antifreeze reservoir of the VAZ 2114. If you work according to the “book”, then you need to completely drain the liquid from the system. But we are always looking for the easy way out, so it’s worth thinking about it. The fact is that the antifreeze tank is the highest point of the system (you can even draw an analogy with heating a house). Therefore, it makes no sense to drain all the liquid. You can pump out the antifreeze using a pear, place a small basin underneath just in case, and get to work.
First, replace the upper tube, which is designed to drain excess antifreeze from the radiator. Then remove the lower pipe and try not to lower it. Install the tank and screw the adsorber into place. Fill in the antifreeze, its level should be close to 0, but you should not pour it higher. Look for any leaks. If there are any, tighten the clamps with a wrench (usually to “7”, but there is also a wrench to “8”).
Several acquaintances complained that the expansion tank on VAZ 2114, 2110, 2112 was breaking. A crack formed at the point of contact with the body, through which antifreeze oozed. Moreover, it was clear that it was leaking, but exactly where it was coming from was not clear until you removed the tank. And the new one lasted a couple of months. The solution is a small piece of rubber, for example, from a camera; it can be glued to the body with double-sided tape or even simply placed under it. And the service life of the expansion tank will increase.
Replacing the expansion tank on a VAZ 2114 with your own hands
In a VAZ 2114 car, the expansion tank serves to remove heat from the power unit. It is noteworthy that these devices have approximately the same design on all AvtoVAZ vehicles. The differences are quite minor.
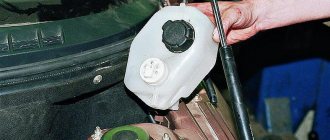
Photo of the expansion tank on a VAZ 2114
Over time, this unit also needs to be replaced. Therefore, today we will talk in more detail about the expansion tank, its characteristic malfunctions and the method of replacement.
Useful video
For more information, watch the video below:
In all cars, the cooling system has an element called an expansion tank. It is designed to compensate the pressure in the system when the temperature of the coolant (coolant) changes. The design of the expansion tank is absolutely identical on all cars of the VAZ 2108 family. Like any part of the car, the tank wears out over time and can fail.
Possible causes of the malfunction: cracks, scuffs on the body, broken fuel tank cap or leaks.
What is this?
Or rather, what he looks like. The expansion tank is a container made of plastic. Liquid is poured inside it, which takes part in cooling the motor.
In addition to the hoses that are connected into a circuit, the tank design also includes a float sensor. With its help, information about the temperature of this liquid is transmitted to the car’s instrument panel inside the cabin.
This unit is located under the hood, on the driver's side. You can easily find it right behind the glass counter. Such placement cannot be called practical, since there is metal on all sides of the tank. Therefore, the metal does not allow the plastic to expand properly if the reservoir cap does not work properly.
The result is the same - the container bursts. This problem is especially relevant in the summer, when the car heats up not only from the engine, but also from active sunlight.
Typical problems and their diagnosis
- Violation of the tightness of the tank: the tank begins to leak due to mechanical damage;
- Rupture of the container due to impact or technological defect.
- Problems with the reservoir cap.
Tank cap malfunctions need to be disassembled separately, as this is the most diverse and common group of breakdowns. A clogged cover valve most often causes inconvenience to owners of “fourteeners”. The valve “clogs” due to dirt and stops releasing hot air. This leads to multiple excesses of operating pressure and overheating of the motor.
Also, coolant may leak through the cap, causing the working fluid level to gradually decrease. A leak can be identified by the presence of smudges in the expansion tank.
Common signs of a broken expansion tank:
- traces of leaks on the tank body;
- The engine overheating indicator light is on;
- smoke from under the hood, other signs of significant overheating;
- warm air does not come out of the heating deflectors, despite the fact that there are “symptoms” of a significant increase in the operating temperature of the engine.
Typical faults
It is important to note that the principle of operation of the expansion tank cap on the VAZ 2114 is based on the fact that it has a valve that allows you to relieve excess pressure when the power plant overheats.
Expansion tank cover
It is the lid that causes the most problems.
- The lid often gets stuck and jams, which is why the pressure builds up, but cannot come out of the tank. There were even cases when the tank exploded. If you encounter such a situation while driving, do not turn off the engine. You need to slow down and wait a while. The radiator fan should turn off on its own.
- The tank is directly connected to the radiator and its cooling fan. Therefore, it is sometimes recommended to check the entire cooling system and pay special attention to it in the summer.
- There may be a drop in the coolant level inside the reservoir. This indicates the need to check the container for cracks leading to leakage. Inspect the entire unit for even the smallest leaks.
- Pay special attention to drips on the neck. Such traces of liquid indicate that the valve is faulty.
How to check the cover and identify problems?
Before checking the expansion tank cap, it must first be inspected to make sure that it is intact and has no mechanical damage in the form of scratches, cracks and severe wear, and is also free of rust, dirt, scale and other defects. Then you should check the functionality of its valves. Several simple diagnostic methods that allow you to only approximately determine their serviceability are given below.
For safety valve. With the engine running and warm, loosen the cap. There should be a hissing sound of compressed air coming out of the tank. This means the valve holds pressure. But not every professional can determine which one exactly.
Unscrewing the tank cap
- If the SOD pipes look deformed (compressed, flat) before starting the engine for the first time in the morning, the valve is definitely faulty.
- Unscrew and remove the cover. Then we strongly squeeze one of the SOD pipes and, holding it like that, install and screw the plug back. Let go of the pipe. If it begins to take its original shape, the valve is most likely working.
A more reliable way to check the operation of the valves is to use a pump with a pressure gauge. You will also need any empty expansion tank. We connect to one of its fittings, and then fix with a clamp the pump hose, from which the tip for the nipple was previously removed. We plug the remaining outputs from the tank with some kind of plugs. Then close the tank with the lid being tested.
Pump with pressure gauge
You can also check it on the tank installed on your car without draining the coolant. To do this, for example, on a VAZ 2109, we disconnect from the expansion tank the pipe that comes from above and removes steam from the SOD. We install a pump hose instead. In order to plug it, we insert something of a round cross-section and suitable diameter, for example, a drill, into the disconnected pipe. Then we put a clamp on this hose and tighten it.
We turn on the pump and, watching the needle on its pressure gauge, record the moment a click appears, followed by a hissing sound coming out of the tank through the air plug. If this happened at around 1.1–1.5 kgf/cm2, and further pumping only leads to increased hissing, but the pressure does not increase, it means that the vacuum valve is not leaking, and the safety valve is working as expected.
Is repair possible?
A very common question that we can answer without any problems.
Repairing the expansion tank is only relevant if it is necessary to replace one of its components. That is, a float or a lid with a valve.
In any other situation, when the breakdown is associated with loss of tightness of the tank, no repair will be possible. Some use adhesives, sealants, and other methods to close cracks. But such pseudo-repairs will not lead to anything good. All you need is a complete and complete replacement of the expansion tank of the VAZ 2114.
Purchase of components
There are some helpful tips to follow when purchasing new parts to replace your expansion tank.
- Buy the original. The original tanks are ideal for the “fourteenth” AvtoVAZ model. Therefore, various analogues are inappropriate here. The level of quality and efficiency of the original is much higher.
- If a cover is required, then use the analogue from model 2199. They are fully compatible even with threads. Plus, the practice of VAZ 2114 owners shows that the “nine” cover works better than the original one.
Replacement nuances
The process of replacing the expansion tank is quite simple; it does not require extensive experience or any supernatural knowledge in the field of car repair. But certain recommendations are worth following.
- Arm yourself with all the necessary tools and materials at once. This includes sandpaper, keys, pliers, screwdrivers, clamps. Sandpaper is required to process the inlet holes, since they are rough from the factory. And they must be smooth so that the pipes fit as securely as possible.
- Follow the instructions that come with each new expansion tank. This is the most correct guide, so there is no amateur activity.
- If you have just arrived at the garage, wait a while for the car to cool down.
- After this, you can open the radiator cap to reduce the pressure inside the system.
- It would be a good idea to replace the coolant. To do this, first drain the old one. There is a plug at the bottom of the radiator, which can be unscrewed to drain the liquid.
- If the fluid is new, pinch the pipes while dismantling the old tank. This way you won't lose your fresh coolant.
- Do not tighten the clamps with too much force, as this may cause damage to the expansion tank inlet.
- Check the fluid level in the new container. Be sure to top up if necessary.
- The VAZ 2114 model is quite demanding in terms of maintaining an average liquid level inside the expansion tank with cooler.
- After completing the assembly, turn on the ignition and let the engine run until it reaches boiling temperature. After this, the fan located on the radiator should turn on. At this point, pay attention to the expansion tank cap. It should rise and release excess pressure.
- Look at the instrument panel. If the pressure release occurs, but the panel indicates a low fluid level, you will have to change the sensor in the tank. It can be purchased separately. Installation is very simple; it consists of disconnecting a special chip on the cover, from where the old sensor is unscrewed, and a new one is screwed in its place.
Obviously, changing the engine cooling system tank or replacing its individual valve is a fairly simple type of repair of the VAZ 2114, which definitely does not require contacting specialists from service stations.
But who did the repairs is not as important as how well the work was done. This is the basis for preserving engine life, as well as your personal safety on the road. Monitor the condition of the cooling system and carry out periodic diagnostics. If malfunctions are detected, determine whether it is necessary to change the entire expansion tank as a whole, or whether it will be enough to install a new cap. You already know how to perform both operations. Good luck!
Recommendations for selection
For VAZ 2110-12 models, you can find 2 types of expansion tanks on sale:
- old model with two necks: the coolant level sensor is screwed into the first, and the second is closed with a plug with a release valve;
On old-style products, a second neck was made for installing an antifreeze level sensor
The new sample container does not have a level sensor
If your car has a sensor in an expansion tank, then you need to select an old-style product. Accordingly, versions without a sensor will require a new reservoir design.
For VAZ 2114-15 models, tanks of the same shape are offered with 3 fittings: two of them are located at one end, and the third is located at the opposite end. Products for the VAZ 2110 and 2114 are not interchangeable with each other, although if you really want to, attaching a part from another model is quite possible. Another thing is that there is no need for this - both varieties are available for free sale and practically do not differ in price.
The reservoir for models 2114-15 has a wider shape and a versatile arrangement of fittings
When purchasing an expansion tank for any series of cars of the “tenth” family, pay attention to the following points:
- the plastic of a quality product should be light and half transparent;
- cracks in the corners or near the fittings are unacceptable;
- the plastic should not be “oaky” or have dark impurities visible to the naked eye;
- look on the body for an imprint of the manufacturer's trademark and catalog number (21083–1311014 for VAZ 2114).
For all modifications “ten”, “fourteen” and “fifteen” a small tuning is available - installation of an expansion tank from the cooling system of a Lada Priora car. Why and how this is implemented will be discussed below.
The reservoir of the Priora cooling system has a rectangular shape and 3 fittings on the front wall