Print this article Font size 16
Initially, CV joints were positioned as elements with a very long service life. Manufacturers even assured that they could last as long as the car itself.
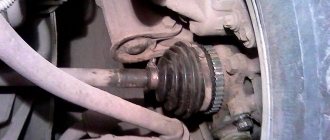
Photo of CV joint for VAZ 2114
But in reality, everything is not as colorful as it is described. A grenade has a life limit. What grenades, you ask. The grenade is the CV joint. People often use the concept of “grenade”. This can be explained very simply - the CV joint looks like a grenade. That's all. Therefore, do not be confused if you hear “grenade” when talking about CV joints. It is the same.
Basic faults
The main problem due to which a CV joint can become unusable is the ingress of a large amount of dirt into it. This happens when the anthers are damaged, so their integrity should be checked regularly. To do this, you just need to look under the car, first turning the wheels completely in any direction, and if you find lubricating fluid, ruptures or cracks in the cover, replace the damaged part. By shaking the drive shaft a little by hand, you can check the condition of its play.
Also, the reasons for the failure of the CV joint may be its expired service life, since it is limited, and poor quality of the part (defective).
Less common is damage to the retaining ring, in which the axle shaft comes out slightly from the part during sharp turns. This contributes to the appearance of damage on the “grenade”, and after some time to its complete failure.
Cracking and knocking noises when turning the wheels are harbingers of external joint malfunctions. Signs of damage to the internal grenade are crackling clicks and strong vibration that transfers to the body during acceleration.
Let's summarize
From the above, it is obvious that replacing a VAZ 2114 CV joint with your own hands is quite affordable. The activities take little time, provided you know how to handle the tool and have common sense. To ensure that repairs do not have to be performed frequently, you need to not only regularly check the condition of the boot. But also change the lubricant. Experts recommend doing this at least every 100 thousand kilometers.
Further steps are performed in reverse order. Also see the sequence of replacing the CV joint on a VAZ 2114, 2113 or 2115 in this video:
Why change
If damaged anthers are found, they must be replaced. Otherwise, dirt will penetrate into the “grenade” through cracks and tears and over time the part will fail, and there will be a need to purchase a new element and then replace it.
What do you mean it will fail? When the car moves at any turn, the CV joint will fall apart into two parts. It will be impossible to continue operating such a machine. In addition, all the oil may leak out of the box.
To avoid unpleasant consequences, it is necessary to promptly replace the damaged part.
An outer CV joint will cost 1000 - 1500 rubles, depending on the manufacturer. The price of the internal “grenade” is slightly higher than 1400 – 2200 rubles.
What to choose?
To replace the inner or outer CV joint on a VAZ 2114, a new element will be required. To be fair, we note that the most suitable and high-quality CV joints for the VAZ 2114 model are produced by the manufacturer, that is, AvtoVAZ.
But here comes the most important disappointment - they are not for sale. The only option is to go to a specialized VAZ official car service center. But from the point of view of financial costs, it is not the most reasonable decision.
In addition, there is now a fairly wide range of analogues on the market. Judging by the reviews of VAZ 2114 owners, special attention should be paid to CV joints produced by such companies as:
- Hola;
- GKN;
- Kraft.
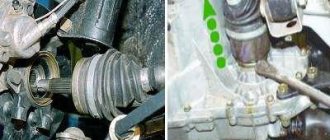
Photo of GKN CV joint for VAZ 2114
CV joint replacement
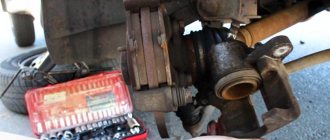
You can make the replacement yourself; to do this, you need to stock up on the necessary tools:
- key at 17, 19;
- heads at 13 – 17, 30;
- balloon;
- mounting blade;
- knob;
- jack;
- pliers and lubricant.
Having prepared the tools, we move on to the car.
For convenience, we drive the car onto an overpass or inspection hole. We put the handbrake on and engage the gear. For greater safety, you can put clamps under the wheels; only the rear two are enough.
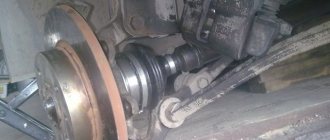
The inner and outer CV joints are located on the shaft drive, therefore, the technology for replacing them is almost identical.
CV joint replacement
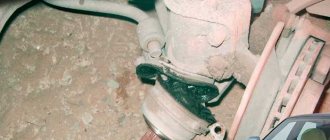
- We remove the crankcase protection; to do this, unscrew two bolts at the front to 17 and 2 nuts at the back to 19.
- Drain the lubricating fluid from the box (about 1/3 of the total volume).
- We use a wheel wrench to remove the wheel bolts of the side of interest.
- Take the 30mm head and unscrew the outer CV joint nut.
- Raise the car using a jack.
- We take a 13mm wrench and unscrew the two bolts (you can knock out one of the pins) from the hub that hold the ball joint.
- Using a mounting blade (mount), we move the hub away from the reaction rods.
- Pull the strut towards you and pull the CV joint pin out of the hub.
- Move the shaft drive to the side.
- Open the hood and use a pry bar to remove the inner CV joint from the box. To do this, you need to insert a mounting blade between the parts and pull it sharply towards the box.
- After the CV joint has moved a little, we move to the wheel arch and pull out the shaft drive with two “grenades”.
- We take pliers and remove the large and small clamps of the protective cover from the grenades.
- If the boot is damaged, we tear it off, and if not, then we move it to the center.
- We hit the inner race of the inner CV joint as hard as possible with a hammer until it falls off. We do the same thing, on the other side.
- Remove the rings from the shaft drive.
- We put rings from the new CV joint kit on the shaft and a new boot.
- We hammer in a new “grenade” with a hammer.
- Lubricate the CV joint with grease, and squeeze the remainder into the boot.
- Using clamps, we fix the boot on the “grenade” and the shaft.
- We do the same with the other CV joint.
- We take the shaft drive, screw the nut onto the outer CV joint and use a hammer to hammer it into the box.
- We assemble the parts in reverse order.
Location
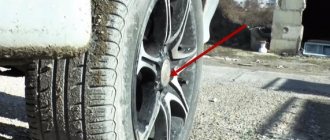
It will be impossible to replace the CV joint on a VAZ 2114 if you do not know where exactly these elements are located. Their location is easy to determine - on both sides of the front suspension at the bottom of the car. They are oblong elements and fit into the hub of each wheel.
CV joint location
That is, getting to the node is not difficult, but this will require certain conditions.
Replacement results
Failure to replace the boot in a timely manner will result in the “grenade” breaking, which in turn will make it impossible to use the car. Regular inspection of boots and CV joints will prevent dirt from getting into the part.
If you find breaks in the boot, you should purchase new ones and install them. When replacing boots, you should inspect the CV joint to make sure it is in good condition. This will not take much time, but will preserve the integrity of the CV joint and save money.
If you nevertheless looked at the cracks and tears in the protective case and did not have time to replace it at the initial stage, but realized the problem from the characteristic sounds, then it is necessary to replace the damaged “grenade” as soon as possible. After the repair has been carried out, it is recommended to check the car; to do this, you need to drive it in a circle and accelerate a little on a straight road. The absence of creaking and tapping sounds is a sign of correct installation.
Advice from experienced motorists
There are some useful tips on this matter that are worth listening to.
- If you hear a characteristic crunch while driving in a straight line, it means the CV joint has failed. If this crunching noise is heard only when turning, then the problem lies in a faulty joint.
- Before installing a new CV joint, treat the grenade landing site with lubricant. This significantly extends its service life.
- To adjust the CV joint and seat it properly, use wooden attachments. If this is not done, the risk of damaging the new element is very high.
- The boot should be installed as tightly and efficiently as possible. If you don't do this, dirt and dust will soon get there. These components will quickly render it unusable, and repair work will have to be carried out again.
- The lock nut on the hub is tightened with a special torque tool. Moreover, tightening is carried out strictly with the parameters specified in the instruction manual for your VAZ 2114 modification.
- During a routine inspection of the technical condition of your car, be sure to pay attention to the condition of the clamps and rubber elements to ensure their integrity. Such seemingly insignificant components can lead to serious consequences and significant financial costs.
- The purchase of spare parts, including CV joints, should be made only from trusted sellers, certified distributors. If you buy a bad, low-quality part, just trying to save money, you will have to pay even more to eliminate the consequences that the use of such elements led to.
The CV joint is an important component of any car, and replacing it even on your own is not particularly difficult.
Drive design features
The main advantage of CV joints, in comparison with conventional joints, is the transmission of rotation without loss, even with a strong change in the angle between the components of the shaft (up to 70 degrees).
In total, the VAZ-2108 drive shaft includes three components:
- Shaft (with connecting splines);
- Internal CV joint (for interaction with the box);
- The hinge is external (provides interaction with the wheel hub).
Both hinges used on the VAZ-2108 are of the ball type; they are almost identical in design, but differ in size. Thus, the outer ring of the internal element has a significantly greater depth. This provides the possibility of axial displacement of the inner race, and as a result, a change in the length of the shaft, which is necessary for the drive wheels to make turns. In addition, the left and right drive shaft assemblies are different lengths.
The main components of the CV joint are:
- Outer ring (made in the form of a glass, special grooves are made on the inner surface);
- Inner race (represents a power fist, which also has grooves);
- Balloons;
- Separator (prevents balls from falling out);
Related link:
Installing a heater on a VAZ car
All this is assembled into a single structure, so it is generally impossible to check the VAZ-2108 CV joint, even if it is completely disassembled.
The inner races are connected to the shaft using splines. They are secured against removal with locking rings.
The outer races are made integral with the limit switches, which are splined into the gearbox and hub. But the end stop of the inner CV joint is secured in the box with a retaining ring, but the outer joint is secured with a threaded connection (nut).