Types and design of CV joints
Before we move on directly to describing the signs and causes that indicate problems with CV joints, we need to find out what they are for and what they are. This will make it easier for you to understand how to diagnose and repair them in the future.
Types and location of CV joints
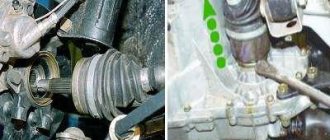
The job of any constant velocity joint is to transmit torque between the axle shafts when they are at different angles at different times. CV joints are used in front-wheel drive and all-wheel drive vehicles to allow the front wheel to turn and rotate under load. There are several types of hinges, but we will not dwell on this in detail. It is important to know that, basically, they are divided into internal and external . Any front-wheel drive car has only four CV joints - two internal and two external, in pairs on each front wheel. The task of the internal one is to transmit torque from the gearbox to the shaft. The task of the external one is to transmit torque from the internal joint directly to the wheel.
a tripod inserted into it - a set of needle bearings operating in three planes. The main shaft (from the “glass” side) is inserted into the gearbox, and another axle shaft is inserted into the tripod, to which torque is transmitted. That is, the design of the internal CV joint is simple, and, as a rule, problems with it arise infrequently. The only mandatory condition for the normal operation of the hinge (this also applies to the external “grenade”) is the presence of lubricant inside it and the integrity of the boot. You can read about choosing a lubricant in a separate article.
Inner and outer CV joints paired
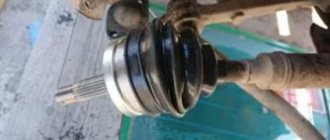
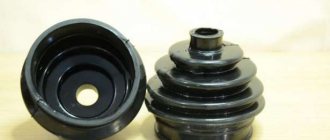
The outer CV joint is a more complex and fragile structure. On one side it is connected to the internal hinge through the axle shaft, and on the other - directly to the hub through its own splined shaft. The design of the outer hinge is based on a ball cage . It can rotate within the angular ranges specified by the design. It is the ball mechanism that is most often the reason why the CV joint crunches. A boot is placed on the body of the external “grenade”, which reliably protects the insides from dust and dirt. The normal operation of the device directly depends on this, and according to statistics, it is a torn boot that is the root cause of the complete or partial failure of this mechanism.
Operation of the outer CV joint
Remember that any constant velocity joint experiences greater loads the greater the angle at which its two axle shafts operate. If they are parallel to each other, then the load on the node is minimal; accordingly, at a maximum angle, the load will be maximum. It is thanks to this property that a faulty hinge can be identified, which we will talk about next.
In what cases is it necessary to replace the inner CV joint?
Replacing the internal CV joint on front-wheel drive VAZ vehicles is required if the following symptoms are present:
- Crunching and knocking noises when driving and accelerating in a straight line;
- Vibration and shock when changing gears;
- Significant play when testing by hand;
- If the “grenade” fails completely, the vehicle cannot move further.
» alt=»»> The main reason for the malfunction of the VAZ “grenade” is the entry of water and dirt through the hole in the torn boot. The second possible cause of failure is a sharp press on the gas with the wheels fully turned, although in this case you risk killing the external rather than the internal grenade.
In addition to the above, replacing the internal CV joint on VAZ-2110 and other models may be necessary if the quality of the previously installed joint is poor.
How to identify a crisp CV joint
Finding out which “grenade” crunches is quite simple. First of all, you need to understand that the characteristic crunching or creaking noise when turning is produced by the outer CV joint. The inner joint may make a clicking noise on a straight road. We will touch on diagnostic algorithms below.
The crunching sound of the outer CV joint usually occurs when the driver turns with the wheels fully or strongly turned (in their direction). This is especially audible if you also “give on the gas” at this time. At this moment, the hinge experiences maximum or close to this load, and if it is faulty, then the mentioned sounds occur. Externally, this may manifest itself in the fact that you will feel “kickback” in the steering wheel when turning.
As for internal CV joints , their failure is more difficult to diagnose. Usually a similar sound comes from them when driving on an uneven road, and the deeper the holes the wheel gets into, the greater the load the joint experiences, and accordingly, the more it crunches. In some cases, a malfunction of the internal CV joint is diagnosed by vibration and “twitching” of the car during acceleration and at high speeds (about 100 km/h or more). Even when driving on a straight and level road (symptoms resemble a situation when the wheels are not balanced).
Next, let's move on to answering the question of how to determine which CV joint is crunching, internal or external. There are several verification algorithms. Let's start with the outer hinges.
Definition of a crunching sound from an outer CV joint
Outer CV joint design
It is necessary to choose a flat area on which you can drive a car. Turn the wheels to one side as far as they will go and drive off quickly. This will put more stress on the hinge, and if it is faulty, you will hear a familiar sound. By the way, you can listen to it yourself (with the windows open) or with an assistant so that he is near the wheel while the car is moving. The second case is especially good for diagnosing right CV joints, since the sound from there reaches the driver worse. However, similar procedures can be carried out on the road or in the field, so as not to bother and look for an additional place for tests.
How the inner CV joint crunches
Inner CV joint design
Internal hinges are diagnosed differently. To determine which CV joint is faulty, left or right, you need to find a straight road with significant potholes and drive along it. If the hinge is broken, it will “knock.”
Let us describe another interesting method for determining how the inner CV joint crunches, which consists in not hanging the wheels, but significantly making the rear part of the car heavier (put a lot of people in, load the trunk), that is, make the front of the car rise and the axle of the inner CV joint curved as much as possible. If in this position you hear a crunching sound while moving, then this is one of the signs of a malfunction of the mentioned unit.
Universal diagnostic method
Diagnosis of a malfunction of the internal CV joint
We present to you an algorithm for another, universal option, how to find out which “grenade” is crunchy. You need to act in the following sequence:
- Place the car wheels level.
- Raise one of the front wheels using a jack.
- Put the car on the handbrake and neutral gear.
- Start the engine, depress the clutch, engage first gear and slowly release the clutch, that is, “move off” (as a result, the suspended wheel will begin to rotate).
- Slowly press the brake pedal, creating a natural load on the joint. If one of the internal “grenades” is faulty, then at this time you will hear familiar knocking sounds on the left or right side. If the internal CV joints are in order, then the car will simply start to stall.
- Turn the steering wheel all the way to the left. Slowly press the brake pedal. If the internal “grenade” is faulty, it will continue to knock. If the outer left CV joint is also faulty, then sound will also be added from it.
- Turn the steering wheel all the way to the right. Carry out similar procedures. If a knocking noise occurs when the steering wheel is turned to the right, it means that the right outer joint is faulty.
- Be sure to put the gear in neutral, turn off the engine, and wait until the wheel comes to a complete stop before lowering it to the ground.
Replacing the outer CV joint on a Lada Granta ⋆ I Love My Lada
Depending on the manufacturer and quality of the CV joint, its service life ranges from 30 to 60 thousand kilometers. Replacement of the external grenade is usually done more often, especially on the right side. It is more susceptible to stress from bad roads. How to replace the outer CV joint in Grante and which one is better to buy, we will figure it out now.
When to change the CV joint, signs of malfunction
As was said, the external grenade fails after about 40 thousand mileage. This is evidenced by crunching, creaking and knocking sounds in the area of the drive shafts. To determine which side of the CV joint requires replacement, you need to turn the steering wheel all the way and drive off. In 90% of cases, a worn drive will manifest itself as a crunching sound. For control, you can turn it first in one direction, and then in the other direction, and turn it back. If the CV joint is worn out, a crunching sound will be heard immediately.
New and worn CV joint
This is the case when there are no visual signs of wear:
- Lubricant leaks near the outer joint.
- Cracks, tears on the boot.
- Lost or misaligned clamps.
- There is obvious play when turning the suspended wheel.
If there are visual signs of wear, we replace the CV joint on the Grant as soon as possible.
Choosing an outer CV joint for the Lada Granta
There are enough hinges from different manufacturers on sale, it’s bad that sellers treat them like all Zhiguli spare parts - everything is the same. In practice, for the first generation Grants there are two types of external (and internal) CV joints - for cars with manual transmission and for Grants with automatic transmission. In a word, grenade 2215012-00 (21 teeth) .
VAZ CV joint
For Lada Granta with a manual transmission there is a CV joint with catalog number 2215012-86 . In order not to be confused with numbers, let’s look at the differences between CV joints for Grants with automatic transmission and manual transmission:
- The spline connection in the outer hinge has changed in size, the number of teeth is 21 . A CV joint with 22 splines is suitable for a manual transmission.
- The geometric dimensions of the body have also been changed.
In particular:
- The length of the outer spline part for manual transmission is 76.5 mm , for automatic transmission - 77 mm .
- height (without spline) 55 mm for automatic and 52.2 mm for manual .
- The number of teeth for the ABS ring does not change and remains 43.
Therefore, before purchasing an outer CV joint, we first look at the number of splines on the inside of the joint body. Among the manufacturers on the market, AvtoVAZ, Belmag and Triall dominate. The price of an outer CV joint on a Lada Granta is around $20.
It is important that the kit includes a locking ring, molybdenum disulfide-based lubricant and a neoprene boot. It should not be too hard, but a boot that is too thin will not last long.
Why does the CV joint start to crunch?
Constant velocity joints, both internal and external, are quite reliable mechanisms, and with proper care their service life can be calculated in years. In some cases, it is even comparable to the service life of the entire car. However, this circumstance directly depends on the care and operating conditions of CV joints.
One of the reasons why joints fail prematurely is an aggressive driving style and/or poor road surface on which the car is driven. As mentioned above, CV joints experience maximum load during sharp turns and high torque from the engine (in other words, when the driver enters a turn “with gas”). As for bad roads, they can damage not only the car’s suspension, but also the CV joint, since a similar situation is created here. For example, the driver accelerates the car through the CV joint, and at this time the wheel oscillates significantly in the vertical plane. Accordingly, under such conditions the hinge also experiences increased load.
Torn CV boot and lubricant splashed from it
The second reason why the CV joint begins to crunch is damage to its boot . This is especially true for the outer CV joint, since it is located in close proximity to the wheel, and accordingly, a significant amount of dust and dirt gets on its body. Under the boot there is a lubricant, which, when moisture and dirt gets into it, immediately turns into an abrasive compound that begins to destroy the surfaces of the internal joint components. This should under no circumstances be allowed. It is necessary to regularly check the condition of the boot in the inspection hole, as well as the presence of lubricant in it. Also check if there is any grease on the wheel rims and parts close to it, because often when the boot is torn, it simply splashes onto the mentioned surfaces.
The third reason why the “grenade” crunches when turning is the natural wear of its internal components under normal operating conditions. This is especially true for cheap Chinese or domestic CV joints. If the mechanism is made of “raw” or low-quality metal, then the service life of such a unit will be short. In the outer hinge, at the point of contact between the balls and the cage, a groove gradually begins to appear. As a result, the designated balls roll very freely, along grooves having a larger diameter than the balls themselves. This rolling is perceived by the human ear as a kind of crunch.
Detecting play on the CV joint
An additional sign of partial failure of the CV joint is the appearance of play on the shaft or axle shaft. It is quite easy to detect it by driving the car into the inspection hole and tugging at the corresponding parts with your hand.
Replacing the CV joint boot on Lada Granta (VAZ Granta)
In a car with front-wheel drive, it is not the driveshaft with the main gear and axle shafts that is responsible for transmitting torque from the gearbox to the wheels, but special parts - CV joints, they are also constant velocity joints, in common parlance - a “grenade”. They consist of a drive and a CV joint itself; there are 2 of them on each drive.
— external (closer to the wheel) and internal (closer to the gearbox). The “Grenade” is very durable, and with constant maintenance the car can withstand 100,000 km. and more. However, it does not last forever, and one day it may fail.
In this article we will talk about how to independently diagnose and replace an external CV joint using the example of the popular Russian car Lada Granta.
Causes of grenade malfunctions and its diagnosis
Usually the CV joint does not break right away. You will feel the car accelerate jerkily and hear a knocking sound from somewhere in the front suspension. Over time, symptoms worsen. Diagnostics is very simple: put the car on a jack and swing the CV joint of the suspended wheel. Do you feel any play? It's time to change the part.
There are 4 main reasons why CV joints fail prematurely:
1) The part itself is of low quality or defective;
2) The vehicle is used off-road;
3) The boot broke and dust and abrasive particles got inside;
4) Aggressive driving style.
If you turn to specialists for help, you will have to fork out money. Replacement service costs an average of 1,500 rubles. for 1 CV joint.
You can save money by doing your own repairs: the cost of a spare part in auto shops starts from 1000 - 1500 rubles. for 1 “grenade”, complete with drive components cost about 3000 - 4000 rubles. There are a lot of manufacturers, but it is better to take the original from AvtoVAZ.
Tools and materials
- new CV joint (the grenade itself, without the drive) and lubricant for it;
- jack, hammer;
- wheel wrench, mounting, pipe of suitable diameter;
- a set of wrenches and sockets, a screwdriver;
- graphite lubricant.
Replacing the “grenade” with the Lada Granta
1) First, you need to place the car on a hard, level surface so that you can jack it up.
2) Remove the wheel using a wheel wrench.
3) Loosen the hub nut with a 30mm socket. If it is difficult to turn, use an iron pipe as a lever.
4) Remove the brake caliper.
5) Remove the 2 bolts from the ball joint.
6) Unscrew the hub nut completely, take the mounting tool and remove the hub from the CV joint (and from the ball joint).
7) Pull off the boot and remove the grease, otherwise there will be a lot of dirt.
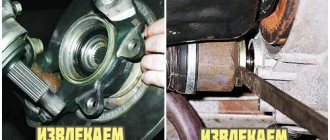
 Using a hammer, carefully knock out the “grenade”.
9) Don't forget to remove the retaining ring with a screwdriver.
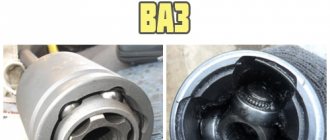
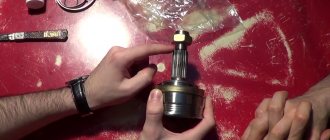
10) On the left in the photo is a CV joint made by AvtoVAZ, and on the right is Belmag. As you can see, of these particular samples, the VAZ one is preferable, since it has better calcination.
11) Take the grease and fill the entire grenade bearing with it.
12) Put on a new boot and put lubricant in it. Then install a new retaining ring.
13) Screw the hub nut onto the CV joint.
14) Hitting the nut with a hammer, hammer the “grenade” into place. During the process, it is extremely important to keep the CV joint straight in relation to the drive.
15) Tighten the boot clamps.
16) Unscrew the nut, then reassemble everything in the reverse order of removal. We recommend coating all bolts with graphite to prevent them from souring.
17) Do not forget to move the ABS ring from the old CV joint if it is not on the new one, otherwise problems with its operation may arise.
Replacing a CV joint is a difficult and quite responsible undertaking, since if you do something wrong, there is a risk of damaging other components and assemblies.
The scheme described above is valid only for an external “grenade”. To get to the inside, it is advisable to put the car on a lift, drain the oil from the gearbox, perform a series of manipulations to remove the hub from the CV joint, and then, using a mounting tool, carefully, trying not to damage the protective ring, pull the drive out of the gearbox.
After that, holding it in a vice, you can comfortably begin replacing it. That's all for today, good luck on the roads!
articles:
1. Replacement of the outer CV joint for the Lada Granta
2.: “Replacing the boot of the outer and inner CV joint (grenade)
Replacement of outer CV joint for Lada Granta
Still, I decided to change the CV joint today. because then there will be no time. I made a photo report, as detailed as I could.
sit down and remove the wheel
While the car is still with the wheel, loosen the hub nut using a 30mm socket and use a metal pipe for reinforcement.
Next, unscrew the caliper assembly. Some will say that there is no need to do this, because you can change the grenade anyway, but it’s convenient for me so that he doesn’t interfere with me.
then unscrew the two bolts from the ball joint
then unscrew the loose hub nut completely, and using a mounting tool (a small pull) remove the hub from the ball and at the same time from the CV joint
remove the boot from the CV joint and remove all possible lubricant so that there is less dirt
and start trying to knock out the grenade with a hammer. And she gave in quite easily, not like last time, we beat her for almost 2 hours.
remove the old retaining ring.
This is a comparison of CV joints from two manufacturers, on the right is BELMAG, and on the left is produced by AVTOVAZ. The difference is immediately visible, AVTOVAZ has a deeper CV joint calcination than BELMAG, which already gives AVTOVAZ a big plus. Let's hope that the new CV joint lasts at least 30 thousand km, and not like BELMAG only 3000 km went before it cracked. The cost of the AVTOVAZ CV joint is 1500 rubles, and the BELMAG CV joint is 1000 rubles, and the kit includes CV joint grease.
Fill the entire CV joint bearing with grease.
We put on a new boot, fill it with the remaining CV joint grease, and install a new snap ring. If the anther does not want to get dressed, then a screwdriver will help, as an option
We screw the old hub nut onto the CV joint.
hold the CV joint straight on the drive and hit the screwed nut with a hammer and hammer the CV joint into place.
But no! Let's take a larger hammer - 2 precise blows and the CV joint sits in its place.
Pull the boot and tighten the clamps on the boot.
When assembling the unit, we do everything in the reverse order, but do not forget to lubricate all the bolts with graphite grease so that nothing sticks.
Source: https://avtozam.ru/vaz/zamena-pylnika-shrusa-lada-granta-vaz-granta.html
Consequences of a CV joint crunch
Is it possible to drive with a CV joint crunching? It all depends on the degree of wear and tear. At the initial stage of the breakdown, you can drive, but it is not advisable , since the operation of the unit leads to even greater damage. Therefore, the sooner you try to repair the hinge, the, firstly, it will cost you less (perhaps everything will cost you by replacing the lubricant), and secondly, you will not put the life and health of you and your passengers in the car at risk.
So, the consequences of a CV joint crunching can be:
- Jamming . That is, the CV joint will stop rotating. This is especially dangerous at speed, as you risk losing control of the car, which can be fatal. You can try to wedge the hinge, but the best solution is to replace it.
- Clip break . If we talk specifically about an external grenade, then when it comes to the wedge, the clip simply breaks, the balls scatter, and then the consequences are unpredictable.
- Shaft or axle shaft rupture . In this case, the gearbox will turn only the designated parts, but for obvious reasons the torque will not be transmitted to the drive wheel. This is the most extreme case, and further movement of the car is possible only with a tow truck or tow truck. Naturally, the only correct solution in this case will be to replace the CV joint. And you will be lucky if you only have to change the hinge itself. After all, there is a risk that other parts nearby will be damaged during this accident.
How to repair a CV joint
Damage to the internal parts of the hinge most often leads to a complete replacement of the mechanism. However, this only happens with significant wear. In most cases, it is recommended to simply replace the CV joint grease and boot. This is often enough to get rid of the annoying sound and make it easier for the parts to interact.
Therefore, if knocking or clicking sounds appear on one of the four CV joints (we will assume that you have already found out which one), you must perform the following steps:
New inner CV joint
- Drive the car into the inspection pit in order to check the integrity of the boots and the presence of lubricant splashes from under them on nearby surfaces.
- If traces of grease are visible on the boot or other parts, it is necessary to remove the CV joint. Next, disassemble it, remove the boot, wash the internal parts and surfaces, change the lubricant and boot.
- If during the inspection process you find significant play and/or damage to the working surfaces of the parts, you can try to polish them. However, as practice shows, this procedure is ineffective, since you cannot eliminate significant waste with anything. Therefore, the best recommendation would be to completely replace the CV joint .
You can replace the lubricant and boot yourself, as the procedure is simple. The main thing is, when disassembling, do not forget to wash all internal parts and surfaces with gasoline, thinner or other cleaning liquid. And only then apply new lubricant. However, if you are dismantling and replacing the lubricant for the first time, then it is better to have a more experienced car owner or technician with you. Or have him perform the procedure and show you its algorithm. In the future, you can easily cope with such work.
Conclusion
Constant velocity joints are reliable and durable mechanisms. However, during operation, it is necessary to constantly monitor their condition in order to determine in time which CV joint is crunching or making other unpleasant sounds. After all, this indicates a malfunction in its operation. Hinge failure at the initial stage is not critical . You can drive hundreds or even a thousand kilometers with a crunch. However, you should remember that the sooner you repair or replace the CV joint, the cheaper it will cost you. In addition, do not forget about safety. Do not bring the condition of the hinge to a critical state , as this threatens you with a serious emergency situation, especially at high speed. We hope that the above information helped you figure out what to do when the CV joint crunches and accurately determine which one is faulty.
CV joint, constant velocity joint or homokinetic joint is a device that replaced the cardan joint and is designed to transmit torque at large, up to 70°, wheel rotation angles. Among motorists, the mechanism was called “grenade”. The reason for this is the external resemblance to ammunition.
Today, homokinetic joints are used on vehicles equipped with front-wheel drive, as well as on all-wheel drive vehicles. The use of the device on cars with rear drive wheels is rare. However, similar examples exist. Kits are also sold that allow you to replace the driveshaft crosspiece with a CV joint on domestic “classics”. » alt=»»> One wheel drive has two hinges - external and internal. The external CV joint of the drive does not differ significantly from the internal one. This design allows for good wheel alignment without loss of power and wear-out of the joint.
Today, the CV joint is the main and well-studied method of transmitting torque when the wheels are turned.
Diagnosis of this element is carried out by any car service center. However, the unit cannot be repaired. If it malfunctions, a complete replacement of the hinge is required.
Replacing a CV joint on a Lada Kalina: how to change it yourself
- Car device
- Nodes
CV joint (constant velocity joint) is a mechanism that allows you to transmit torque between misaligned shafts. The device is actively used on front-wheel drive vehicles. On each shaft coming out of the gearbox there are two of them - internal and external. Repair is impossible; if the unit breaks down, it is replaced as an assembly.
Step-by-step algorithm for replacing a CV joint
The process should be started if there is complete confidence in the failure of the specified unit. Replacing the outer CV joint step by step if you do it yourself.
- We loosen the tightening of the wheel fasteners and the hub nut (first remove the cotter pin) on one of the sides of the car.
- We hang up this side with a jack and install stops under the wheels of the stern, and a safety support under the body.
- We completely remove the wheel.
- Unscrew the two bolts holding the ball joint to the steering knuckle bracket and the hub nut.
- We turn the steering wheel of the Lada Kalina as far as possible to the side, move the axle and remove the axle shaft from the splined engagement of the hinge and the hub. If there are difficulties with the free exit of the axle shaft, then use a hammer, applying impact forces to the shaft through a drift.
- When the axle shaft is released, we begin to dismantle the outer joint boot in combination with the clamps. These items must be replaced.
- Now we move on to removing the CV joint. To do this you will need a special puller. If it is missing, then use the hammer again. It is forbidden to apply an impact load to the separator, so we apply gentle blows to the body in an outward direction. The joint will come off if the retaining ring compresses, allowing the cage to slide off the axle shaft.
- When it is necessary to dismantle the entire axle shaft, the algorithm of actions up to point No. 7 is similar, and then, using a mount, we remove the shaft of the designated CV joint from engagement with the side gear in the transmission differential. Before such manipulation, drain the oil from the box. We take out the axle shaft as an assembly, after which we perform the necessary disassembly steps, etc.
- Removing the internal hinge involves the identical procedure given in point No. 7. To make disassembly easier, we use a vice in which we place and fix the structure.
CV joint repair
As mentioned above, the hinge cannot be repaired. Conventionally, one of the repair measures includes washing the “grenade” after driving with a damaged boot.
Washing is carried out at the same time when the damaged boot on the pomegranate is replaced. The hinge is carefully knocked off the shaft, inspected for damage and thoroughly washed to remove any dirt and grease in gasoline or kerosene.
After washing, the assembly is filled with lubricant and mounted in place, having previously installed the boot. The procedure makes sense only if there are no obvious signs of a joint malfunction.
A crunchy or knocking part definitely needs to be replaced, since wear forms on the working surfaces of the inner race, and it is no longer possible to stop the destruction. Continued operation of the vehicle may be dangerous for the driver and other road users.
Assembly procedure step by step
We carry out the entire list of assembly operations in a Lada Kalina car in strictly reverse order. During the procedure, it is necessary to take into account some nuances.
- First, we put the boot on the axle shaft. If this is difficult, then its surface can be lubricated with the grease supplied with the new hinge kit.
- Now we fill the same grease into the CV joint bearing, and the remainder into the internal cavity of the boot.
- We install the hinge on the axle shaft. We also use a hammer, applying a shock load to the body. The retaining ring should be replaced.
- When the “grenade” “sits” in its place, we push the boot, after squeezing it with our hands to remove excess air. We install clamps.
- We do the same when replacing the internal hinge.
- Now we install the axle shaft into the transmission housing until the shaft engages with the side gear. Don’t forget to fill the unit with oil afterwards.
- We insert the outer joint into the steering knuckle until it fully engages with the splined race of the hub. Screw on the central nut (do not tighten it).
- We return the ball joint to its place.
- We hang the wheel and do not tighten its fasteners too much.
- We lower the car (we do not unload the jack completely). Tighten all fasteners to the required torques. We remove the jack and stops. Replacement of the outer CV joint is complete.
Types of CV joints
During its existence, the design of the internal CV joint and its external version has been modified several times. Previous hinge models remained in use along with new developments. Today there are 4 main hinge designs known.
- Cam (cracker). Consist of 2 shaped discs and a similar number of forks. Due to the large adhesion area, they are able to withstand intense loads, but are not without significant design flaws.
Vehicles equipped with cam joints can only be driven at low speeds. Otherwise, the unit heats up and fails. The cracker type device is common in freight transport. - Tripod. This type of hinge consists of 3 rollers, which are placed in a special bowl. The transfer of angular momentum occurs due to the displacement of the rollers.
These types of CV joints are used for small cars. Some passenger cars and vehicles not designed for transporting heavy loads ride on a tripod. - Cardan shafts are paired. In fact, they are a pair of cardan joints, due to mutual rotation, equalizing each other’s operating speed. Such designs were actively used in the American automotive industry in the 20s of the last century. Today, some models of construction equipment and tractors are equipped with twin hinges.
- Ball. This node model is the most common. The hinge consists of a body, a separator, a cage and 6 balls. The latter move along oblique grooves on the inner surface of the outer race, thereby ensuring torque transmission.
There are also intermediate models of the unit: four-ball, rigid tripods. However, they are not widely used because they are not very reliable and perfect.
How to independently replace the internal grenade on VAZ cars
CV joint (constant velocity joint) is a mechanism that allows you to transmit torque between misaligned shafts. The device is actively used on front-wheel drive vehicles. On each shaft coming out of the gearbox there are two of them - internal and external. Repair is impossible; if the unit breaks down, it is replaced as an assembly.
Why does the CV joint crunch?
While operating the car, the driver sometimes hears a faint crunching sound - the crunch of a grenade. This usually becomes noticeable when the wheels are turned to the maximum angle.
Why does the CV joint crunch? What to do in such a situation?
A crunch is evidence of a unit malfunction. Initially appearing only when the wheels are turned, later it begins to appear during straight-line movement. Extraneous sounds produced by the hinge require its replacement.
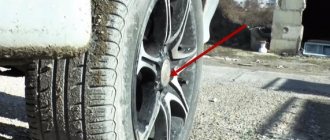
It’s easy to find out which CV joint is crunching. All you have to do is leave an assistant outside, unscrew the wheels and drive off slowly. The person remaining on the street will clearly hear where the sounds are coming from.
If you perform the diagnostics yourself, you should hang up the front wheels of the car and inspect the boots. Crisp grenades can be identified by their damage.
The fact is that the cause of the crunching is usually dust and grains of sand that get into the hinge through breaks in the rubber cap. Also, a malfunction can be suspected of a unit on which greater play was detected than on all other hinges.
Removing the inner CV joint of the Lada Granta
We carry out the work when replacing a hinge or its cover. Remove the front wheel drive (see “Removing the front wheel drives”). We clean the outside of the hinge and clamp the drive shaft in a vice with soft metal jaw linings.
Using sliding pliers, squeeze the large clamp by the protrusions and pry the end of the clamp with a screwdriver...
... disconnect the clamp and remove it. Similarly, remove the small clamp.
Slide the cover off the hinge body. Using a rag, remove the grease from the end of the hinge housing. When replacing the hinge cover, we use a file to mark the relative positions of the body, holder and hinge separator so that they take their original places during assembly.
Use a screwdriver to pry up the inner hinge retainer...
...and remove the lock. We move the hinge body along the shaft...
By striking the end of the joint cage through a soft metal drift...
...remove the cage with the separator and balls.
The drift should not transfer force to the cage and balls to avoid damaging them. Using a screwdriver...
...remove the retaining ring from the shaft groove. Remove the protective cover of the joint from the shaft. To inspect the hinge parts, take out the balls and arrange them in order. We remove the clip from the separator. We remove the old grease from the hinge body and wash it in kerosene. Wipe the hinge parts with a rag and blow with compressed air.
We inspect the balls, separator, cage and internal cavity of the body. Scratches, dents, cracks, and traces of corrosion are not allowed - we replace such a hinge. We clean the shaft of old grease and apply a thin layer of new grease to it. We put a new joint cover on the shaft and install a new retaining ring in the groove of the shaft. We put a separator on the end of the shaft (the conical part to the cover).
Using a hammer with a plastic striker, press the cage onto the splined part of the shaft. Rotate the separator until the marks align.
We insert the balls into the separator windows. To hold the balls in the windows, we apply lubricant to them (CV joint-4). We put the same lubricant into the cavities of the hinge body and cover, apply it to the balls and the separator - 80 g in total. We put the hinge body on the inside of the hinge according to the marks and install the lock. We check the mobility of the hinge body - it should move without jamming. We put the cover on the hinge body and install a small clamp. We install the hinge body approximately in the middle position from its longitudinal movement relative to the shaft.
Using a screwdriver with a thin blade, we move the edge of the cover away from the hinge body to equalize the air pressure inside and outside the cover. We secure the cover with a large clamp.
Source
How to operate a car with a crunchy “grenade”
Many motorists are concerned about the question of how long they can drive with a faulty CV joint. If the breakdown occurs only when turning, the unit can be used for quite a long time. An important condition for its “reanimation” is replacing the lubricant and boot.
When making turns, you should maintain a low speed. If the inner CV joint is broken, it will take longer for it to finally fail than in the case of the outer one. » alt=»»> When extraneous sounds occur when driving straight or do not disappear at all, replacing the unit cannot be delayed. Such a hinge can completely break at any moment. This will make further movement impossible.
Hello, dear motorists! A car enthusiast can only consider himself a real car owner when he is truly concerned about the condition of the car’s components and assemblies, and every new knock, creaking and other signs of car breakdowns haunt him.
Driving a car can be called comfortable only if all elements are in good working order.
However, each part, especially those that operate under load and friction like a CV joint, has its own working life.
Sooner or later, the material wears out and loses its properties, which leads to failure of the part. This is objective. And a “hint” about an impending breakdown from the part itself must be taken seriously. It’s better not to wait for the car to stop on a long journey, but to immediately begin troubleshooting and fixing it.
Owners of front-wheel drive cars are familiar with such an unpleasant phenomenon as a CV joint crunching. Considering that the front suspension of the car, in addition to its main functions, must also ensure the transmission of rotation from the differential gears to the drive wheels, it is equipped with unique devices: constant velocity joints, which in its abbreviated version sounds like “CV joint”.
This part is very important and quite complex in design; therefore, it is expensive and requires increased attention. If the CV joint crunches, then without any hesitation you need to take the car in for repairs and change it.
Why does the CV joint crunch?
Experienced drivers are able to determine the location of a car breakdown by ear. Such skills are acquired over time, but the crunch of a CV joint cannot be confused with anything.
In order to understand the nature of this characteristic noise, you should remember how the CV joint is designed. The task of the CV joint is the transmission of rotation from one axle shaft to another, provided that the angle between them continuously changes.
This property is due to the need not only to rotate the drive wheel, but also to give it the ability to turn and move up and down on a spring.
The CV joint consists of the following main elements:
- outer body in the form of a bowl with six semicircular grooves inside and a semi-axis outside;
- the inner race is in the form of a spherical fist and also has six grooves and a splined connection for the axle shaft;
- Between the inner walls of the bowl and the holder there are 6 balls in the separator.
All elements are made so precisely that they have no play when assembled. The cage transmits force through the balls to the body and rotates it, and moving the balls along the grooves makes it possible to change the angle between the axle shafts.
Over time, a hole forms at the point where the balls come into contact with other elements and a backlash appears. The free movement of the balls (rolling) generates a sound that is very similar to crunching.
Considering that CV joints are installed two on each wheel, when alarming symptoms appear, it becomes difficult to find out which CV joint is crunching: inner or outer, right or left.
Replacing the CV joint on the Lada Grant. Service life and causes of malfunctions of the “grenade”
In a car with front-wheel drive, it is not the driveshaft with the main gear and axle shafts that is responsible for transmitting torque from the gearbox to the wheels, but special parts - CV joints, they are also constant velocity joints, in common parlance - a “grenade”. They consist of a drive and a CV joint itself; there are 2 of them on each drive.
– external (closer to the wheel) and internal (closer to the gearbox). The “Grenade” is very durable, and with constant maintenance the car can withstand 100,000 km. and more. However, it does not last forever, and one day it may fail.
In this article we will talk about how to independently diagnose and replace an external CV joint using the example of the popular Russian car Lada Granta.
Causes of grenade malfunctions and its diagnosis
Usually the CV joint does not break right away. You will feel the car accelerate jerkily and hear a knocking sound from somewhere in the front suspension. Over time, symptoms worsen. Diagnostics is very simple: put the car on a jack and swing the CV joint of the suspended wheel. Do you feel any play? It's time to change the part.
There are 4 main reasons why CV joints fail prematurely:
1) The part itself is of low quality or defective;
2) The vehicle is used off-road;
3) The boot broke and dust and abrasive particles got inside;
4) Aggressive driving style.
If you turn to specialists for help, you will have to fork out money. Replacement service costs an average of 1,500 rubles. for 1 CV joint.
You can save money by doing your own repairs: the cost of a spare part in auto shops starts from 1000 – 1500 rubles. for 1 “grenade”, complete with drive components cost about 3000 – 4000 rubles. There are a lot of manufacturers, but it is better to take the original from AvtoVAZ.
Replacing the “grenade” with the Lada Granta
1) First, you need to place the car on a hard, level surface so that you can jack it up.
2) Remove the wheel using a wheel wrench.
3) Loosen the hub nut with a 30mm socket. If it is difficult to turn, use an iron pipe as a lever.
4) Remove the brake caliper.
5) Remove the 2 bolts from the ball joint.
6) Unscrew the hub nut completely, take the mounting tool and remove the hub from the CV joint (and from the ball joint).
7) Pull off the boot and remove the grease, otherwise there will be a lot of dirt.
Using a hammer, carefully knock out the “grenade”.
9) Don't forget to remove the retaining ring with a screwdriver.
10) On the left in the photo is a CV joint made by AvtoVAZ, and on the right is Belmag. As you can see, of these particular samples, the VAZ one is preferable, since it has better calcination.
11) Take the grease and fill the entire grenade bearing with it.
12) Put on a new boot and put lubricant in it. Then install a new retaining ring.
13) Screw the hub nut onto the CV joint.
14) Hitting the nut with a hammer, hammer the “grenade” into place. During the process, it is extremely important to keep the CV joint straight in relation to the drive.
15) Tighten the boot clamps.
16) Unscrew the nut, then reassemble everything in the reverse order of removal. We recommend coating all bolts with graphite to prevent them from souring.
17) Do not forget to move the ABS ring from the old CV joint if it is not on the new one, otherwise problems with its operation may arise.
Replacing a CV joint is a difficult and quite responsible undertaking, since if you do something wrong, there is a risk of damaging other components and assemblies.
The scheme described above is valid only for an external “grenade”. To get to the inside, it is advisable to put the car on a lift, drain the oil from the gearbox, perform a series of manipulations to remove the hub from the CV joint, and then, using a mounting tool, carefully, trying not to damage the protective ring, pull the drive out of the gearbox.
After that, holding it in a vice, you can comfortably begin replacing it. That's all for today, good luck on the roads!
Source: https://avtgid.ru/zamena-shrusa-na-lade-grante.html