A CV joint is an angular velocity joint. An alternative name is considered to be grenade due to its visual similarity. The main purpose is to transmit rotational movements between the axle shafts. The angle, due to rotation, constantly changes in relation to each other.
Periodic breakdowns are associated with the influence of constant loads; the issue remains during the period of operation. In the manufacturing process of the part, strong carbon steel is used, which can withstand heavy loads for a long period of time.
Over time, the VAZ 2110 CV joint still needs to be replaced. Among the main reasons for failure is contamination with sand getting inside the mechanisms, loss of lubricant, torn boots or mechanical damage to the structure.
Replacing the internal CV joint of a VAZ-2110
To extend the life of this component, which significantly affects the level of safety, you need to:
- firstly, monitor the choice of the original spare parts, made of high-quality carbon steel, designed for long-term loads;
- secondly, it is necessary to undergo regular maintenance and independently inspect the functional components of the car.
The need and timing of these procedures follow from the manufacturer’s recommendations and the functionality of the element in question. The CV joint can fail as a result of foreign objects, significant constant load, and loss of lubrication. Replacing the internal CV joint of a VAZ-2110 will require a certain set of tools.
Please note that it cannot be repaired, it can only be replaced. You can do this yourself, without the help of specialists. We are considering how to do this without draining the oil, and also without a pit.
Symptoms of a problem
The operation of a CV joint is always associated with the impact of enormous loads. Despite the use of high-strength materials in the design of the unit, it can sometimes fail. The following reasons contribute to this:
- Use of low quality materials in the manufacture of assembly parts, use of counterfeit or defective spare parts.
- Lack of lubricant inside the mechanism or its poor quality.
- Water or abrasive debris getting inside the mechanism due to damage to the boot.
- Excessive load on the mechanism due to poor road conditions or aggressive driving style.
- Long-term operation, during which the life of the parts is exhausted.
A malfunction of the internal CV joint is manifested by the following symptoms:
- A characteristic crunching sound when hitting obstacles, starting from a stop or sharp acceleration.
- Jerking and vibration during acceleration.
- Play in the joints of the hinge when the wheel is hanging.
Equipment and tools for replacing CV joints
To replace the CV joint, you need to prepare the following tool:
- internal grenade, including a clamp and lubricant; timely replacement of the grenade ensures long-term operation;
- replacement without a pit requires a lift. The inspection hole also implies the presence of a jack and fixing the car in a safe and convenient position for performing work;
- standard tool for replacing a hinge.
Any set for motorists can be used as a tool without any other accessories.
Device
Installation of internal and external CV joints
The drive system consists of the following joints:
- two internal ones, which are installed directly in the gearbox, drive the axle shaft (one on each side);
- two external ones are located on the hubs and serve to transmit torque to the wheels.
It may seem that they have the same service life. But in reality, everything is not quite like that, the internal ones work longer, while the external ones fail much more often. The reason for this is that the loads that arise when the car moves on the wheel hub are too high, as well as the fact that the outer CV joint rotates at a much larger angle than the inner one. External differences can also be noted - the size of internal grenades is much larger than external ones.
Replacing the CV joint - instructions
Stage 1:
- Secure the vehicle off the ground using a lift while engaging 4th gear and applying the handbrake.
- Install wheel chocks under the wheels.
- Remove the protective cap and use a pry bar to unscrew the hub nut.
- After removing the hub nut, unscrew the car wheel components.
- Raise the wheel using a jack.
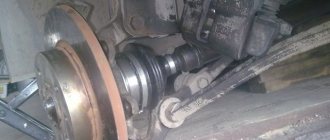
- Find the CV joint and unscrew the 6 bolts, in this case the hinge will be fixed only to the flange.
- Unscrew the knuckle mounting bolts (2 pcs.);
- Turn the steering mechanism to its most extreme position; after these steps, the hinge should fall out by itself.
Stage 2. Dismantling:
- replace the boot as part of an updated design solution;
- remove the retaining ring;
- remove the hinge secured by the shaft splines;
- carry out equipment diagnostics;
- install all components, new CV joint.
Note to the car owner
In order to carry out repairs, you will need the following tools and spare parts:
- Hinge kit – CV joint, boot, tube of lubricant, ring, nut, clamps.
- Key "30" with a long handle.
- Hammer and punch.
- A set of keys for “17”, “19”. Preferably caps.
- Jack.
- Wheel chocks.
- Reliable supports.
- Puller for tie rod end.
If there are faults in other components (balls, tie rod ends), these elements must also be replaced. To avoid having to disassemble the suspension again, do everything at once.
Installation of CV joints at the final stage in detail
Please note the following notes:
- install a plastic plug on the end of the shaft;
- the retaining ring is installed before mounting the hinge;
- Before installing a new CV joint, the installation site is generously treated with lubricant to ensure a tight fit;
- After installing the drive, the hinge must “sit” tightly on the gear until it is completely fixed, which is done with a hammer.
Carrying out this replacement of a functional element of a VAZ shaft with your own hands does not require experience in car repair. The replacement can be carried out following the video instructions. If you are not confident in your abilities, contact a specialist to ensure that the hinge is installed reliably.
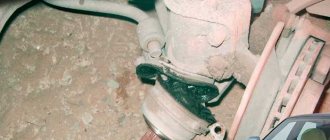
Diagnostics
To ensure that you avoid problems with a CV joint that pops out while driving, it is necessary to carry out diagnostic work in a timely manner. At least once a month, inspect the condition of the boot; if it is damaged, be sure to correct this problem. Failure detection is carried out as follows:
- A common method is to start with the wheels turned out
. To carry out such diagnostics, you will need to turn the wheels and start sharply from a place. The presence of a specific crunch will mean problems with the CV joints; - Raise the wheel on a jack, ideally you should use a lift, but garages usually don't have them. Then we inspect the CV joint; there should be no visible damage on it. Also try moving the wheel. The hinge should not have any play;
- This method is more complicated, but quite reliable. The front of the car is hanging out. First gear is engaged, if you have an automatic transmission, select mode
– D. Start the engine and listen to the wheels. They should not make even the slightest crunch.
Actually, this is all that can be done for diagnosis. It should be noted that this process at service stations is completely identical to the methods described.
General recommendations
Obviously, the inner joint cannot be removed without lifting the vehicle structure, since the wheel must be removed.
This can only be done when the car is suspended. Some technicians recommend draining the oil before such repairs, but you should not do this. Carrying out the replacement according to the instructions will allow you to do without draining. It is also recommended to replace the CV joint seal together with the hinge. The CV joint is changed separately without replacing the boot and oil seal only in cases where there is a functional reserve, and the wear of the CV joint is more pronounced than other structural elements. Typically, repairs are divided into two stages if it is not possible to complete a replacement in full. Don’t forget to replace the oil seal and boot afterward in order to maintain all variations to maintain the level of vehicle safety.
Watch the video instructions for performing the work. For example, the grenade and hub are changed until the mechanism completely fails.
Sources
- ladaautos.ru/vaz-2110/kak-delaetsya-zamena-vnutrennego-shrusa-vaz-2110.html
- drive2.ru/l/7210376/
- vazweb.ru/desyatka/hodovaya/zamena-vnutrennego-shrusa.html
Constant velocity joint or CV joint
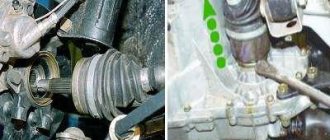
VAZ 2110 grenade boot
The design of the car provides that the hinge is subject to a significant load and is made of very strong alloys. A well-maintained and good CV joint (grenade) can last longer than the car itself. To achieve this result and save money, because the procedure for replacing a hinge is expensive, you must follow some rules. One of these rules is to systematically check the condition and timely replacement of the grenade boot. The most important enemies of a car grenade are dirt, dust, water and sand that enter the working part while driving. To protect against such destructive factors, anthers are installed, which are protective rubber cones that very tightly cover the CV joint mechanism of the vase. If you find that the grenade boot is torn, it must be replaced immediately. During periodic technical inspections, you need to carefully inspect the boots and replace them if necessary.
Note. If folds, cracks, deterioration in the elasticity of the rubber and other deformations and damage are found on the anthers, replacement should not be shelved.
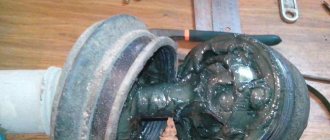
How to completely remove the drive
You have already removed the outer hinge. But the internal one is still in the gearbox. Before removing it, drain the oil from the gearbox (at least 2/3 of the total volume). The easiest way to remove the inner CV joint is to use a short, wide chisel and a hammer. How to use these tools? Position the chisel so that it rests against the joint and lug on the transmission housing. Using sharp blows of a hammer in the direction from the wheel to the gearbox, remove the hinge. Usually 2-4 hits are enough. You should not use a mounting spatula. Practice shows that with its help the CV joint is removed much worse. That's all. The drive is in your hands. You can begin further repairs.
What does a torn boot threaten the car owner with?
And if a rupture occurs, or cracks are already found on it, then one way or another moisture with elements of sand and dirt begins to seep inside. This will not have the best effect on the operation of the front-wheel drive system as a whole. Despite the fact that the elements are assembled from high-quality and durable materials, rupture can occur at any time.
Reasons for boot failure
Among all the reasons for the premature failure of the boot, the following can be distinguished:
- Low quality spare parts, possible presence of fakes or defective parts.
- The amount of lubricant inside is minimal , therefore, the material dries out over time.
- The driving style of the car is harsh, therefore, the boot breaks from strong and sharp turns of the steering wheel .
- Poor quality of the road surface negatively affects the condition of the front suspension as a whole, and in particular the constant pressure on the CV joint boot.
All of the above reasons in one way or another have a negative impact on the general condition of the CV joint boot, and below we offer you a way to replace it yourself without resorting to the help of a car service center.
Why is it necessary to replace the boot?
It is known that any part is subject to wear during operation and this is due to the appearance of various cracks and gaps on its surface. These are exactly the symptoms that are characteristic of the CV joint boot. But what is a CV joint?
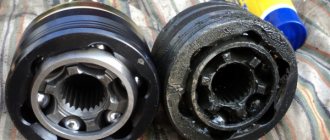
This is what the new CV joint and boot look like
CV joint (constant velocity joint - approx.) is a special joint equipped with transverse grooves and able to change the angle between the driven and driven axle shafts. In other words, thanks to this element, the car transmits torque from the gearbox directly to the wheels.
And over time, when the boot wears out, dust and dirt get inside the CV joint, thereby mixing with the lubricant, which leads to the formation of a kind of “crunch” when turning the steering wheel or sharply accelerating the car. In this case, the grenade itself will need to be replaced.
Additional factors that may indicate CV joint wear:
- When the car starts to move, or when the moment of movement changes, small jerks appear.
- There is play on the shaft between the inner or outer CV joint.
SHRUS device diagram
In order to study in more detail the structure of CV joints and their anthers, we offer a detailed diagram:
This is what the diagram looks like.
Thus, long-term driving with a torn boot, and even more so with a faulty CV joint, is highly not recommended. Can knock out a grenade.
Tools required for repairs.
To remove and install the VAZ 2110, 2111, 2112 CV joint, you will need the following tools:
- jack;
- keys for 17 and 19;
- pliers
- heads for 13, 14, 15, 16, 17 and 30;
- mount;
- knob;
- wheel wrench;
- lubricant;
- rags.
Do-it-yourself repairs are well justified by saving time and money. Since the price of work on replacing the CV joint of a VAZ 2110 and other models in a car service is: for an external one - 1100 rubles, for an internal one - 1300 rubles. Tariffs are valid as of 02/15/2019. And this is comparable to the cost of the parts themselves.
Preparing for repairs
Place the car on a level surface. Place chocks under the rear wheels. In this case, the neutral gear must be engaged. Your task is to unscrew the nut from the hinge. To do this, you need to unlock it with a drift and turn it with a key at “30” with a large lever. It is possible that this will not be done the first time. But replacing CV joints on a VAZ 2110 model is impossible without unscrewing this nut. The wheel must be on the ground. There is no need to jack it up at this stage. Unscrew the nut and bolts securing the wheels. After this, you can raise the side to be repaired. What's next? Remove the wheel and lower the car onto a support.
How to check functionality
First you need to check how the external and internal grenade works. When replacing, the process will be different, as will the symptoms.
If the outer link fails, the main signs of failure will be the appearance of a specific sound, similar to a crunching sound. The reason is the wear of the grooves, and the movement of the balls remains the same, as if the element is in good condition. It becomes more obvious as soon as the car begins to turn, or when the gas pedal is pressed sharply.
To make sure that it is necessary to replace the outer CV joint boot on a VAZ 2110, you will need:
- When starting, you can organize small jerks.
- You can quickly pick up speed and then slow down.
- Move the shaft transversely between the CV joints. If it senses play, the grenade requires replacement.
Replacing grenades
Replacing internal grenades of a VAZ 2110
The cause of this noise is the appearance of a small depression in the metal base. The ball located inside the grenade begins to move freely along this recess. Due to the constant movements of the grenade, this recess often remains on the other side of the mechanism, and the noise stops appearing, and the car can please its owner for some time. The only black spot in this set of circumstances will be driving in reverse. With this movement of the vehicle, the noise will appear again and again. There are several standard ways to replace a part of a VAZ 2110 car. One of the repair options is to replace the internal grenade with complete dismantling of the car drive. The next method of removing a grenade from a car is the one that involves the presence of a drive on the hub (see VAZ 2110: replacing the hub using a proven method). In this case, only the grenade is dismantled. This method is labor-intensive, but there are times when the nut cannot be removed and its damage is unacceptable. In this case, the second method is much more practical. The main difference between the first method is convenience, which is missing in the second example. All work, when using the second method, is carried out under the car, which is extremely inconvenient for a person making repairs at home.
The first method of replacing a CV joint
Replacing the internal grenade of a VAZ 2110
So, with the first option of replacing the internal grenade of a VAZ model 2110, you need to perform the following steps:
- The drive with grenades is removed from the car.
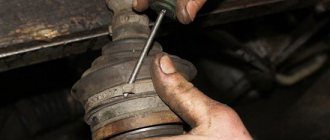
- The clamp located on the boot is dismantled (see How to replace the boot).
- The retaining ring that holds the inner grenade separator is removed.
Note: This job is easily accomplished using a flat head screwdriver.
- The drive is removed from the grenade along with the separator. Using a hammer, carefully strike it to disconnect it from the drive.
Internal grenade VAZ 2110
- The old boot is removed. The drive is cleaned and wiped dry with a dry cloth.
- A new, working mechanism is installed in place of the old boot.
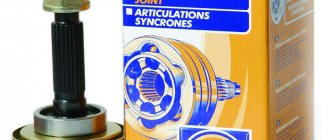
- When purchasing a new grenade in a store, a small retaining ring is also included in the kit.
Note: its installation must be carried out carefully. One edge of it is inserted into the recess, and the second edge is mounted into the groove. This work is carried out in such a way that the ring does not loosen during the work. Otherwise, installing the grenade may be difficult.
- The three-studio is installed on the axle shaft. It must be installed in the correct way, as its sides can easily be mixed up. It has a special recess. This recess should be in contact with the thick retaining ring. If installed incorrectly, you can get a lot of troubles that will be difficult to fix.
VAZ 2110 internal grenades
- To install the separator in its original place, it is necessary to make a series of gentle blows with a hammer. At this moment, it is necessary to follow the rules of striking. They cannot be carried on wheels. With high-quality installation of a new retaining ring, this process will not be long and painstaking.
- The internal grenade is completely filled with CV joint.
- The separator is mounted in a grenade. The retaining ring is inserted into the inner grenade.
- The boot is mounted on the grenade.
- The clamp on the anthers is returned to its previous position.
VAZ 2110 internal grenade
The process of replacing the internal grenade of a VAZ 2110 car is now complete. The drive is mounted in the gearbox. The process is not difficult, the grenade is easily mounted in its original position with a small push. When replacing a grenade, it is necessary to replace the oil seal. If the cuff is not replaced in a timely manner, oil will leak.
Note. There are two grenade options on the aftermarket. The first has a ball base, the second is called a three-rose hip. If given a choice, you should choose the last option. Such a grenade will definitely have a positive effect on the car’s performance and its dynamism.
VAZ 2110 grenade internal
What will you need at work?
When replacing the internal CV joint of a VAZ 2110 car, it is necessary to select the right equipment and tools, without which subsequent work is impossible. Repairing the unit is not possible; it will only need to be replaced.
To perform the following operations, you will need a set of equipment and tools:
- A new internal grenade, which includes a clamp and lubricant, will ensure subsequent trouble-free operation of the system over a long period of time;
- A lift, or a special inspection hole with a jack, will be required to lift and secure a VAZ 2110 model vehicle, guaranteeing safety during the work;
- A set of standard tools used to replace the internal CV joint. Includes wrenches, screwdrivers, pliers and much more needed for repairs.